ZZ Plant Root Rot: Signs, Cleanup, and Repotting
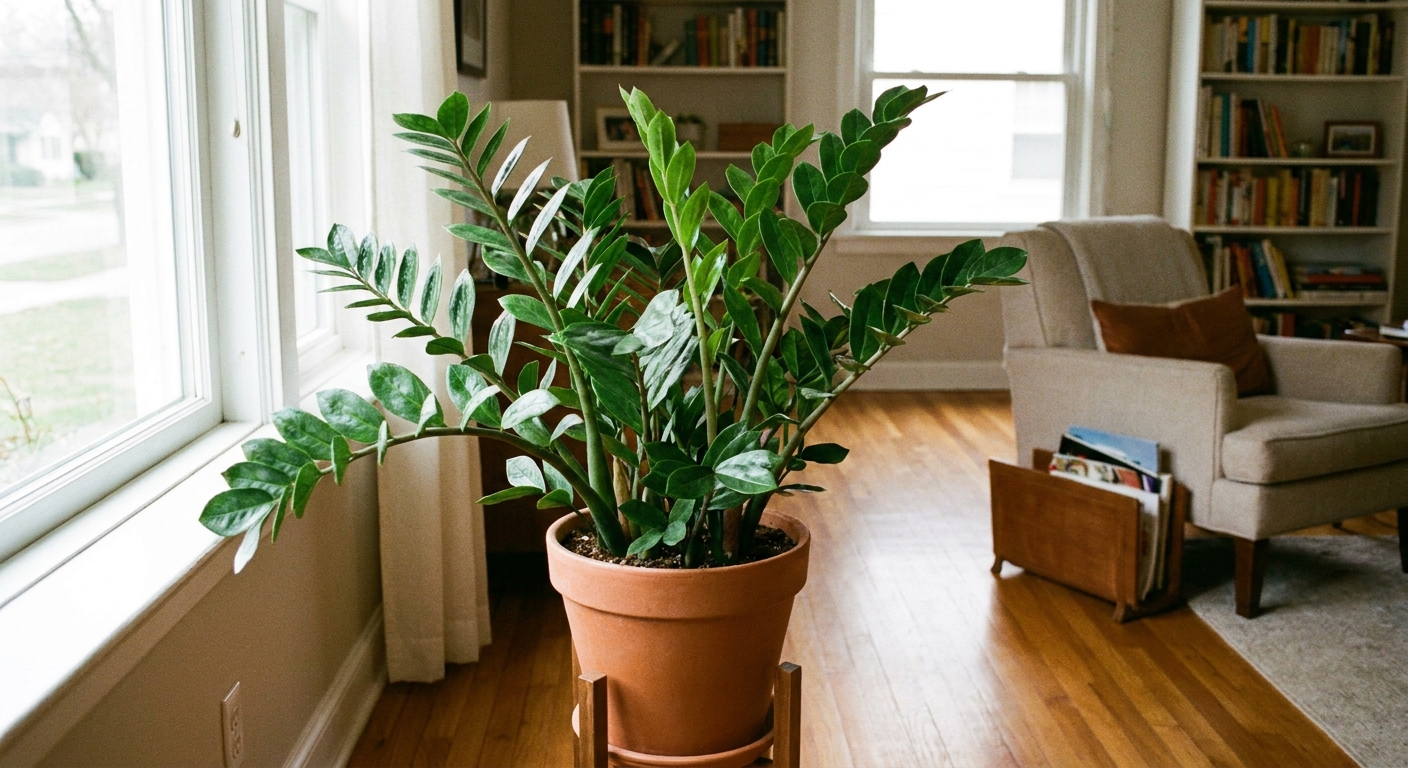
ZZ plants (Zamioculcas zamiifolia) have a reputation for being unkillable. And honestly, they are tough. But there is one thing that can take down even a ZZ with a good attitude: sitting in wet soil for too long.
Root rot feels high-stakes because it can look sudden, but it usually builds slowly. The good news is that ZZ plants store water in thick rhizomes (those potato-like structures under the soil), which gives you a real window for recovery if you act early.
Quick safety note: ZZ plant sap contains calcium oxalate crystals, which can irritate skin and eyes. If you are cutting roots or stems, wear gloves or wash your hands well afterward, and keep the plant pieces away from pets and kids.

Early signs of ZZ plant root rot
Root rot is not just yellow leaves. Yellowing can come from age, low light, or inconsistent watering. Root rot has a particular set of clues, especially on the stems and at the soil line.
What you might see on leaves
- Yellowing that spreads quickly across multiple stems at once, not just one older stalk.
- Dull, washed-out green and leaflets that feel less firm.
- Leaf drop when you barely touch the plant, especially if the soil is moist.
What you might see on stems
- Soft, squishy stems near the base, sometimes with wrinkling higher up.
- Leaning or collapsing stalks even though the plant is not bone-dry.
- Darkening at the soil line that looks water-soaked rather than dry and papery.
What you might notice from the pot
- Soil that stays wet for 10 to 14 days (or longer) after watering. This often suggests drainage or mix issues, but cool temps, low light, a too-large pot, and low airflow can also slow drying.
- A musty or sour smell coming from the potting mix.
- Fungus gnats hovering around the soil, especially when the surface never really dries.
If you see a combination of these, it is time to check the roots. Think of it as a gentle health inspection, not a plant emergency room panic.
Root rot or underwatering?
ZZ plants can look dramatic for two totally opposite reasons. A quick check can save you from “fixing” the wrong problem.
- More like rot: soft base + wet/heavy mix + yellowing that spreads.
- More like underwatering: mix is dry + stems look wrinkled or slightly puckered + the rhizomes feel firm, not mushy.
If the base is soft and the soil is staying damp, treat it like a rot situation and inspect.
Before you unpot: a quick reality check
Not every sad ZZ needs a full repot. I like to do two simple checks first:
- Finger test: Push a finger about 2 inches into the soil. If it is still damp several days after watering, the mix may be holding too much moisture.
- Pot weight test: Lift the pot. If it feels heavy like a soaked sponge and it has been that way for a while, the roots may be oxygen-starved.
If the plant is clearly staying wet, proceed to inspection.
How to inspect ZZ roots safely
ZZ stems snap more easily than you would think, so take your time. Choose a day when you can leave the plant out for an hour or two.
What you will need
- Clean pruners or scissors
- Rubbing alcohol for sterilizing blades
- Paper towels or a rag
- A new pot (or the old one cleaned well)
- Fresh fast-draining potting mix (recipe below)
- Optional: gloves (recommended if you are sensitive to sap)
Unpotting steps
- Lay down a towel or newspaper.
- Tip the pot on its side and support the stems with your hand.
- Squeeze the pot (if it is plastic) and slide the root ball out.
- Gently loosen soil with your fingers. Do not yank the stems.
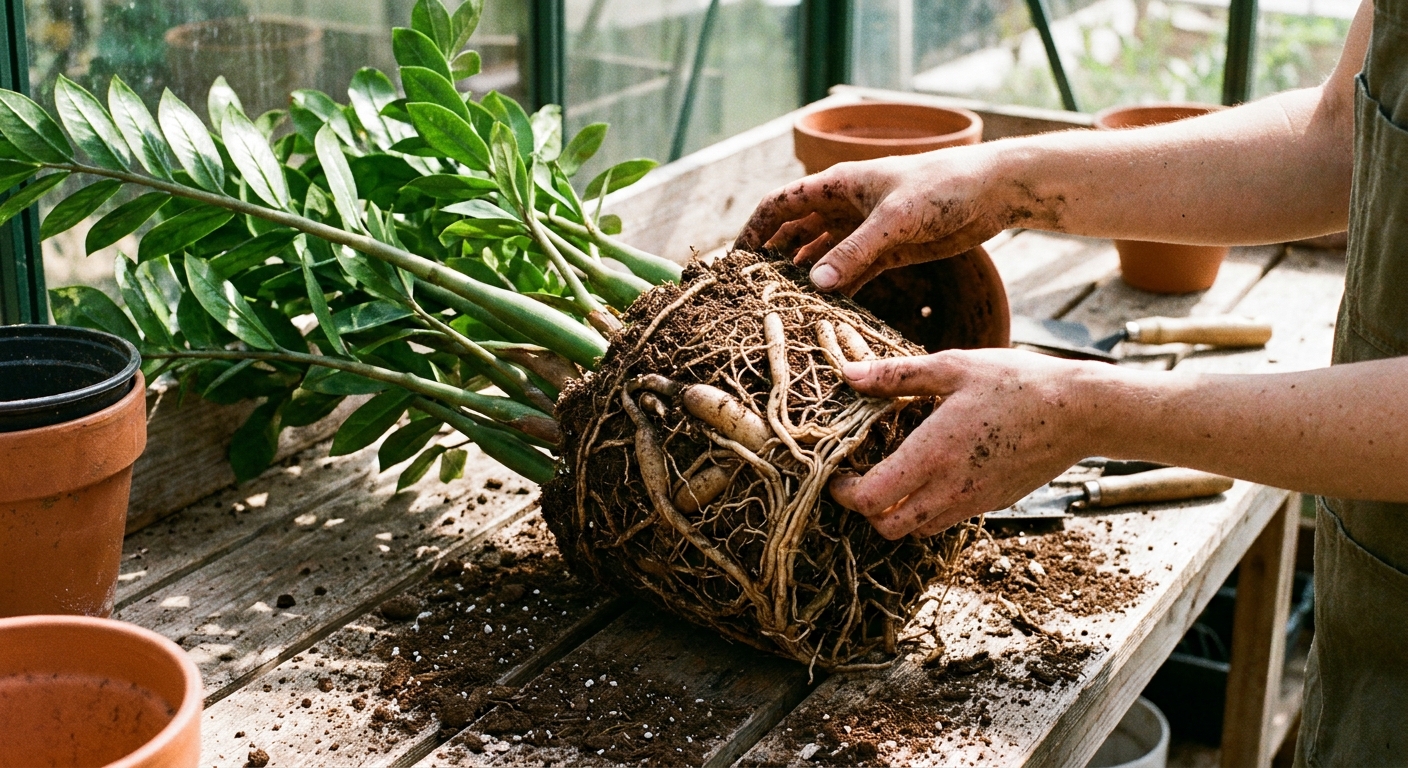
Healthy vs rotting roots and rhizomes
- Healthy roots: firm, pale tan to creamy, not slimy.
- Rotting roots: dark brown or black, mushy, slimy, and may shed an outer layer when pulled.
- Healthy rhizomes: firm and plump like a fresh potato.
- Rotting rhizomes: soft spots, hollow-feeling areas, or a foul smell.
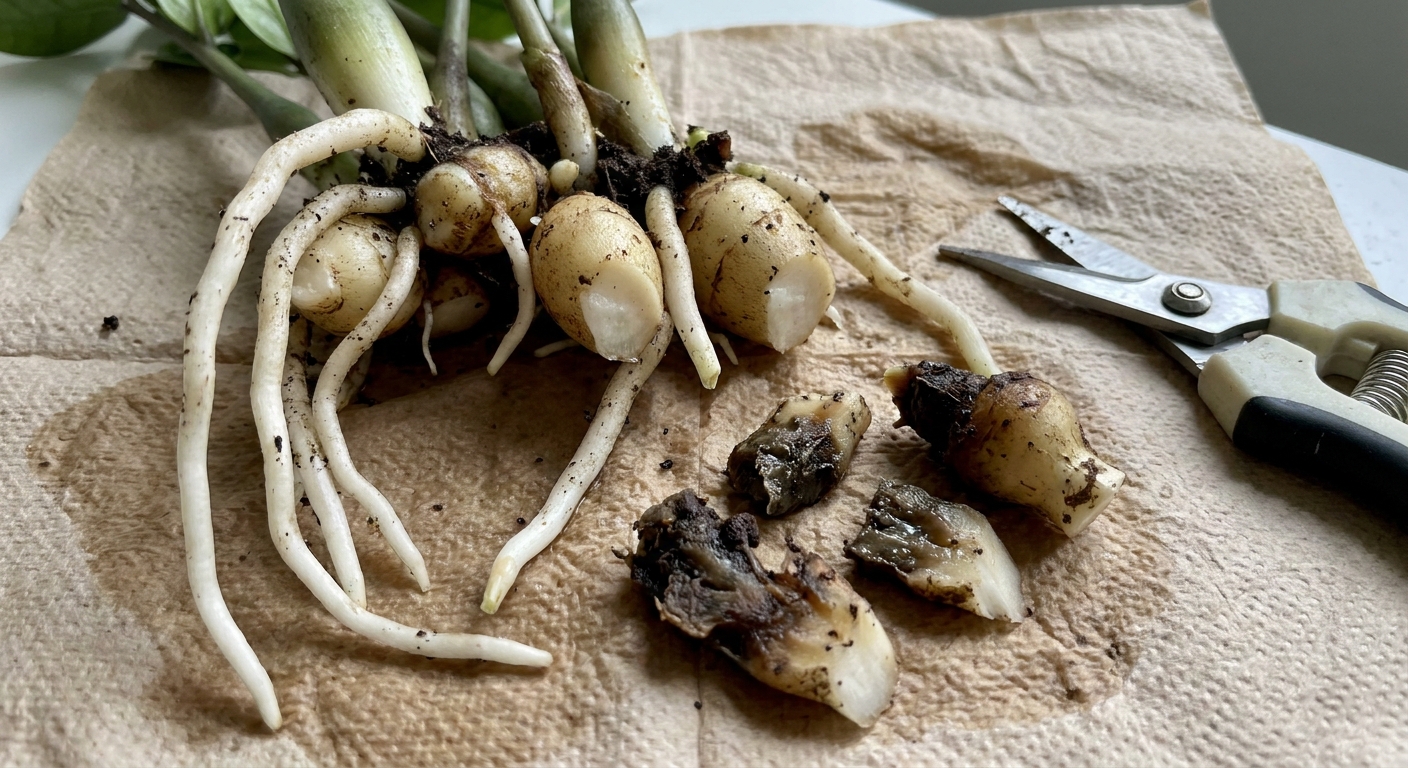
Root cleanup: what to cut and what to keep
The goal is simple: remove anything that is actively rotting so the plant can regrow clean roots. ZZ plants are slow, but they are steady once they are back in breathable soil.
Step-by-step cleanup
- Sterilize your blades with rubbing alcohol.
- Trim rotted roots back to firm tissue. If a root is brown and mushy all the way to the rhizome, remove it.
- Check the rhizomes carefully. Cut away soft, rotten portions. Keep anything firm.
- Remove collapsing stems if their base is mushy. A stem with a rotten base will not recover.
- Re-sterilize your blades between major cuts, especially if rot is widespread.
You do not need to wash the entire root system under running water unless the soil is extremely muddy. If you rinse, be gentle and avoid breaking healthy roots.
Should you use hydrogen peroxide or fungicide?
For most home rescues, good trimming plus fresh, airy mix does the heavy lifting. Treatments are optional, and evidence is mixed. If you want an extra step, keep it mild and brief: mix 1 part 3% hydrogen peroxide with 2 parts water, then give the roots a quick rinse or splash (do not soak for long periods). Higher concentrations or long contact time can irritate tender tissue.
If you use any treatment, let the plant dry briefly afterward so cuts are not sitting wet.
Let it callus
ZZ plants have thick, water-storing tissues. After you cut rot away, many growers find it helps to give those cut surfaces a little air time.
- Set the plant in a shady, airy spot for 2 to 6 hours, or up to overnight if humidity is high.
- The goal is for cuts to feel slightly dry to the touch, not wet and raw.
This one pause can help reduce the chance of fresh rot restarting, especially if you had to remove mushy rhizome tissue.
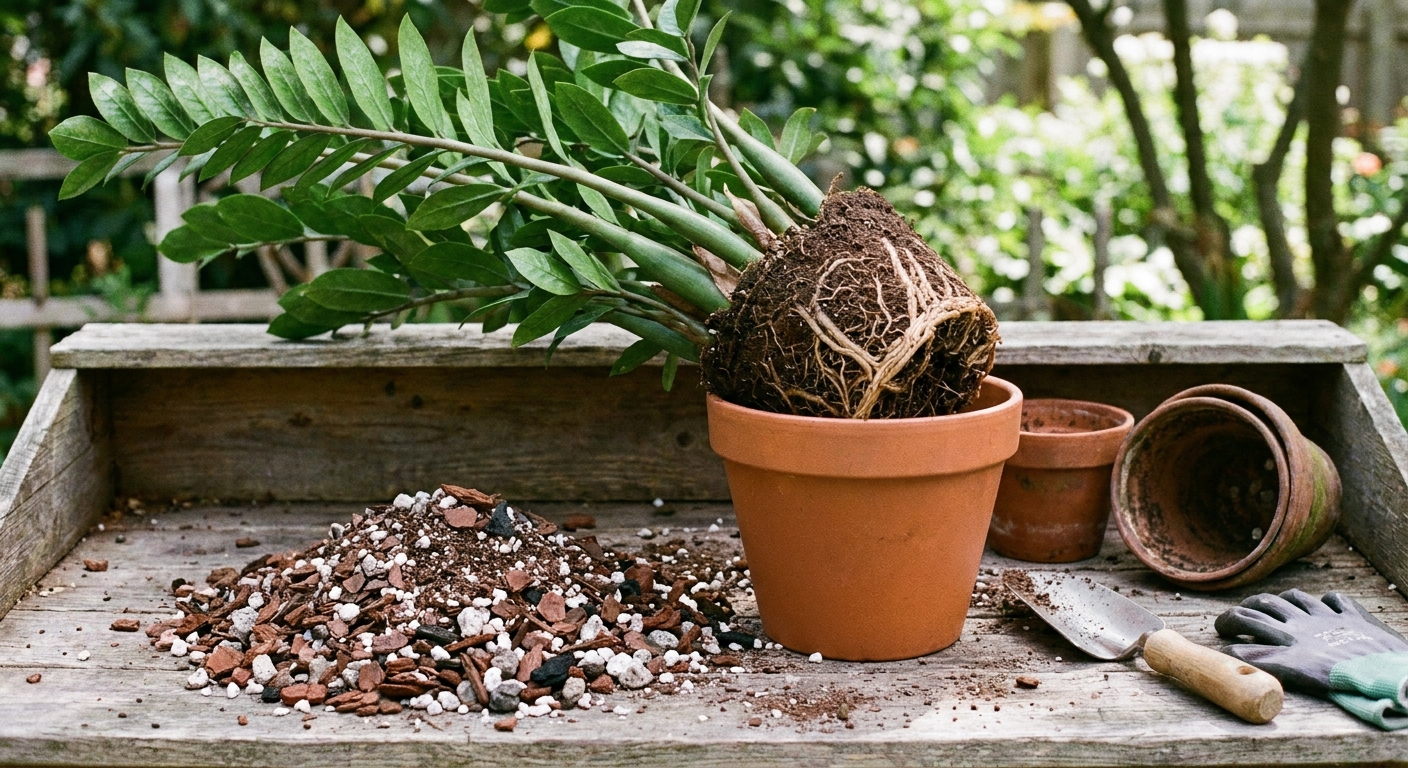
Recovery repotting: pot and mix
If you only change one thing after root rot, change the soil structure. Standard potting soil often holds too much moisture for ZZ plants indoors, especially in low light.
Choose the right pot
- Drainage holes are non-negotiable. If your decorative pot has no holes, use it as a cachepot with a nursery pot inside.
- Size matters: go only 1 to 2 inches wider than the cleaned root mass. Oversized pots dry slowly and invite repeat rot.
- Material: terracotta helps the mix dry faster, plastic holds moisture longer. Either can work if the mix is airy, but terracotta is forgiving.
Drainage setup tips
- Skip the rocks layer. It does not improve drainage in a pot and it can keep roots sitting in the wet zone longer.
- Keep holes clear. If you are worried about mix falling out, use a small piece of mesh screen or a coffee filter over the holes.
My simple ZZ anti-rot mix
Aim for a mix that dries evenly and leaves plenty of air pockets.
- 2 parts indoor potting mix (not moisture control)
- 1 part perlite or pumice
- 1 part orchid bark (fine or medium)
If your home runs cool or you tend to water often, bump up the mineral portion: add a little extra perlite or pumice.
Repotting steps
- Add a small layer of mix to the bottom of the pot.
- Set the rhizomes so the plant sits at the same height as before. Do not bury stems deeper.
- Fill around the root ball with your mix, gently tapping the pot to settle it.
- Do not pack the soil down hard. Air is part of the medicine here.
Aftercare watering
This is the moment most people over-correct. A freshly trimmed ZZ does not want a big drink right away.
When to water after repotting
- If you removed significant rot, many people have success waiting about 5 to 10 days before the first watering.
- If cleanup was minimal and roots were mostly healthy, about 3 to 5 days is often enough.
Use the mix as your cue: you are aiming to water when the mix is mostly dry and the plant feels stable in the pot. In very dry, hot homes with a small remaining root system, you may not want to push the wait to the max.
How to water going forward
- Water thoroughly until it drains, then empty the saucer.
- Do not water again until the mix is dry most of the way down. For many homes, that is every 2 to 4 weeks, sometimes longer in winter.
- Use the pot-weight test. A light pot is a much better cue than the calendar.
Light and temperature for recovery
- Give bright, indirect light if possible. Low light slows drying and slows root regrowth.
- Avoid cold drafts. Cool, wet soil is rot heaven.
Should you fertilize?
Not yet. Wait until you see new growth or at least steady firmness returning, then feed lightly during the growing season. Fertilizer on stressed roots can backfire.
What recovery looks like
ZZ plants heal at their own pace. After root rot, it is normal for the plant to look a little stalled while it rebuilds underground.
- Weeks 1 to 3: soil dries appropriately, no rapid new yellowing, stems feel more stable.
- Weeks 4 to 8: subtle improvement in leaf firmness, fewer leaves dropping.
- 2 to 6 months: new shoots may appear, especially in spring and summer.
If your plant loses a few leaflets during recovery, breathe. As long as the remaining rhizomes are firm and the mix is drying well, it can come back.
When to propagate instead
If most rhizomes are mushy and the smell is strong, the best move can be to salvage healthy pieces.
- Divide and save: If you find one or two firm rhizomes with healthy roots, pot them up separately in fresh mix.
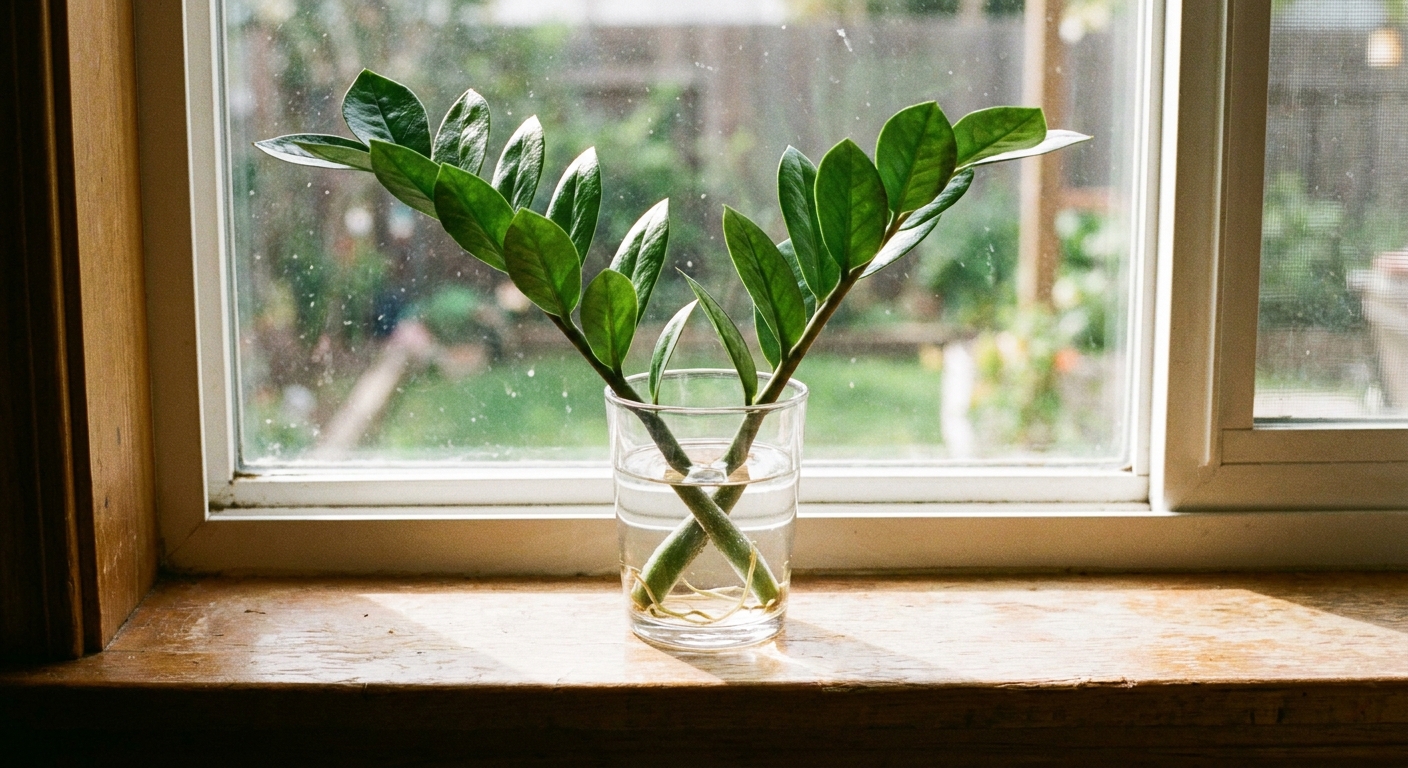
- Stem cuttings: Take a firm stem, cut it cleanly, and root it in water or airy mix. This is slow, but it is a solid backup plan.
- Single leaflets (last resort): If all stems are ruined but you have healthy leaflets, you can propagate individual leaflets in water or lightly moist, airy mix. This is very slow, but it can keep the genetics alive.
Propagating a ZZ is basically an exercise in patience, but it is also a beautiful reminder that plants want to live.
Clean up and sanitation
- Discard contaminated soil. Do not reuse it for houseplants.
- Wash the pot with hot soapy water. If rot was severe, you can follow with a brief soak or wipe using a dilute bleach solution, then rinse very well and let it dry.
- Clean your tools with rubbing alcohol so you do not spread pathogens plant to plant.
How to prevent ZZ root rot
- Switch to a chunky mix that drains fast and holds air.
- Match watering to light: lower light means less frequent watering.
- Always empty the saucer after watering.
- Do not use moisture-control soil for ZZ plants.
- Consider terracotta if you tend to love your plants with extra water.
And if you only remember one line from this whole page, make it this: ZZ plants prefer to be a little thirsty rather than a little soggy.
Quick checklist
- Confirm signs: soft base, rapid yellowing, wet soil that will not dry
- Unpot gently and inspect roots and rhizomes
- Trim all mushy, dark roots and any soft rhizome tissue
- Let cuts callus for a few hours
- Repot in a smaller, draining pot with a chunky mix
- Wait several days before watering, then water only when mostly dry