Why Is My Monstera Turning Yellow?

Yellow leaves on a Monstera can feel like a personal insult, especially when it was looking so lush last week. Take a breath. Yellowing is your plant’s way of sending a clear message, and most of the time it is fixable.
This guide is written with Monstera deliciosa in mind (and it translates well to other common Monsteras like adansonii). It helps you diagnose what’s going on using what I call “photo clues” (what you would see if you snapped a close-up pic), then walks you through the exact steps to get your Monstera back to healthy green growth.
Quick diagnosis: match the yellow pattern
Before you change anything, look closely at which leaves are yellowing and how the yellow shows up. These patterns are surprisingly consistent.
- Lower, oldest leaf turns evenly yellow and the rest looks fine: often normal aging or a mild watering mismatch.
- Several leaves yellow at once, especially with soft stems or damp soil: commonly overwatering or root issues.
- Yellow with brown crispy edges: underwatering, low humidity, salt buildup, or hot/cold air stress.
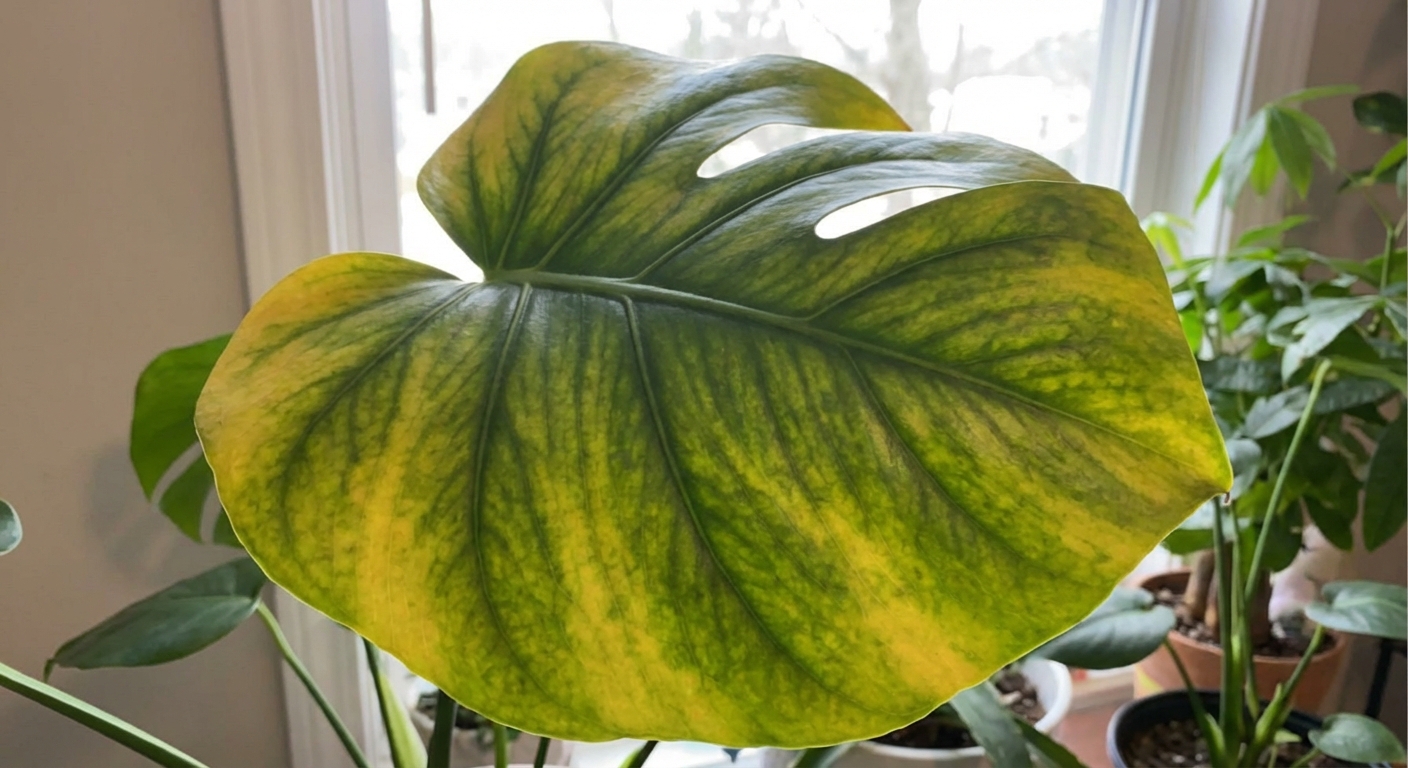
- Yellow between green veins (leaf looks “striped”): can indicate a nutrient issue (often magnesium or iron), but can also show up with root stress, pH issues, or temperature shock.
- Pale, bleached yellow patches on the side facing the window: too much direct sun.
- Yellow + droop: could be either too wet or too dry. Soil feel decides it.
Overwatering (one of the most common)
Photo-style clues
- Yellow leaves feel a bit soft or limp, not crispy.
- Soil stays dark and wet for many days.
- Pot stays heavy; water lingers in the saucer.
- Newer leaves may yellow too if it has gone on long enough.
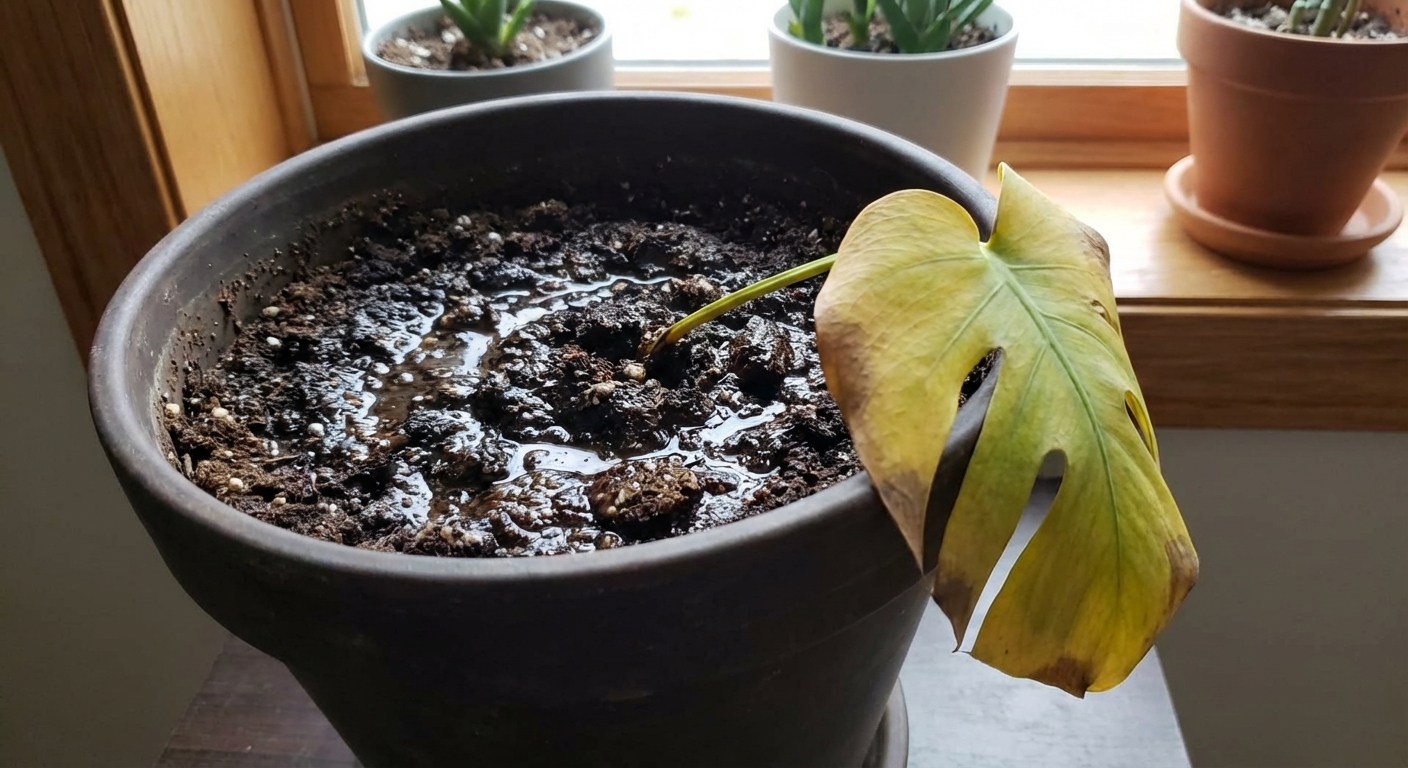
Why it happens
Monsteras like to dry a bit between waterings. Constant moisture pushes air out of the pot, roots struggle to breathe, and leaves start yellowing as the plant can’t move water and nutrients properly. Over time, potting mix can also compact and break down, which further reduces oxygen around the roots.
Step-by-step fix
- Pause watering until the top 2 to 3 inches of soil are dry (use your finger or a wooden chopstick). For larger pots, check a little deeper since the surface can lie.
- Empty the saucer every time. No “wet feet.”
- Check drainage: pot must have a drainage hole. If it doesn’t, repot.
- Adjust your routine: water only when the pot is noticeably lighter and the top layer is dry.
- If yellowing continues and soil smells musty, jump to the root rot section.
Underwatering (or soil that won’t absorb)
Photo-style clues
- Yellowing starts with a dull, faded look, then edges turn crispy brown.
- Leaves may curl inward slightly.
- Soil pulls away from the pot edges and feels bone dry.
- Water runs straight through and barely moistens the mix (hydrophobic soil).
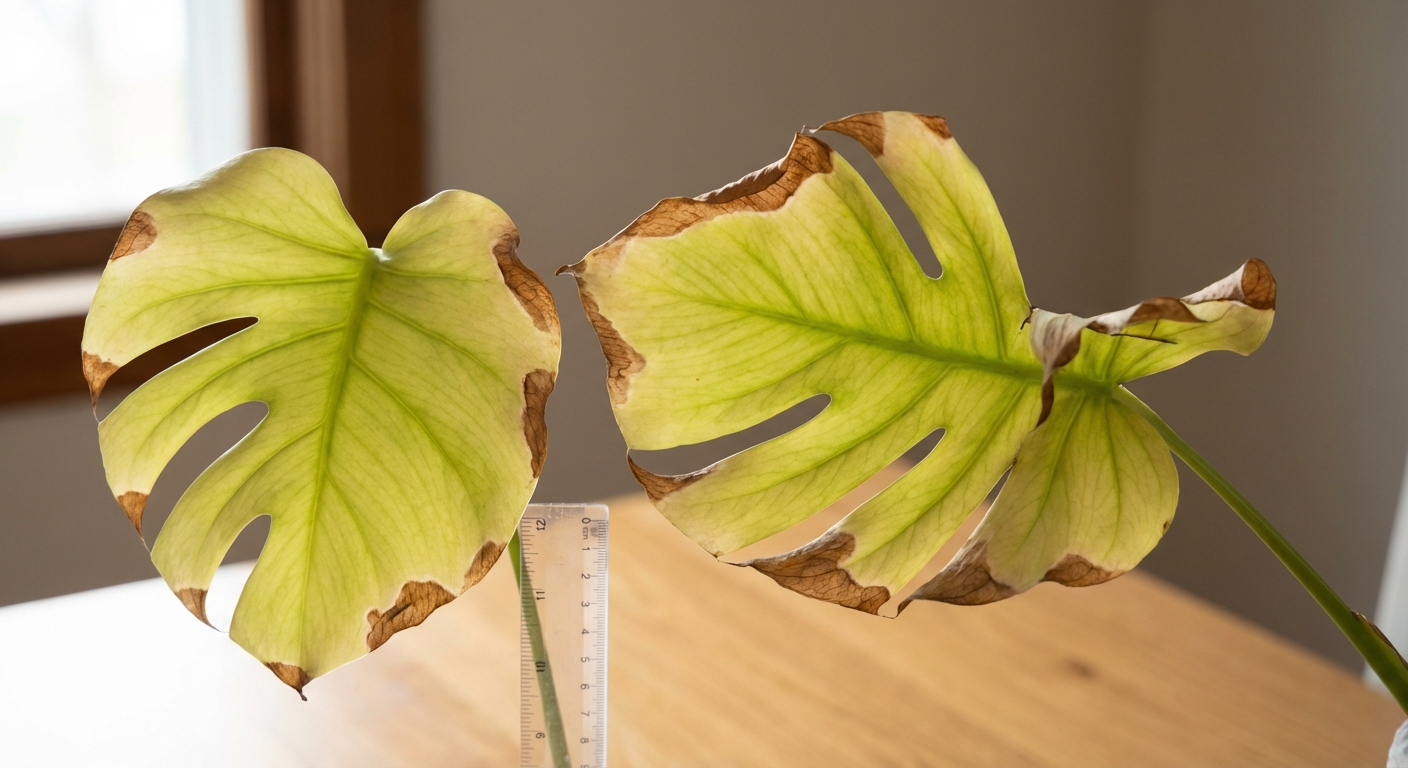
Why it happens
Monsteras are forgiving, but repeated deep dries can make leaves sacrifice themselves. Also, peat-heavy mixes can become water-repellent when they dry out too far, so you think you watered but the roots stayed dry.
Step-by-step fix
- Rehydrate thoroughly: take the pot to the sink and water slowly until it runs freely from the bottom.
- If water beads and rushes out, bottom-water: set the pot in a bowl of water for 20 to 30 minutes, then drain well.
- Set a simple check: test soil weekly. Water when the top 2 inches are dry, not by the calendar. Smaller pots dry faster, bigger pots take longer.
- Consider a repot if the mix keeps turning hydrophobic: a chunky aroid mix (bark, perlite, coco coir or peat, a bit of compost) holds moisture without staying swampy.
Light issues
Too much direct sun
Photo-style clues: yellow looks like bleached patches or washed-out areas, often on the side facing the brightest window. You might also see crispy spots where the sun hit hardest.
Fix:
- Move it back 2 to 4 feet from a south or west window, or use a sheer curtain.
- Aim for bright, indirect light. East windows are often perfect.
- Trim only fully yellow leaves. Partly damaged leaves can still photosynthesize.
Too little light
Photo-style clues: plant looks stretched with longer gaps between leaves, new leaves are smaller, and older leaves may slowly turn yellow. Soil also dries very slowly because the plant is not using much water.
Fix:
- Move closer to a bright window (no harsh midday sun on the leaves).
- Rotate the pot weekly so growth stays even.
- If your space is truly dark, add a grow light 10 to 14 hours a day.
Nutrient deficiency
Monsteras are not heavy feeders like tomatoes, but in a pot they eventually run out of nutrients. Yellowing can be your plant asking for a proper meal.
Photo-style clues
- Overall pale leaves, slower growth: can indicate a general nutrient deficiency.
- Yellow between green veins on newer leaves: can indicate iron or micronutrient issues (sometimes pH related), but also shows up when roots are stressed.
- Yellow between veins on older leaves: can indicate magnesium deficiency.
Step-by-step fix
- Rule out watering and light first. A stressed root system cannot use fertilizer well.
- During active growth (spring through early fall), feed with a balanced houseplant fertilizer at 1/4 to 1/2 strength every 4 to 6 weeks.
- For suspected magnesium deficiency, use Epsom salt sparingly: 1 teaspoon per gallon of water, applied once, then wait a few weeks to assess. More is not better here, and overdoing it can contribute to salt stress.
- If you see recurring interveinal yellowing despite feeding, consider repotting into fresh mix and check your water source (very alkaline water can lock out iron).
Tip from my own plant shelf: if your Monstera has not been repotted in 2+ years and you are feeding regularly, it may not be “hungry,” it may be root-bound or dealing with salt buildup. Keep reading.
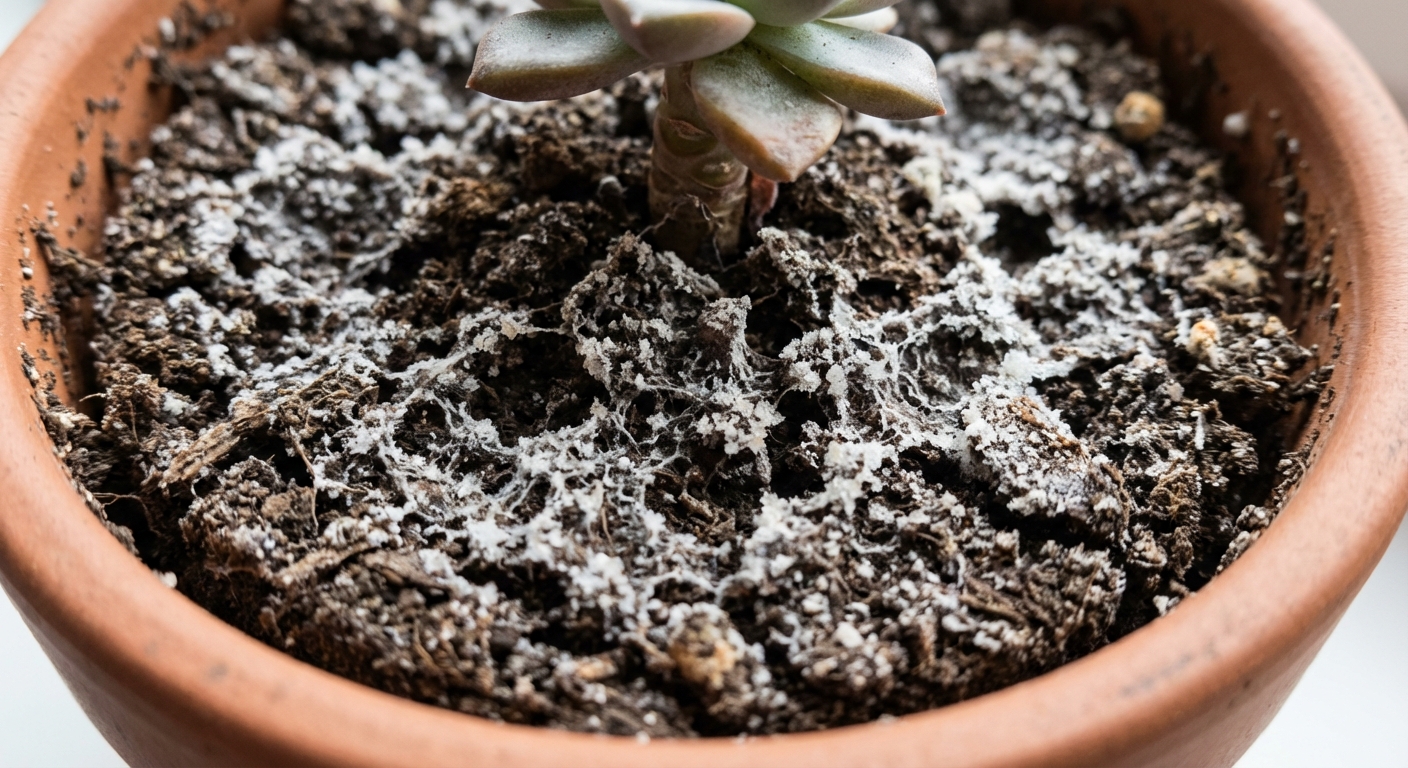
Salt buildup and water quality
If you fertilize often, use softened water, or have hard tap water, minerals can build up in the soil. That can stress roots and lead to yellowing and crispy edges. (A quick note: sodium-based water softeners can add extra salts that plants do not love.)
Photo-style clues
- White crust on the soil surface or around the pot rim.
- Leaf tips yellow, then brown and papery.
- Plant seems to decline even though your care routine has not changed.
Step-by-step fix
- Flush the pot: run room-temperature water through the soil for several minutes (aim for 3 to 4 times the pot volume), making sure it drains freely and completely.
- Do not repeat the flush over and over in a short time window. One good flush, then let the soil return to a normal dry-down so you do not accidentally keep it waterlogged.
- Pause fertilizer for 4 to 6 weeks.
- Switch water if needed: filtered, rainwater, or distilled mixed with tap can help.
- Repot if crust returns quickly or soil structure has broken down and stays dense.
Root rot (when yellowing is urgent)
If your Monstera is yellowing fast and the soil stays wet, treat this like a rescue mission. Root rot is not a moral failure, it is just biology. We fix it by bringing back oxygen.
Photo-style clues
- Multiple leaves yellowing quickly, often with droop.
- Soil smells sour or swampy.
- Stems near the base may feel soft.
- When you slide the plant out, roots are brown or black and mushy, sometimes sloughing off.
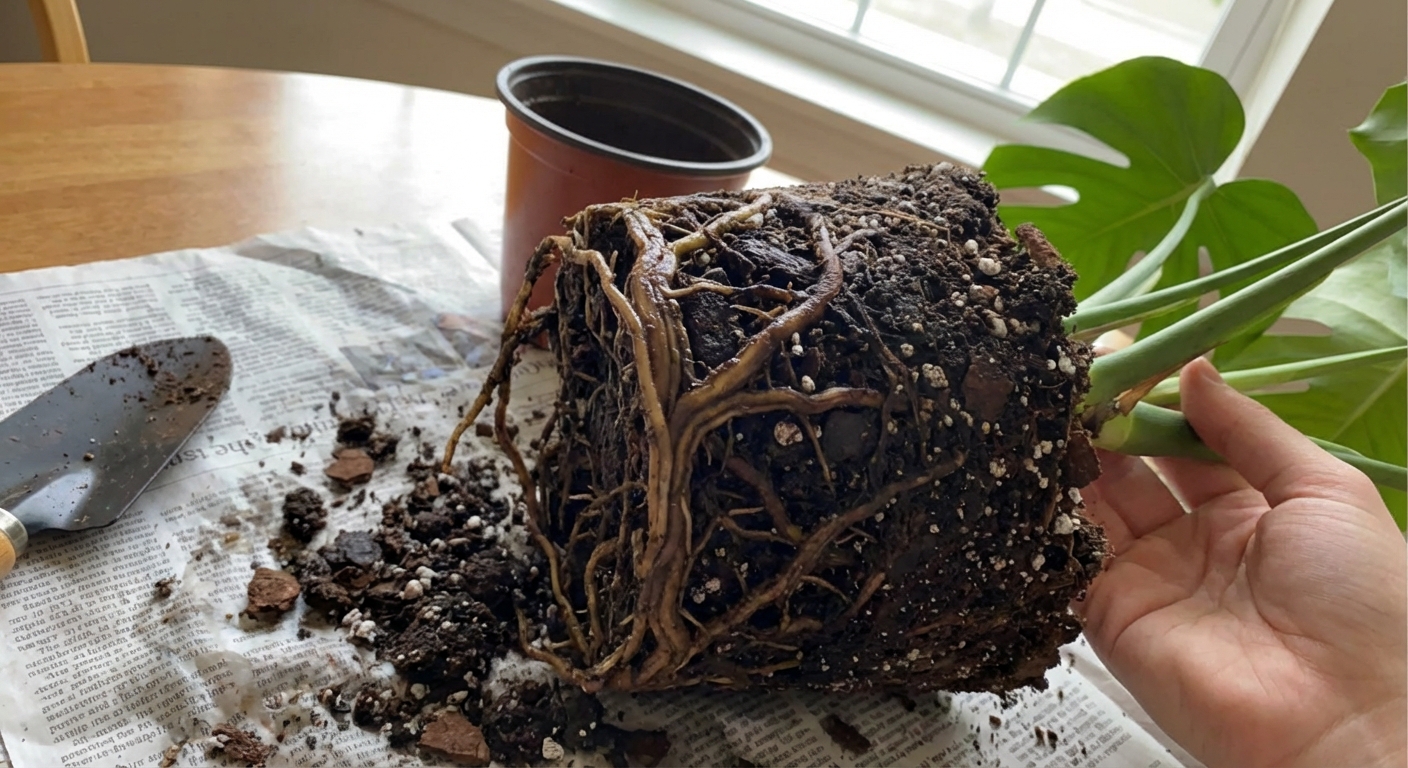
Step-by-step fix
- Unpot the plant and gently remove as much wet soil as possible.
- Rinse the roots with lukewarm water so you can see what is healthy.
- Trim rot: use clean scissors to cut away mushy, dark roots back to firm, pale tissue.
- Optional but helpful: rinse remaining healthy roots with a diluted hydrogen peroxide solution (1 part 3% peroxide to 2 parts water), then do a final quick rinse with plain water.
- Disinfect tools with alcohol between cuts if rot is extensive.
- Repot in fresh chunky mix in a pot with drainage. Do not reuse the old soggy soil.
- Watering after repot: if your fresh mix went in slightly moist, wait 24 to 48 hours. If it went in dry, water lightly once to settle it. After that, let the top few inches dry before watering again. The goal is “evenly moist, then breathing,” not “bone dry” and not “swamp.”
- Stabilize conditions: bright indirect light, warm temps, no fertilizer for a month, and keep it away from cold windows or AC blasts while it recovers.
If the root system is severely compromised, you can also take a healthy cutting and root it in water or moist sphagnum as a backup plan.
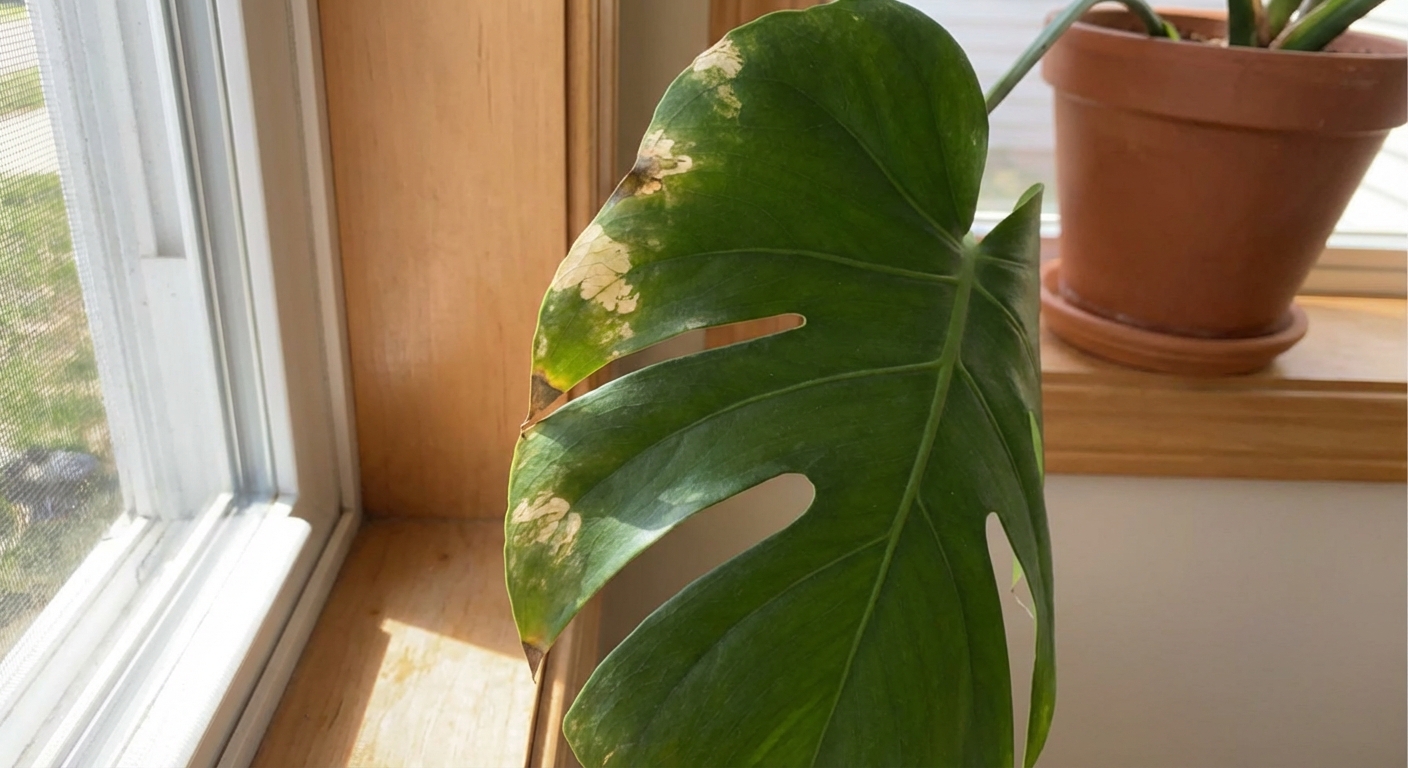
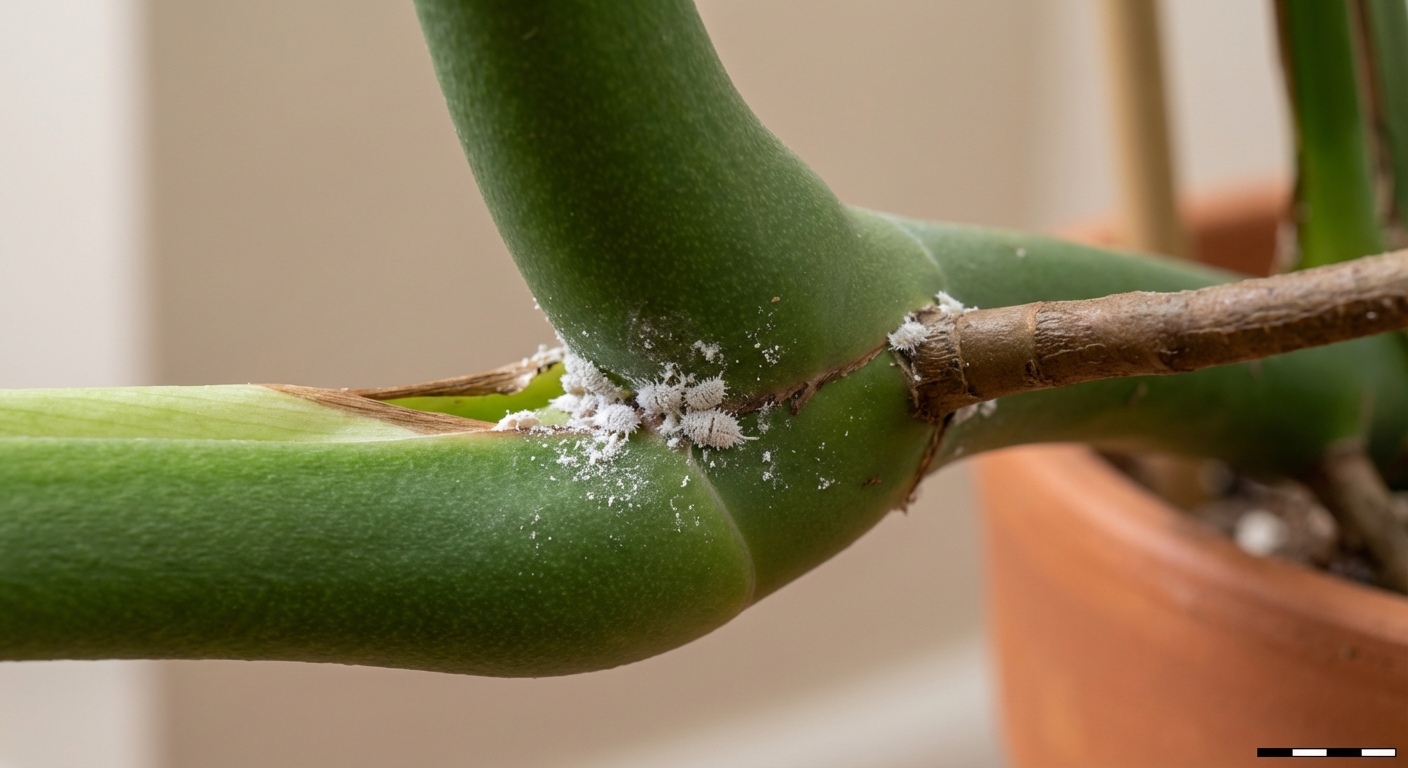
Pests
Pests can cause yellowing by draining the leaf tissue and stressing the plant. The good news: once you identify them, treatment is straightforward.
Photo-style clues
- Spider mites: fine webbing, speckled yellow stippling, worse in dry air.
- Thrips: silvery streaks, tiny black dots (frass), distorted new growth.
- Scale: small brown bumps on stems and leaf undersides, sticky residue.
- Mealybugs: white cottony clusters in leaf joints.
Step-by-step fix
- Isolate the plant for a couple weeks.
- Rinse and wipe leaves (top and underside). A soft cloth with mild soapy water helps.
- Treat with insecticidal soap or horticultural oil, following label directions. Repeat every 7 to 10 days for 3 to 4 rounds.
- Thrips note: they can be stubborn. Plan on several weeks of consistent treatment, and consider targeted options like spinosad or a systemic product where legal and appropriate for your home.
- Boost conditions: pests thrive on stressed plants, so correct light and watering too.
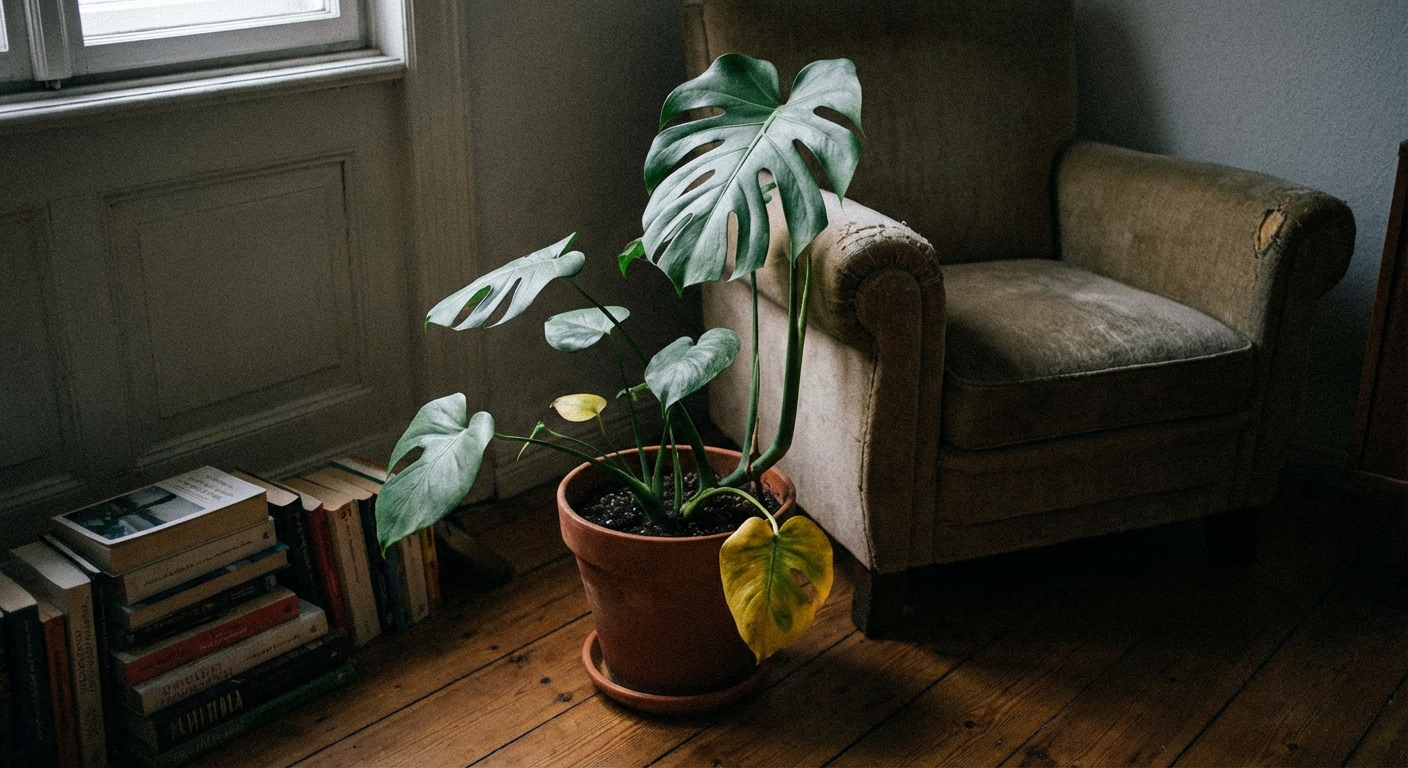
Natural aging
Monsteras shed older leaves as they grow, especially the very lowest leaves that helped the plant early on. If your plant is otherwise healthy, one yellow leaf here and there can be totally normal.
Photo-style clues
- Only one lower leaf yellows at a time.
- New growth looks healthy and green.
- No mushy stems, no weird spots, no pest signs.

What to do
- Let the leaf fully yellow, then snip it off close to the stem with clean scissors.
- Use it as a cue to check basics: light, watering, and whether the plant is due for a repot.
Repotting and root-bound stress
A Monstera that is root-bound can yellow because the roots cannot access water evenly and nutrients run out quickly. This often shows up as “I water, I feed, and it still looks tired.”
Photo-style clues
- Roots circling the inside of the pot or poking out of drainage holes.
- Soil dries extremely fast, sometimes in 1 to 2 days.
- Growth stalls; leaves may yellow more often.
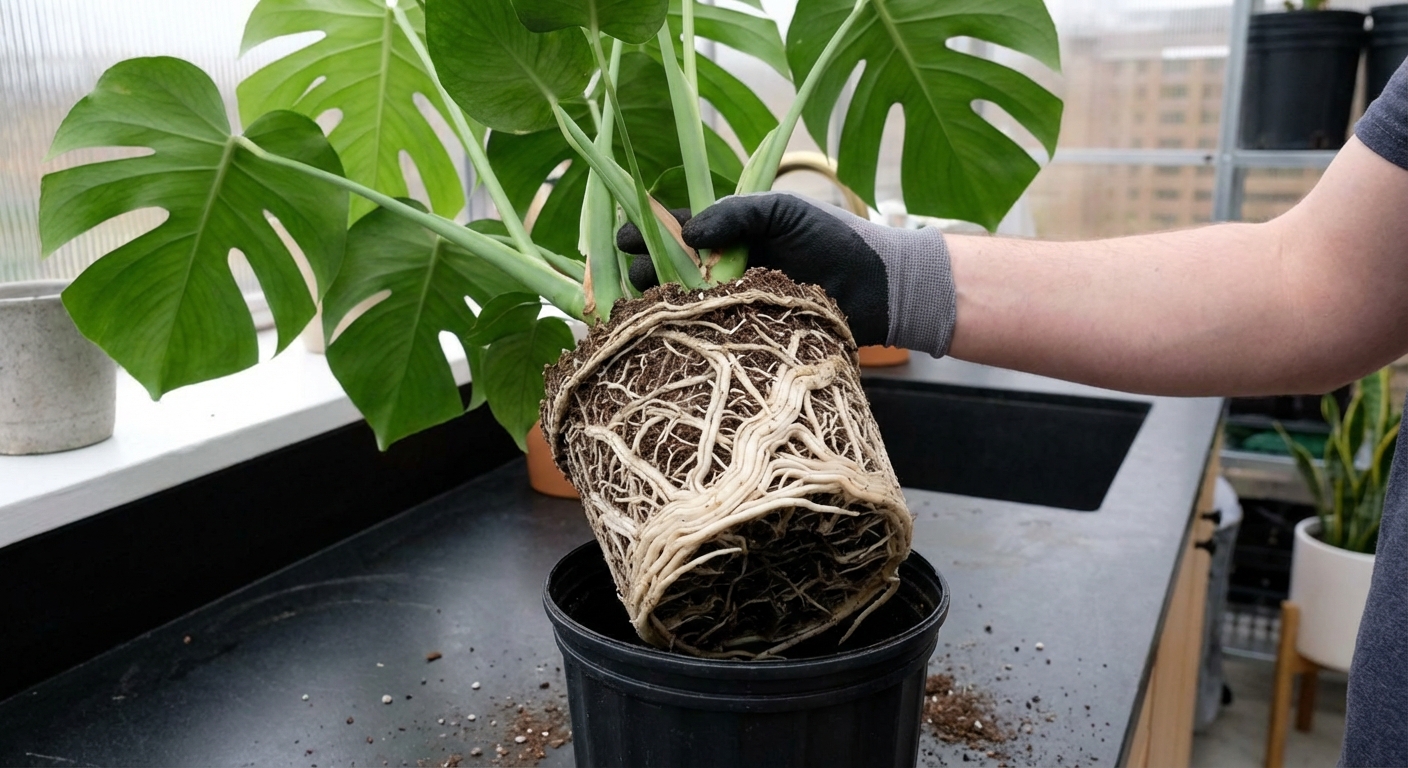
Step-by-step fix
- Choose a pot 1 to 2 inches wider than the current one (going too big can cause waterlogging).
- Use a chunky aroid mix for airflow.
- Loosen circling roots gently and repot at the same depth.
- Water once to settle soil, then return to watering only when the top few inches dry.
Yellow leaf triage: what to do today
If you are not sure which cause fits, do these quick checks in order. Think of it as a calm little plant wellness visit.
- Feel the soil 2 to 3 inches down (deeper for big pots). Wet means wait. Dry means water deeply.
- Check the light: bright indirect is the sweet spot. Move out of harsh sun.
- Watch the air: cold drafts from windows, AC, or heat vents can trigger yellowing and leaf decline. If it is in the path of a blast, relocate it.
- Inspect for pests under leaves and at leaf joints.
- Smell the soil. Sour or swampy suggests root trouble.
- Look at the pattern: one old leaf is often normal; many leaves is a care issue.
And yes, you can remove fully yellow leaves. They will not turn green again, and trimming helps your plant focus energy on new growth.
Prevent yellowing long term
- Watering rhythm: water thoroughly, then let the top 2 to 3 inches dry (deeper checks for bigger pots).
- Pot and mix: drainage hole always, airy chunky mix always. Replace old, compacted mix when it starts holding too much water.
- Light: bright indirect, rotate weekly.
- Feeding: light, consistent feeding in spring and summer, rest in winter.
- Leaf care: wipe dust monthly so the plant can photosynthesize efficiently.
If you want, tell me what your yellowing looks like (which leaves, how fast, soil feel, and your window direction). I can help you narrow it down like we’re standing together in the nursery aisle.