Staking a Weak Phalaenopsis Orchid Spike
If your Phalaenopsis orchid spike is leaning like it has had a long day, you are not alone. Those elegant arches are gorgeous, but a weak or bent spike can turn into a snap in seconds if it gets bumped, dries too much, or tries to hold heavy buds without help.
The goal of staking is not to force a spike perfectly straight. The goal is to support it so buds open safely, the plant does not waste energy repairing damage, and you still get that lovely, natural curve.
Before you stake: confirm it is a spike
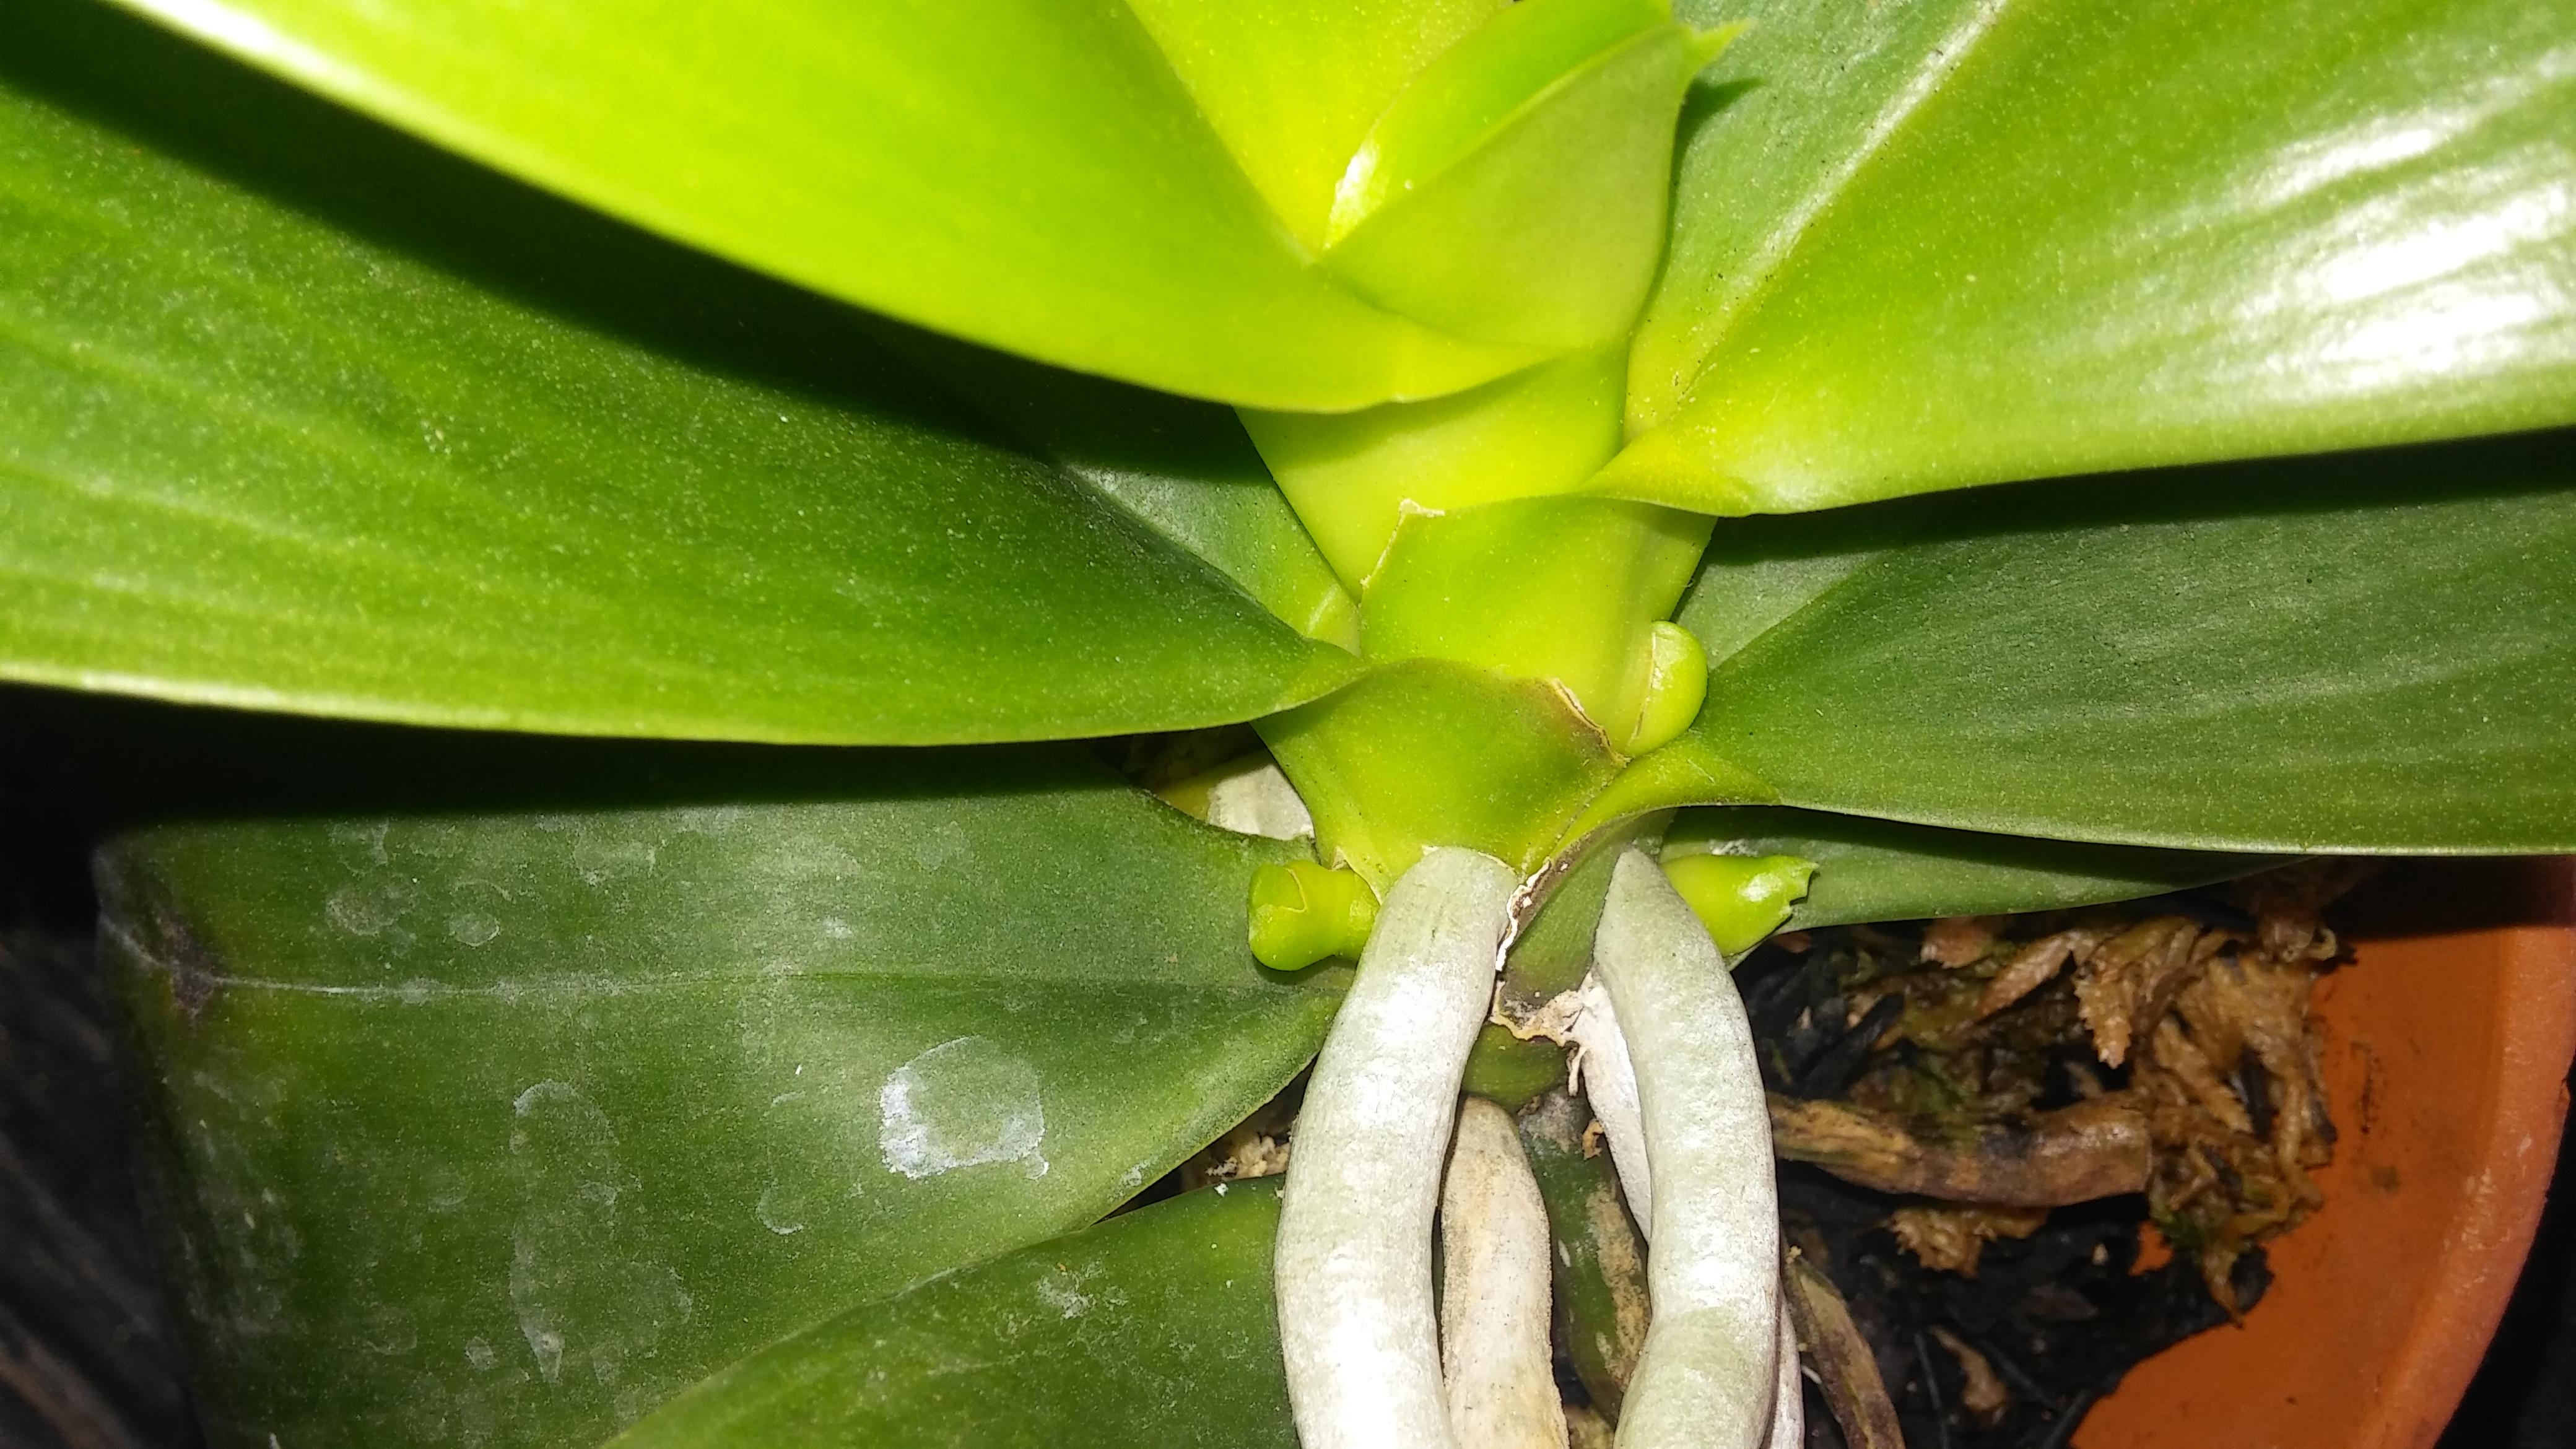
Early on, roots and spikes can look confusingly similar. A quick double-check saves a lot of accidental pokes and bends.
- Spike: usually flatter with a little “mitten-shaped” tip, and it tends to grow toward light.
- Root: rounder, often with a shiny green or silver tip, and it grows wherever it pleases.
When to stake
Best window: while the spike is still flexible
The easiest time to stake is when the spike is still flexible but has clearly committed to blooming. Growers do this in a couple of common windows:
- Early staking (very common): when the spike is about 4 to 8 inches (10 to 20 cm) and easy to guide, especially if you want a specific presentation.
- Later staking (also fine): once you can see buds forming (little rounded nubs that look different from flatter, “mitten-shaped” nodes), but before the buds get big and start pulling the spike downward.
When not to stake
- Do not force a brand new spike that is only a few inches long unless it is at real risk of snapping. Early spikes naturally reorient toward light, and pushing them can cause kinks.
- Do not stake right after repotting if the plant is wobbly. Stabilize the pot first so you are not jostling tender roots while you work.
- Do not straighten a sharply creased spike. If you see a true crease, treat it as fragile and support it where it is rather than trying to bend it back.
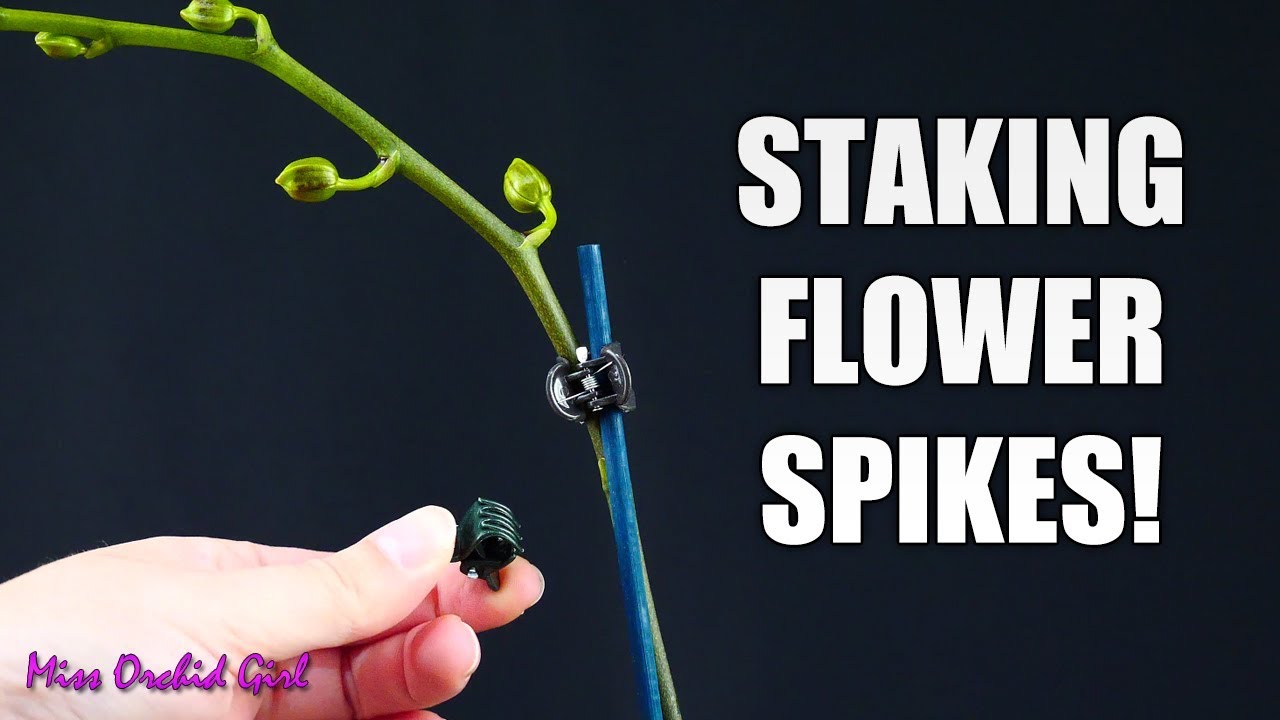
What to use
Think “soft support,” not “tight restraint.” These are my go-to supplies:
- Stake: bamboo stake, thin fiberglass orchid stake, or a coated wire stake tall enough to reach just above the top blooms.
- Ties: soft Velcro plant tape, silicone orchid clips, soft twist ties with foam coating, or strips of old nylon stocking.
- Optional: a few small orchid clips for quick, non-crushing support.
Quick hygiene note: If you are reusing stakes, clips, or cutters, clean them first. Orchid viruses and other diseases can be spread by unclean tools. Wash off debris, then disinfect (for example, with 70% isopropyl alcohol or a fresh 10% bleach solution), and let everything dry before it touches the plant.
Avoid anything that can cut into tissue as the spike thickens:
- metal wire directly against the spike
- thin string, fishing line, or thread
- tight zip ties
Before you start
- Choose a calm time: no pets, no kids, no fan blowing the spike around.
- Work in good light so you can see nodes, buds, and where the spike is naturally willing to sit.
- Do it when the plant is hydrated: if the mix is bone dry, water earlier in the day and stake later once the plant is perkier. Hydrated tissue is often a little less prone to cracking.
- Rotate the pot for access, but keep the spike oriented the same direction relative to the window when you are done. Phalaenopsis chase light, and frequent turning can twist the spike.
- Avoid the crown and leaf bases: when you are maneuvering the stake, do not push it into the crown or wedge it between leaf bases. That area damages easily and does not forgive.
How to stake a weak spike
1) Decide the shape you are supporting
Look at the spike from the side. Your job is to support its current arc or guide a gentler arc, not to straighten it like a ruler. A natural curve is less stressful than a forced straight line.
2) Insert the stake without stabbing roots
Place the stake near the inside edge of the pot, on the side that gives the spike the best support. Most of the time, it looks cleanest if the stake sits just behind the spike from the viewer’s angle, rather than directly in front of the blooms.
- In bark mixes: wiggle the stake down slowly, rotating it as you go. If you hit a firm root, back up and try a slightly different angle.
- In sphagnum: go even slower. Dense moss hides roots, and it is easy to spear one if you rush.
- In a clear pot: use the pot wall as your “root map” and slide the stake down where you can see fewer roots.
If the orchid is in a decorative cache pot, take it out first. You want full control and no surprise tipping.
3) Support the spike with your fingers first
Before adding ties, gently cradle the spike with one hand to take its weight. This is the moment that prevents sudden cracking when the first tie goes on.
4) Add the first tie low on the spike
Start near the lower third of the spike, usually a few inches above where it emerges from the plant. Use a soft tie in a loose figure-eight:
- one loop around the stake
- one loop around the spike
The figure-eight creates a tiny cushion of space so the spike is not rubbing directly on the stake. Tight ties are a common cause of bruising and “pinched” spikes.
5) Add more ties as the spike rises
Place ties every 2 to 4 inches, adjusting for weight. Add more support where buds cluster or where the spike changes direction.
Each tie should be snug enough to prevent flopping, but loose enough that you can slide a fingertip between tie and spike.
6) Guide slowly over several days if you want it more upright
If your spike is dramatically bent and you want it more upright, do it in gentle stages:
- Stake it in its current position today.
- After 2 to 3 days, move one tie slightly to encourage a small shift.
- Repeat once or twice if needed.
This “slow coaching” approach is far safer than one big bend that ends in heartbreak.
Single vs branching spikes
Single, unbranched spike
With a single spike, you can usually run one stake parallel to the spike and tie it in 3 to 5 points.

- Stake position: just behind the spike, slightly offset so ties do not press buds against the stake.
- Top support: add a tie below the first bud cluster, not right at the buds.
- For a forward-facing display: position the stake behind the spike on the “back” side of the pot and let the spike and buds turn toward the light naturally. Try not to twist the spike to face front.
Branching spike (side branch forming)
Branching spikes need support at the “Y” junction. This is the spot most likely to twist or split if the branch gets heavy.
- Main stake: support the main spike as usual.
- Branch support: add a second shorter stake for the side branch if it is long, or use a clip attached to the main stake to keep the branch from flopping.
- Do not tie over the junction: place ties above and below the branch point instead of squeezing it.
Avoid snapping spikes
- Do not bend hard near nodes or bracts. The spike often becomes more rigid around these points, although flexibility varies by plant and age.
- Warm room temperature helps. Cold spikes are more brittle. Let the plant come to room temperature if it was near a chilly window.
- Support first, adjust second. Get it stable, then fine-tune the shape later.
- Keep buds away from pressure. Buds bruise easily. Tie below clusters and avoid pushing them into the stake.
- Leave wiggle room. Spikes thicken as they mature, and tight ties can constrict them.
- Stabilize the pot. Many “spike breaks” happen because the pot tips, not because the spike was weak.
Common mistakes
- tying too tight “to be safe”
- tying at the buds instead of below the bud cluster
- forcing one big bend instead of making small adjustments over a few days
- rotating the plant every day and accidentally twisting the spike
- pushing the stake straight down through a root-packed pot without checking the path
If the spike already cracked
If you notice a partial split or crease:
- Do not try to straighten it. Support it exactly where it sits.
- Add a tie above and below the damaged point so the crack is not bearing weight.
- Reduce movement by moving the plant away from walkways and fans.
If the spike fully snaps, you can still enjoy it. Place the flowering portion in a small vase of clean water. Phalaenopsis cut spikes can look lovely for several days to a week (sometimes longer), depending on bud stage and water hygiene. The plant itself is usually fine and will focus on leaves and roots next.
Care while it is staked
- Water normally, but avoid sloshing the pot so hard that the stake wiggles and loosens roots.
- Keep light steady. A spike will keep leaning toward its light source. If you must rotate the plant, do it a few degrees at a time every several days.
- Check ties weekly. Loosen or reposition any tie that looks tight as the spike thickens.
After-bloom stake removal
Once the last flower drops, you have options. If you plan to keep the spike for a possible secondary bloom, you might keep the stake a bit longer. If you are going to cut the spike, removal is easy.
When to remove the stake
- Remove after flowering when the spike is no longer top-heavy and you are done enjoying the display.
- Keep it temporarily if the spike is still green and you are watching for a side branch.
How to remove without stress
- Support the spike with one hand.
- Undo ties from the top down.
- If leaving the spike on the plant, let it rest naturally without forcing a new position.
- Slide the stake out slowly, angling away from visible roots.
Quick troubleshooting
The spike keeps sliding down the stake
- Add one more tie lower on the spike.
- Use a figure-eight tie so the spike has a soft “seat” rather than a slick straight wrap.
Buds are facing the wrong direction
- Give the orchid consistent light from one direction and stop rotating it.
- Avoid twisting the spike to face forward. Let the buds reorient naturally as they develop.
The spike wobbles because the plant is loose in the pot
- Stabilize the plant first with an orchid plant clip (a pot stabilizing clip) or by tucking fresh medium gently around roots.
- If the mix is broken down and the plant cannot anchor, plan a careful repot after flowering.
A gentle reminder
Your orchid is not judging you. Spikes bend. Stakes slip. Sometimes a bud snaps off and the plant simply shrugs and keeps growing leaves like nothing happened. Staking is just giving your Phalaenopsis a steady shoulder to lean on while it does its very dramatic blooming thing.