Snake Plant Root Rot: Signs, Cleanup, and Repotting
Snake plants (Sansevieria, now classified as Dracaena trifasciata) are famously tough. They can forgive low light, missed waterings, and the occasional “I forgot you existed” season. What they do not forgive is staying wet for too long. That is when root rot sneaks in.
If your plant is slumping, soft at the base, or smelling a little swampy, take a breath. Root rot looks dramatic, but snake plants often recover beautifully once you remove the rot and reset their growing conditions.

Root rot vs overwatering: what is the difference?
These two get lumped together, but they are not the same thing.
- Overwatering is a habit: the soil stays wet too often or too long. A snake plant can be overwatered and still have mostly healthy roots, especially early on.
- Root rot is damage: roots and sometimes the crown (the thick base where leaves attach) have begun to decay, usually from lack of oxygen in soggy soil plus opportunistic fungi and bacteria.
The good news: if you catch it at the “overwatering” stage, a dry-out and better watering rhythm may be enough. If it is true rot, you will need to unpot, trim, and repot.
Fast diagnosis: signs your snake plant has root rot
Above-the-soil symptoms
- Leaves feel soft or bendy near the base, even if the top looks okay.
- Yellowing starting at the bottom of a leaf, sometimes with translucent patches.
- Sudden lean or collapse, like the plant cannot hold itself upright.
- Funky odor from the pot: sour, musty, or sewage-like.
- Soil that stays wet for more than 10 to 14 days in average indoor conditions.
The most reliable sign: what the roots look and feel like
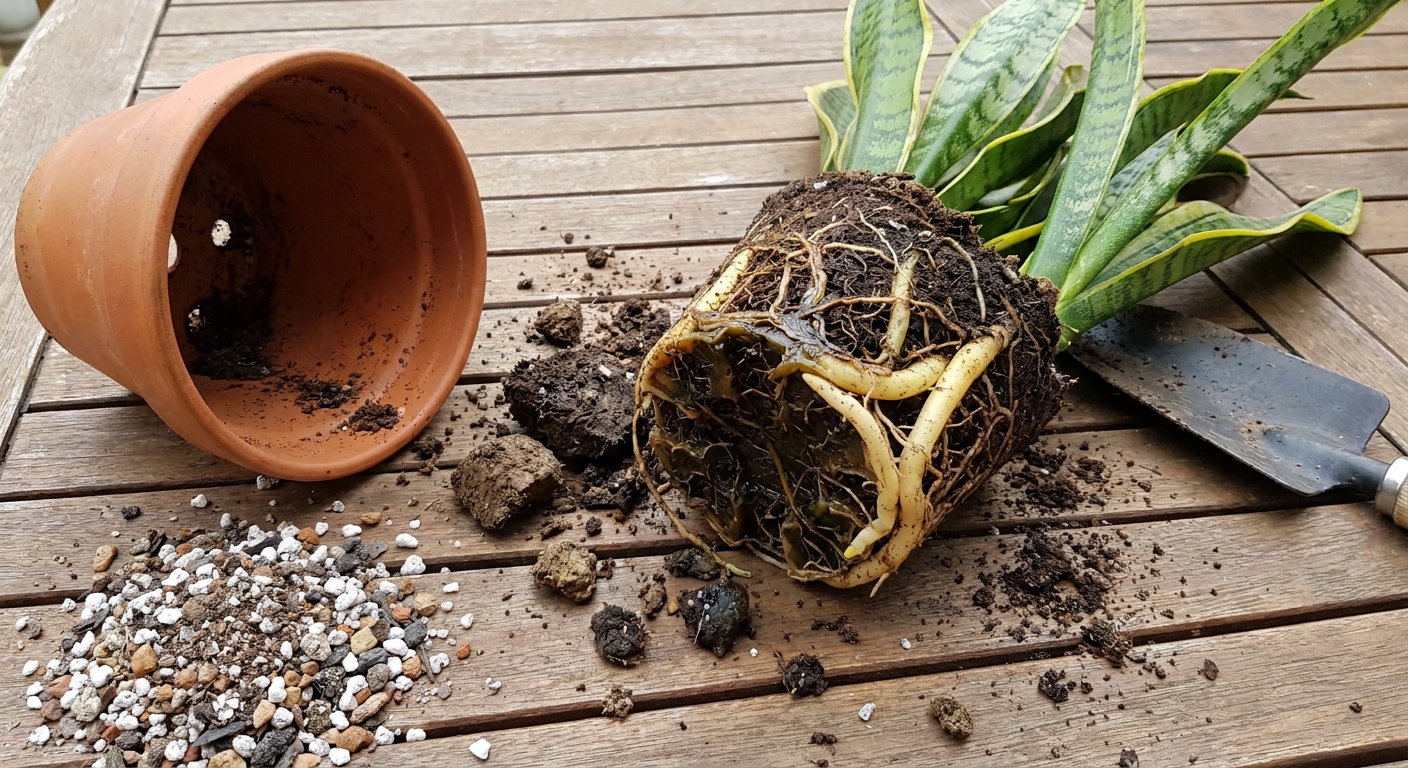
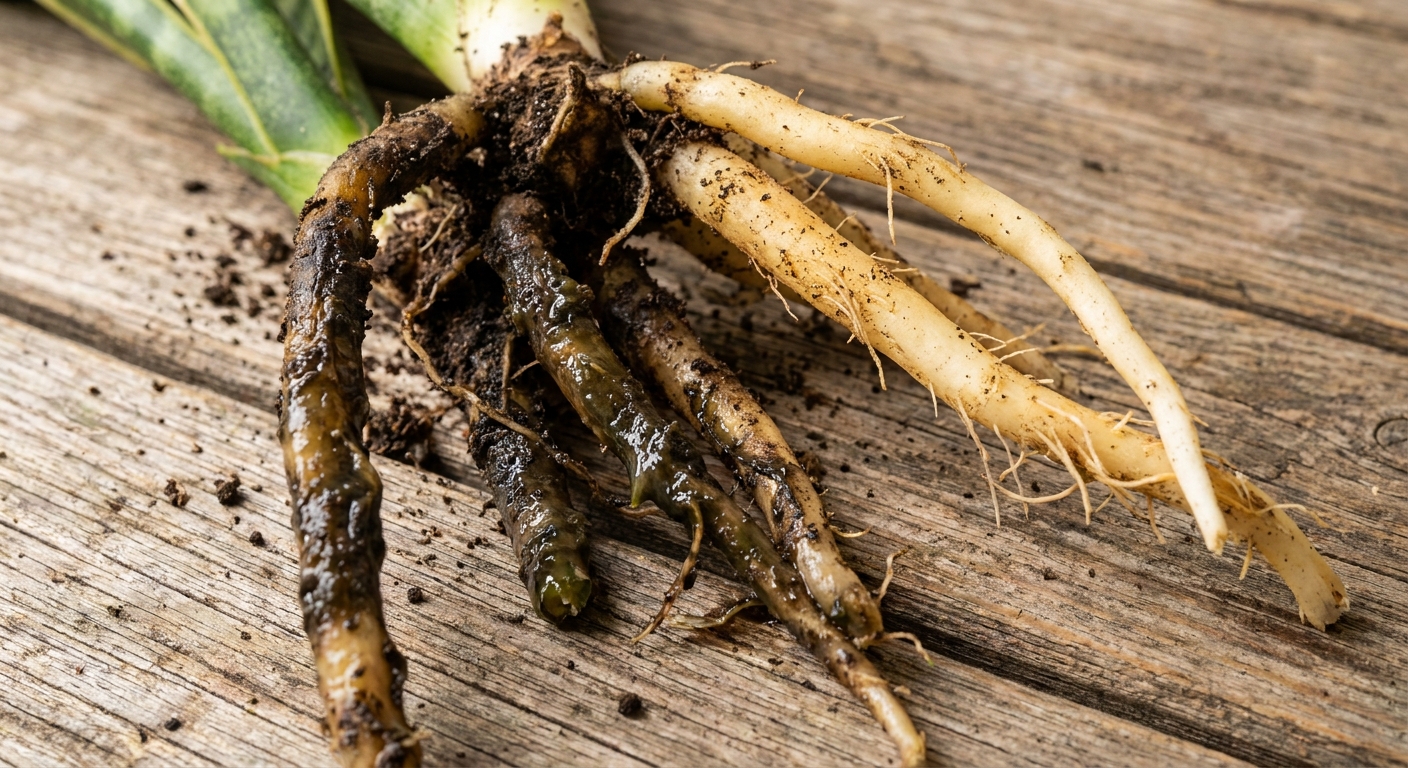
Slide the plant out of its pot (more on how in a moment). Healthy snake plant roots are firm and typically pale cream to light tan. Rotting roots are often:
- Brown to black
- Mushy or slimy
- Hollow, with the outer sheath slipping off when you gently pull
If the base of the plant (the crown) is soft, wet, or smells bad, treat it like an emergency. Crown rot can spread upward fast.
What causes snake plant root rot?
Snake plants are drought-tolerant succulents at heart. Rot usually happens when several “wet” factors stack up:
- Potting soil that holds water (peat-heavy mixes are common culprits).
- No drainage hole or a decorative cachepot that traps water.
- Oversized pot, where soil stays wet because roots cannot use the moisture quickly.
- Low light + cool temperatures, which slows drying dramatically.
- Frequent watering on a schedule instead of watering based on soil dryness.
Emergency steps: how to save a snake plant with root rot
Set yourself up first. This goes faster and cleaner when everything is ready.
Supplies
- Clean scissors or pruning shears
- Rubbing alcohol (70% is fine) or soap and hot water for tool cleaning
- Fresh gritty potting mix (recipes below)
- A pot with a drainage hole
- Paper towels or newspaper
- Optional: disposable gloves
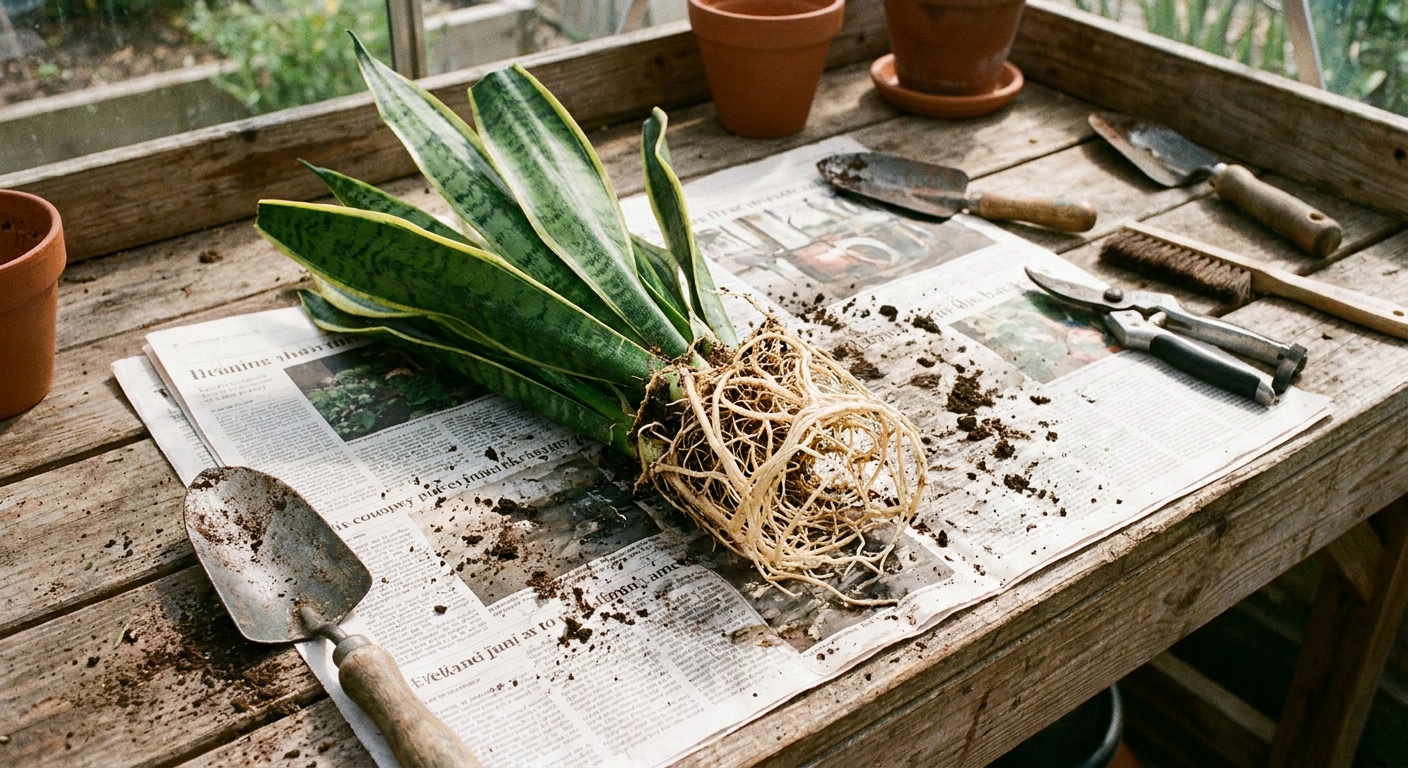
Step 1: Unpot gently (and do not panic if soil falls apart)
Tip the pot sideways and support the leaves near the base. If the plant is stuck, squeeze the pot or run a dull knife around the inside edge. Let old soil crumble away. If the mix is soggy and compacted, that is information, not failure.
Step 2: Remove wet soil and inspect the crown
Brush or rinse away enough soil to clearly see the roots and rhizomes. Snake plants often have thick, pale rhizomes that look like little underground stems. Those should be firm. If the rhizome is dark, soft, or smelly, you will need to cut back to clean tissue.
Step 3: Trim everything that is mushy, dark, or hollow
Disinfect your cutting tool, then snip away rotted roots. Work slowly and keep only what is firm. It can feel ruthless, but leaving “a little rot” is like leaving a little moldy bread in the bag. It spreads.
- If a root’s outer layer slides off easily, trim it back.
- If the crown base is soft, cut until the inside tissue is pale and solid.
- Wipe blades with alcohol between big cuts, especially if rot is advanced.
Step 4: Let the plant dry and callus
This is the secret that saves more snake plants than any product. After trimming, place the plant in a warm, dry spot out of direct sun for 24 to 48 hours (longer if the crown was cut). The cut surfaces should feel dry, not tacky.
Step 5: Optional treatments (useful, but not mandatory)
- Hydrogen peroxide (3%): Some gardeners use a quick rinse to reduce microbial load. If you do, do it once and let the plant dry thoroughly afterward.
- Powdered sulfur or cinnamon: Light dusting on fresh cuts can help them dry and discourage pathogens. Use sparingly and avoid caking.
- Fungicide: Only if you repeatedly lose plants to rot or crown rot is severe. Follow label directions exactly.
My practical rule: prioritize clean cuts + dry time + fast-draining mix. Those are the big three.
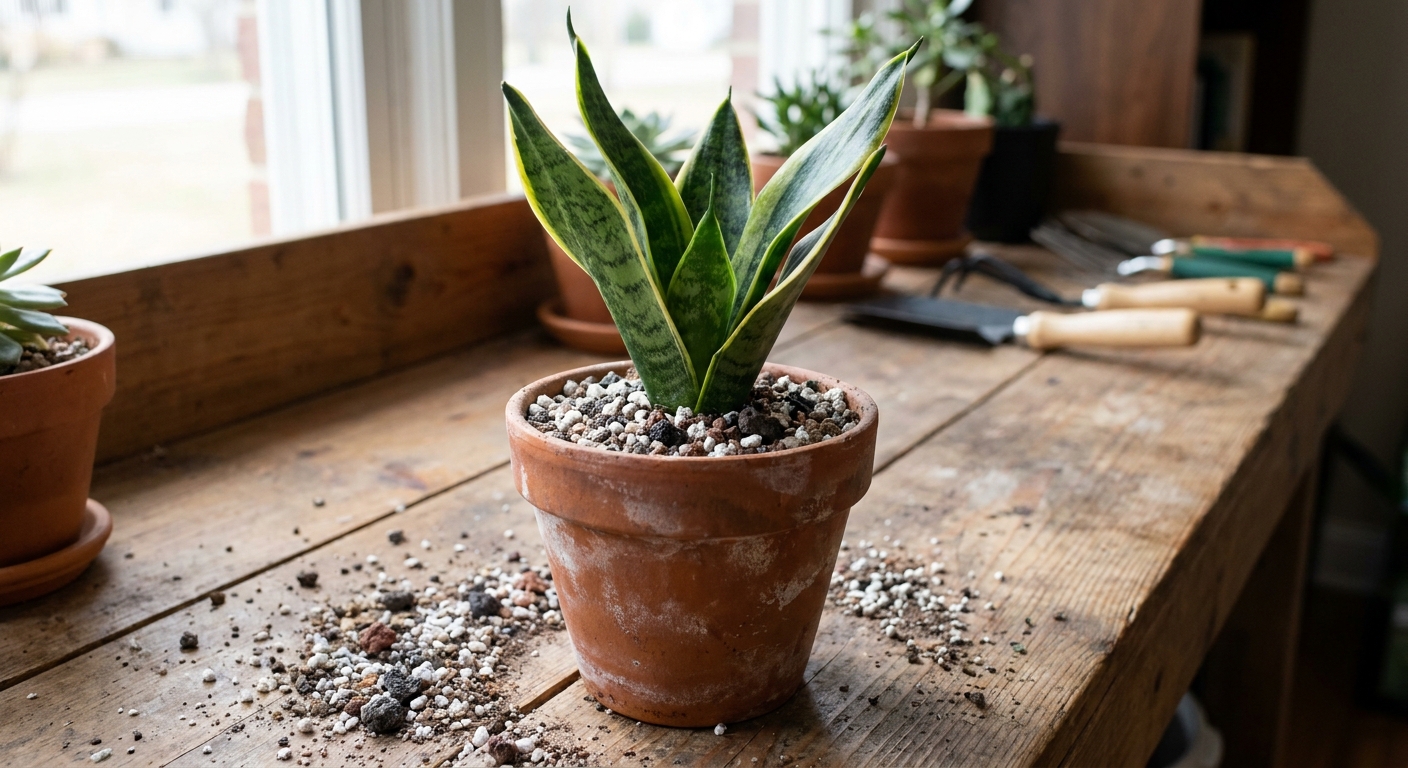
Repotting after rot: pot size, soil mix, and technique
Choose the right pot (smaller is usually safer)
A snake plant prefers to be slightly snug. After root rot, go even more conservative.
- Pot size: aim for a pot only 1 to 2 inches wider than the remaining root mass and rhizome cluster.
- Drainage: non-negotiable. One large hole is fine, several holes are even better.
- Material: terracotta helps moisture evaporate faster. Plastic is okay if your mix is gritty and you are careful with watering.
Use a gritty, airy mix
You want water to run through and air to move in. Avoid heavy “moisture control” mixes for this plant.
Easy DIY options:
- Option A (simple): 2 parts cactus/succulent mix + 1 part perlite or pumice
- Option B (extra gritty): 1 part potting soil + 1 part cactus/succulent mix + 1 part pumice or perlite
- Option C (chunky): 2 parts cactus/succulent mix + 1 part orchid bark + 1 part pumice (great for humid homes)
If you only change one thing today, change the soil structure. Airy roots are happy roots.
Repotting steps
- Add a small layer of mix to the bottom of the pot.
- Set the plant so the crown sits slightly above the soil line. Do not bury the base deeper than before.
- Backfill with gritty mix, tapping the pot to settle it. Do not pack it down hard.
- Stabilize tall leaves with a temporary stake if needed. A wobbly plant can tear newly forming roots.
Aftercare rules: when to water after repotting
This is where most rescues succeed or fail. After rot, the instinct is to “help” with water. Resist that urge.
Right after repotting
- Wait to water: usually 5 to 10 days after repotting. If you had to cut into the crown, wait closer to 10 to 14 days.
- Light: bright indirect light is ideal. Avoid harsh direct sun for the first week while the plant is stressed.
- Airflow: gentle airflow helps the mix dry evenly and discourages fungal issues.
Summer watering (active growth)
In warmer months with brighter light, snake plants can drink a bit more often, but they still want to dry out fully.
- Water only when the pot is dry at least 2 to 3 inches down, and the pot feels light.
- For many homes this is every 2 to 4 weeks, but always follow the soil, not the calendar.
- Water deeply, then let excess drain completely. Never leave the pot sitting in water.
Winter watering (slow growth)
Winter is root-rot season because drying slows way down.
- Water only when the mix is dry almost all the way through.
- In many homes this is every 4 to 8 weeks or even longer in low light.
- If your home is cool or the plant is in low light, err on the dry side. Snake plants handle drought far better than damp feet.
A simple “yes or no” watering check
- Yes if: the pot feels light, soil is dry well below the surface, leaves look firm, and temperatures are warm.
- No if: soil is even slightly cool and damp, the pot feels heavy, or the plant is in low light.
What if the crown is rotting? (Advanced rescue)
If the base of the plant is mushy, you may need to shift from “saving roots” to “saving genetics.”
Option 1: Divide and save healthy sections
If your snake plant has multiple shoots, gently separate them and keep only divisions with firm rhizomes and at least some healthy roots. Repot each in a small pot with gritty mix.
Option 2: Leaf cuttings as a backup plan
If the base is failing but leaves are still decent, take clean leaf cuttings.
- Cut a healthy leaf into 3 to 5 inch sections.
- Keep track of which end is the bottom. Cut a small notch on the bottom end if that helps.
- Let cut ends callus for 2 to 3 days.
- Root in barely moist succulent mix or in water (then transition carefully to soil).
Note: some variegated varieties may not keep their variegation from leaf cuttings. Division is the best way to preserve a specific look.
How long recovery takes (and what progress looks like)
Snake plants heal slowly but steadily.
- First 2 to 4 weeks: not much visible growth. The plant is rebuilding roots. Leaves should become firmer, not softer.
- 1 to 3 months: new root growth, improved stability in the pot.
- 3 to 6 months: new pups or leaf growth if conditions are right.
If leaves continue to soften, the base smells bad, or yellowing accelerates, unpot and re-check. It is better to look twice than to lose the plant.
Preventing root rot next time
- Use a fast-draining mix from day one.
- Size down the pot if your plant is swimming in soil.
- Prioritize light. Brighter indirect light means faster drying and stronger roots.
- Water by dryness, not by routine.
- Empty saucers and cachepots after watering.
And if you needed to hear this: root rot is not a moral failing. It is just a plant telling you it wants more air and less sogginess. You can absolutely fix that.
Quick FAQ
Should I cut off yellow leaves after root rot?
If a leaf is mostly yellow or mushy at the base, remove it with a clean cut. If it is only lightly yellowed, you can leave it while the plant recovers. The plant may still pull some resources from it.
Can I reuse the old soil or pot?
Do not reuse the old soil. You can reuse the pot if you scrub it well and disinfect it (hot soapy water, then a rinse, then a quick wipe with rubbing alcohol or a mild bleach solution followed by thorough rinsing and drying).
Do I need to add rocks at the bottom for drainage?
No. A drainage hole plus a gritty mix does the job. Rocks at the bottom can create a perched water layer that keeps the root zone wetter.