Separate and Root Chinese Money Plant Pups
If your Chinese money plant (Pilea peperomioides) has started popping up little coin-leaf pups (or “puppies,” if you are feeling affectionate), congratulations. That is your plant quietly telling you it is happy enough to multiply. And the good news: offsets are the most reliable way to propagate Pilea. Leaf cuttings are inconsistent and often do not produce a full new plant.
Below, I will walk you through when to wait, how to separate pups cleanly, and how to root in soil or water with aftercare that actually works. I will also show you what to do with a leggy parent once the pups are gone, plus a troubleshooting section for those stubborn pups that refuse to root.

When to separate pups
Pups can look “ready” long before they are actually set up for success. The goal is to separate a baby that can handle a little stress and start producing roots quickly.
Size cues
- Common guideline: pup is about 2 to 4 inches tall with 4 to 6 leaves.
- Another easy cue: the pup is roughly 1/3 to 1/2 the size of the mother plant’s main rosette.
- Even better: you can see or feel a slight thickening at the base, or you spot tiny roots when you gently scrape the top layer of soil away.
- Wait longer if: the pup is very pale, floppy, or only has 2 to 3 small leaves.
Timing cues
- Spring through early fall is easiest because the plant is actively growing.
- If it is mid-winter, you can still do it, but expect slower rooting and be a bit more careful with watering.
My rule of thumb: If you would hesitate to pick the pup up by its leaves because it seems too delicate, it is probably too small to separate.

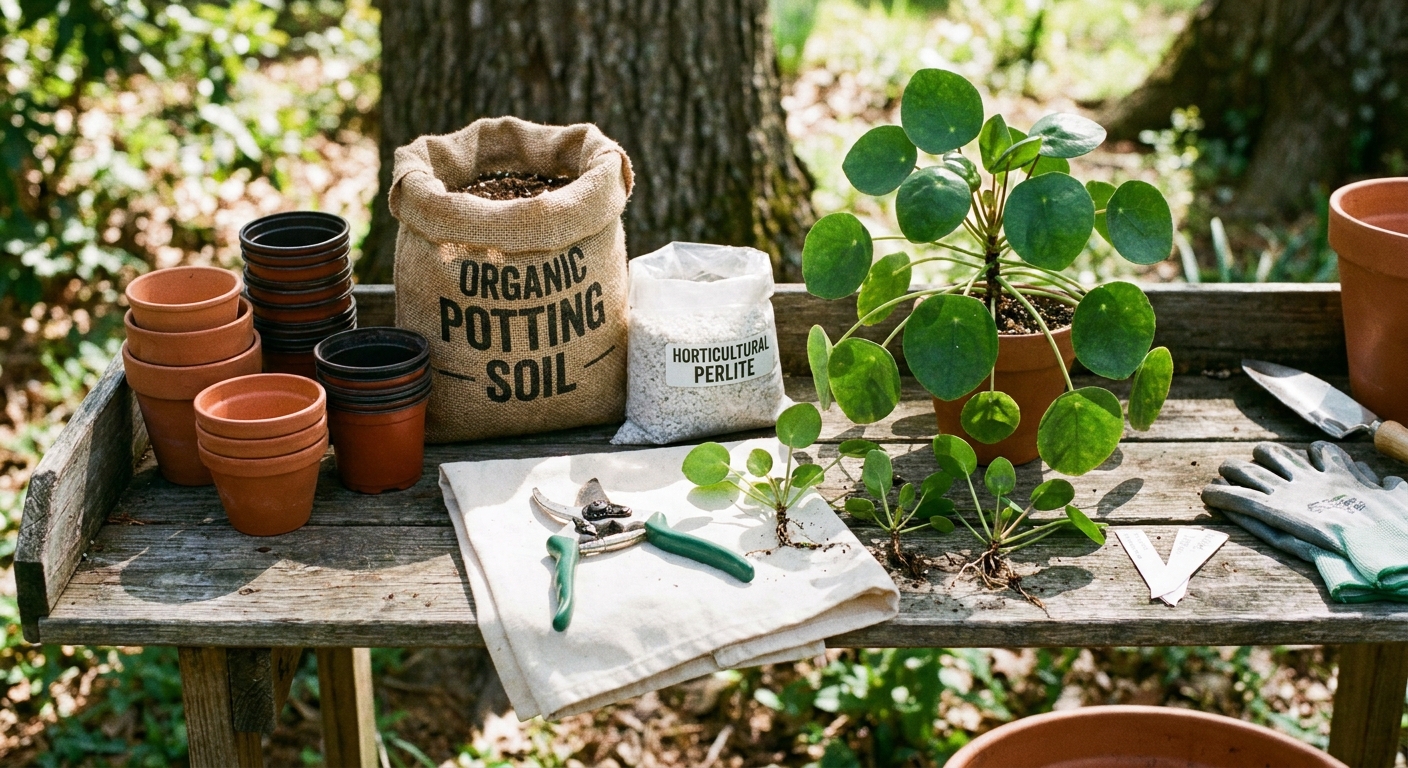
Tools and setup
You do not need a fancy propagation station. You do need cleanliness and the right potting mix.
Grab these
- Small pots with drainage holes (2 to 4 inch is perfect)
- Fresh potting mix plus extra drainage material
- A clean, sharp knife or pruners (my preferred method)
- Rubbing alcohol or soap and hot water (for sanitizing)
- A chopstick, pencil, or butter knife (for loosening soil)
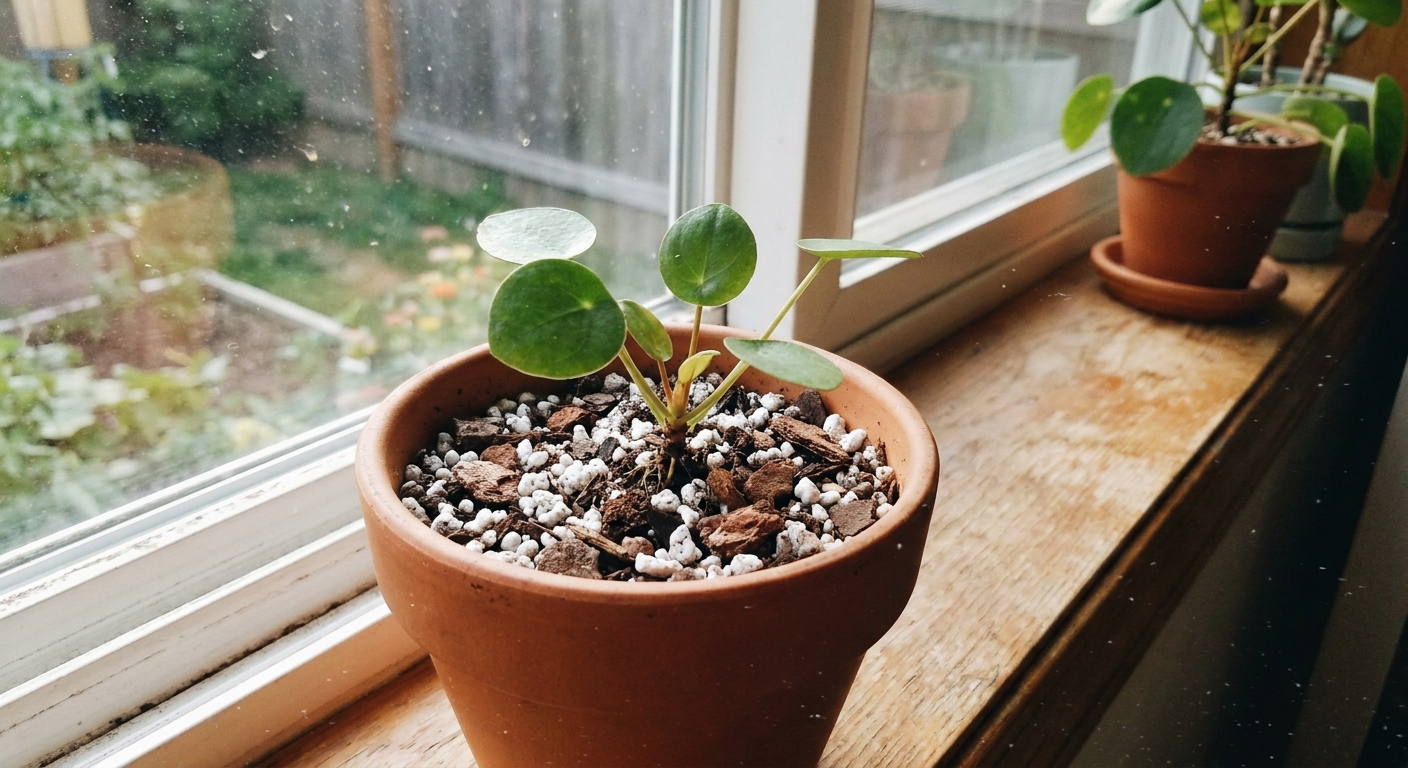
Soil mix for pups
Pups rot when they sit in dense, soggy soil. Aim for “moist sponge,” not “mud pie.”
- 2 parts quality indoor potting mix
- 1 part perlite or pumice
- Optional: a small handful of orchid bark if your home runs humid or you tend to overwater
Pot size note: Use the smallest pot that fits the base comfortably. Oversizing keeps the mix wetter longer and raises rot risk.
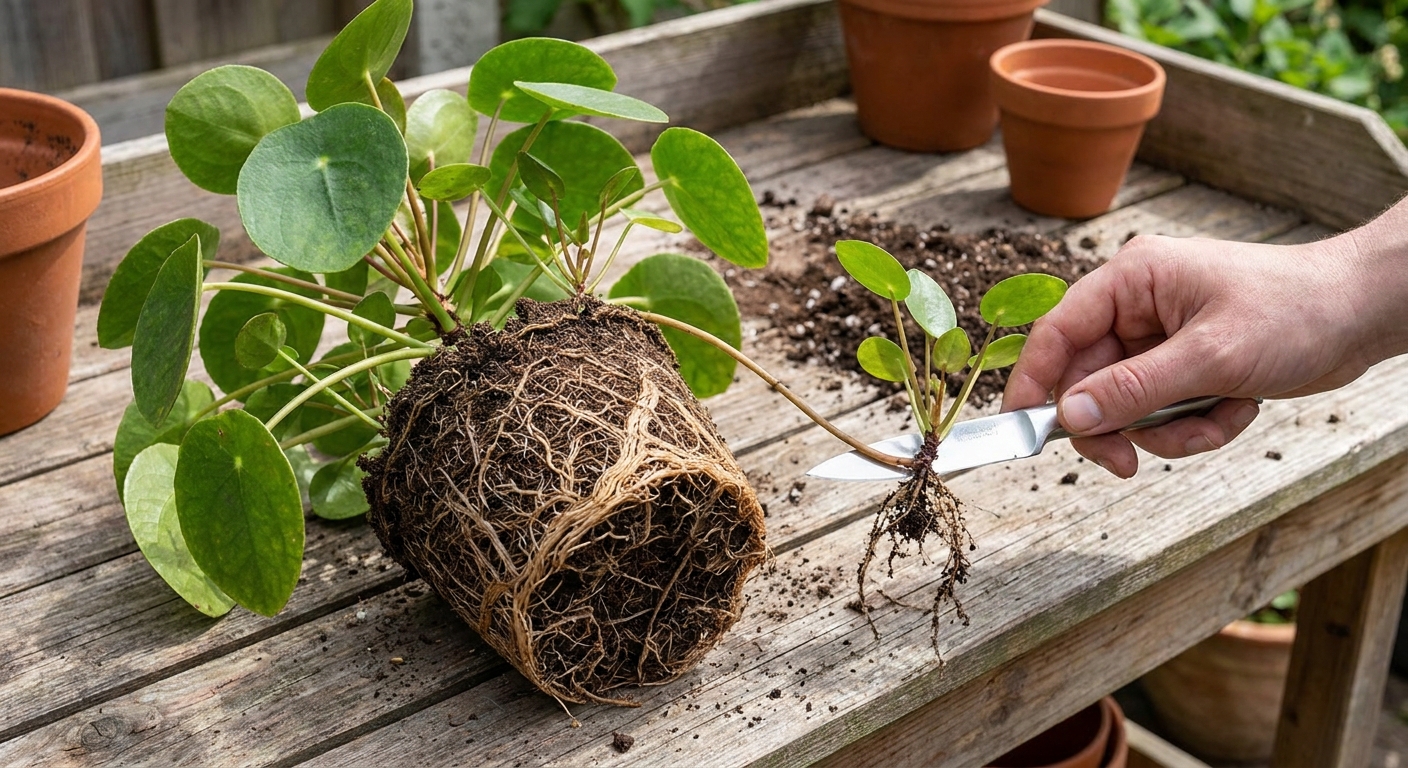
How to separate pups
There are two reliable approaches: cutting the runner (clean and controlled, my default) and twisting (fine only when the pup clearly has its own little base and separation point). I will tell you which one to use based on what you see.
Option A: Cut pups off (best default)
If you want the lowest-drama method, cut. It is especially helpful when pups are crowded, tight to the mother plant, or you worry twisting will tear tissue.
- Water the plant 12 to 24 hours ahead. Slightly moist soil loosens more easily, and roots are less brittle.
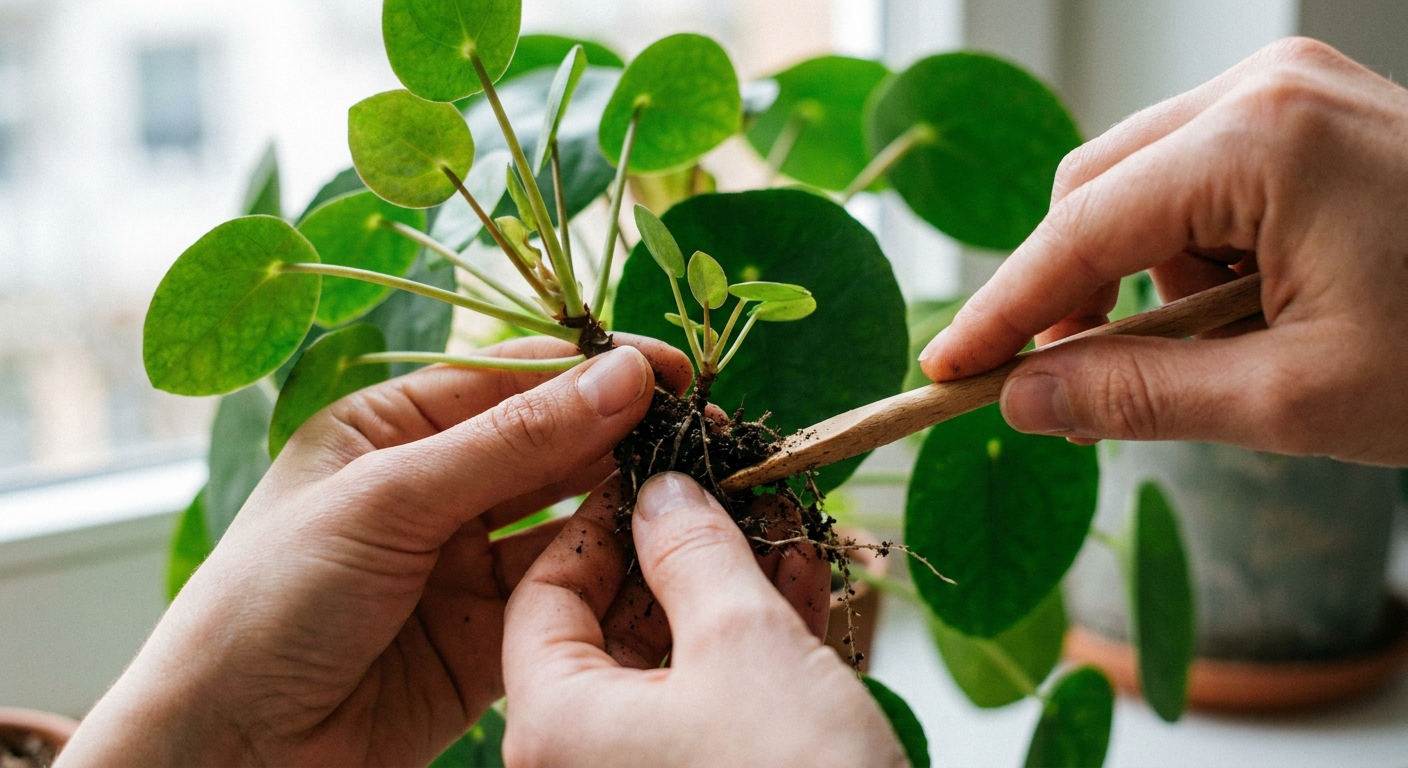
- Expose the connection. Use a chopstick to gently pull soil away until you can see where the pup meets the runner (stolon).
- Stabilize the mother. Hold the main stem steady near the soil line.
- Make one clean cut. Cut the runner as close to the pup as practical, leaving the pup with a small nub of runner tissue.
- Avoid sawing. One decisive cut heals faster than repeated chopping.
Option B: Twist pups off (only when they are clearly independent)
Twisting can work well when the pup has a distinct little stem or base of its own and feels like it wants to separate cleanly. If it resists, do not wrestle it. Switch to cutting.
- Expose the connection. Pull soil away until you can see the attachment point.
- Hold the mother steady. One hand supports the main stem near the soil line.
- Twist slowly at the base. Rotate gently, like you are loosening a lid. You want a clean release, not a tear.
- Check the base. A good separation includes a small “button” of tissue at the bottom where roots will form.
Quick triage after separation
- If the pup has a few tiny roots: go straight to soil rooting.
- If the pup has no roots: soil or water both work, choose based on your habits (I break it down below).
- If the base tore and looks ragged: trim ragged tissue with a clean blade to create a fresh edge. If the cut looks very juicy, or the pup has no roots, let it air-dry briefly (about 10 to 30 minutes) before rooting. For very small pups, do not overdo the drying time.
Soil vs water rooting
Both methods can succeed. The difference is mostly about how you like to care for plants day-to-day.
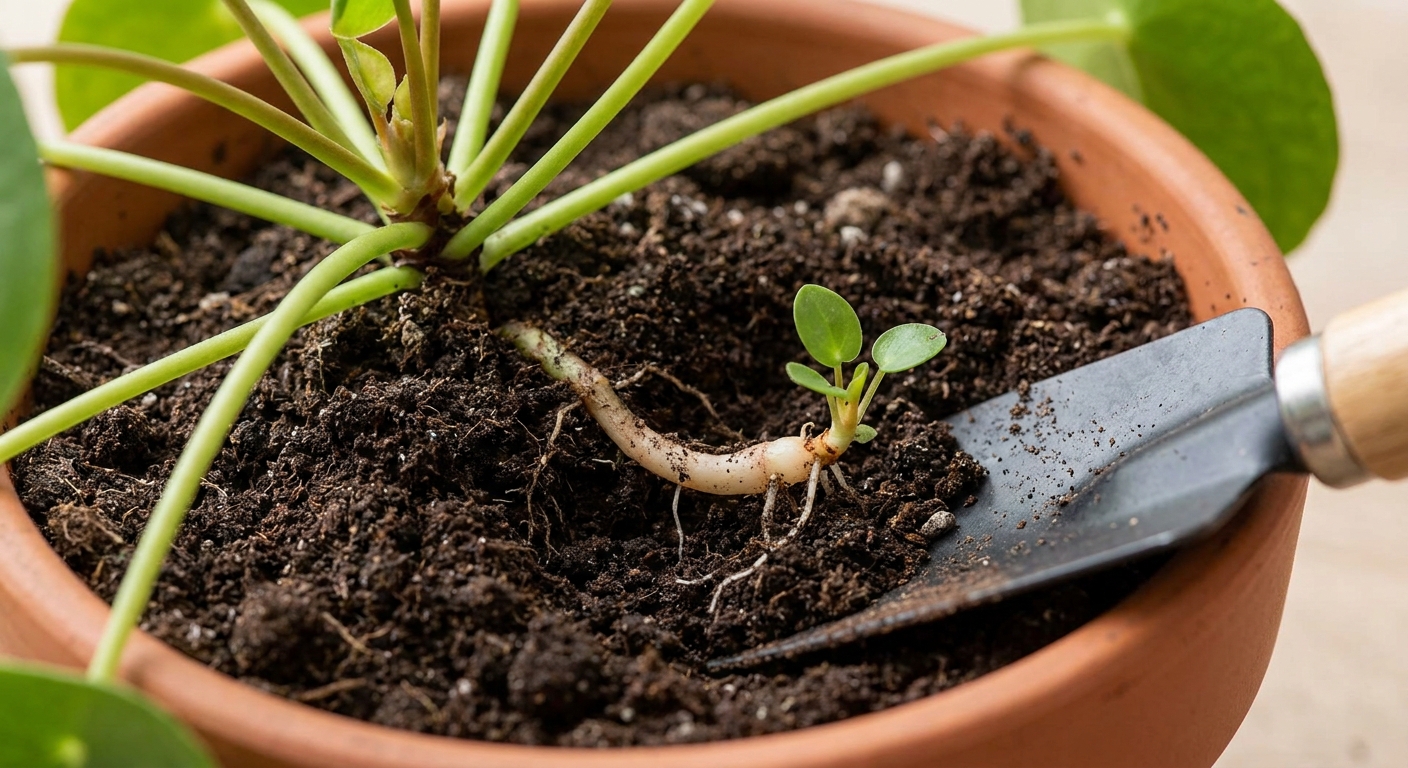
Soil rooting (my go-to)
Why I like it: roots formed in soil are already adapted to soil, so the pup usually skips the transplant sulk.
- Fill a small pot with your airy mix and pre-moisten it so it is evenly damp.
- Make a hole with a pencil and set the pup in so the base is just below the soil surface.
- Firm gently. Think “tuck in a blanket,” not “pack a suitcase.”
- Water lightly to settle soil, then let excess drain.
- Add gentle humidity if your home is dry: place the pot in a clear plastic bag with a few holes, or under a vented cloche. Keep leaves off the plastic.
Light: bright, indirect (for example, near an east window, or a few feet back from a bright south or west window). Temperature: warm room is perfect. Timeline: often 2 to 6 weeks, sometimes longer in low light or cooler rooms, until you feel light resistance when you tug very gently.
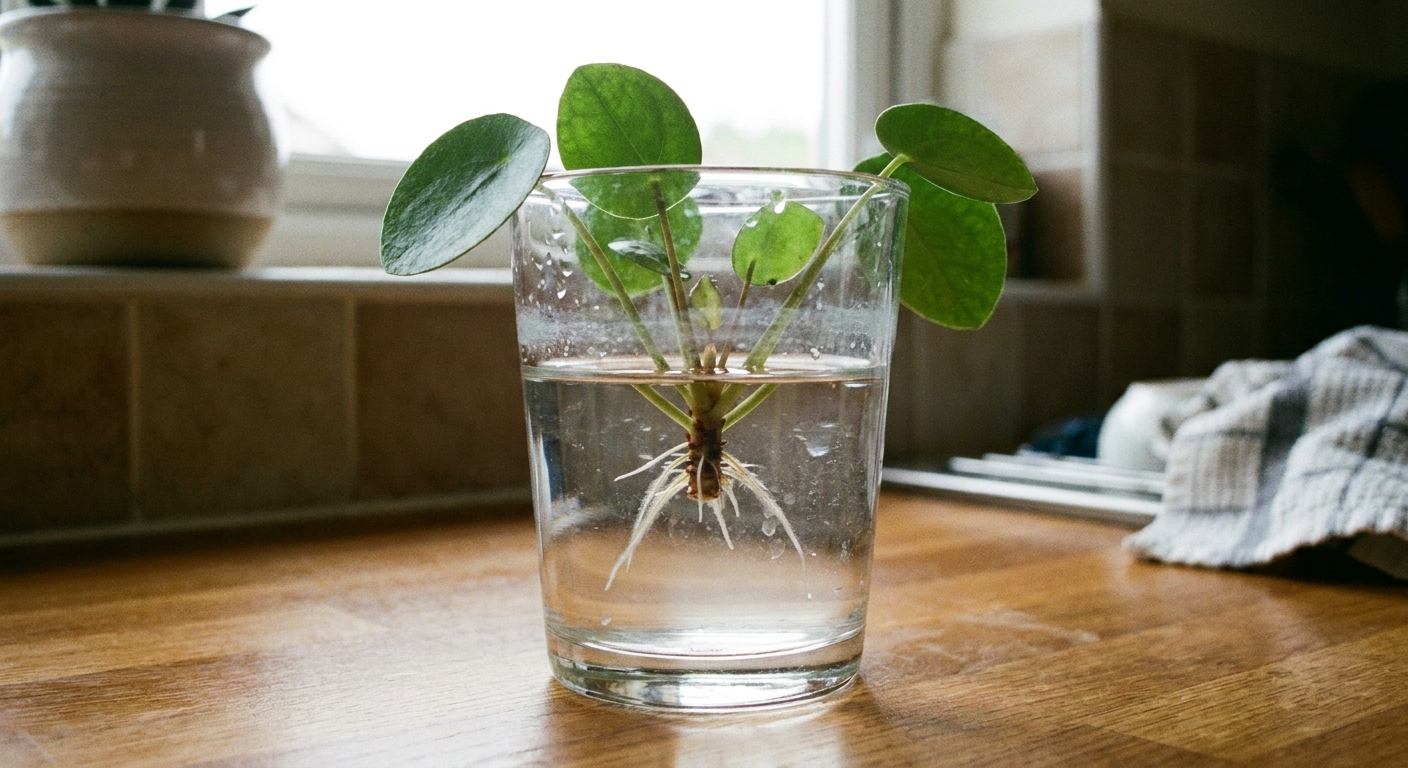
Water rooting (great if you want proof)
Why people love it: you can watch roots form. Downside: water roots can be a bit delicate when you move to soil.
- Use a small glass and fill with room-temperature water.
- Keep leaves dry. Submerge only the base. If leaves sit in water, rot is more likely.
- Refresh the water regularly. Every few days is great. Weekly can also work if the water stays clear and fresh.
- Pot up at the right moment. When roots are 1 to 2 inches long and you see at least a couple branching roots, move to soil.
Transition tip: After transferring water-rooted pups to soil, keep the mix a touch more evenly moist for 7 to 10 days. Then shift to the normal “dry a bit” pattern.
Aftercare for the first month
Pilea pups are tough, but newly separated pups do not have much margin for drought or soggy soil. Here is the sweet spot.
Light
- Bright, indirect light is ideal while rooting.
- A little morning sun is fine, but avoid harsh midday sun until the pup is established.
Water
- For soil-rooted pups: water when the top 1 inch of soil feels dry, then drain fully.
- For freshly transplanted water-rooted pups: keep slightly more even moisture for 1 to 2 weeks, then shift to the normal dry-a-bit pattern.
Humidity (optional)
If your home air is very dry, a loose humidity tent can speed rooting. Open it daily for fresh air. Stale air invites mold and gnats.
Fertilizer
Skip fertilizer until you see new growth. Then feed at quarter strength about once a month during the growing season.
How you know it worked
- You see a new leaf unfurl from the center.
- The pup stays upright without staking.
- You feel gentle resistance when you wiggle it very slightly.
Leggy parent plant fixes
Once the babies move out, the parent sometimes looks like a lanky teenager with a bare stem and a leafy haircut at the top. You have a few options that keep things looking intentional.
Option 1: Rotate and refresh
If the plant is only mildly leggy, rotate the pot a quarter turn weekly and make sure it is getting enough bright, indirect light. Many Pileas lean toward the window like they are listening for gossip.
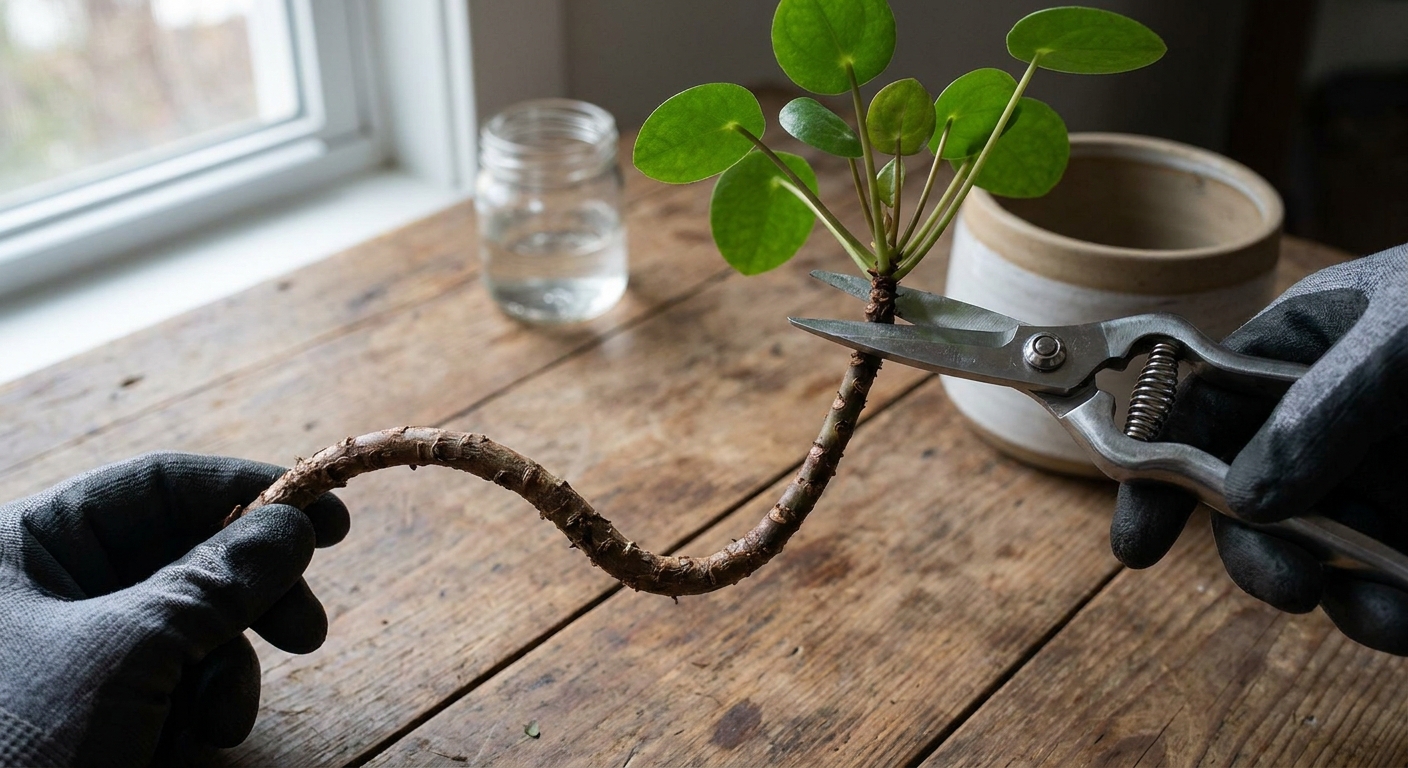
Option 2: Top and re-root
If the stem is long and bare, you can create a fuller plant by taking the top as a cutting.
- Sanitize pruners.
- Cut the top rosette with 2 to 4 inches of stem.
- Root the top in water or soil (same methods as pups).
- Keep the original stump in bright, indirect light and normal care. It often pushes new growth points from nodes on the stem.
Option 3: Bury the stem a bit deeper
When repotting, you can set the plant slightly deeper so the bare stem is less obvious. Do not bury leaves, and do not bury so deep that the stem stays constantly wet.
Troubleshooting
If your pup is just sitting there like it is on strike, it is usually one of a few fixable issues.
No roots after 4 to 6 weeks
- Cause: too cool, too dark, or the base dried out repeatedly.
- Fix: move to brighter indirect light, keep temperatures warm, and aim for consistent light moisture. Consider a humidity tent for 1 to 2 weeks.
Base turns brown and mushy
- Cause: rot from overly wet soil or submerged leaves in water.
- Fix: cut back to firm tissue with a sterile blade, let the base air-dry briefly (about 10 to 30 minutes), then restart in fresh airy soil. Use a smaller pot.
Pup wilts within a day or two
- Cause: not enough roots yet plus too much light or very dry air.
- Fix: reduce light intensity, add gentle humidity, and keep soil evenly damp for a short period. Remove any severely damaged leaves so the pup loses less water.
Water-rooted pup collapses after potting
- Cause: transition shock. Water roots are not the same as soil roots.
- Fix: pot into an airy mix, water in thoroughly once, then keep slightly moist for 7 to 10 days. Avoid fertilizing. Give bright, indirect light.
Tiny flies around the new pots
- Cause: fungus gnats thrive in constantly wet soil.
- Fix: let the top inch dry between waterings, use yellow sticky traps, and treat with BTI (Mosquito Bits or dunks) to target larvae. Optional: a light top-dressing of coarse sand can act as a barrier in some setups, but it is not a guarantee and can keep moisture underneath if you overwater.
Quick FAQ
Can I separate multiple pups at once?
Yes, as long as the mother plant is healthy. If you remove a whole crowd at once, keep the parent in bright, indirect light and water normally once disturbed roots settle.
Do I need rooting hormone?
No. Pilea pups are naturally eager. Rooting hormone can help in stubborn cases, but airy soil, warmth, and steady moisture do most of the work.
Should I remove pups if I want a fuller pot?
Not necessarily. If you love a “clump” look, leave some pups in place and only remove a few to share. If the pot becomes crowded, repot into a slightly larger container with fresh mix.
Is Pilea pet-safe?
Pilea peperomioides is often listed as non-toxic, but pets can still get stomach upset from chewing plants. If you have a persistent nibbler, keep it out of reach and check a trusted source or your vet.
A final note
Propagation feels like a high-stakes operation the first time, but it is really just a small, tidy interruption in a plant’s normal life. Keep things clean, use a small pot with airy mix, and remember that waiting for the right pup size is not procrastination. It is good horticulture.
If you want, tell me whether your pup has roots yet and what your light situation looks like, and I will recommend whether soil or water rooting will be easiest for you.