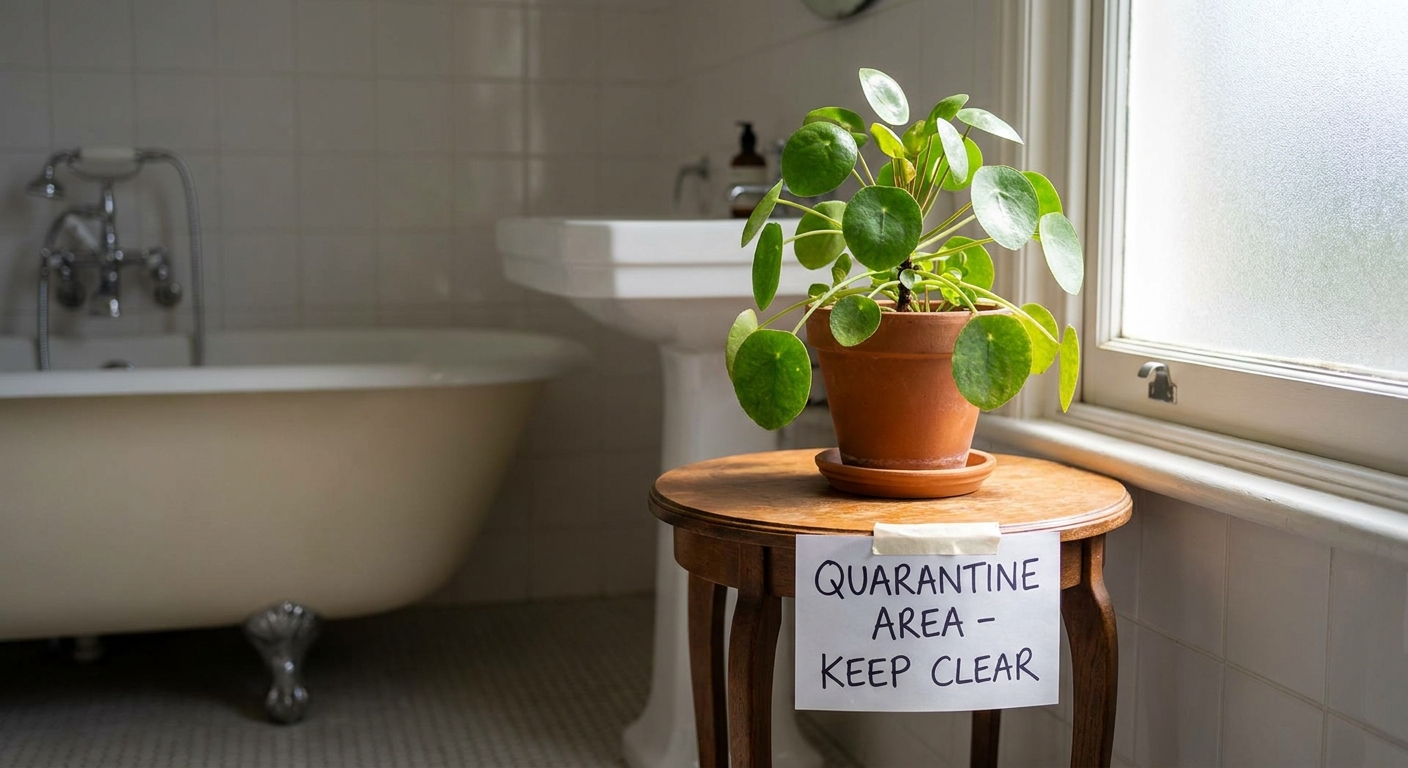
Quarantine New Houseplants
New houseplants are pure joy. New houseplants can also be tiny Trojan horses.
I am not saying this to scare you. I am saying it because one calm, boring quarantine routine can save you weeks of battling thrips, spider mites, mealybugs, fungus gnats, or scale across your whole plant family. Think of quarantine as a little welcome spa week for your new plant: it gets to rest, recover from travel, and prove it is pest-free before it meets the others.

What quarantine actually means
Quarantine is simply isolating a new plant (or any plant you suspect has pests) far enough away that crawling bugs, flying adults, and accidental leaf-to-leaf contact cannot spread problems to your collection.
What quarantine is not: It is not a magic shield. If you confirm pests, quarantine buys you time and prevents spread, but you still need to treat.
- Distance matters: Best case is a separate room with a door. If that is not possible, put the plant as far away as you realistically can. Think “different corner of the home,” not “next to just one plant.” If you want a rough fallback, 6 to 10 feet can help reduce accidental brushing and leaf contact, but farther is better.
- Airflow matters: Normal room airflow is fine, but avoid a fan blowing directly from the quarantine plant toward the rest of your collection.
- Tools matter: Use separate tools, or disinfect between plants. Pests and eggs can hitchhike on pruners, gloves, and your clothing.
- Soil and saucers matter: Do not share drip trays. Do not reuse the nursery potting mix elsewhere until the plant clears quarantine.
How long to quarantine new houseplants
Here is my practical rule that balances real life with good prevention.
- Minimum: 14 days. This often catches obvious issues and gives the plant time to show stress that can reveal pests.
- Best practice: 21 to 30 days. This window often covers multiple pest check cycles under typical indoor conditions, and it gives you more chances to spot thrips or spider mites that were hiding at first.
- If you bought from a big-box store or the plant looks stressed: Do 30 days.
- If you had a recent pest problem in your home: Do 30 days and be extra strict about distance, tool cleaning, and handwashing.
If you treat a plant during quarantine, restart the clock. Not because you failed, but because you are being kind to the rest of your plants.
One more honest note: even a perfect quarantine cannot guarantee you will catch every pest every time. Some infestations stay subtle, and life cycles vary with temperature and humidity. The goal is risk reduction, not perfection.
Where to place a plant in quarantine
Pick a spot that is inconvenient for pests, convenient for you, and gentle on the plant.
My favorite quarantine spots
- Bathroom with a window: Great humidity, easy wipe-down surfaces.
- Laundry room: Often bright enough, easy to keep separate.
- Spare bedroom: Works well if you can give decent light and keep the door closed.
Quarantine setup checklist
- Light: Bright, indirect light is safest for most plants while they adjust. Avoid scorching sun unless the plant truly loves full sun.
- A washable surface: Tile, a tray, or a plastic boot mat is perfect. You want to be able to wipe up fallen leaves and spilled soil.
- No shared drainage: Use a clean saucer. Empty it after watering.
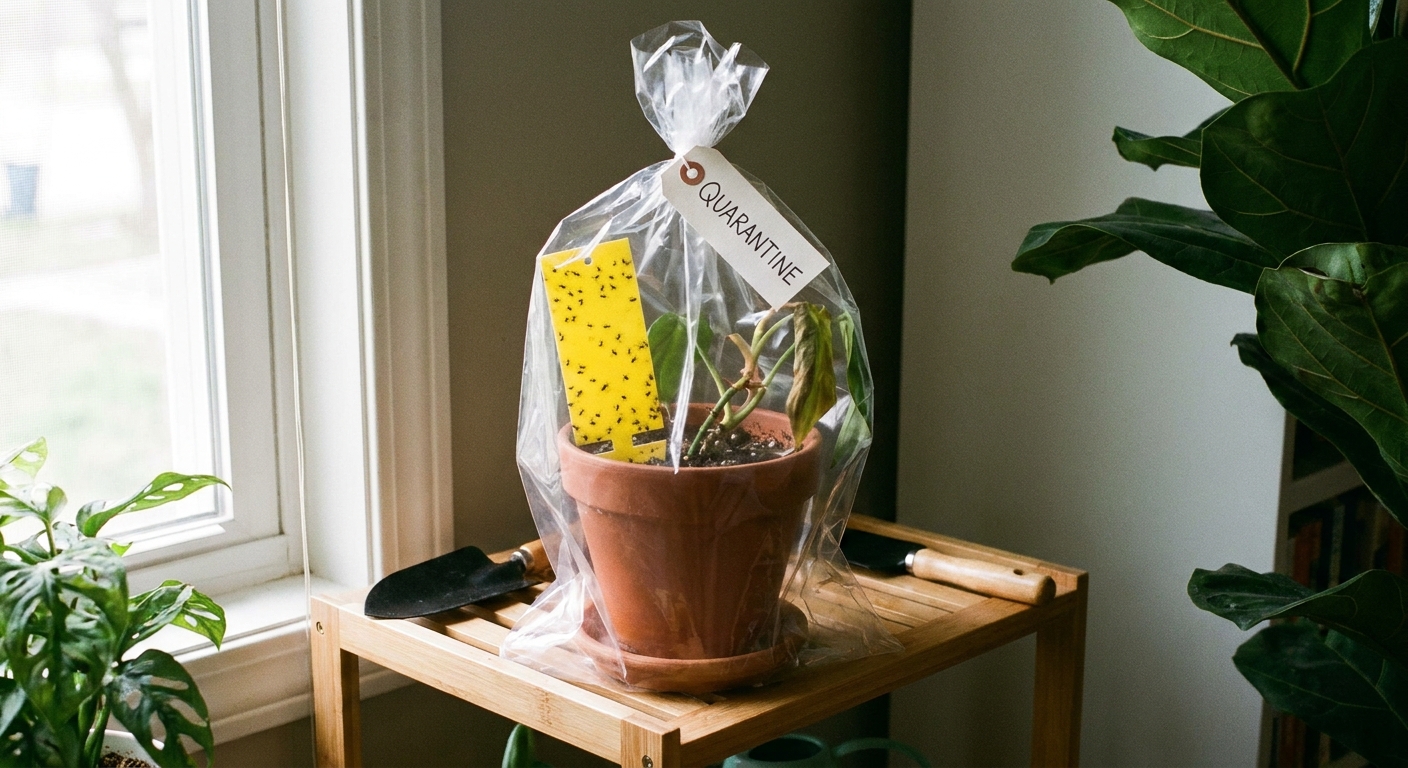
- Sticky traps: Optional but very helpful for monitoring fungus gnats and flying pests.
Your step-by-step quarantine workflow
This is the routine I use when a new plant comes home. It is gentle, thorough, and does not require fancy products.
Step 1: Keep the plant bagged until you reach the quarantine spot
If the plant came in a sleeve or bag, keep it on until you are in the isolation area. It is not a perfect barrier, but it reduces the odds of dropping hitchhikers along the way.
Small caution: do not leave it sealed up for long in heat or direct sun (like a hot car). Plants like air.
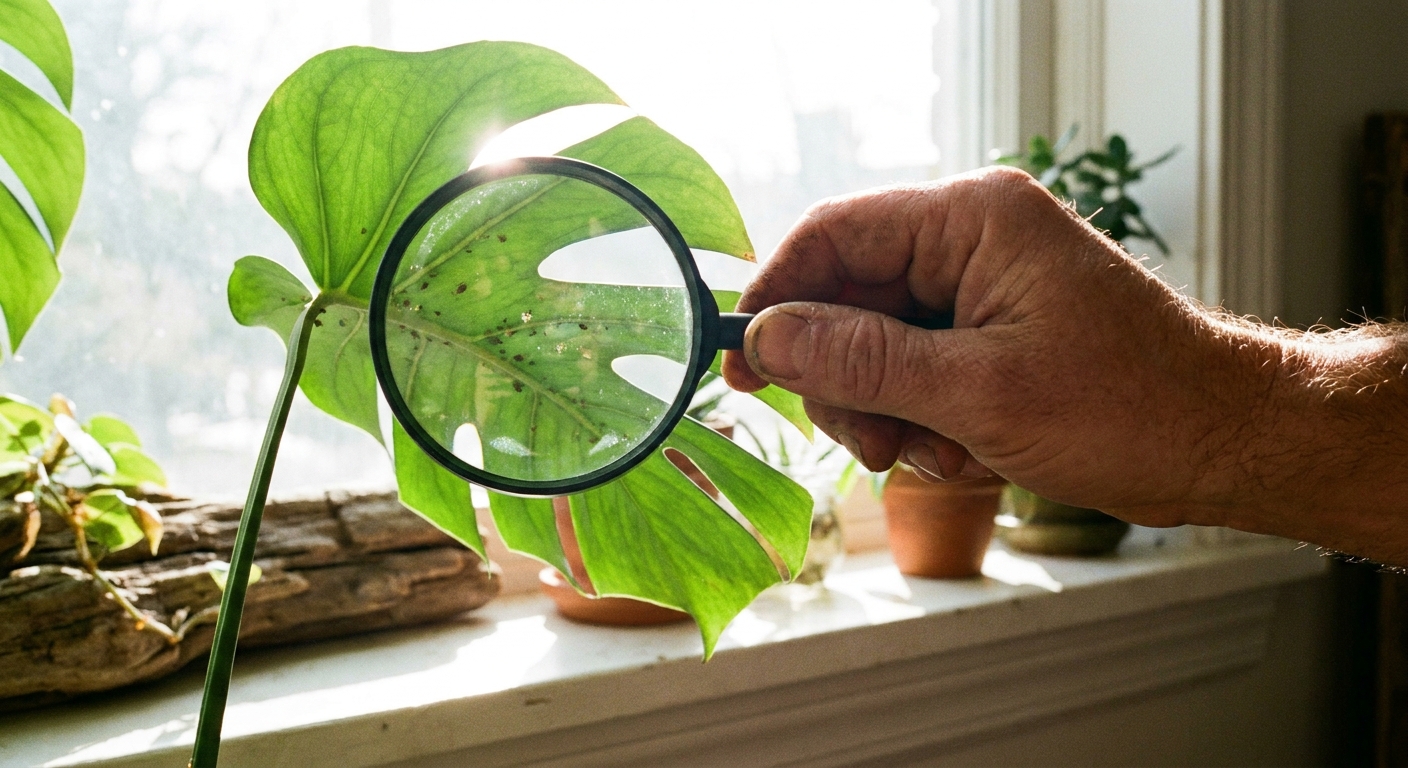
Step 2: Do a dry inspection in bright light
Before watering or misting, inspect while everything is dry. Many pests are easier to spot on dry leaves.
- Check the newest growth: Thrips love tender new leaves and buds.
- Check the undersides of leaves: Spider mites and their webbing often start there.
- Check leaf joints and stems: Mealybugs and scale hide in tight creases and along stems.
- Check the rim and drainage holes: Fungus gnat larvae live in soil, but adults often hang around the pot rim and surface.
Helpful tool: A small flashlight and a magnifying glass, or your phone camera zoom, makes a big difference.
Step 3: Remove obvious problem leaves and debris
Snip off yellowing leaves, damaged leaves, and any leaf litter sitting on the soil surface. This removes hiding places and reduces rot risk in quarantine.
Disinfect your snips afterward with rubbing alcohol (70% is a common, effective choice) or hot soapy water.
Step 4: Rinse if the plant can handle it
Many houseplants benefit from a gentle rinse in the shower or sink, especially smooth-leaved plants like pothos, philodendron, hoya, and rubber plants.
- Use lukewarm water.
- Aim the spray under leaves.
- Let the plant drain well.
Skip rinsing for plants that hate wet foliage (some fuzzy-leaved plants) or if the plant is already stressed and droopy. In that case, rely on careful inspection and targeted treatment if needed.

What to look for: common pests
These are the pests most likely to sneak in with new houseplants. You do not need to memorize every bug on earth. You just need to know the classic clues.
Thrips
- Clues on leaves: Silvery streaks, scarring, tiny black specks (frass), distorted new growth.
- Where to look: New leaves, leaf folds, flower buds, the tight center of rosette plants.
- What they look like: Tiny, slender insects, often tan, brown, or black. They move fast.
Spider mites
- Clues on leaves: Fine speckling (stippling), dull look, tiny pale dots, webbing between stems and along leaf undersides.
- Where to look: Undersides of leaves, especially in warm, dry conditions.
- Easy test: Tap a leaf over white paper. Moving pepper-like specks can indicate mites.
Mealybugs
- Clues on leaves: Cottony clusters, sticky residue (honeydew), ants if the plant was outdoors or near an open window.
- Where to look: Stem joints, leaf axils, under pots, along the midrib under leaves.
- What they look like: White, fuzzy, slow-moving bugs that look like little bits of lint.
Scale
- Clues on leaves: Small, stuck-on bumps that do not wipe away easily, sticky residue (honeydew), leaf yellowing over time.
- Where to look: Along stems and leaf veins, especially on sturdier plants like ficus, hoya, and citrus.
- What they look like: Brown, tan, or translucent bumps that look more like “plant texture” than insects. That is the trick.
Fungus gnats
- Clues: Tiny black flies that flutter up when you water, consistently damp soil, algae on soil surface.
- Where to look: Top inch of soil, drainage holes, nearby windows.
- What matters: Adults are annoying. Larvae mainly become a real problem for seedlings, cuttings, and stressed plants in consistently wet soil.

Timing: water, repot, fertilize
The goal in quarantine is stability. A stressed plant is more vulnerable to pests, and stress symptoms can also mimic pest damage. Here is how I pace things.
Watering
- Do not auto-water on day one just because it is new. Check the soil moisture first.
- Water only when appropriate for that plant type, and empty saucers after.
- If fungus gnats are suspected: Let the top 1 to 2 inches dry between waterings if the plant tolerates it, and use sticky traps to monitor adults.
Repotting
Repotting is optional during quarantine, not mandatory.
- Repot early if the nursery soil is soaking wet, smells sour, is full of mushrooms, or the plant is severely rootbound and drying out too fast.
- Wait 1 to 2 weeks if the plant looks healthy but just needs time to acclimate. Let it settle, then repot if needed.
- If you saw pests: Consider repotting after you knock down the infestation, because eggs, crawlers, and larvae can hide in crevices and old soil.
Fertilizing
Hold off for at least 2 to 4 weeks. Most new plants are already fertilized, and pushing growth during quarantine can make thrips especially happy.
Optional: gentle preventive care
Some plant parents prefer to treat everything proactively. Others only treat when they see a confirmed pest. Both approaches can work. If you want a low-drama middle ground, stick to gentle, targeted steps.
- Wipe-down: For sturdy, smooth leaves, wipe tops and undersides with a damp microfiber cloth. Add a drop of mild soap to a bowl of water if the plant tolerates it, then wipe again with plain water.
- Spot-treat mealybugs and some scale: Dab visible pests with a cotton swab dipped in 70% isopropyl alcohol. Avoid broadly “spraying down” sensitive plants with alcohol.
- Rinse and repeat: A weekly rinse during quarantine can be surprisingly effective against mites and early thrips populations on many plants.
Note: Always test any soap, oil, or alcohol on one leaf first and wait 24 hours. Plants can be picky, and I respect that.
Safety note: Do not mix DIY treatments (soap + oil + alcohol + whatever you saw online). If you use any pesticide or labeled product, follow the label directions, ventilate the space, and keep it away from kids and pets.
Simple hygiene habits
This is the unglamorous part that makes quarantine actually work.
- Wash your hands after handling the quarantine plant (or use hand sanitizer in a pinch).
- Avoid brushing your clothes against your main collection right after you inspect a quarantined plant. If you are deep in pest drama, consider a dedicated apron or “plant shirt.”
- Keep a small cleaning routine: Wipe the quarantine surface occasionally and vacuum or sweep up spilled soil and fallen leaves.
Biocontrol note
If a plant arrives with beneficial insects (like predatory mites) or you plan to use them, quarantine still matters. Just choose treatments carefully, because many sprays and soaps can harm the helpers you are trying to keep.
Monitoring schedule
Quarantine works because you check more than once. Many pests are excellent at hiding on day one.
Day 1
- Inspect in bright light
- Remove damaged leaves
- Rinse if appropriate
- Set up sticky trap if you want monitoring
Days 3 to 5
- Re-check undersides and new growth
- Look for fresh speckling, silvering, webbing, or sticky spots
- Watch for flying gnats when you disturb the pot
Week 2
- Inspect again, slower this time
- Rotate the pot and check the back side of the plant
- Check along stems and petioles for mealybugs and scale
Weeks 3 to 4 (ideal)
- Continue weekly checks
- If all is clear, plan the move into your collection
Not pests: common quarantine surprises
Quarantine can reveal issues that look dramatic but are not bugs.
- Acclimation leaf drop: A plant may shed an older leaf or two after a move. Annoying, but normal.
- Transport damage: Creases, bruises, snapped stems, and torn leaves often show up a day later.
- Edema: Small blisters or corky spots can happen when watering and airflow change quickly, especially on thicker leaves.
If the pattern is not spreading and you do not see pests after a couple inspections, it may be plain old adjustment.
When it is safe to end quarantine
Your plant can graduate quarantine when all of the following are true:
- No visible pests (including on undersides and stem joints)
- No new damage patterns appearing on fresh growth
- No webbing, cottony clusters, sticky residue, black specks, or stuck-on bumps
- Sticky traps (if used) stay mostly clear for 1 to 2 weeks
- The plant looks stable after at least 14 days, ideally 21 to 30
If you are on the fence, extend quarantine by one more week. One extra week is still easier than treating every plant you own.
If you find pests during quarantine
First, take a breath. This is exactly why we quarantine.
Quick response plan
- Isolate harder: Move the plant even farther away if possible.
- Confirm the pest: Look carefully before choosing a treatment. Thrips, mites, scale, and mealybugs require different approaches.
- Remove the worst parts: Prune heavily infested leaves if the plant can spare them.
- Treat consistently: Most pest control is about repetition, because eggs hatch in waves.
- Restart the quarantine clock: Count 14 to 30 days from your last sighting or last treatment, depending on severity.
If the infestation is severe and the plant is inexpensive or easily replaced, it is okay to let it go. Sustainability includes protecting your time and sanity too.
Common mistakes
- Putting the new plant next to “just one” existing plant: Pests do not respect friendships. Use a separate room if you can.
- Sharing watering cans and tools without cleaning: Quick alcohol wipe or a hot soapy rinse is enough.
- Overwatering in quarantine: Stress plus soggy soil is an open invitation to fungus gnats and root rot.
- Skipping the undersides of leaves: That is where the drama lives.
- Assuming one inspection is enough: Quarantine is a process, not a glance.
Quarantine kit
You can quarantine with almost nothing. But if you want a small kit that makes it easy, here is what I keep on hand:
- Yellow sticky traps
- 70% isopropyl alcohol and cotton swabs (great for spot-treating mealybugs and some scale)
- A flashlight or headlamp
- Magnifying glass or phone camera zoom
- Microfiber cloths
- A washable tray or boot mat for the quarantine spot
- Clean pruners plus alcohol for quick disinfecting
Quarantine in 5 bullets
- Separate room with a door if possible. If not, go as far away as you can.
- Inspect dry in bright light, especially undersides and new growth.
- Keep tools, saucers, and hands clean.
- Monitor at least weekly for 2 to 4 weeks.
- If you treat, restart the clock.
One last gentle reminder
If quarantine feels like a lot, remember this: you are not being paranoid. You are being kind to the plants you already have.
And if you ever miss something and pests slip through anyway, welcome to the club. Plants are living things, and we are all learning. The win is that now you have a calm system to fall back on.