Propagate Snake Plants
Snake plants are the houseplant equivalent of that friend who never misses a flight. Tough, calm, and oddly reassuring. The best part is that once you learn propagation, one plant can turn into many with very little drama.
In this guide, I will walk you through three reliable methods: leaf cuttings in water, leaf cuttings in soil, and division. I will also be honest about timelines (snake plants move at their own slow pace), how to avoid the classic mushy cutting situation, and the one method you need if you want to keep variegation.
Before you start
Best time to propagate
Spring through early summer is easiest because the plant is naturally in growth mode. You can propagate in winter too, but expect slower rooting and more chances of rot if your home is cool and dim.
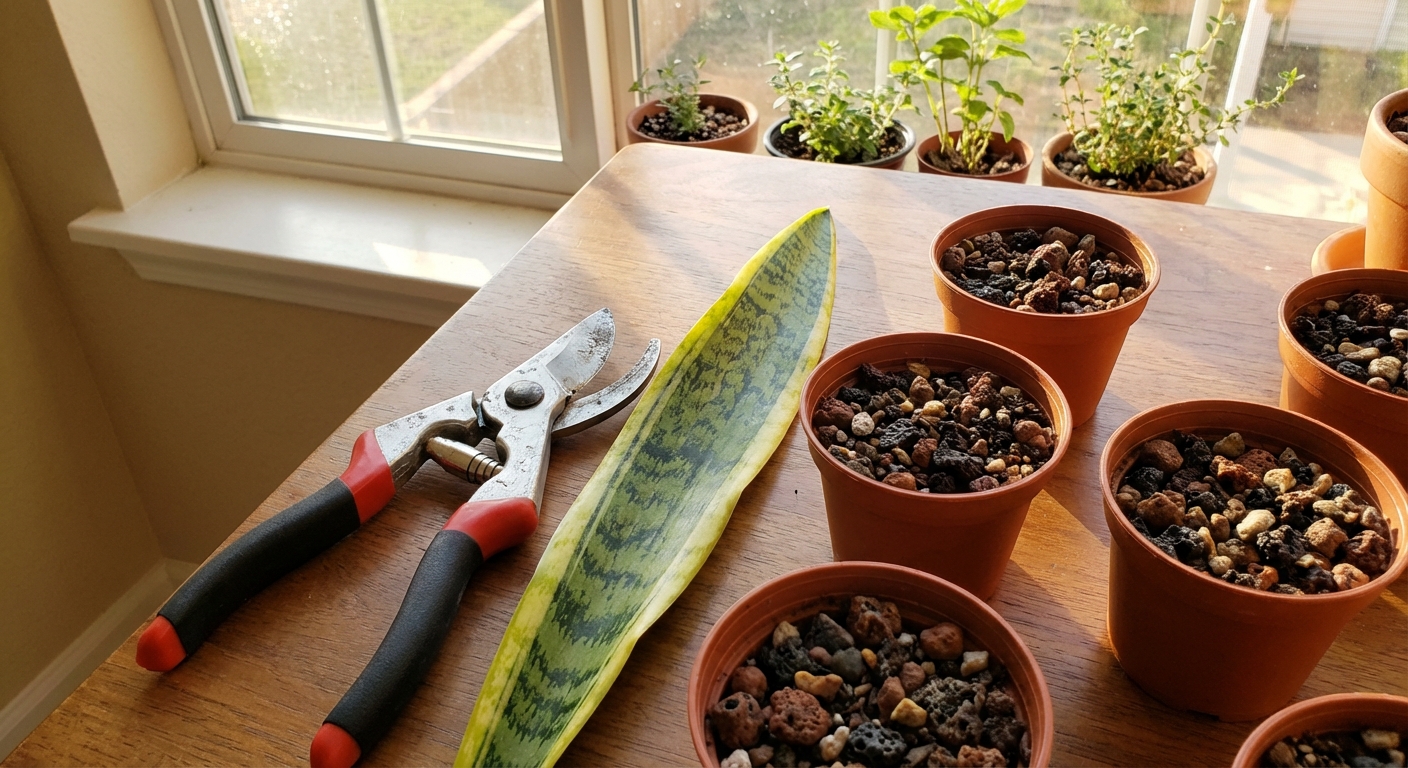
What you need
- Healthy snake plant (Sansevieria, now often classified as Dracaena trifasciata)
- Clean scissors or pruners
- Rubbing alcohol or soap and hot water (for tool cleaning)
- Small pots with drainage holes
- Gritty, fast-draining mix (more on that below)
- Optional: rooting hormone powder, cinnamon (not a hormone, but can help keep cuts drier), small jar for water propagation
Choose the right potting mix
Snake plants hate sitting in wet soil. For propagation, I like a mix that drains quickly but still holds a little moisture near the cutting.
- Easy DIY mix: 2 parts cactus/succulent mix + 1 part perlite or pumice
- Even grittier option: 1 part potting mix + 1 part perlite/pumice + 1 part orchid bark
If your mix feels fluffy and airy in your hand, you are in the right neighborhood.
A quick note on toxicity
Snake plants are mildly toxic if chewed. If you have pets or toddlers who snack on greenery, keep cuttings and newly potted starts out of reach.
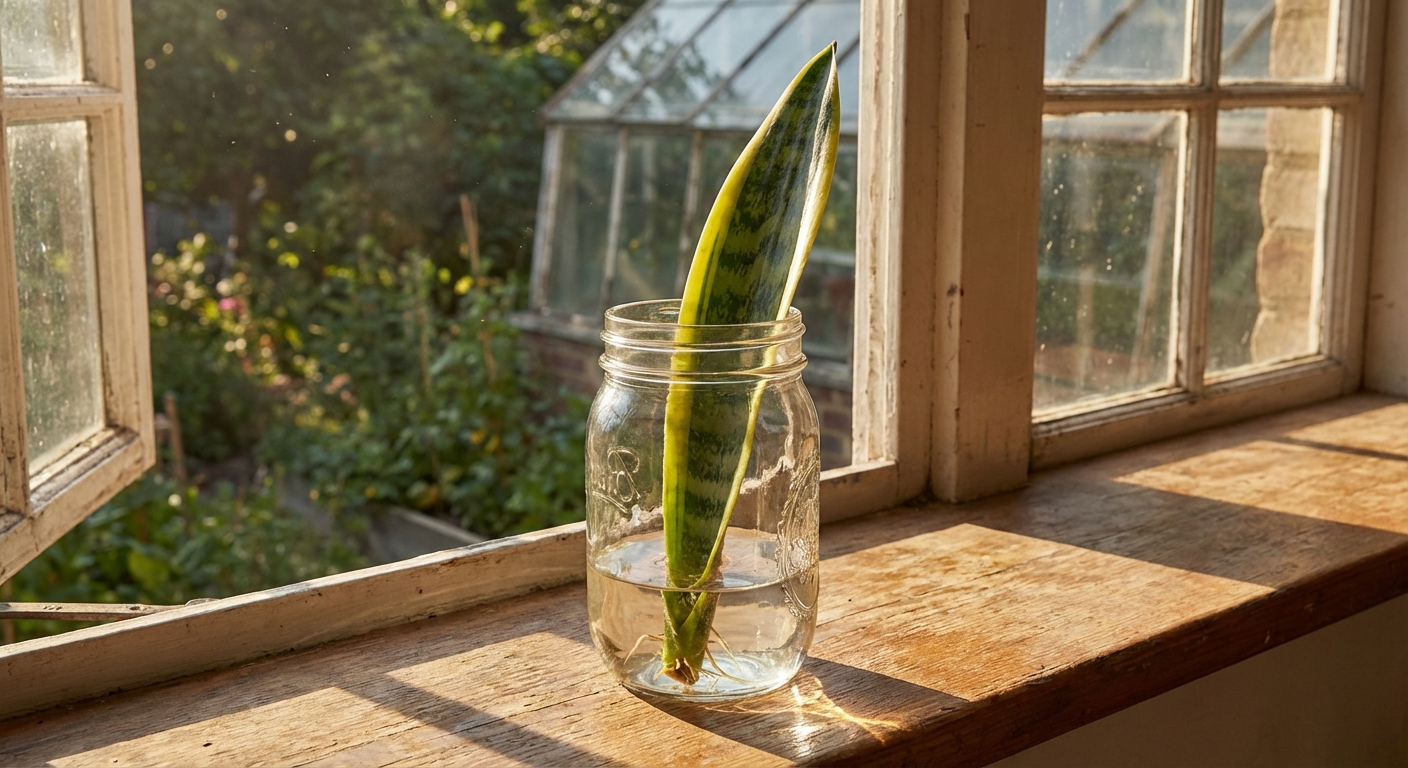
Propagation method 1: Leaf cuttings in water
Water propagation is satisfying because you can watch things happen. It is also a little riskier for rot if you keep the water too high or too stale. If you are a chronic over-waterer, consider soil propagation instead.
Step-by-step
- Pick a healthy leaf. Choose a firm, mature leaf with no mushy base and no active pests.
- Make a clean cut. Cut near the soil line. Then cut the leaf into sections 3 to 6 inches long.
- Keep the orientation. This part matters: the end that was closest to the soil must go in the water. If you flip it, it will usually fail. I like to cut a small V shape notch at the bottom of each segment so I never forget which end is down.
- Let cuts callus. Set the segments out in a dry spot for 24 to 48 hours so the cut ends seal slightly. This reduces rot.
- Place in water. Add just enough water to cover the bottom 1/2 to 1 inch of the cutting. More water is not better.
- Bright, indirect light. A spot near a window is perfect. Avoid harsh, hot direct sun that can cook the jar and encourage algae.
- Change water regularly. Refresh every 5 to 10 days, or sooner if it looks cloudy.
Timeline expectations
- Week 1 to 3: Not much to see. This is normal.
- Week 4 to 10: Roots often begin forming, especially in warm, bright homes.
- Week 8 to 16+: Tiny pups may start at the base. Sometimes it takes longer.
Snake plant propagation is not instant gratification. Think “slow simmer,” not “microwave.”
When to move from water to soil
Pot up when you have a small cluster of roots, ideally at least 1 to 2 inches long. If you wait for a massive tangle of water roots, the transition can be bumpier because water roots and soil roots behave differently.
How to pot up water-rooted cuttings
- Use a small pot with drainage (2 to 4 inches is plenty at first).
- Fill with pre-moistened gritty mix, not soaking wet.
- Plant the cutting about 1 inch deep and firm the soil gently.
- Wait 3 to 5 days before the first watering to let any minor root damage settle.
Propagation method 2: Leaf cuttings in soil
If you want the simplest, lowest-fuss route, soil propagation is my favorite. It is also less likely to produce slimy ends, especially in cooler homes.
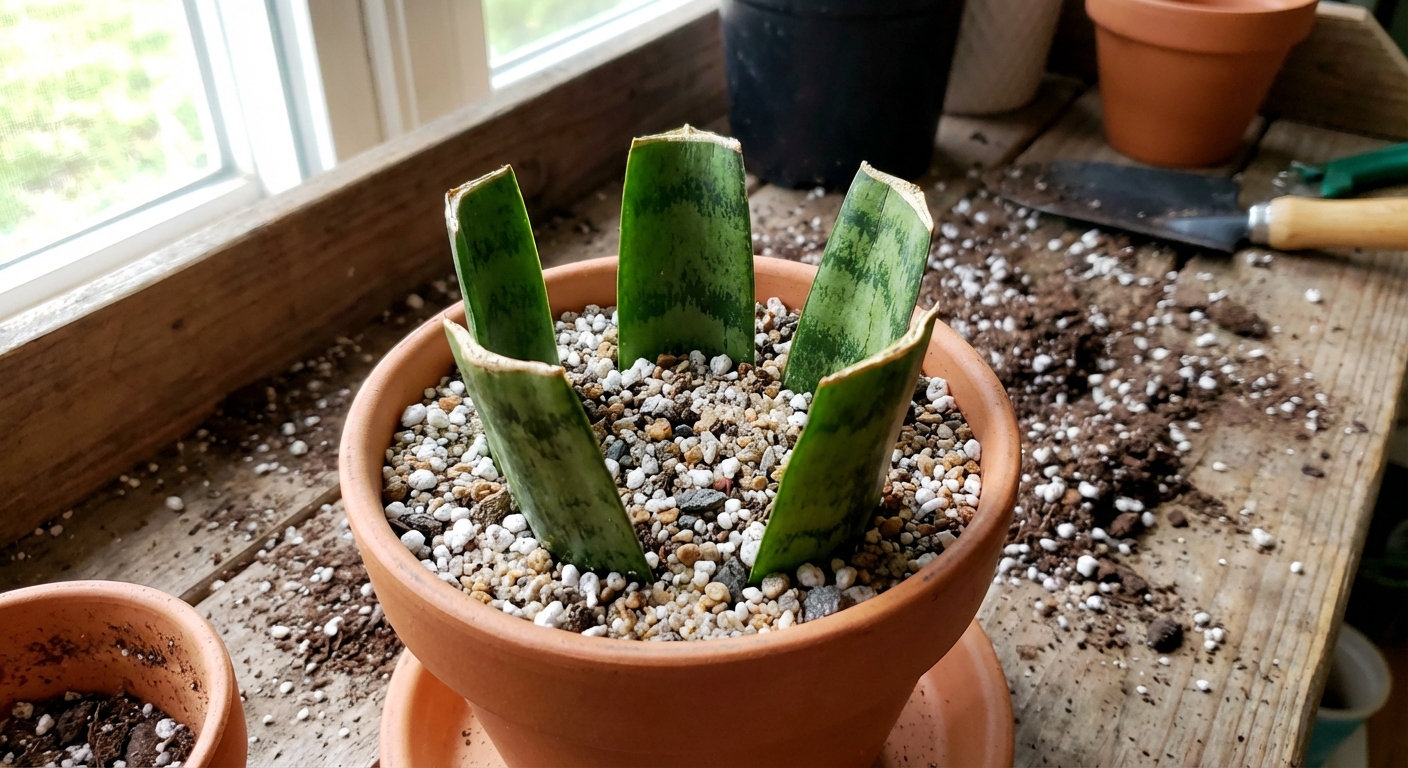
Step-by-step
- Cut healthy leaves into segments 3 to 6 inches long.
- Mark the bottom end (or use the V cut method) so you do not plant upside down.
- Callus the cuttings for 24 to 48 hours in a dry place.
- Plant in gritty mix. Insert each segment about 1 inch deep. Keep them upright.
- Water lightly once. After planting, water just enough to settle the soil, then let it dry well.
- Place in bright, indirect light. Warmth helps. A room around 70 to 80°F (21 to 27°C) is ideal.
How often to water soil cuttings
This is where most cuttings fail. A cutting has no roots at first, so it cannot drink much. Wet soil plus a wound equals rot.
- Let the pot dry out almost completely between waterings.
- In many homes, that means watering every 2 to 4 weeks while rooting.
- If you are unsure, wait a few more days. Snake plants forgive drought far more than soggy feet.
Timeline expectations
- Month 1: The cutting may look unchanged. That is okay.
- Months 2 to 4: Roots often form.
- Months 3 to 6+: Pups begin emerging from the soil near the cutting.
Once pups appear, you are officially in business. At that point, treat the pot like a normal snake plant: water only when the mix is dry and give it bright light for faster growth.
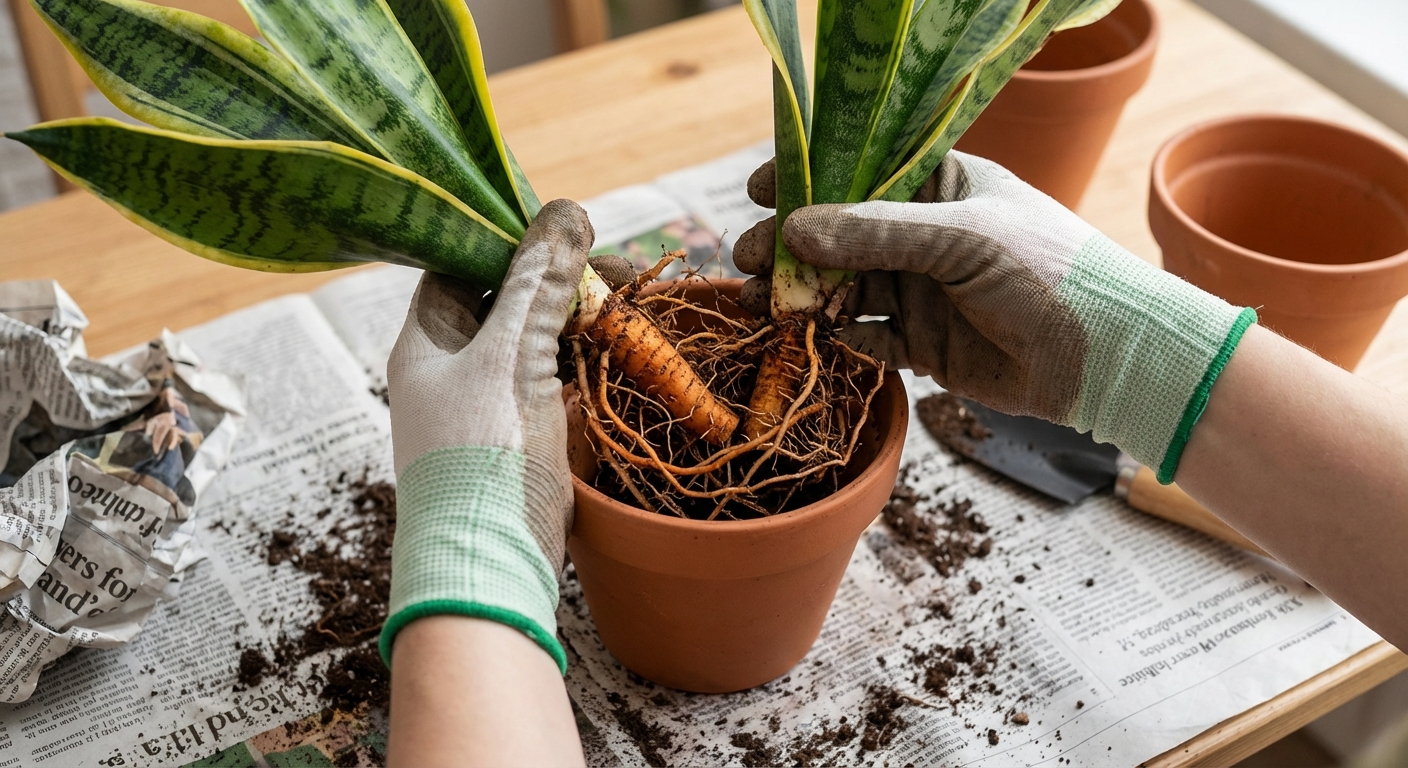
Propagation method 3: Division (the fastest and best for variegation)
Division is the method I recommend if you want a new plant that looks exactly like the parent, especially for variegated varieties like ‘Laurentii’ (yellow edges) or ‘Moonshine’ (silvery leaves).
Important: Most variegated snake plants do not reliably keep their variegation from leaf cuttings. Leaf cuttings often revert to solid green because the variegation is tied to specific tissue layers that do not reproduce the same way from a leaf segment. Division keeps the original rhizome structure, so the new plant stays true.
When to divide
- The pot is crowded and the plant is pushing against the sides
- You see multiple rosettes (clusters of leaves) and want to split them
- The plant has pups with their own roots forming
Step-by-step
- Water a few days ahead (optional). Slightly hydrated roots are more flexible, but do not divide a soaking-wet pot.
- Remove the plant. Tip the pot and slide it out. Loosen soil so you can see the rhizomes (the thick horizontal stems).
- Identify natural sections. Look for clumps with their own roots and at least one strong growth point.
- Separate. You can gently pull sections apart. If the rhizome is stubborn, use a clean knife to cut it.
- Let cuts dry. If you had to cut rhizomes, let the sections sit out for a few hours to a day so the cut surfaces dry slightly.
- Pot up. Use snug pots with drainage and gritty mix. Plant at the same depth as before.
- Hold off on watering. Wait 5 to 7 days, then water lightly. Resume normal watering once you see new growth.
Timeline expectations
- Immediately: You have “new” plants the same day.
- Weeks 2 to 6: Roots re-establish and the plant settles in.
- Months 1 to 3: New growth usually resumes, faster with bright light.
How to maintain variegation (and what to expect)
If your snake plant has stripes, edges, or unique coloring and you want the babies to match, here is the simple rule:
- Use division for true-to-parent plants.
- Leaf cuttings can revert to green. This is very common with ‘Laurentii’ and other variegated types.
If you do leaf cuttings anyway, treat it like a fun experiment. You might get solid green pups that are still gorgeous and just as hardy. They are simply not clones of the variegated parent.
Light helps variegation look its best. Even a variegated plant can look duller in low light. Bright, indirect light keeps colors crisper, but do not roast it in harsh sun.
Common problems (and how to fix them)
Mushy, black, or smelly cuttings
This is rot, and it is almost always too much moisture plus not enough air circulation, warmth, or callusing time.
- Cut away all mushy tissue with a sterile blade until you reach firm, healthy flesh.
- Let the cutting dry and callus for 48 hours.
- Restart in fresh water (kept low) or fresh gritty soil.
- Keep warmer (above 70°F / 21°C if possible) and in brighter indirect light.
Cutting shrivels and wrinkles
A little wrinkling can happen while it is rootless. But severe shriveling usually means the cutting is dehydrating in a too-hot spot or the segment is too small.
- Move it out of hot direct sun.
- For soil cuttings, water a little more consistently, but still let the mix dry between waterings.
- Use larger leaf segments next time.
No roots after months
Slow is normal, but if you are truly stuck, check the basics.
- Light: Move to brighter indirect light.
- Temperature: Warmer rooms root faster.
- Orientation: Confirm the cutting is not upside down.
- Medium: Soil too dense or water too high invites failure. Go grittier.
White fuzzy growth on soil or cutting
This can be harmless mold from consistently damp conditions, but it is a signal to dry things out.
- Increase airflow.
- Let soil dry more thoroughly between waterings.
- Remove the top layer of soil if it is moldy and replace with fresh mix.
Pests while propagating
Mealybugs and spider mites occasionally hitch a ride. If you see cottony clumps or fine webbing, isolate the plant and wipe leaves with a cotton swab dipped in isopropyl alcohol (test a small area first).
When to repot new snake plants
Newly propagated snake plants do best in a snug pot. Too much extra soil stays wet longer, which slows rooting and increases rot risk.
Repot from a starter pot when
- Roots are circling the pot or coming out of drainage holes
- The plant dries out much faster than usual (a sign it is root-filled)
- You have multiple pups crowding the pot
How big to size up
Go up just 1 to 2 inches wider than the current pot. Snake plants like to be slightly tight.
Aftercare for fresh starts
- Light: Bright, indirect light is the sweet spot. Low light is tolerated, but growth slows.
- Water: Water only when the mix is dry most of the way down.
- Fertilizer: Wait until you see active new growth, then feed lightly in spring and summer (half strength is plenty).
Quick choose-your-method guide
- Want the fastest, most reliable results: Division
- Want to keep variegation: Division
- Want to watch roots grow: Leaf cuttings in water
- Want the lowest rot risk: Leaf cuttings in soil (with gritty mix and light watering)
If you are nervous, start with one cutting and one division. That way you get a sure win and a fun experiment at the same time. And if a cutting fails, you did not fail. You simply learned what that particular leaf was ready to do.