Propagate a ZZ Plant From Division, Leaflets, or Stem Cuttings
ZZ plants (Zamioculcas zamiifolia) are the patient gardener’s best friend. They forgive missed waterings, tolerate low light, and quietly put out glossy new growth when they are good and ready. Propagation is the same vibe: slow, steady, and surprisingly satisfying once you understand what is happening under the soil.
There are three reliable ways to propagate a ZZ plant at home:
- Division: separating existing thick, tuber-like rhizomes during repotting. This is the fastest way to get a bigger new plant.
- Leaflet (leaf) cuttings: rooting individual leaflets (the individual leaf segments along the stalk) until they form a tiny rhizome.
- Stem cuttings: rooting a section of stalk with multiple leaflets attached, which often forms a larger starter plant sooner than single leaflets.
Below, I will walk you through division first (quick wins), then both cutting methods, realistic timelines, and the common failure modes that trip up beginners, especially rot caused by cold, wet media.
Quick safety note: ZZ plants are toxic if ingested and the sap can irritate skin. Wear gloves if you are sensitive, and keep fresh cuttings away from pets and kids.

Before you start
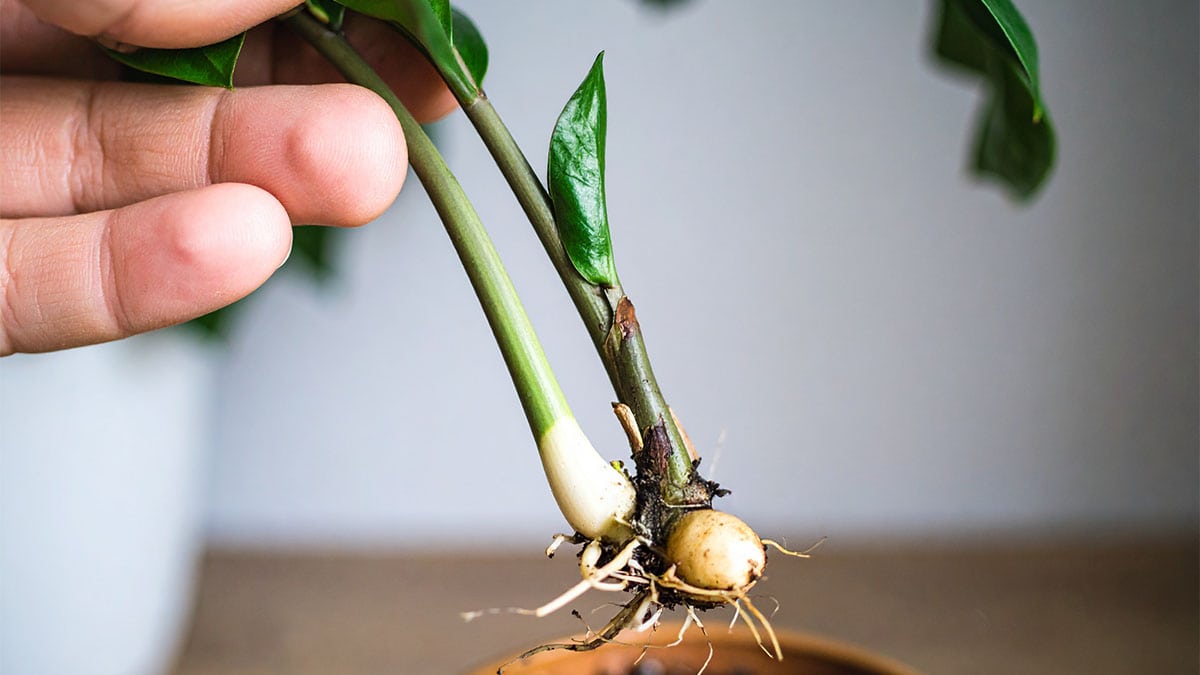
ZZ plants grow from rhizomes, which are thick, tuber-like storage structures that sit under the soil. When you propagate from a leaf or stem, you are not just making roots. You are waiting for a new rhizome to form. That rhizome is the battery pack that will eventually power new shoots.
This is why ZZ propagation takes longer than pothos or philodendron. The cutting often looks unchanged for weeks, even months, while it quietly builds that rhizome underground.
Tool tip: Use clean, sharp scissors or a blade. If you want to be extra careful, wipe the blade with rubbing alcohol before you cut.
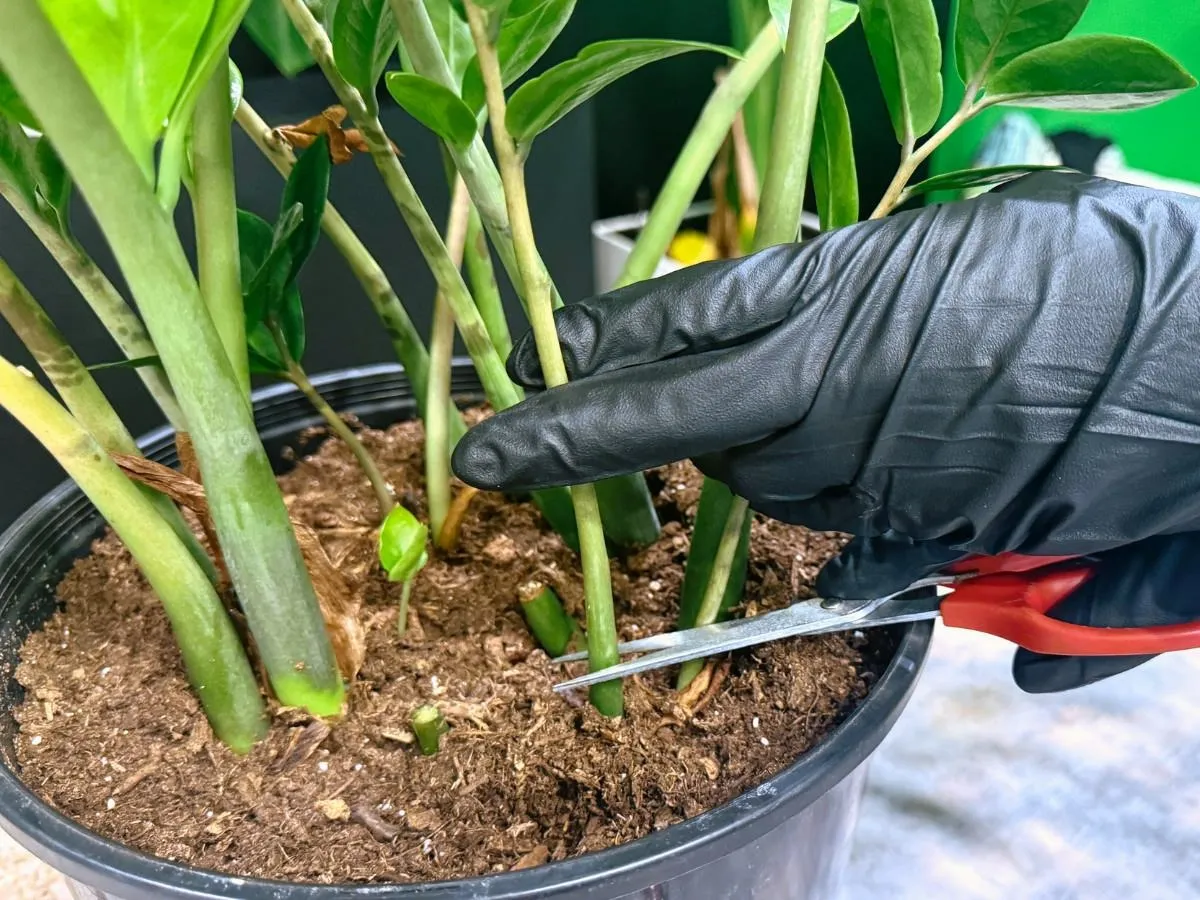
Division (fastest method)
When to do it
- When your ZZ is being repotted anyway.
- When the pot is crowded with multiple rhizomes and shoots.
- When you want a new plant that looks like a ZZ plant right away, not a single leaflet in a tiny pot.
How to divide
- Slide the plant out of the pot and gently shake or tease away loose soil so you can see the rhizomes.
- Find natural “clusters” where a group of shoots is attached to one or more rhizomes.
- Gently pull clusters apart. If they will not separate, use a clean knife to cut between rhizomes.
- Dust off broken bits, then let any fresh cuts dry for a few hours before potting (overnight is fine).
- Pot each division into a snug container with drainage holes and a fast-draining mix (see mixes below).
Aftercare
Water once to settle the mix, let it drain, then wait until the soil is mostly dry before watering again. Divisions usually bounce back faster than cuttings, but they still hate cold, wet soil.
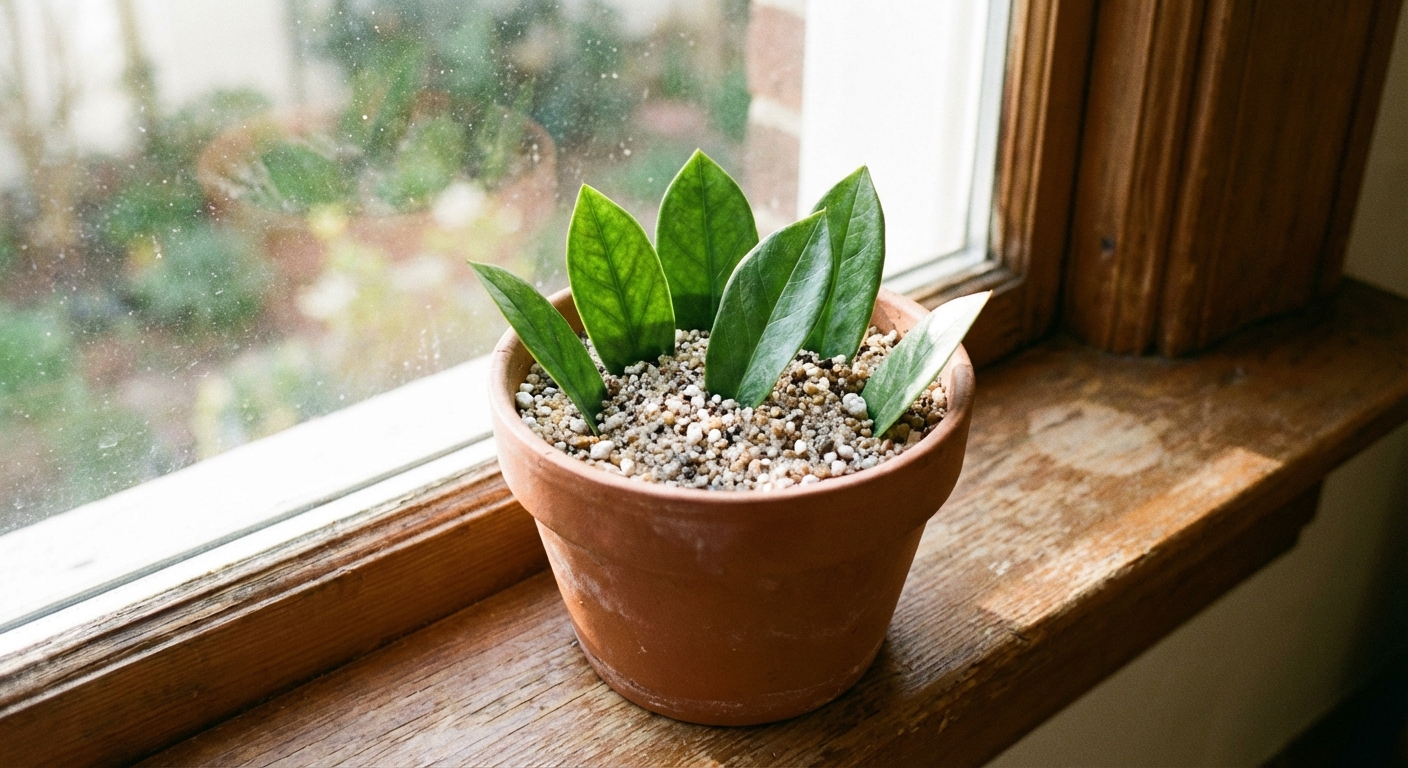
Leaflet cuttings (single leaflets)
Why choose this method
- Great if you only want to take a tiny bit from a plant.
- Low risk to the mother plant’s shape.
- Fun for experimenting and making lots of babies at once.
Downsides
- Slowest timeline.
- Highest risk of rot if the mix stays cold and wet.
- Each leaflet becomes a very small starter plant at first.
What to cut
Choose firm, healthy leaflets from a mature stalk. Avoid yellowing or soft leaflets. Use clean scissors or a sharp blade and take the leaflet where it connects to the stalk.
Let the cut end dry (recommended)
Set the leaflets on a clean plate or paper towel for 12 to 48 hours (longer if your home is humid). The cut end should feel dry, not tacky. Some people plant immediately into very gritty mix and do fine, but drying first is my go-to for reducing rot.
Beginner-friendly potting mix
Your goal is a mix that holds a little moisture but dries quickly and stays airy.
- Easy mix: 2 parts cactus or succulent mix + 1 part perlite
- DIY mix: 1 part potting soil + 1 part perlite + 1 part orchid bark (small grade)
Avoid heavy, peat-dense mixes on their own. They stay wet too long, especially in winter.
Container size
Small is your friend here. Use:
- 2 to 3 inch nursery pots for a few leaflets
- Or a 4 inch pot for 6 to 10 leaflets
Too much soil around a tiny cutting is a common beginner mistake. Extra soil stays wet longer and invites rot.
How to plant the leaflets
- Fill the pot with your mix and lightly tap it down. Do not pack it tight.
- Use a pencil or chopstick to make a small hole.
- Insert each leaflet cut end down, about 1/2 inch deep.
- Space them so air can move between leaflets.
- Water once to settle the mix, then let excess drain completely. Do not water again until the mix is mostly dry.
Humidity note: ZZ cuttings do not need high humidity, and soggy, still air can increase rot. If you tent a pot to help with shriveling, keep it loose and ventilate daily.
Stem cuttings (whole stalk or sections)
Why choose this method
- Often faster than single leaflets.
- Creates a larger starter plant sooner.
- Good option if a stalk broke or you are pruning leggy growth.
What to cut
Pick a healthy stalk with firm leaflets. You can propagate:
- One whole stalk (best success rate)
- Stalk sections if you want multiple cuttings (each section should include several leaflets and a solid piece of stalk)
Let the cut end dry (recommended)
Let the cut end dry for 24 to 72 hours. Thick stalks need longer than single leaflets. You are aiming for a dry, sealed cut surface. As with leaflets, some people plant immediately in very gritty mix, but drying first is a safer default.
Soil mix and container size
Use the same airy mixes as above. For stem cuttings, choose a pot that stabilizes the cutting but is not oversized:
- 4 inch pot for one medium cutting
- 5 to 6 inch pot for multiple cuttings
If the cutting wobbles, add a bamboo skewer for support. Movement can damage fragile new roots.
How to plant stem cuttings
- Lightly moisten the mix so it is evenly damp, not soggy.
- Make a hole and insert the stalk 1 to 2 inches deep (deep enough to stand upright).
- Firm the mix gently around the base.
- Water lightly, then let the pot drain fully. Then wait until the mix is mostly dry before watering again.
What to expect
Timeline for roots and rhizomes
Timelines vary a lot based on temperature, light, and how wet the mix stays. Cultivar matters too. Raven and variegated ZZ types are often slower. Here is a realistic range for most homes.
- Leaflet cuttings: roots often start in 4 to 10+ weeks, rhizome formation commonly in 2 to 6 months, first new shoot often 6 to 12+ months (and yes, sometimes over a year).
- Stem cuttings: roots often in 3 to 8 weeks, rhizome formation commonly in 1.5 to 4 months, first new shoot often 4 to 9 months (sometimes longer).
- Division: you already have rhizomes, so you skip the long “build a battery” phase. New growth can still take weeks to months, but the plant is established from day one.
If you are propagating in winter, tack on extra time. ZZ plants slow way down in cooler, darker months.
How you will know it is working
- The leaflet stays firm and green (not mushy).
- You may feel gentle resistance if you tug very lightly, but this can snap new roots, so be cautious.
- A more hands-off sign: the pot starts drying a bit faster over time, which often means roots are forming.
- Eventually, a tiny rhizome forms under the soil, followed by a new shoot.
My favorite trick is to use a nursery pot inside a cachepot. You can lift the inner pot to check drainage and weight without disturbing the cutting.
Light, warmth, and watering
Light
Bright, indirect light is ideal. ZZ plants tolerate low light, but propagation moves faster with more light. Avoid hot direct sun that can stress leaflets and overheat small pots.
Temperature
Warmth is your secret weapon. Aim for 70 to 80°F (21 to 27°C) if possible. The most common rot scenario I see is cold + wet, like a pot sitting near a drafty window in winter while the mix stays damp.
Watering rhythm
After the initial watering to settle the mix, let the pot dry down most of the way. Then water again. For many homes, that means watering every 2 to 4 weeks, sometimes longer in winter.
A simple test: lift the pot. If it still feels heavy, wait. ZZ cuttings prefer patience over fussing.
Common problems
1) Rot from cold, wet media
Symptoms: leaflet or stalk turns mushy, dark, translucent, or smelly at the base.
Causes: heavy soil, oversized pot, frequent watering, low temperatures, poor drainage.
Fix:
- Remove the cutting, trim back to healthy, firm tissue.
- Let it dry again for 24 to 72 hours.
- Repot into a smaller container with a grittier mix.
- Move to warmer, brighter indirect light.
2) Leaflets shrivel
Symptoms: wrinkled, dehydrated leaflet.
Causes: mix bone-dry for too long, very low humidity plus warm air, leaflets that were already stressed.
Fix: Water thoroughly once, then return to a slow dry-down. If you are in an extremely dry home, you can loosely tent the pot with a clear plastic bag for a week or two, but open it daily for airflow and keep the soil on the drier side to avoid rot.
3) Nothing happens for months
Symptoms: cutting looks unchanged, no visible growth.
Causes: normal ZZ behavior, low light, cool temps, disturbance from checking too often.
Fix: Give it brighter indirect light and warmth, and stop unpotting to check. Rhizomes form underground first.
4) Mold on the surface
Symptoms: fuzzy growth on soil surface.
Causes: overly wet mix, stale air, organic-heavy soil.
Fix: scrape off the top layer, add fresh dry gritty mix on top, increase airflow, and water less often.
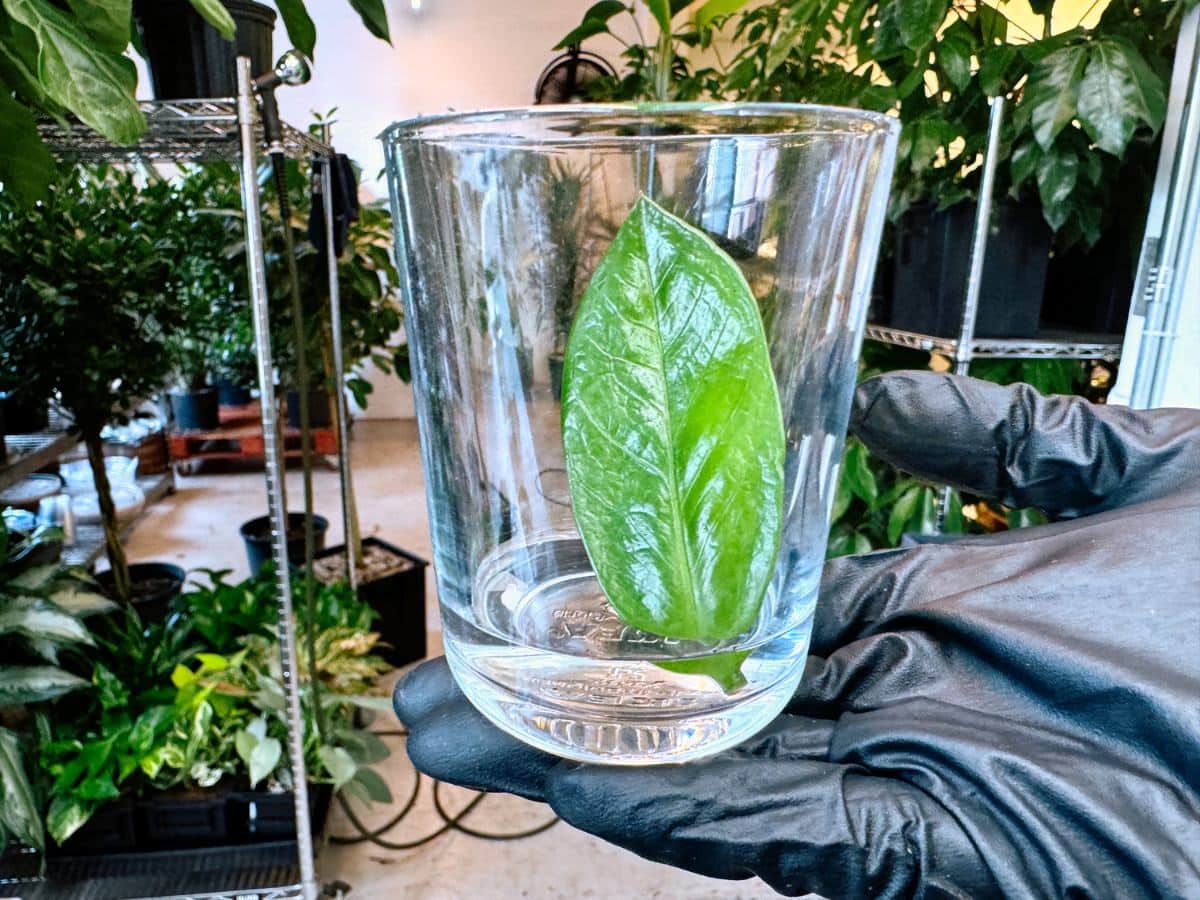
Water propagation
You can root ZZ stalks in water, but I rarely recommend it for beginners because it can make the transition back to soil trickier, and stagnant water can encourage rot. If you do try water propagation:
- Use a clean glass and change the water weekly (or sooner if it gets cloudy).
- Keep only the lower stalk in water, not the leaflets.
- Give it bright, indirect light and warmth.
- Move to a gritty soil mix once you have several inches of roots and, ideally, a small rhizome starting.
For most homes, soil propagation is steadier and lower maintenance.
When to pot up
Do not rush the upgrade. Pot up when:
- You see a new shoot emerging, or
- The cutting is firmly rooted and you can spot a small rhizome when you gently slide the root ball out, or
- Roots are circling the pot (more common with stem cuttings than single leaflets).
Move up just one size. For example, from a 3 inch pot to a 4 inch pot. Oversized pots hold too much moisture and slow everything down.
Quick checklist
- Pick your method: division for speed, cuttings for multiplication.
- Start with healthy material and a clean cut.
- Let cut ends dry first (recommended).
- Use a gritty, fast-draining mix.
- Choose a small pot with drainage holes.
- Bright indirect light, warm temps.
- Water sparingly and avoid cold, wet soil.
- Expect months, not days. The rhizome comes first.
If you want a little encouragement from someone who talks to her ferns: label your propagation pot with the date, then let it be. ZZ plants reward the gardeners who can sit on their hands.