Orchid Keiki: When to Remove and How to Pot It
If your orchid has surprised you with a tiny baby plant sprouting from a flower spike, take a moment to celebrate. That little hitchhiker is called a keiki (pronounced kay-kee), and it is one of the sweetest rewards in orchid growing. It is also the moment many plant parents freeze and whisper: “What do I do now?”
Let us turn that panic into a plan. Below, I will walk you through what a keiki is, when it is safest to leave it attached versus remove it, exactly how to pot it (with beginner-friendly sphagnum moss), and a week-by-week aftercare checklist. If your keiki is being stubborn about roots, I have troubleshooting for that too.
What is a keiki?
A keiki is a baby orchid plant that forms on the mother plant, usually on a flower spike (most common with Phalaenopsis, the classic grocery-store orchid). A keiki is genetically identical to the mother plant, so it will usually bloom the same color and shape, although growing conditions can affect bloom size and intensity and nature always keeps a few surprises in its pocket.
Keikis are influenced by a mix of factors: genetics (some orchids are simply more keiki-prone), plant hormones (especially cytokinin activity at a node), and growing conditions. Sometimes they show up after stress, sometimes on a strong plant with enough energy to multitask, and sometimes for reasons that remain firmly in the “orchids being orchids” category.
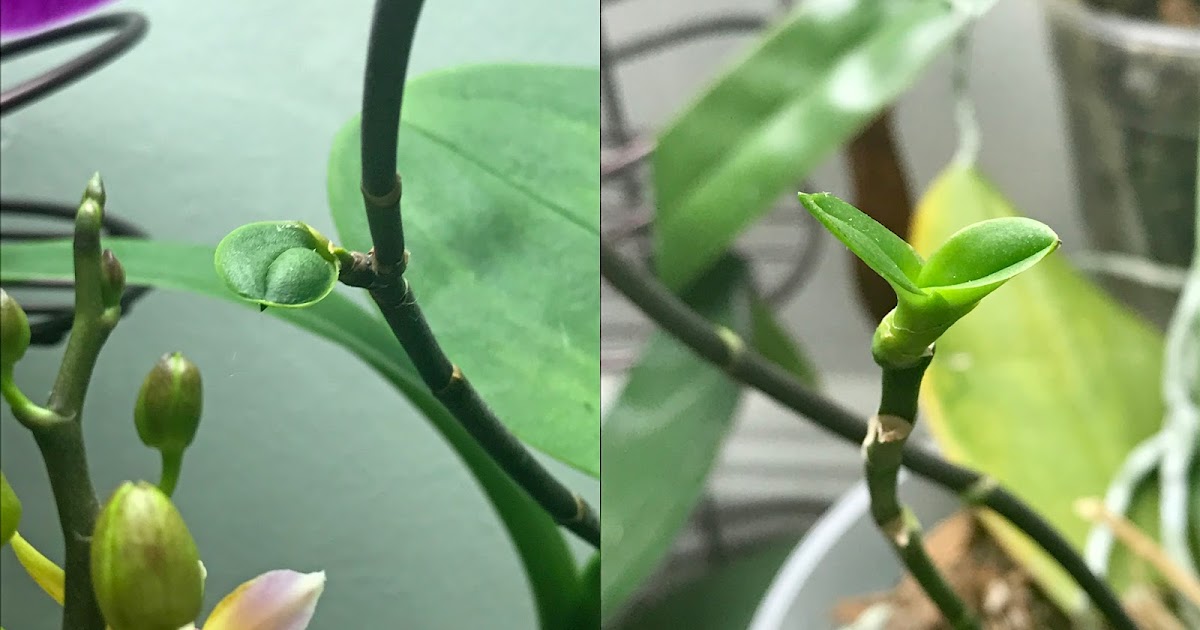
Keiki vs spike
- Keiki: looks like a tiny crown of leaves at a spike node, then develops roots that are thicker and silvery-green like typical orchid roots.
- New flower branch: emerges as a pointed green nub that elongates and makes buds, not leaves.
- Node swelling: a bump at a node that does not form leaves or roots for weeks.
Basal keiki caution
One important note, because it trips people up: some Phalaenopsis make a basal keiki (a new growth at the base of the plant, down near the crown). Basal keikis are often better treated as part of the same plant. Do not rush to separate a basal keiki. It may share roots and tissue with the mother, and separation can harm both. This guide focuses on the more common spike keiki growing on a flower spike.
Leave it or remove it?
The safest default is this: leave the keiki attached until it has enough roots to feed itself. Being attached is like having an umbilical cord. The mother plant can support the keiki while it builds roots and learns to live on its own.
When to leave it
- Roots are short or absent. If you see only nubs or no roots at all, keep it attached.
- The keiki has fewer than 2 to 3 leaves. Leaves help it photosynthesize, which powers root growth.
- The mother plant is healthy. If mom has firm leaves and active roots, she can usually support a keiki for a while.
- You cannot keep warmth and humidity steady. If your indoor air is very dry or temperatures swing, waiting can improve survival.
When to remove it
There are two popular readiness guidelines in the orchid world, and it helps to know both:
- “Rule of Threes” (common standard): 3 leaves, 3 roots, each about 3 inches (about 7 to 8 cm) long.
- “3-2-2-ish” (a flexible minimum): 3 leaves and at least 2 roots that are each 2 to 3 inches (about 5 to 8 cm) long, plus the ability to provide higher humidity while it settles in.
Think of these as guidelines, not laws. More roots is always better, and patience usually wins. That said, some growers separate earlier with excellent humidity and careful aftercare.
- The keiki is top-heavy and tipping the spike. A large keiki can stress or snap the spike.
- The mother plant is declining. If the mother is struggling, separating can reduce the burden, but only do this if the keiki has roots to stand on.
- The spike is yellowing past the keiki. If the spike is dying back, the keiki may lose support soon.
If the spike is dying and the keiki has no roots
This is the stressful one. If the spike is fading and the keiki is still rootless, your best move is often to leave it attached as long as any green tissue remains and improve conditions: brighter indirect light, steady warmth, and higher humidity (with airflow). If the spike is still flexible enough to reach a pot, you can also nest the keiki against damp sphagnum while it is still attached. More on that in the FAQ.
Supplies
Keep it simple. Keikis do best when the potting setup stays lightly moist, airy, and stable.
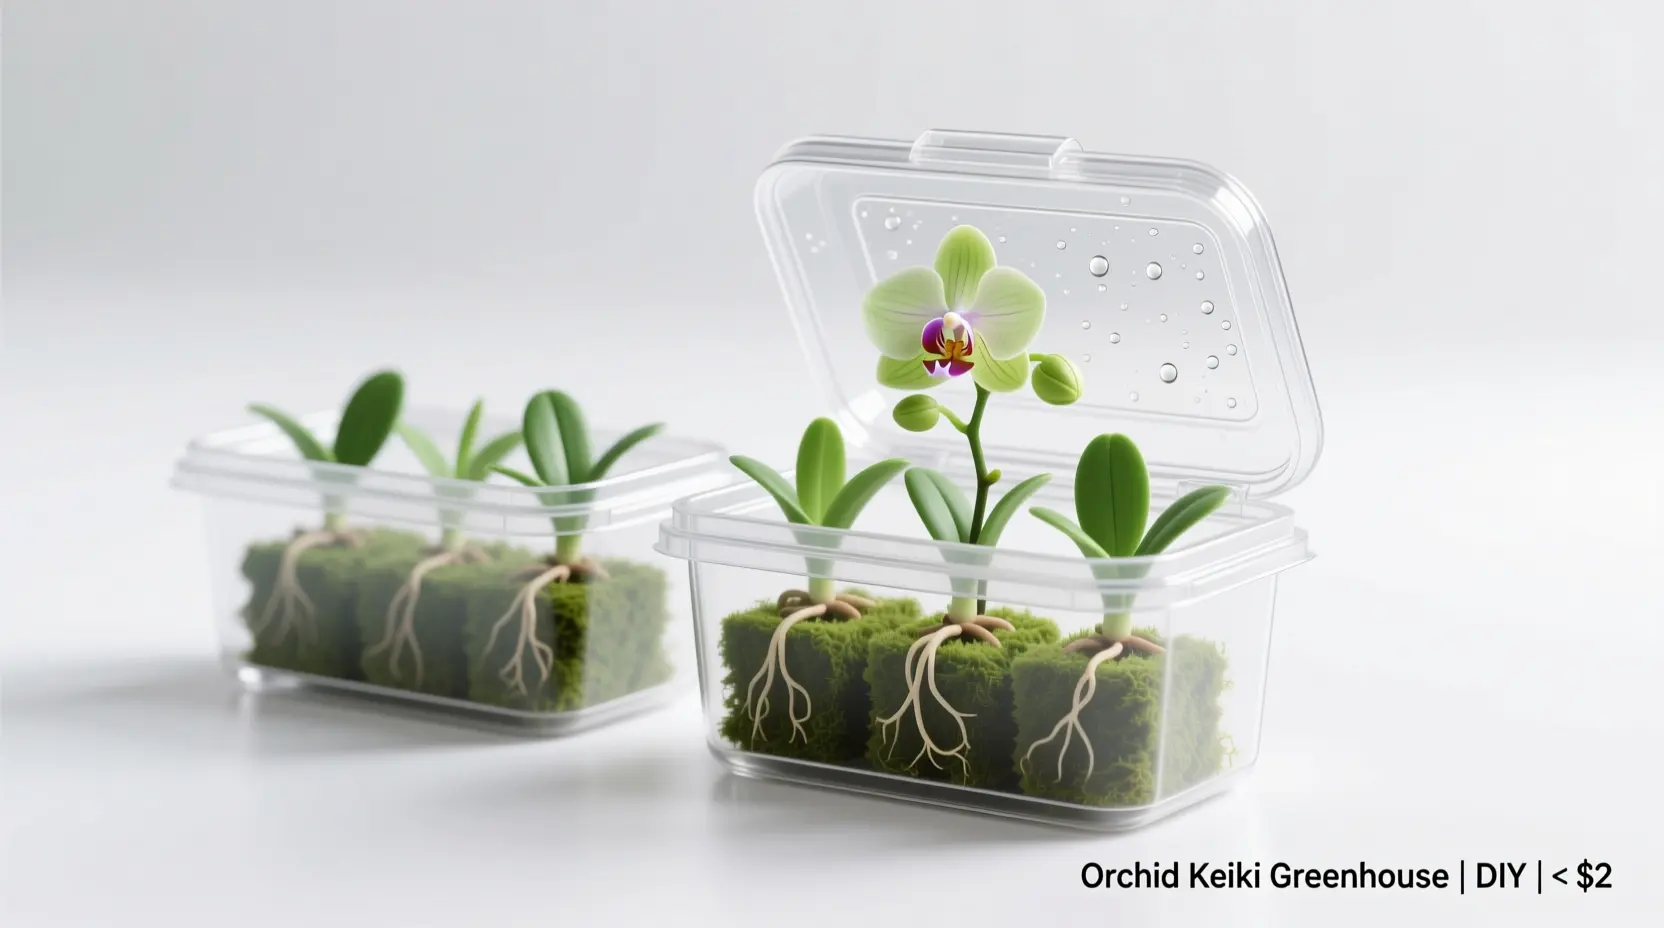
Pot and media
- Small clear pot (2 to 3 inch, about 5 to 8 cm). Clear plastic helps you monitor root health and moisture.
- Long-fiber sphagnum moss (high-quality, not dusty). This is ideal for keikis because it holds moisture without smothering when used loosely.
- Optional: a few bits of fine orchid bark or perlite mixed into the moss for extra air.
Tools and hygiene
- Sterilized snips or a razor blade (wipe with isopropyl alcohol).
- Cinnamon powder (optional) to dab on cut spike ends only. Avoid getting cinnamon on living roots because it can be drying. Also, a little goes a long way. Overdoing it can slow healing.
- Gloves (optional) and a clean paper towel.
Helpful extras
- Humidity support: a clear storage bin, a large clear bag, or a mini greenhouse setup.
- Stake or soft plant tie to stabilize a wiggly keiki.
- Spray bottle for light misting of moss surface.
Best timing
Indoors, “season” is less strict than outdoors, but timing still matters. The best time is when:
- your home is warm and bright (often spring through early fall),
- the keiki has active root tips (bright green tips are a great sign),
- the mother plant is not in major stress, and
- you can keep humidity steady for a few weeks.
If your keiki is ready during a dry spell (hello, winter heat), you can still do it. You will just want to lean harder on humidity control, gentle watering, and airflow.
How to remove it
Step 1: Hydrate first
Water the mother orchid the day before, or soak the roots briefly the same day. Hydrated roots are more flexible and less likely to crack.
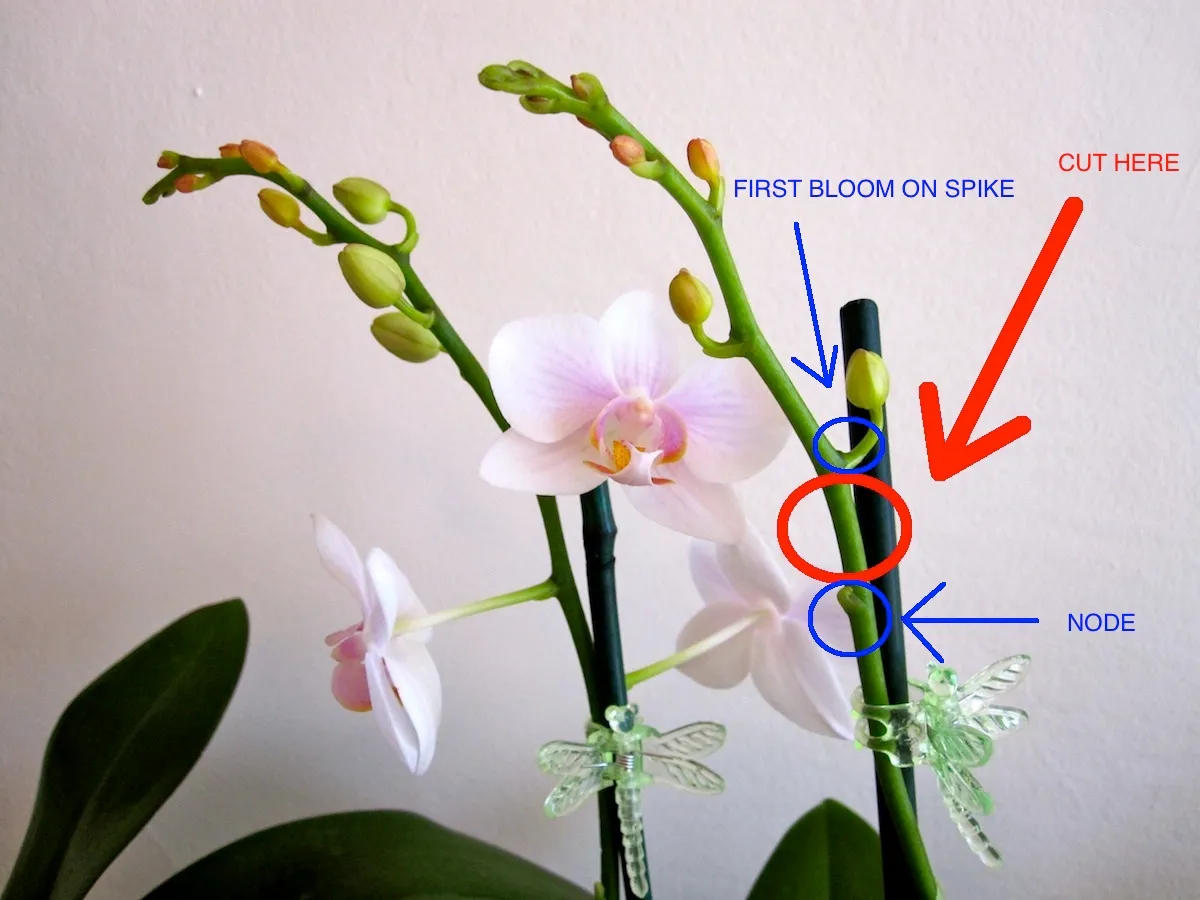
Step 2: Find the attachment point
Most Phalaenopsis keikis grow from a node on the flower spike. Many growers cut the spike about 1 inch below and 1 inch above (about 2.5 cm) the keiki, keeping a small spike “handle” attached to the baby for stability while potting.
If you prefer a cleaner setup, you can cut closer. Either way is fine. The key is this: watch the leftover spike piece in the pot. If it starts to yellow, soften, or look moldy, you can trim it shorter later (with sterile tools) so it does not decay against your moss.
Step 3: Make clean cuts
Use sterilized snips and cut confidently rather than sawing back and forth.
Step 4: Let cuts dry
Let the cut ends sit out for 20 to 60 minutes so they can callus a bit. If you want, dab a tiny amount of cinnamon on the cut spike ends only. Many growers use nothing at all, and that is also perfectly acceptable.
How to pot it
With keikis, the goal is not to pack the pot. The goal is to create a softly supportive nest that stays slightly moist but airy.
Step 1: Prep the moss
- Rinse sphagnum moss if it is dusty.
- Soak for a few minutes, then squeeze it out well. It should feel like a wrung-out sponge, not dripping.
Step 2: Choose the pot size
Pick a pot just big enough for the roots to fit with a little room. Oversized pots stay wet too long and invite rot.
Step 3: Position the keiki
- Hold the keiki so the base of the leaves sits just above the moss line.
- Gently guide roots into the pot. Do not force stiff roots. It is okay if a couple roots stay slightly above the surface.
Step 4: Add moss loosely
Wrap small tufts of moss around the roots and fill the pot, keeping it fluffy. Do not bury the crown (the center where new leaves emerge). If water sits there, rot can happen fast.
Step 5: Stabilize
If the keiki wiggles, add a stake or a soft tie. Movement breaks tender new root tips and delays establishment.
Step 6: First watering
If the moss is evenly damp from prep, you can wait 2 to 3 days before watering again. If it dried during potting, water lightly around the edges.
Aftercare
For the first month, your job is to balance three things: humidity, gentle moisture, and bright indirect light. Keikis fail most often from drying out too hard or staying soggy too long.
Week 1
- Light: bright, indirect. An east window is lovely. Avoid hot direct midday sun.
- Humidity: aim for 50 to 70 percent if possible. A loose “humidity tent” can help, but include airflow.
- Water: keep moss lightly damp. Check daily.
- No fertilizer yet. Let roots focus on healing.
Week 2
- Look for green root tips and firmer leaves.
- Water: same rhythm. If moss stays wet more than 5 to 7 days, it is packed too tight or the pot is too large.
- Airflow: gentle air movement nearby helps prevent rot and fungus.
Week 3
- Fertilizer: 1/4 strength balanced orchid fertilizer, every 2 to 4 waterings.
- Flush: once this week, water thoroughly to rinse salts out of the moss, then let it drain fully.
Week 4
- Humidity: slowly reduce reliance on tents or bins if roots are growing well.
- Water: shift toward your normal Phalaenopsis rhythm, still erring on the side of lightly moist rather than very dry.
- Stability: keep it in one spot. Keikis hate constant environmental shuffling.
Weeks 5 to 8
- Repotting: do not rush. Keikis often stay in sphagnum for several months.
- Next step: once the pot has a healthy web of roots, you can transition to a bark mix if that suits your watering style.
- Bloom timeline: blooms can take 1 to 3 years depending on size, light, and overall growth. Focus on roots and leaves first.
Watering cues
If you are new to sphagnum, the hardest part is learning “damp, not swamp.” Here are beginner-friendly checks:
- Pot weight: lift it. A freshly watered pot feels noticeably heavier. Water again when it feels much lighter.
- Root color (clear pot): silvery roots usually mean it is time. Green roots often mean there is still moisture.
- Moss feel: the top can be slightly crisp while the center is still moist. If the pot stays wet for a week, loosen the moss and increase airflow.
I do not recommend moisture meters for orchids. Your eyes and the clear pot are better tools.
Moss watch
Sphagnum is wonderful for keikis, but it can go sour if it stays too wet.
- Signs to replace it: sour smell, persistent slime or algae, or moss that stays wet day after day even with good airflow.
- What to do: repot into fresh, loosely packed moss and make sure the pot has good drainage and air gaps.
Common mistakes
- Removing too early: wait for multiple roots of usable length. The mother plant support is valuable.
- Packing sphagnum tightly: tight moss suffocates roots. Fluffy is your friend.
- Burying the crown: keep the leafy center above the media line.
- Too much water, not enough air: moss should be damp, not swampy. Always use a pot with drainage holes.
- Direct sun: small leaves scorch quickly. Bright shade is ideal.
Troubleshooting
Orchids are slow, and keikis are even slower. “Not rooting” often means “not rooting yet” or “root tips keep getting damaged.” Here are the most common scenarios I see.
Leaves but no roots
- Likely cause: humidity too low or inconsistent, the keiki is not mature enough, or light is too dim.
- Try this: increase humidity to 60 to 80 percent using a bin or loose bag, but open daily for fresh air. Keep moss barely damp, not wet. Move slightly brighter but still indirect.
Roots turn brown or mushy
- Likely cause: overwatering, packed moss, poor airflow, or crown staying wet.
- Try this: unpot and inspect. Trim only truly dead, mushy roots with sterilized snips. Repot into fresh, fluffier moss. Increase airflow. Water less often.
- Tip: water around the pot edge and avoid pouring water into the crown.
Roots shrivel and look papery
- Likely cause: underwatering or moss drying too fast in a warm, dry home.
- Try this: rehydrate by soaking the pot for 10 to 15 minutes, then draining well. Use a humidity tray or tent temporarily.
Leaves wrinkle or flop
- Likely cause: dehydration from lack of roots, or root loss from rot.
- Try this: check roots through the clear pot. If roots are scarce, prioritize humidity and stable warmth (70 to 80 F, about 21 to 27 C, if you can).
Keiki wobbles and will not anchor
- Likely cause: movement snapping new root tips.
- Try this: stake it. Stability is underrated orchid medicine.
“Sphag and bag” recovery
If the keiki has few roots and is struggling, you can use a simple recovery setup:
- Place lightly damp sphagnum in a clear bag or lidded bin.
- Set the potted keiki inside without sealing it airtight. Leave a small gap for air.
- Keep warm, bright-indirect, and open daily for fresh air.
This creates a gentle humidity bubble so the keiki can focus on root growth instead of survival mode.
FAQ
Can I pot a keiki without removing it?
Sometimes, yes. If the spike can reach a pot, you can nest the keiki roots into moss while still attached. This is a great option for early keikis because it reduces risk. Once it is rooted well, you can cut the spike later.
Should I use keiki paste?
Keiki paste is a hormone product used to encourage keikis on certain orchids. If you already have a keiki, you do not need it for rooting. For most home growers, consistent humidity, good light, and patience do more than hormones.
Will the mother orchid suffer?
A healthy mother usually handles one keiki fine, though it can slow blooming. If the mother is weak, prioritize her recovery with good light, careful watering, and fresh media when appropriate.
My best advice
If I could kneel beside you in your kitchen with a cup of tea and your orchid on the table, I would say this: do less, but do it consistently. Do not rush the cut. Do not cram the moss. Do not swing between drought and swamp. Give your keiki bright, gentle light and a steady little pocket of humidity, and let it do what orchids do best, which is grow slowly and stubbornly toward the light.
And yes, I absolutely talk to mine. The ferns started it.