Orchid Aerial Roots: What’s Normal and How to Manage Them
If you have ever looked at your orchid and thought, “Why is it growing tentacles?”, welcome. Those wandering, silver-green noodles reaching into the air are aerial roots, and in most homes they are perfectly normal, even healthy. Orchids, especially common Phalaenopsis (moth orchids), are epiphytes in nature. That means they cling to tree bark, letting their roots grab onto surfaces, sip humidity, and catch rainfall as it drips by.
In other words, aerial roots are not your orchid misbehaving. They are your orchid doing orchid things.

Why orchids grow aerial roots
Aerial roots are multipurpose tools. In the wild they help orchids:
- Anchor to bark and crevices
- Absorb moisture from humid air and rain
- Exchange gases so the root system can “breathe”
- Gather nutrients from debris and water running down tree trunks
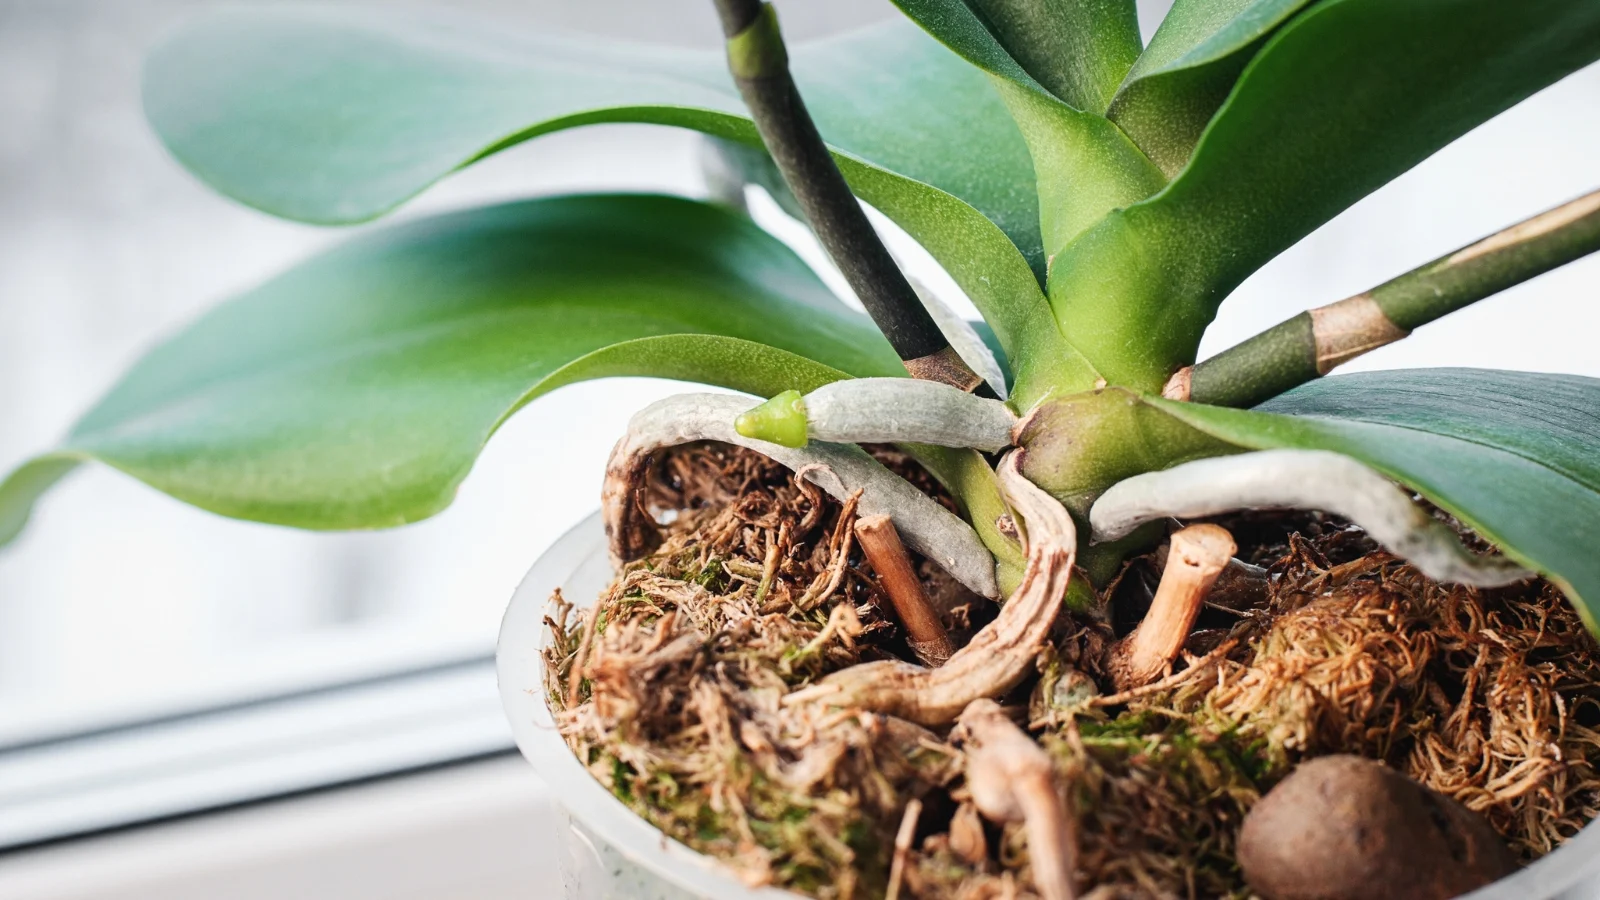
That silvery coating you see on many orchid roots is called velamen. Think of it like a spongey jacket. When dry it looks pale gray or silver. When wet it turns greener as the root inside becomes visible.
So if your aerial roots look silver most of the time, that is not automatically a problem. It is often just “dry velamen,” which is normal between waterings.
What healthy aerial roots look like
Healthy aerial roots can be straight, curly, or doing interpretive dance toward the nearest light source. Shape is not the issue. What you are watching for is texture and color response.
Signs your aerial roots are healthy
- Firm and plump when you gently pinch (no mushiness)
- Silver to pale green when dry, then green after misting or watering
- Growing tips that look smooth and slightly shiny, often green or pinkish depending on variety
- No foul smell near the base of the plant or potting mix
One more reassurance: more aerial roots often show up when your orchid is actively growing, especially in spring and summer, or when it has outgrown its pot and is exploring for more space and airflow.

What is not normal: dry versus rotten aerial roots
Aerial roots can dry out in typical household humidity, especially near heating vents, fireplaces, or a sunny window with low ambient moisture. They can also rot if they stay wet and stagnant, usually when water pools in crevices or the crown.
Desiccated (too dry) aerial roots
These are roots that have been chronically under-hydrated or baked by hot, dry air.
- Wrinkled, shriveled, or paper-thin
- Hollow or crunchy when gently squeezed
- Velamen may flake off, revealing a wiry thread inside
- Root does not green up much after misting
Rotting aerial roots
Rot usually starts where roots stay wet for too long with little airflow. It is less common on aerial roots than on roots buried in soggy media, but it can happen.
- Mushy or slimy texture
- Brown or black sections that spread
- Bad smell, especially near the base of the plant
- Velamen may slip off like a wet sock
If you are unsure, try this gentle test: lightly mist the root. If it turns green within a few minutes and feels firm, it is doing its job. If it stays dull, collapses, or feels squishy, it is likely damaged.
Home humidity: why your orchid grows “extra” aerial roots indoors
Most homes sit around 30 to 50 percent humidity, and winter heating can drop it even lower. Many orchids, especially Phalaenopsis, prefer something closer to 40 to 60 percent for easy growth.
When humidity is low, orchids often respond by:
- Sending roots out of the pot to hunt for pockets of moisture
- Growing thicker velamen as protection
- Slowing leaf growth while focusing on survival basics
This is why a plant can look “rooty” even when you are watering correctly. The orchid may simply be adapting to your air.
If you want to support aerial roots without fuss, aim for small, sustainable tweaks: a pebble tray, clustering plants, or a humidifier nearby (not blasting directly on the orchid).
Misting, mounting, and bark pots: how each affects aerial roots
How you grow your orchid changes how those aerial roots behave. There is no single “right” method, but there are some predictable outcomes.
Misting aerial roots
Misting can help temporarily, but it is not a substitute for proper watering of the potting media. A quick spritz often evaporates before the velamen fully hydrates.
- Helpful when: humidity is low and roots look wrinkled, or you are encouraging new root tips
- Skip it when: your home is already humid, or misting leads to water sitting in the crown or leaf joints
If you mist, do it in the morning so the plant dries by nightfall. Use fine droplets and avoid soaking the crown.
Mounted orchids
Mounted orchids, attached to cork, wood, or tree fern fiber, are closer to how many orchids live in nature. They usually produce more visible aerial roots because nearly all roots are exposed.
- Pros: great airflow, lower risk of soggy root rot
- Cons: you must water more often, sometimes daily in dry homes
Mounted orchids thrive when you can offer consistent moisture and decent humidity. If you love a daily plant ritual, mounting is deeply satisfying.
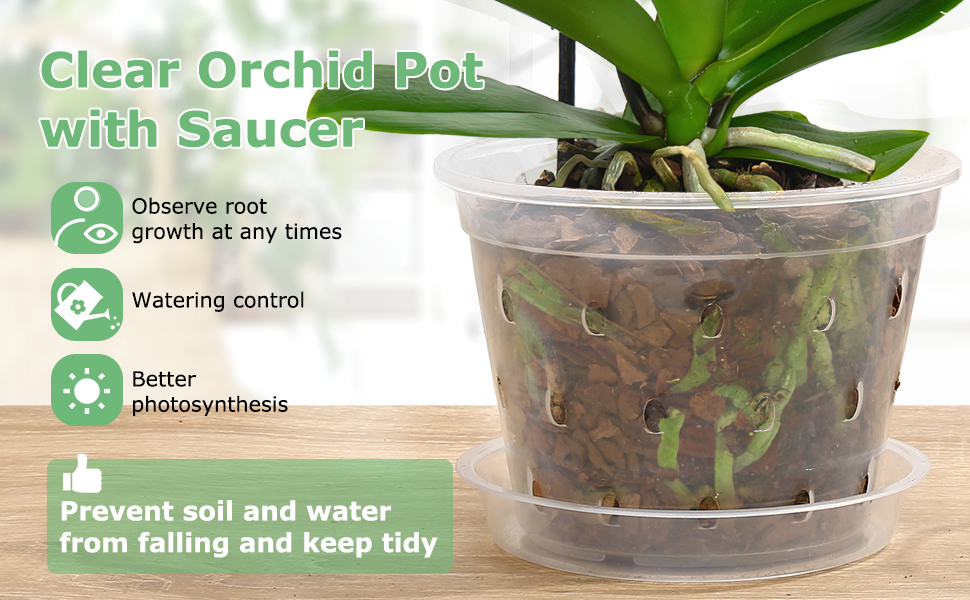
Bark mix in pots
A bark-based orchid mix in a pot is the most common home setup. It balances moisture retention with airflow, which is why it is beginner-friendly.
- Expect some aerial roots, especially as the orchid matures
- If you see a sudden surge of aerial roots along with limp leaves, it may indicate the pot roots are struggling or the mix has broken down
As bark ages it holds more water and less air. That can encourage rot inside the pot, even while aerial roots look fine. When in doubt, check the media texture and smell. Fresh bark smells woody. Old mix often smells sour or composty.
Should you cut aerial roots?
Most of the time, no. Healthy aerial roots are valuable. They store water, help stabilize the plant, and act as backups if some roots in the pot decline.
Consider trimming only if a root is:
- Completely dead (hollow, brittle, and brown all the way through)
- Rotting and spreading mushy tissue
- Broken and dangling in a way that keeps getting snagged
If you do cut, use sterilized snips and trim back to firm tissue. If the root is only partially damaged, leave the healthy portion. Orchids are surprisingly good at rerouting resources.
Repotting with aerial roots: gentle handling that actually works
Repot day is when most aerial roots get accidentally snapped. The velamen can be tough, but dry roots are much more brittle.
Before you start
- Water the orchid or soak the roots for 10 to 20 minutes first. Hydrated roots are flexible.
- Choose a pot that fits the root mass. Orchids usually prefer to be slightly snug, not swimming in extra media.
- Use fresh orchid bark or a bark-based blend suited to your environment.
During the repot
- Do not force aerial roots into the pot if they resist. A cracked root is an open door for infection.
- If a root naturally bends inward after soaking, you can tuck it gently, like guiding a ribbon.
- Support the plant at the base while you add mix, tapping the pot to settle media instead of packing it tight.
After the repot
- Keep the orchid in bright, indirect light.
- Go easy on fertilizer for a couple of weeks while small root abrasions heal.
- Water thoroughly, then allow the mix to approach dryness before watering again.
A few bruised roots are not the end of the world. Orchids are resilient, especially when the rest of the care is steady.
What not to bury (this part matters)
If you take only one thing from this page, let it be this: do not bury the crown.
The crown is the center point where leaves emerge. If it stays wet or packed in media, it can rot quickly, and crown rot is one of the few orchid problems that is truly difficult to reverse.
Safe to keep above the potting mix
- The crown
- Most of the stem (unless you are carefully addressing a leggy orchid with a specific method)
- Aerial roots that sit high and do not naturally tuck into the pot
When people bury too much
It is often because the orchid looks unstable. Instead of piling mix up the stem, stabilize with:
- A stake or orchid clip
- A slightly heavier outer cachepot
- A pot that better matches the root mass
Quick troubleshooting checklist
- Aerial roots everywhere, leaves firm: normal growth, enjoy the jungle vibe
- Aerial roots wrinkled, leaves slightly limp: increase hydration consistency and humidity, check pot roots
- Pot roots mushy, aerial roots okay: media staying too wet or too broken down, repot into fresh airy mix
- Black mush near base or bad smell: suspect rot, remove affected tissue and correct watering and airflow
- Roots will not green up when wet: likely dead sections, trim only what is clearly gone
The calm takeaway
Aerial roots are not a sign you are failing. They are often a sign your orchid is alive, adapting, and reaching. Your job is simply to read what the roots are telling you: firm equals fine, wrinkled means thirsty, mushy means too wet. Keep the crown above the mix, repot gently, and let those roots be a little wild.
Orchids are not here to be perfect houseplants. They are here to remind us that growth is allowed to look a bit unruly.