How to Water Orchids Correctly
Orchids have a reputation for being fussy, but most orchid heartbreak comes down to one simple thing: water. Not how much you love your plant. Just how often and how you water it.
For most home growers, especially with the beloved grocery store orchid (the Phalaenopsis, or moth orchid), the goal is beautifully boring: water thoroughly, then let it dry a bit before you water again. That is it. No daily sips. No guessing games. Just a steady rhythm you learn by reading the roots and the pot.
What orchid roots want
Most common house orchids are epiphytes, meaning in nature they cling to trees and their roots get drenched by rain, then dry quickly in moving air. They are not designed to sit in wet soil like a fern or a pothos.
That is why orchid potting “soil” is usually chunky bark, sphagnum moss, or a blend. It is there to hold some moisture and keep roots anchored while still letting air circulate.
- Watering correctly means soaking the entire root zone, then letting excess water drain away completely.
- Watering incorrectly usually means keeping the mix constantly damp, which suffocates roots and invites rot.
When to water: 3 checks
If you only remember one thing from this page, make it this: water on the plant’s schedule, not yours. Here are the most reliable ways to tell.
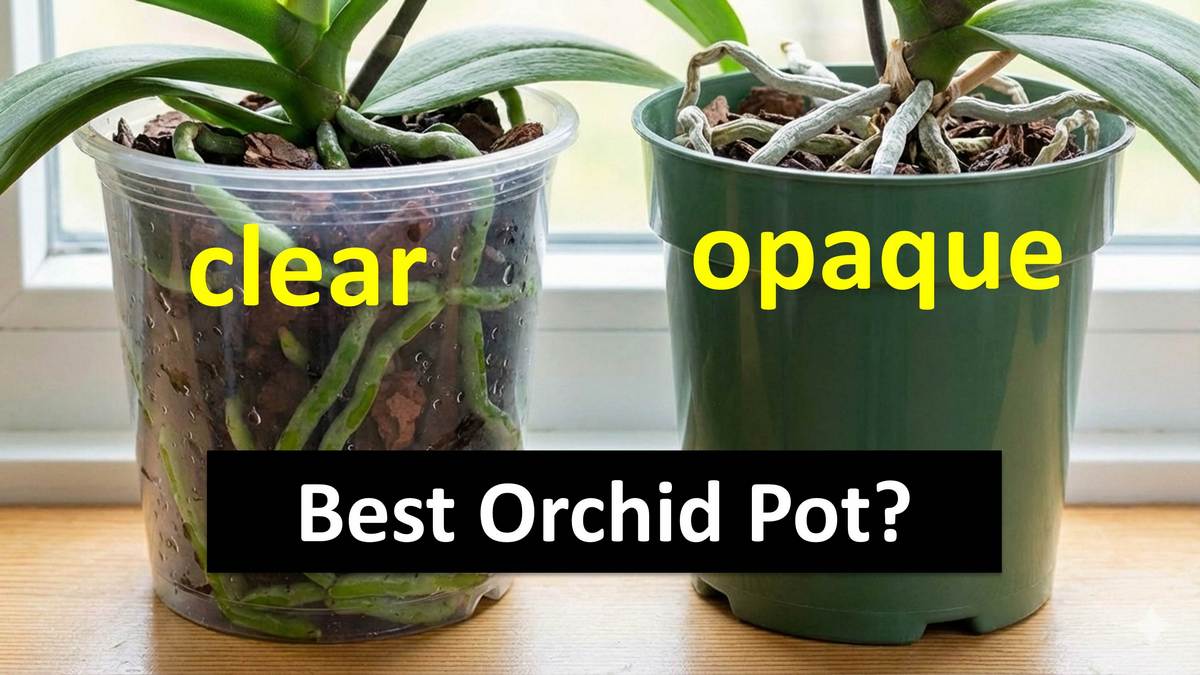
1) Root color (best clue for Phalaenopsis)
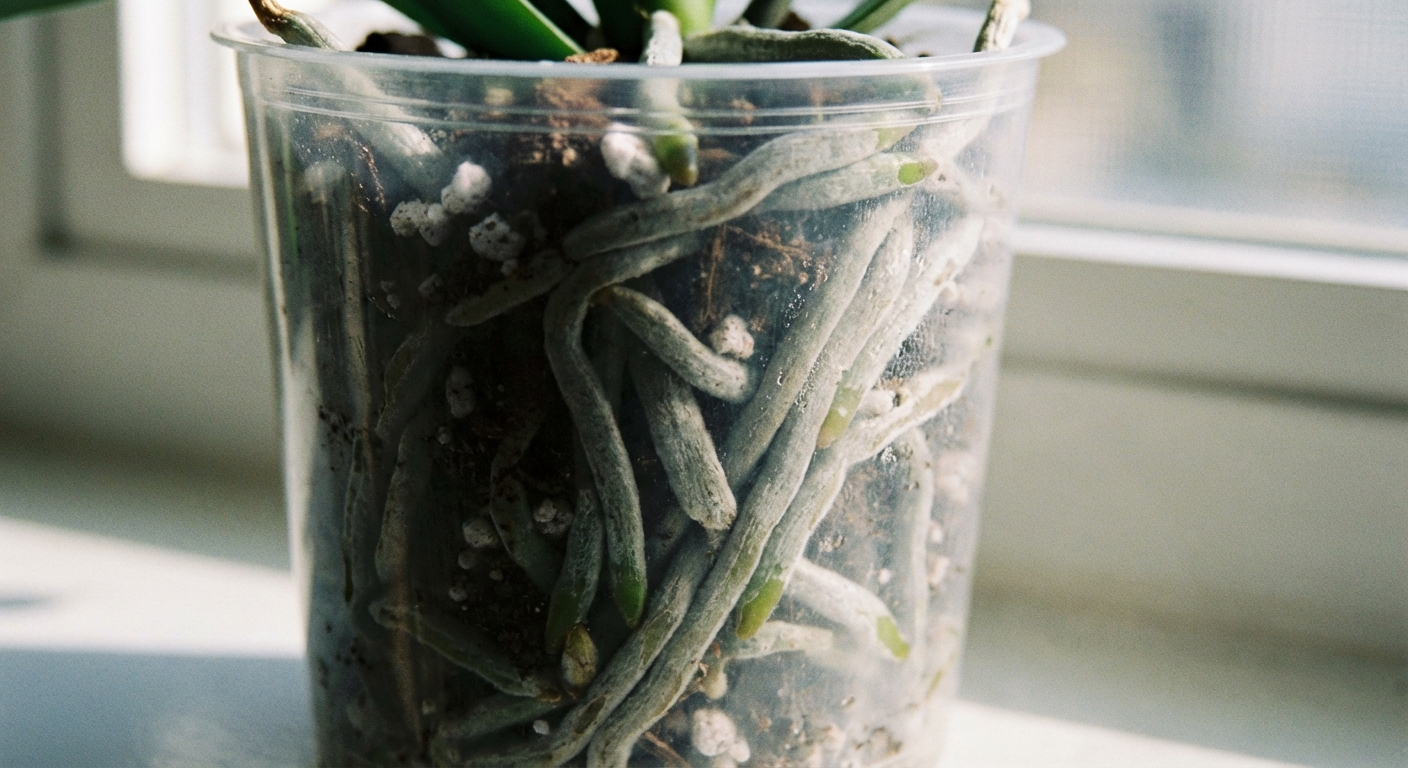
Phalaenopsis orchids often come in clear pots for a reason: the roots will tell you what to do.
- Bright green roots (especially the ones pressed against the pot) mean the velamen is wet. Wait.
- Silvery gray roots mean the velamen is dry and ready for water.
- Brown, mushy, hollow roots suggest rot, usually from staying wet too long.
Quick caveat: Root color is most reliable on roots you can see near the pot edge or on top. Roots deeper in the mix can look different, and clear pots can grow algae that tints things green. When in doubt, pair this check with pot weight or a skewer test.
2) Pot weight (my favorite low-tech trick)
Pick up your orchid right after a thorough watering. Feel that weight. Then pick it up again a few days later. When it feels noticeably lighter, it is usually time.
This works for bark mixes and moss, for clear pots and decorative cachepots. Your hands become the measuring tool.
3) A finger or skewer test
If you cannot see the roots, slide a wooden skewer or a chopstick into the potting mix for 10 to 15 minutes.
- If it comes out cool and damp, wait.
- If it comes out mostly dry, water.
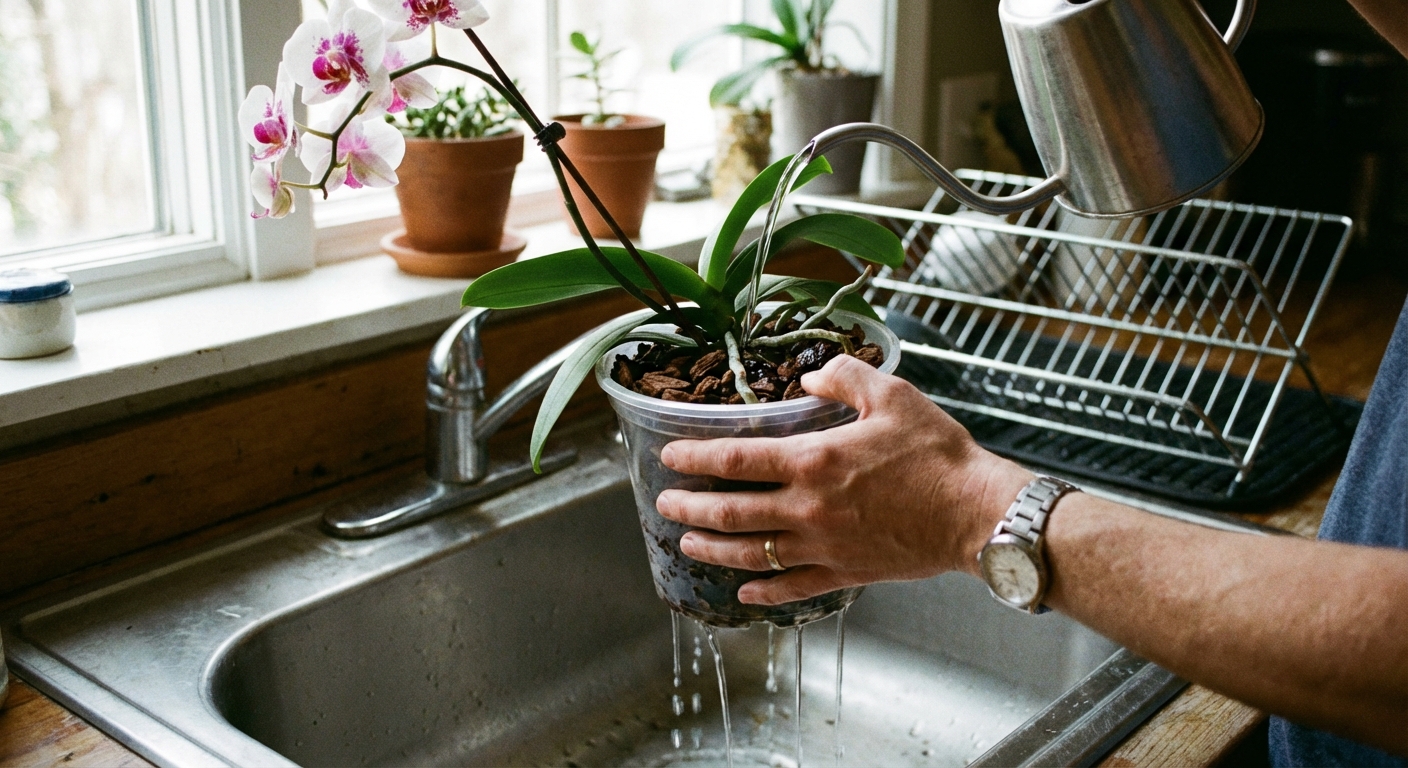
Soak and drain (safest method)
If I could stand next to you at the sink, this is what I would have you do. It is simple, and it matches how orchids drink in nature.
Step by step
- Bring the orchid to the sink. Remove the inner pot from any decorative outer pot.
- Use room-temperature water. Avoid very cold water and very hot water.
- Choose your approach:
- For bark mixes (most common): Run water through the pot for 15 to 30 seconds until the mix is evenly wet and water pours freely from the holes.
- For very dry media or moss-packed pots: Set the pot in a bowl of water for 10 to 15 minutes so the bark or moss hydrates evenly, then lift it out.
- Drain completely. Let it drip for a full minute or two. If it sits in a cachepot, tilt the inner pot and gently shake once or twice so trapped water can escape. No puddles left behind.
- Return it to its spot. Only after it has finished draining, place it back into the cachepot.
Important: Try not to leave water sitting in the crown (the center where leaves meet). If you splash water there, dab it dry with a paper towel. Crown rot is sneaky and fast.
Best time of day: Morning is ideal, because any stray water has time to dry before cooler nighttime temperatures.
Ice cubes: the real story
You have probably seen the advice to “water your orchid with three ice cubes a week.” It is popular because it feels tidy and foolproof. And to be fair, it can work for some people in some conditions, especially with Phalaenopsis in bark, where the slow melt can reduce the odds of flooding.
But it is not a magic formula. In many homes, it also under-waters, especially with larger pots, warm bright windows, or thirsty plants in active growth.
Why people like it
- Prevents overwatering by volume for many beginners
- Easy routine to remember
- Less mess than sink watering
The downsides (and why I do not recommend it as the default)
- Uneven watering: ice melts in one spot, so parts of the pot may stay dry.
- Cold stress risk: orchids are tropical. Ice against roots is not their favorite thing.
- Not adaptable: three cubes a week might be too much in winter and not enough in summer.
- Often too little water: the plant may never get a full, root-zone soak, especially in warm and bright conditions.
If you insist on using ice cubes
If the ice cube method is the only way you will actually water consistently, use it thoughtfully:
- Use it only for Phalaenopsis in a bark-based mix.
- Place cubes on the media, not touching the crown or leaves.
- Rotate where you place them each time for more even moisture.
- Still check root color and pot weight. Adjust the number of cubes as seasons change, pot size changes, and the plant grows.
My gentle bottom line: soak-and-drain is more plant-friendly and teaches you how your orchid actually behaves.
How often to water Phalaenopsis
There is no single schedule that fits every home. Treat these as starting points, then adjust based on roots, pot weight, and how fast your mix dries.
- Most homes: every 7 to 10 days
- Warm, bright, dry conditions: every 4 to 7 days
- Cooler, darker winter conditions: every 10 to 14 days (sometimes longer)
Frequency depends on:
- Potting media (bark dries faster than moss)
- Pot size (small pots dry faster)
- Pot type (slotted orchid pots dry faster than solid pots)
- Airflow (fans, vents, open windows speed drying)
- Ventilation and humidity
- Light and temperature
One big grocery-store caveat: Many Phalaenopsis come with a tight nursery plug of sphagnum moss in the center, even if the outer layer looks like bark. That plug can stay wet far longer than you expect. If your pot seems to stay damp forever, or roots keep failing, check for a hidden moss core at repot time.
If you want a simple mantra: water well, then wait until it is almost dry.
Overwatering vs underwatering
Orchids rarely die from one bad watering. They decline from repeated patterns. Both overwatering and underwatering can cause limp leaves, so use the roots as your truth-teller.
Signs of overwatering
- Roots turning brown, mushy, or hollow
- Potting mix that stays wet for days and smells sour
- Leaves that look limp even though the mix is wet
- Yellowing leaves plus soft, failing roots
What to do: Let the plant dry more between waterings, improve drainage, and consider repotting into fresh medium if the mix is breaking down or roots are rotting.
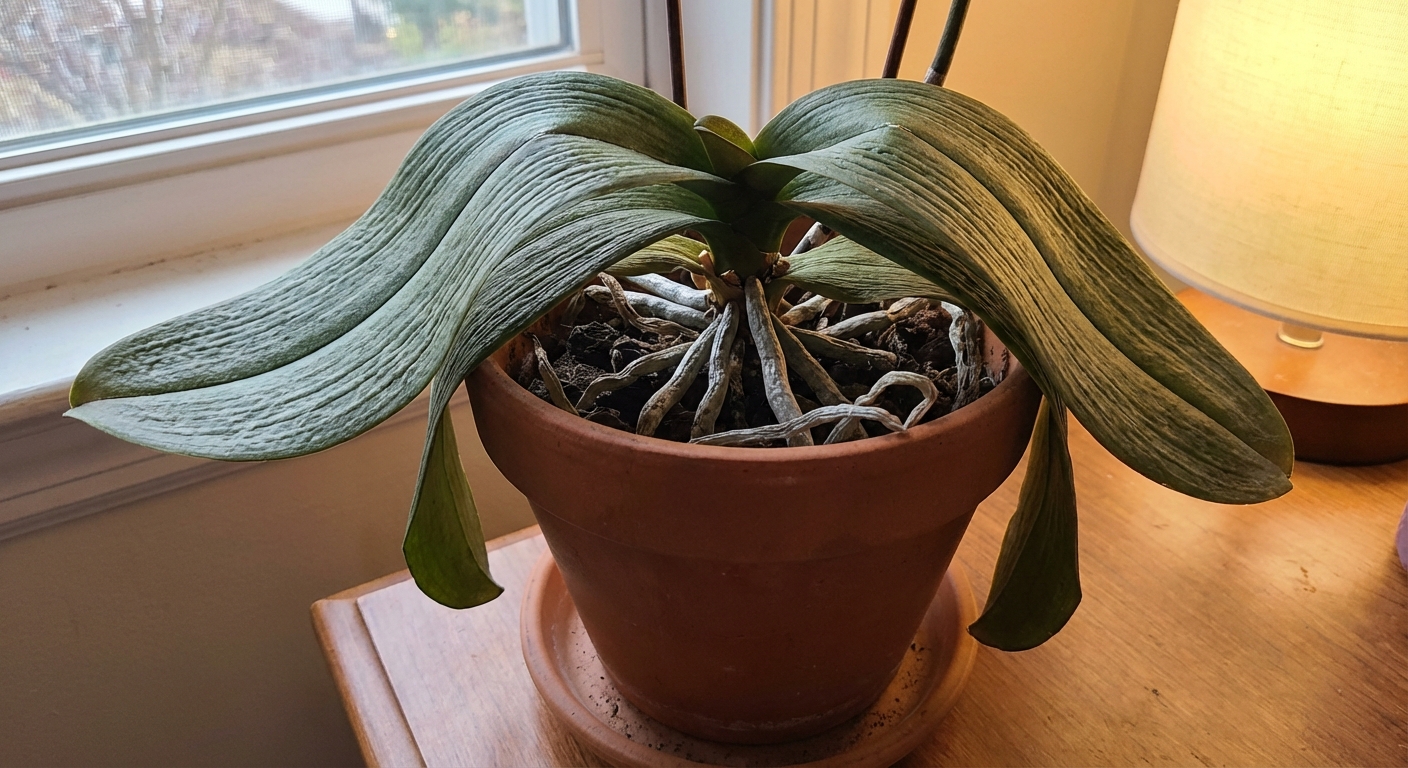
Signs of underwatering
- Roots look silvery and wrinkled for long periods
- Leaves are limp, thin, or pleated
- Buds shrivel or drop (especially in very dry air)
What to do: Water more thoroughly, and consider longer soak times. If the medium is extremely dry and water runs straight through, soak the pot for 10 to 15 minutes to rehydrate the bark or moss evenly.
Seasonal adjustments
Your orchid does not read calendars, but it does respond to light and temperature. When days get shorter, growth slows, and water use drops.
Spring and summer
- Expect to water more often.
- Check pot weight and roots more frequently.
- Warm rooms plus a sunny window can dry a small pot quickly.
Fall and winter
- Expect to water less often.
- Let the mix dry a little more between waterings.
- Watch out for cold windowsills. Cold plus wet is a rough combo for roots.
If your home uses forced heat in winter, humidity often drops. That can make leaves thirstier even when the pot dries slowly. In that case, keep watering conservative, but consider boosting humidity with a pebble tray or a small humidifier nearby.
Water quality
Many Phalaenopsis orchids do fine with tap water, but if your water is very hard, you may see mineral crust on the medium or leaf tips over time.
- Best case: rainwater, distilled, or reverse osmosis water, then fertilize lightly to replace nutrients.
- If using tap: let it run a moment so it is fresh, and flush the pot thoroughly each watering to reduce buildup.
- A bigger concern: heavily softened water from sodium-exchange systems can be rough on orchids over time.
A practical compromise I often use: tap water most of the time, and once a month do a long flush through the pot to wash away salts.
Fertilizer note: During active growth, fertilize weakly (a diluted orchid fertilizer) and keep that monthly flush so salts do not build up.
Other orchids, quick notes
This guide focuses on Phalaenopsis because they are the most common house orchid. If you have another type, here are quick, helpful tendencies:
- Cattleya: likes to dry more between waterings. Overwatering is a common mistake.
- Dendrobium: many types like a wet-dry cycle, but some need a drier rest in winter depending on variety.
- Oncidium: often prefers more even moisture than Cattleya, but still hates soggy roots.
- Cymbidium: generally drinks more, especially during active growth, and tolerates cooler conditions.
If you are unsure of your orchid type, start with root checks and pot weight. Those cues work across orchids better than any rigid schedule.
Common mistakes
- Mistake: “A little splash” every few days.
Fix: Water thoroughly, then let it dry partway. - Mistake: Leaving the inner pot sitting in water inside a decorative pot, saucer, or tray.
Fix: Drain fully before returning it. Empty any collected water. - Mistake: Water in the crown.
Fix: Water at the media level, and blot the crown dry if needed. - Mistake: Old, broken-down potting mix that stays wet too long.
Fix: Repot into fresh orchid mix when media decomposes (often every 1 to 2 years).
When to repot sooner
Sometimes “every 1 to 2 years” is too generous. Repot earlier if you notice:
- A sour smell from the pot
- Media that looks dark, crumbly, or sludge-like
- A pot that stays wet far too long
- Lots of dead or rotting roots
Quick checklist
- Check visible roots: green means wait, silvery means water (but remember algae and hidden roots can confuse the picture).
- Lift the pot: light means water, heavy means wait.
- Water with soak-and-drain.
- Drain completely. Never let roots sit in water.
- Adjust with seasons, airflow, and pot type rather than sticking to a strict weekly schedule.
If you are feeling nervous, you are not alone. Orchids teach patience. And once you learn their quiet signals, watering stops being scary and starts feeling soothing, like a tiny weekly ritual with a plant that is rooting for you right back.