How To Save Orchids From Dying
Orchids have a dramatic reputation, but most “dying” orchids are simply stressed and giving you very clear clues. The good news is that orchids are built for recovery. If there is any firm green tissue left and at least a few viable roots, you can usually bring one back.
Let us rescue yours the way I do at my own kitchen sink: calmly, step-by-step, and with a little respect for what the plant is actually asking for.

First: Is it actually dying or just done blooming?
This matters because an orchid that finished flowering can look sad while still being perfectly healthy.
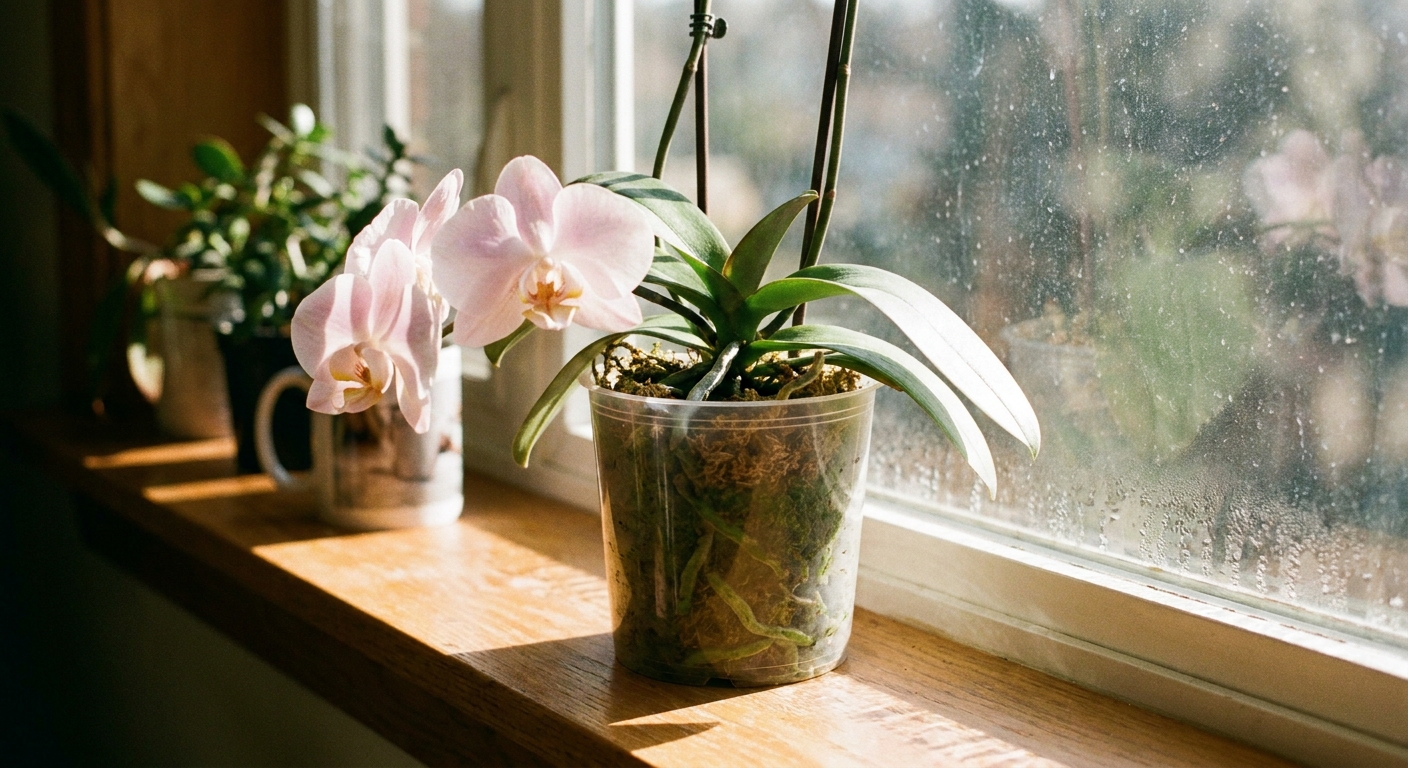
- Normal: flowers fade and drop, the spike turns brown from the tip, leaves stay firm, roots look green or silvery and plump.
- Not normal: leaves wrinkle or yellow rapidly, crown looks dark or mushy, roots are brown and hollow, buds drop before opening, potting mix stays wet for days.
If the plant is only done blooming, focus on steady care and patience, not emergency surgery.
Quick diagnosis: the 60-second orchid check
Before you change anything, do this quick check. It prevents “fixing” the wrong problem.
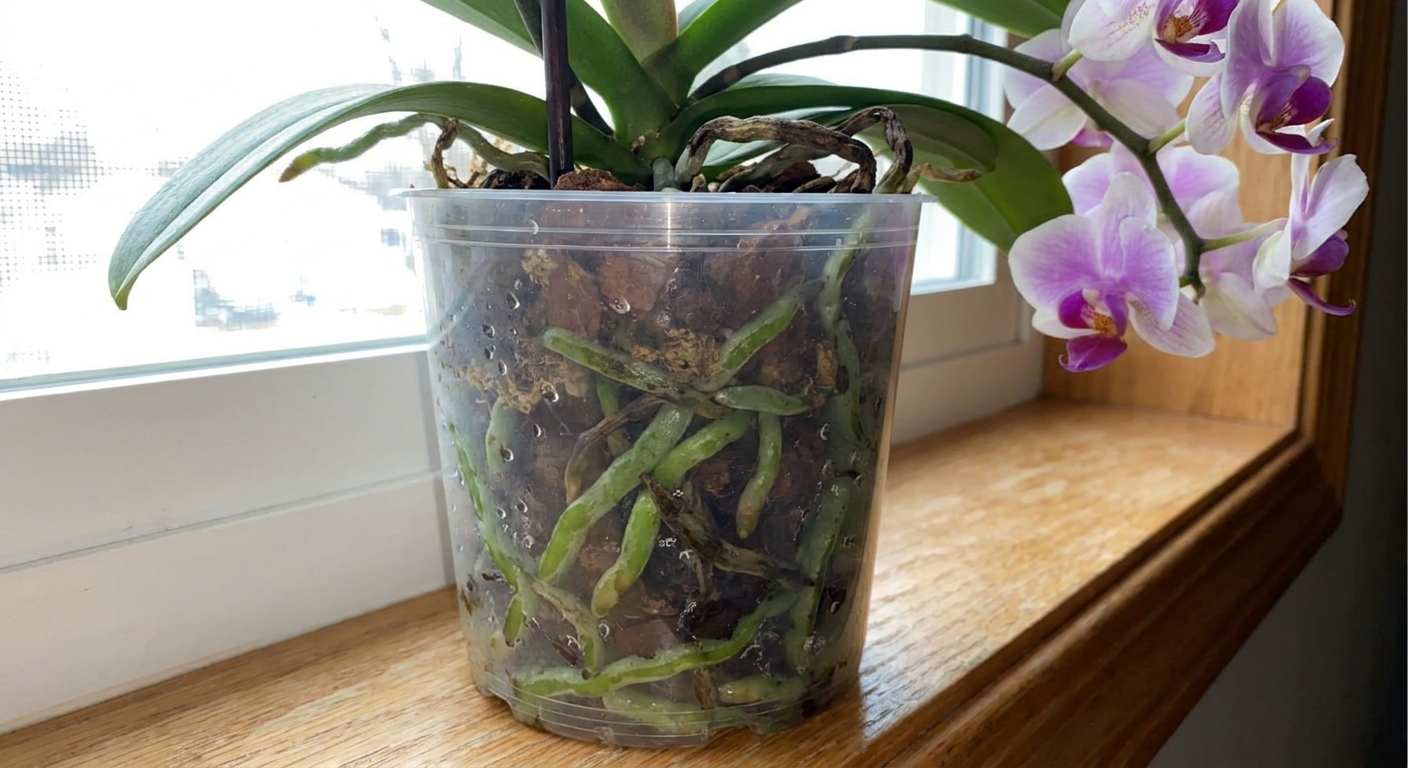
1) Check the roots
- Healthy roots: firm, round, green when wet and silvery when dry.
- Rotten roots: brown or black, squishy, papery, hollow, bad smell.
- Severely dry roots: thin, stringy, brittle, shriveled, very little green even after watering.
2) Check the crown and leaves
- Healthy leaves: firm, slightly glossy, upright.
- Dehydration: wrinkled, limp leaves, but crown stays firm.
- Crown rot: wet, dark, mushy center where new leaves emerge, sometimes with a sour smell.
3) Check the pot and mix
- Good sign: mix dries in about 5 to 10 days indoors (varies by season).
- Red flag: mix stays wet longer than 10 days, looks broken down like soil, or the pot has poor drainage.
The most common reasons orchids decline
If I had to bet, your orchid is struggling for one of these reasons.
Overwatering and suffocated roots (most common)
Orchid roots need air as much as they need water. When the mix stays constantly wet, roots cannot breathe and they rot. The plant then looks dehydrated because rotted roots cannot drink.
Underwatering (less common, but real)
In very dry homes or in coarse bark, orchids can dry too quickly. Roots shrivel, leaves wrinkle, and spikes abort buds.
Not enough light
Low light slows growth and makes watering issues worse. A Phalaenopsis (the common grocery store orchid) usually wants bright, indirect light, like near an east window or a few feet back from a bright south or west window with a sheer curtain.
Old, decomposed potting mix
Bark breaks down over time and holds too much moisture. Most orchids need a refresh every 12 to 24 months, sometimes sooner if the mix is staying soggy.
Cold drafts and hot blasts
Heating vents, AC drafts, or chilly windows can cause bud blast, leaf drop, and stress that looks like “mystery dying.”
Orchid rescue plan (step-by-step)
If your orchid has root problems or the mix is old, this is the gentle reset that saves the most plants.
Step 1: Gather supplies
- Clean scissors or pruners
- 70% isopropyl alcohol (for sterilizing tools)
- Fresh orchid bark mix (medium grade is a safe default for Phalaenopsis)
- A pot with lots of drainage, ideally clear plastic with side holes
- Cinnamon (optional for cuts, but use carefully)
Note on cinnamon: Cinnamon is drying. It can help on a cut spot on the plant body, but avoid dusting it all over live roots.
Step 2: Unpot and rinse
Slide the orchid out and rinse the roots with lukewarm water so you can see what is viable. Take a breath. This part always looks worse before it looks better.
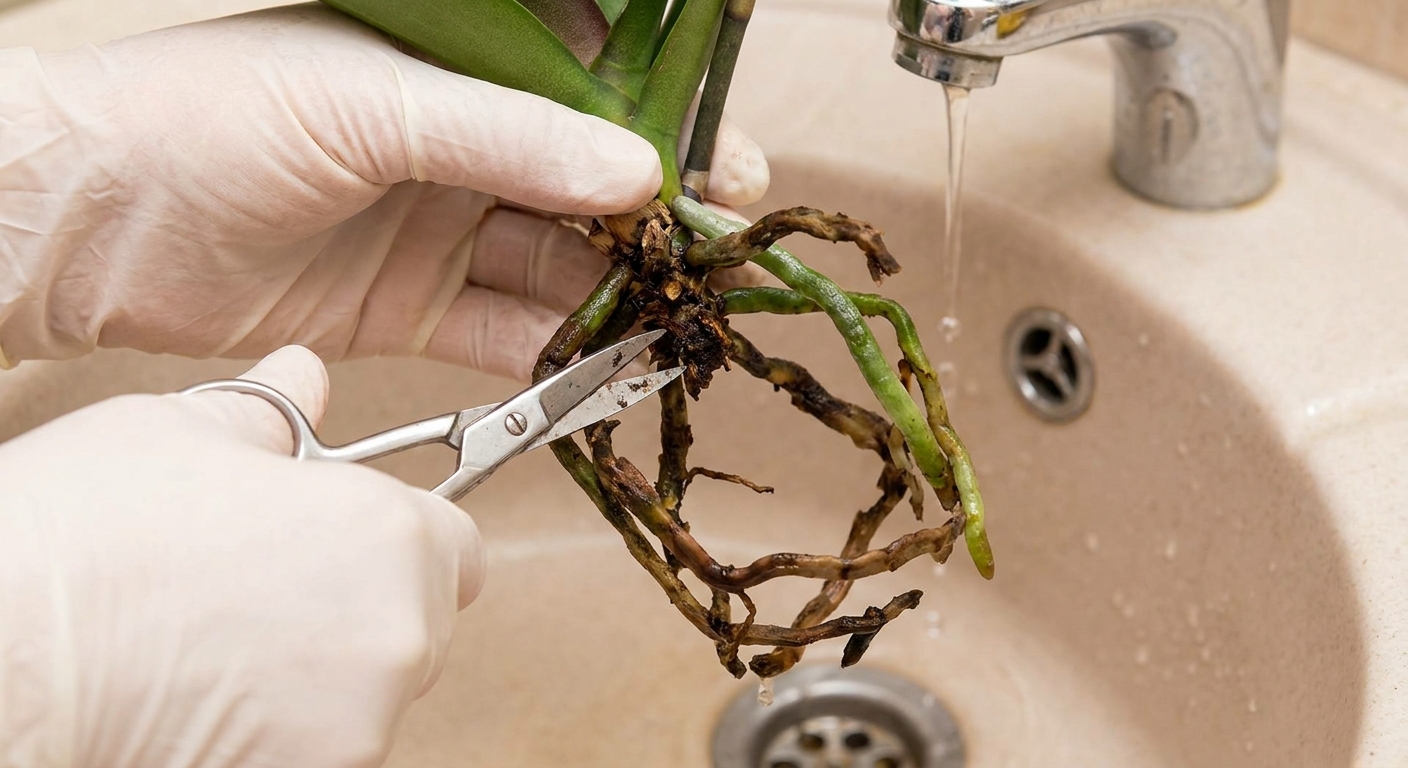
Step 3: Trim dead roots
Sterilize your tool with alcohol. Then trim away roots that are brown, mushy, hollow, or papery. Keep roots that are firm, even if they look a little stained.
If you remove a lot of roots, that is okay. A clean, smaller root system beats a bigger rotten one every time.
Step 4: Treat if rot is present
If you smelled rot or removed many mushy roots, let the orchid sit out on a clean towel for 30 to 60 minutes to air-dry. Good airflow is your friend.
Step 5: Repot correctly
- Place the orchid so the base of the plant sits just above the mix, not buried.
- Gently tuck bark around the roots, but do not pack it down hard. Roots need air pockets.
- Choose a pot that fits the root mass. Oversized pots stay wet too long.
Step 6: Water lightly, then wait
After repotting, I usually give a small drink to settle the bark, then I wait until the mix is nearly dry before watering again. For a stressed orchid, constant wetness is the fastest way to repeat the same problem.
If the crown is rotting
Crown rot is the most urgent situation because it affects the growth point. It often happens when water sits in the leaf center.
- Act fast: Use a paper towel corner to wick out any standing water in the crown.
- Dry it: Keep the plant warm with good airflow. Avoid misting and avoid water pooling in the leaf joints.
- Water differently: Water only the potting mix. If you accidentally splash the crown, blot it dry.
If the center is already mushy and collapsing, recovery is harder, but not always impossible. Sometimes orchids push a basal keiki (a baby plant) from the base if the lower stem stays healthy.
How to water a recovering orchid (without guessing)
Watering is where most orchids live or die, and it is not about a strict schedule. It is about timing and airflow.
Use these cues
- Clear pot method: Water when roots look silvery and dry, not bright green.
- Pot weight method: Learn the “light pot” feeling. Water when it feels noticeably lighter.
- Finger or skewer test: If the center still feels damp, wait.
How to water
- Use lukewarm water.
- Soak or run water through the pot until it drains freely.
- Never leave the pot standing in water.
- Try watering earlier in the day so the plant dries by evening.
In most homes, a Phalaenopsis in bark lands around once a week, but your light, temperature, pot type, and humidity will change that.
Light, humidity, and temperature: the recovery sweet spot
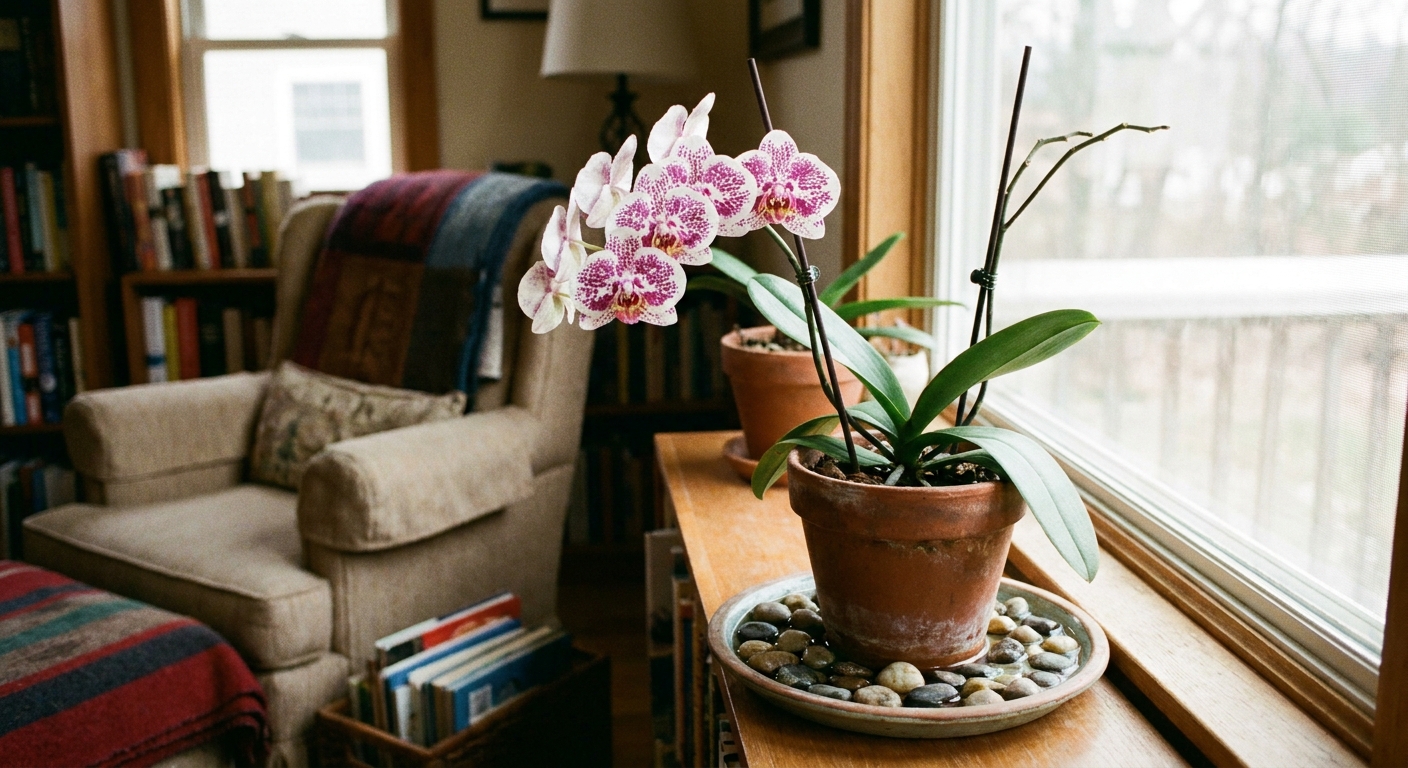
Light
Aim for bright, indirect light. If leaves are very dark green and growth is slow, increase light gradually. If leaves are yellowing with scorched patches, pull it back from hot sun.
Humidity
Orchids prefer moderate humidity, but you do not need a rainforest. A simple pebble tray or grouping plants together can help. If you use a humidifier, keep airflow moving to prevent fungal issues.
Temperature
Most common orchids like typical indoor temps, roughly 65 to 80 F (18 to 27 C), with slightly cooler nights. Avoid vent blasts and cold windowsills in winter.
Fertilizer: helpful, but only after stability
A struggling orchid does not need a heavy feeding. It needs functioning roots.
- Wait until you see signs of new root tips or a new leaf starting.
- Then feed at a low dose, about 1/4 strength, every 2 to 4 weeks during active growth.
- Flush with plain water occasionally to prevent salt buildup, especially if you use tap water.
If your tap water is very hard, consider filtered or rainwater for happier roots over time.
Bud drop and wrinkled leaves: what they really mean
Buds dropping before opening
- Sudden temp change (draft, heater, cold window)
- Ethylene exposure (ripening fruit nearby, especially bananas and apples)
- Low humidity combined with dry roots
- Recent repotting or move
Move the orchid to a stable spot, away from fruit bowls and vents, and focus on consistent watering.
Wrinkled leaves
This is usually dehydration, but dehydration can come from two opposite causes:
- Dry roots: not enough water or mix drying too fast.
- Rotten roots: too much water, roots died, plant cannot drink.
That is why the root check comes first.
What not to do (the well-meaning mistakes)
- Do not plant orchids in regular potting soil. It stays too wet and suffocates roots.
- Do not water with ice cubes. Cold shock is real, and it encourages uneven watering.
- Do not cut green spikes in a panic. If the spike is green, it can still photosynthesize and sometimes rebloom. Cut only when it turns brown and dry, or if the plant needs to redirect energy during a serious rescue.
- Do not mist the crown. Misting often invites crown and leaf rot indoors.
- Do not oversize the pot. Bigger pot equals slower drying.
Timeline: what recovery usually looks like
Orchid rescue is a slow, steady romance, not a quick fix.
- Week 1 to 2: Plant stabilizes after repotting, leaves may still look limp.
- Weeks 3 to 8: Look for new root tips, usually bright green and glossy.
- Months 2 to 6: New leaf growth, firmer posture, better hydration.
- Next blooming cycle: Many Phalaenopsis bloom once a year, often triggered by cooler nights in fall or winter.
If nothing changes after two months and roots continue to decline, reassess light, watering frequency, and whether the mix is staying too wet.
When an orchid is beyond saving (and what you can still do)
If the entire crown is mushy and there are no firm roots or viable stem tissue, the plant may not recover. But do not beat yourself up. Orchids are often sold in conditions that set them up to struggle at home.
If the base is still firm, keep caring for it lightly for a few weeks. Sometimes a basal keiki surprises you when you least expect it.
My simple “rescue routine” for most Phalaenopsis
- Bright, indirect light near an east window
- Water only when roots turn silvery and the pot feels light
- Airy bark in a snug, well-draining pot
- No water left sitting in the crown
- Gentle feeding only after new growth appears
If you want, tell me what your orchid looks like right now: leaf texture, root color, pot type, and how often it is watered. I can help you pinpoint the most likely issue and the least stressful fix.