How To Save A Dying Orchid
Orchids have a dramatic reputation, but most “dying” orchids are simply stressed. The good news is that orchids are also surprisingly resilient. If you can get the roots healthy and the routine steady, your plant has an excellent chance of bouncing back.
Quick reassurance: If your orchid dropped its flowers, that alone does not mean it is dying. Blooms are temporary. We are rescuing the plant itself, which mostly comes down to roots, leaves, and crown health.

First, define “dying”
Before you change everything at once, take a slow look at the clues. Orchids speak in symptoms.
Common symptoms and what they usually mean
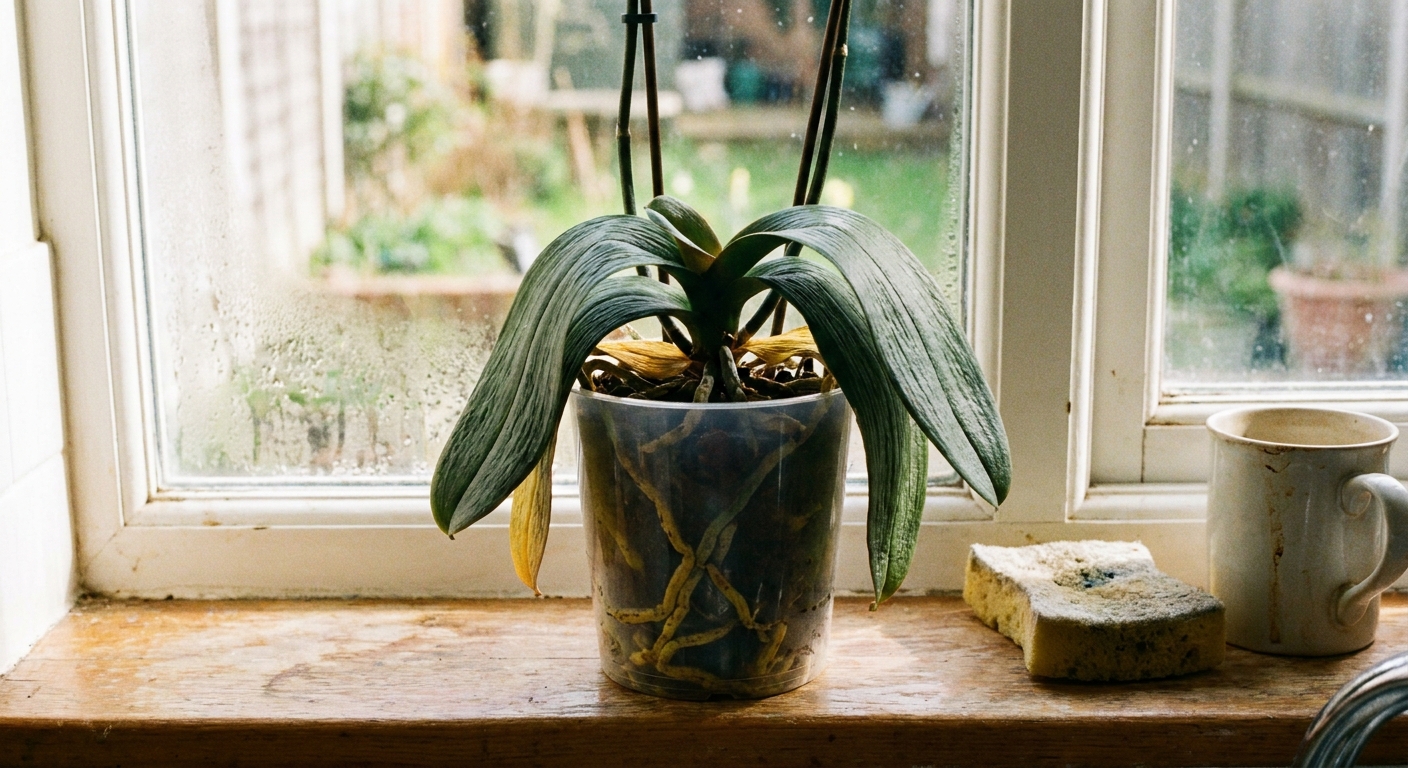
- Wrinkled, limp leaves: most often dehydration, damaged roots, or both.
- Yellow leaves: normal aging (one older bottom leaf), too much sun, or overwatering stress.
- Black, mushy roots: root rot from staying wet too long.
- Brown, crispy roots: underwatering, very low humidity, or accumulated salts (often alongside other signs like white crust on the media or pot).
- Soft, dark spot at the base (crown): possible crown rot, urgent.
- Bud blast (buds fall off before opening): sudden temperature swings, dry air, drafts, or inconsistent watering.
Most rescue plans start with the roots. If the roots are healthy, everything else gets easier.
Stop doing this right now
If your orchid is struggling, these well-meant habits can slow recovery fast:
- No ice cubes: cold shocks roots and does not evenly hydrate bark.
- No standing water: never let the inner pot sit in pooled water inside a decorative pot.
- No water in the crown: avoid pouring into the leaf center.
- No “comfort fertilizing”: pause fertilizer until the plant stabilizes.
- Skip misting as a main strategy: it is brief and can leave water where it should not sit.
Emergency check: crown health
If you have a typical grocery-store orchid, it is likely a Phalaenopsis (moth orchid). For Phals, the crown is the growing point where new leaves emerge.
How to check
- Gently spread the top leaves and look down into the center.
- Healthy crown: firm, green, no foul smell.
- Possible crown rot: black or mushy tissue, water sitting in the center, bad odor.
If you suspect crown rot
Act fast. Crown rot can be fatal because it attacks the plant’s main growth point.
- Tip the plant and wick out any standing water with a paper towel.
- If tissue is mushy, remove only what easily sloughs off. Do not dig into firm tissue.
- Disinfect and dry: many growers apply a small amount of 3% hydrogen peroxide to the affected area once, let it fizz, then allow the crown to dry completely. Another option is a tiny dusting of cinnamon as a drying agent, but keep cinnamon off roots because it can damage them.
- Keep water out of the crown going forward. Water the potting mix, not the leaf center.
- Increase gentle airflow and keep the plant warm and bright (no harsh sun).
If rot reaches the growth point, recovery may be unlikely. That said, some Phals surprise you by producing a basal keiki (a baby plant at the base). Keep conditions steady and watch for new growth.
If the crown is firm, you can relax. We move on to the roots, where most recoveries happen.
Step 1: inspect the roots
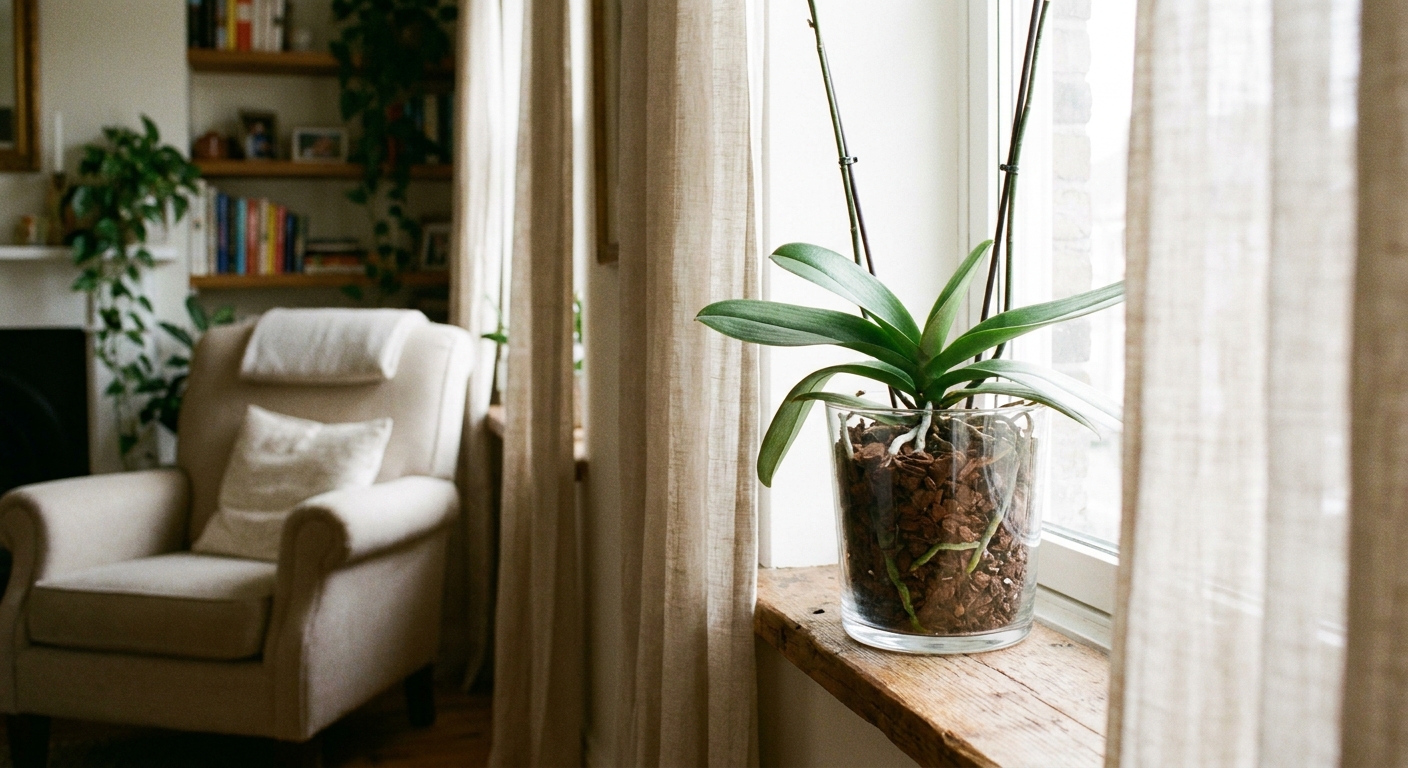
Orchid roots should be firm. In many Phals, they look green when wet and silvery when dry. If your orchid is in a clear pot, you can learn a lot just by looking.
How to inspect without panicking the plant
- Take the inner pot out of the decorative cachepot, if it has one.
- Check if water has been sitting at the bottom. Standing water is a root rot invitation.
- If the plant is declining quickly, unpot it fully so you can see what is happening.
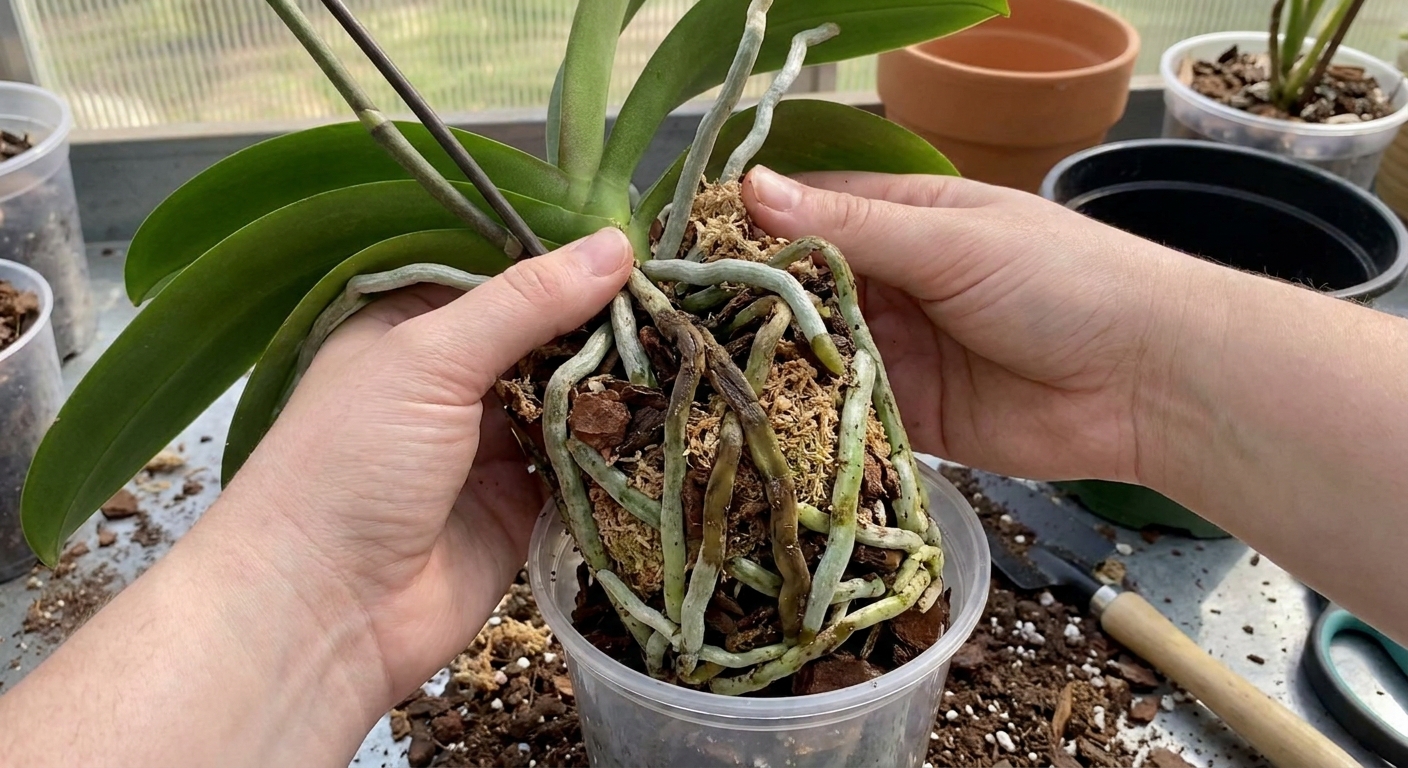
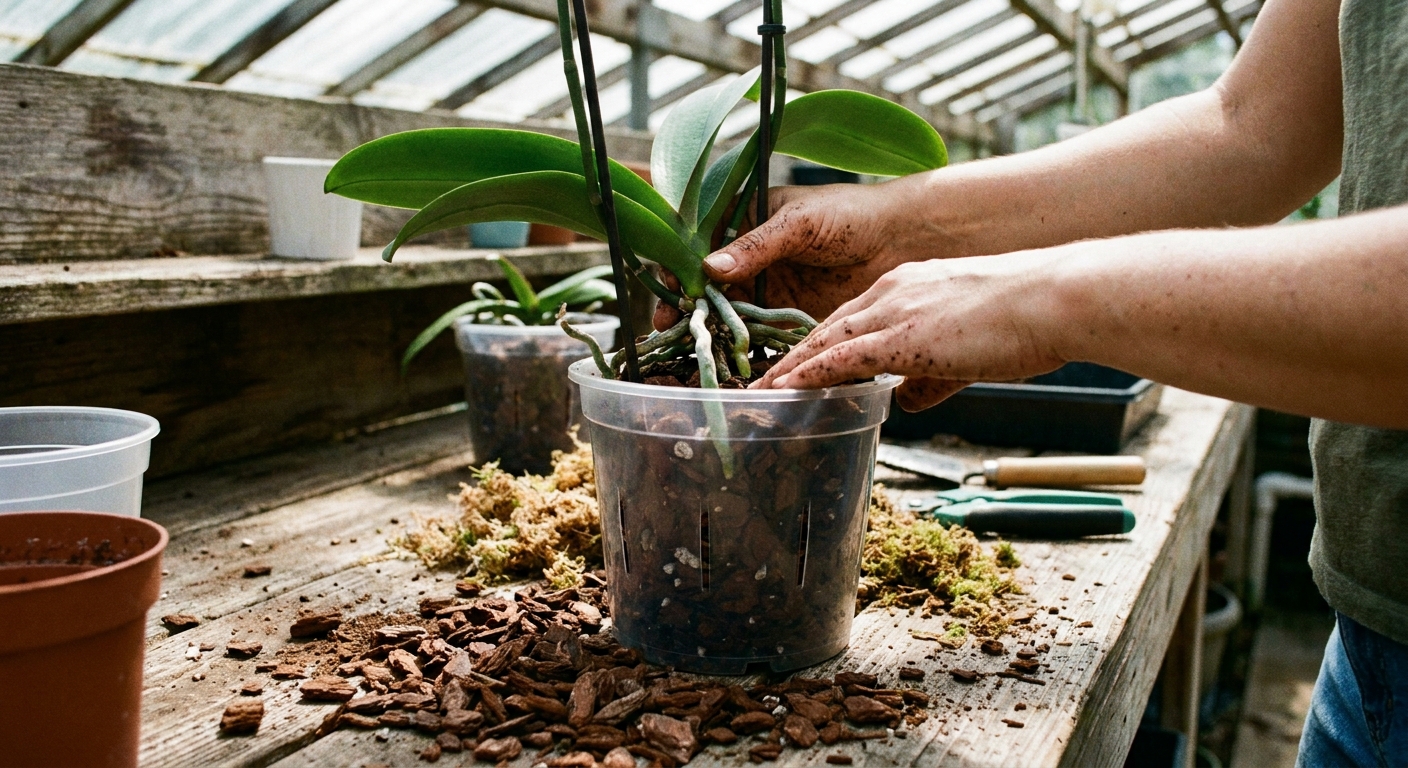
Step 2: trim rot and repot
If you find rotten roots, repotting is not optional. It is the rescue.
What you will need
- Fresh orchid bark mix (medium-grade bark is a good general choice for Phals)
- Clean scissors or pruners
- Rubbing alcohol (to sanitize tools)
- A pot with lots of drainage and air holes (clear pots are fantastic for learning)
How to trim and repot, step by step
- Unpot the orchid and gently tease away old mix. Rinse roots with lukewarm water so you can see what is firm versus mushy.
- Sanitize your scissors with rubbing alcohol.
- Trim dead roots: remove roots that are black, hollow, mushy, or papery. Keep roots that are firm, even if they look a little stained.
- Choose the right pot size: orchids like snug quarters. A pot that is slightly tight is better than one that is too big.
- Repot: hold the plant so the base sits just above the mix line. Tuck bark around roots, tapping the pot to settle it. Do not bury the crown.
- Wait before watering: if you trimmed a lot of roots, wait 24 to 72 hours before the next watering so cut ends can callus. In cooler, dimmer homes, lean toward the longer end.
My quirky but true tip: While you work, talk your orchid through it. It keeps you gentle, and gentle handling matters.
Step 3: fix watering
A very common cause of beginner orchid losses is frequent watering in low light, cool temps, and poor airflow. Orchids want a wet and dry rhythm, not constant dampness.
The best watering rule for most Phalaenopsis
Water only when the mix is nearly dry, not on a calendar.
- If roots look silvery and the pot feels light, it is usually time.
- If roots are green and the pot feels heavy, wait.
How to water correctly
- Take the inner pot to the sink.
- Run lukewarm water through the pot for 20 to 30 seconds, soaking the bark.
- Let it drain completely. No puddles in the cachepot.
- Keep water out of the crown. If water splashes into the leaf center, blot it dry.
If you tend to underwater
Soak the pot for 10 minutes in a bowl of water, then drain fully. This rehydrates bark that has become water-repellent.
If you tend to overwater
Increase airflow, use chunkier bark, and consider a pot with side slits. The goal is alternating moisture and air around the roots.
Step 4: adjust light
Light is orchid food. Without enough, the plant cannot rebuild roots and leaves.
Best light for most beginner orchids
- Bright, indirect light near an east window is ideal.
- South or west windows can work if filtered by a sheer curtain.
- Too much direct sun can cause yellow patches or sunburn.
Two easy cues: Medium green leaves are a happy target. Very dark green often means too little light. A reddish or purple tinge can mean the light is intense (sometimes fine, sometimes a sign to back off).
Helpful home test: If you can comfortably read a book in that spot during the day without turning on a lamp, your orchid is probably in the right range. Use the leaf color cues above as the tie-breaker.
Step 5: humidity, airflow, and temperature
Orchids love humidity, but they hate stale, wet air. We want moist air around the plant and drying air through the pot.
Targets that work in real homes
- Humidity: 40 to 60 percent is a sweet spot for many homes.
- Airflow: gentle movement, not a cold draft.
- Temperature: Phalaenopsis generally do well in typical home temps. Try to avoid cold windows at night, heater blasts, and sudden swings, especially while budding.
Simple ways to help
- Run a small humidifier nearby.
- Cluster plants together.
- Use a pebble tray (pot sits above the waterline, never in it).
- Use a small fan across the room on low, especially after watering.
Skip misting as a main strategy. It is brief, inconsistent, and can encourage crown issues if water sits where it should not.
Step 6: fertilize lightly
A struggling orchid is like a tired person. You do not hand them an energy drink and tell them to run. First we stabilize, then we nourish.
My rescue fertilizing plan
- After repotting and correcting watering, wait 2 to 3 weeks.
- Then feed at quarter strength with a balanced orchid fertilizer.
- Fertilize every 2 to 4 weeks during active growth, depending on light and season.
- Flush with plain water monthly to reduce salt buildup.
If you see white crust on bark or pot edges, flush thoroughly and reduce fertilizer concentration.
Leaves and spikes: what to do
Yellow leaves
- One bottom leaf yellowing: normal aging. Let it fall off on its own.
- Several leaves yellowing fast: check roots immediately for rot.
- Yellow with scorched patches: too much sun, move to filtered light.
Wrinkled or floppy leaves
This most often points to water not reaching leaves because roots are damaged or the plant is chronically dry. Fix roots and watering first. Old leaves may not fully plump up again, but new leaves will be stronger.
Flower spike turning brown
After blooming, spikes often fade. You can:
- Cut it at the base if it is fully brown and dry.
- Trim above a node if it is still green and you want to try for a secondary bloom, though this can slow overall recovery.
If your orchid is stressed, I prefer cutting the spike and letting it focus on roots and leaves.
Media options: bark and moss
For most Phalaenopsis in most homes, a chunky bark mix is the easiest, safest starting point.
- Bark: best for average home humidity and anyone prone to overwatering.
- Bark plus a little sphagnum: helpful if your home is very warm or dry, or if the bark dries too fast.
- Full sphagnum moss: can work, but it holds a lot of water and is easier to overdo. It is best used with experience, strong airflow, and careful watering habits.
Orchid ICU (for very few roots)
If your Phal has almost no viable roots left, it may need a temporary boost while it regrows them.
- Set the orchid in a small, ventilated high-humidity setup (many people use a clear bag or container with the plant kept above any standing water).
- Keep it warm and in bright, indirect light.
- Air it out daily so it does not stay stagnant.
This is slow work. Rootless orchids can take months to rebuild, but it is absolutely possible.
Timeline: signs of recovery
- First 1 to 2 weeks: stabilization, no further decline, pot dries at a more normal pace.
- Weeks 3 to 8: new root tips (bright green points) are the best sign.
- Months 2 to 6: new leaf growth, firmer posture, healthier color.
- Next blooming cycle: often 6 to 12 months, depending on variety and home conditions.
Recovery is rarely instant. Think steady, not speedy.
Troubleshooting
My orchid is in a decorative pot with no drainage
Use it only as a cover pot. Keep the orchid in a draining inner pot and empty any collected water every time.
The bark dries out in one day
Your home may be very warm or dry, or the pot is too airy for your conditions. Mix in a little sphagnum moss, or water more thoroughly, but still only when nearly dry.
The bark stays wet for a week
Light may be low, temperatures cool, or the mix is too fine and broken down. Repot into fresh, chunky bark and increase light and airflow.
I see tiny bugs
Common culprits include fungus gnats (usually from overly wet media), mealybugs, and scale.
- Isolate the plant.
- Wipe leaves with a damp cloth to remove what you can.
- Treat with insecticidal soap or horticultural oil, following label directions, and repeat as directed since mealybugs and scale often require multiple rounds.
- Correct watering so the media is not staying soggy, especially for fungus gnats.
Rescue checklist
- Check crown for mushiness and remove standing water.
- Inspect roots. Trim dead, mushy, hollow roots with sanitized scissors.
- Repot in fresh orchid bark in a snug, well-draining pot.
- Water only when nearly dry, then drain fully.
- Move to bright, indirect light.
- Boost humidity to 40 to 60 percent and add gentle airflow.
- Keep temps steady and avoid cold drafts, especially near windows at night.
- Fertilize lightly only after stabilization.
If you want, tell me what kind of orchid you have (a quick photo helps) and what symptoms you are seeing. I can help you narrow down the exact cause, because orchid problems are usually a small mismatch in routine, not a personal gardening failure.