How To Revive An Orchid Plant
Orchids have a dramatic flair. One week they look like they belong on a magazine cover, and the next they are slumped over like they have given up on civilization. The good news is that most “dying” orchids are just stressed, not doomed. If you can get the roots happy again, the rest of the plant usually follows.
This guide focuses on the most common house orchid, Phalaenopsis (the classic grocery store orchid), but the rescue logic works for many others too.

First, a quick reality check
Before you start surgery, let’s separate “normal orchid behavior” from true trouble.
Not an emergency
- Flowers dropping: Blooms are temporary. When they fall, it is not death, it is a season ending.
- One bottom leaf yellowing: Many orchids shed an older leaf now and then.
- Slow growth: Orchids are not fast like pothos. They take their sweet time.
Needs help soon
- Wrinkled, limp leaves that stay limp even after watering
- Mushy, brown, or hollow roots
- Leaves turning yellow from the crown downward
- Funky smell from the potting mix
- Black spots spreading or a wet, collapsing crown
Diagnose, do not panic
When an orchid struggles, the cause is usually one of five things: watering practices (frequency plus drying), light, roots and potting mix, temperature swings, or pests. You will get the fastest answers by inspecting the roots and the crown.
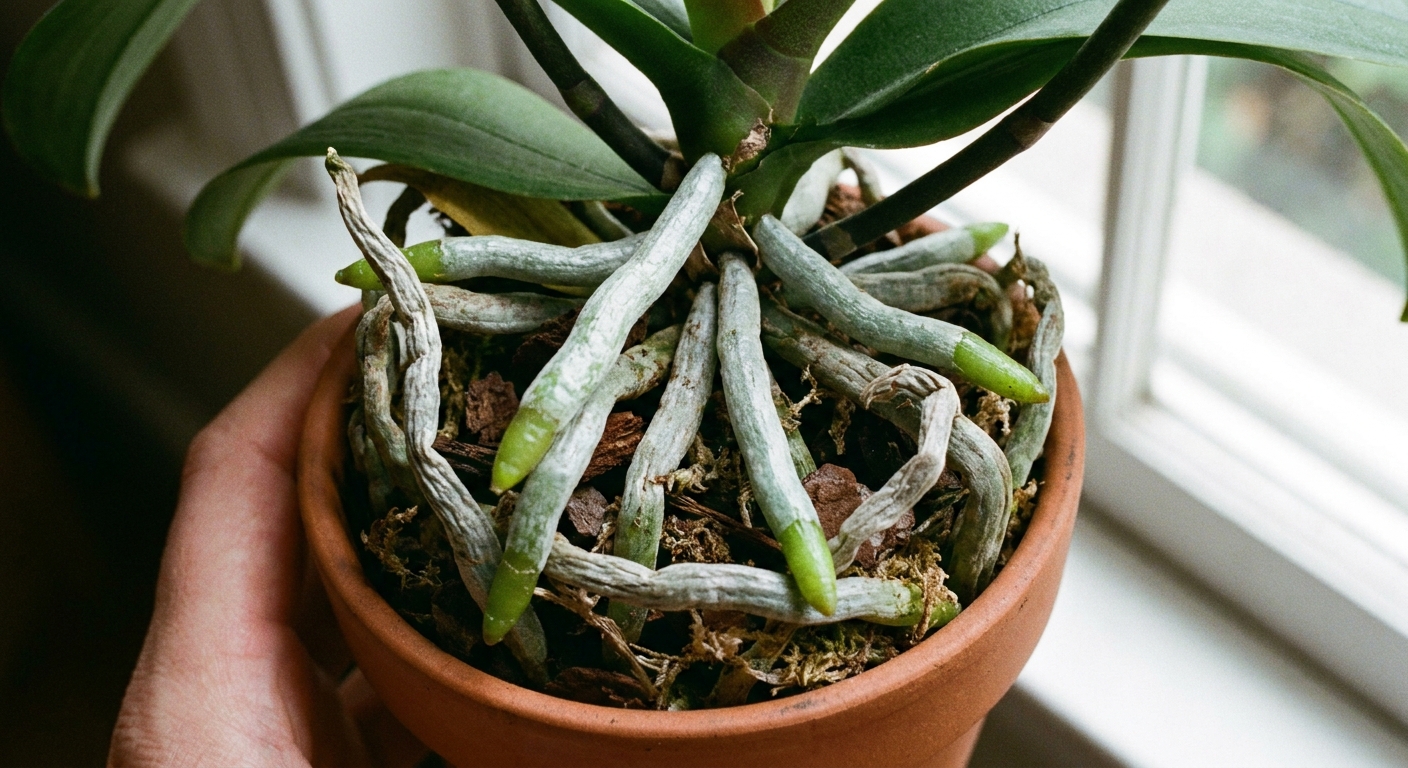
Step 1: Check the pot and roots
If your orchid is in a clear pot, you have a built-in window into its mood.
- Healthy roots: firm, plump, green when wet and silvery when dry.
- Dehydrated roots: thin, papery, shriveled, often gray and never really plump up.
- Rotting roots: brown or black, mushy, hollow, or the outer layer slips off when you pinch it.
If you cannot see the roots, gently slide the plant out of the pot. Do not worry, orchids handle repotting far better than people think.
How to revive an orchid
This is my go-to rescue routine. Set yourself up with a towel, a bowl, and a little patience. I also recommend saying something encouraging to the plant. It cannot hurt, and I am unapologetically pro pep-talk.
1) Gather supplies
- Clean scissors or pruning snips
- 70% isopropyl alcohol (for tool cleaning)
- Fresh orchid bark mix (or bark plus a little sphagnum moss)
- A pot with drainage (ideally clear, just slightly larger than the root mass)
- Cinnamon powder (optional, for cuts on roots only)
- Hydrogen peroxide 3% (optional, one-time emergency use for crown issues)
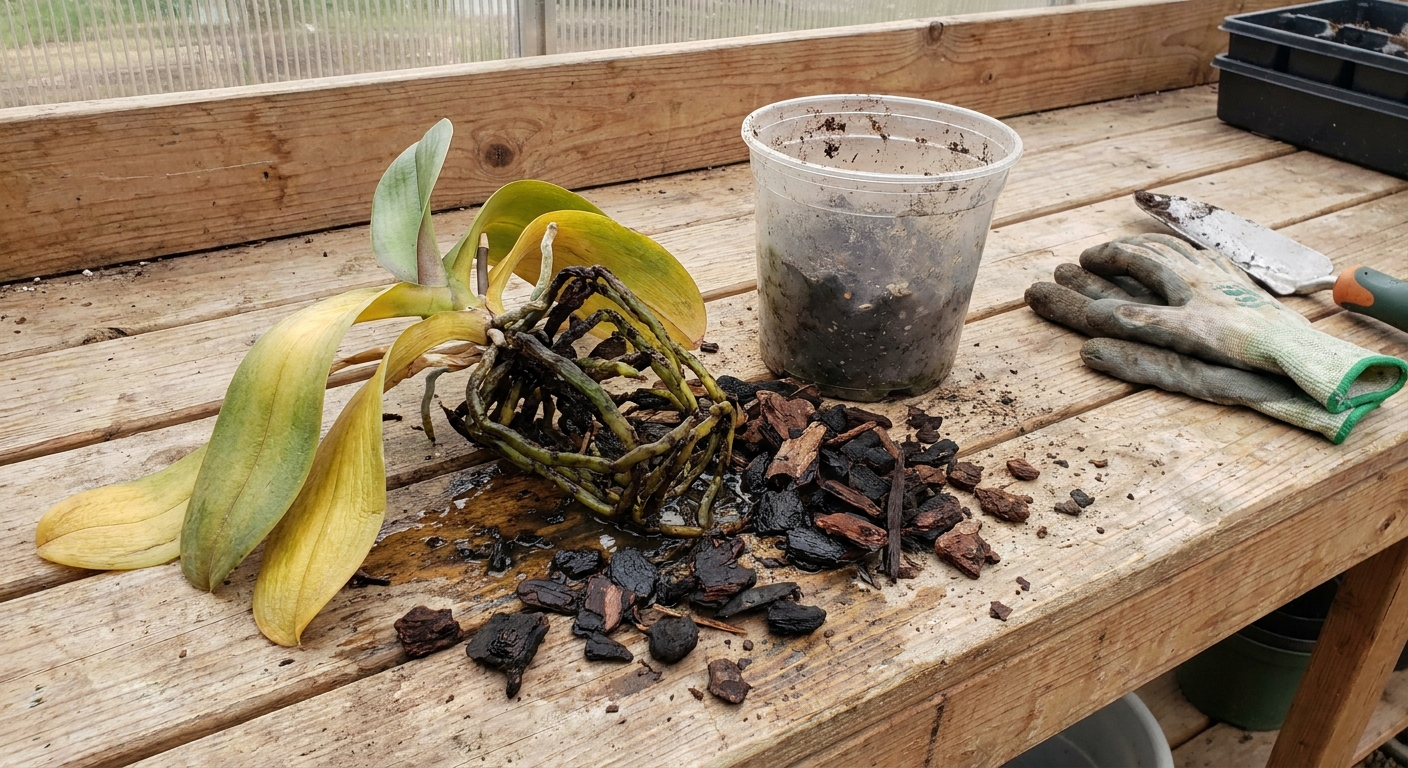
2) Remove old medium and inspect
Gently tease away old bark or moss from the roots. If it is stuck, soak the root ball in lukewarm water for 10 to 15 minutes, then continue.
Rule of thumb: old mix that smells sour, feels spongy, or looks like compost has to go. Orchid media should be airy, not soil-like.
3) Trim only what is truly dead
Sanitize your scissors with alcohol. Trim roots that are clearly gone: mushy, black, hollow, or sloughing their outer layer. Keep any root that is firm, even if it is wrinkled, stained, or looks a bit wild. Older or aerial roots can look rough and still do useful work.
If you want, dab a tiny bit of cinnamon on the cut ends of roots. Do not put cinnamon on the crown or leaves, it can be too drying.
4) Deal with crown problems now
The crown is the center where leaves emerge. If water sits there, it can cause crown rot, which is one of the few fast-killers.
- If the crown looks wet or dark and soft, tip the orchid sideways and wick out moisture with a paper towel.
- You can use a small splash of 3% hydrogen peroxide in the crown one time to bubble out trapped gunk, then let it drain and dry thoroughly. Some growers skip this entirely, and repeated use can irritate living tissue, so treat it like an emergency tool, not a routine.
- After that, keep the crown dry and improve airflow.
Expectation check: if the crown is mushy, foul-smelling, and collapsing, recovery is unlikely. Isolate the plant from your other houseplants while you decide what to do next.
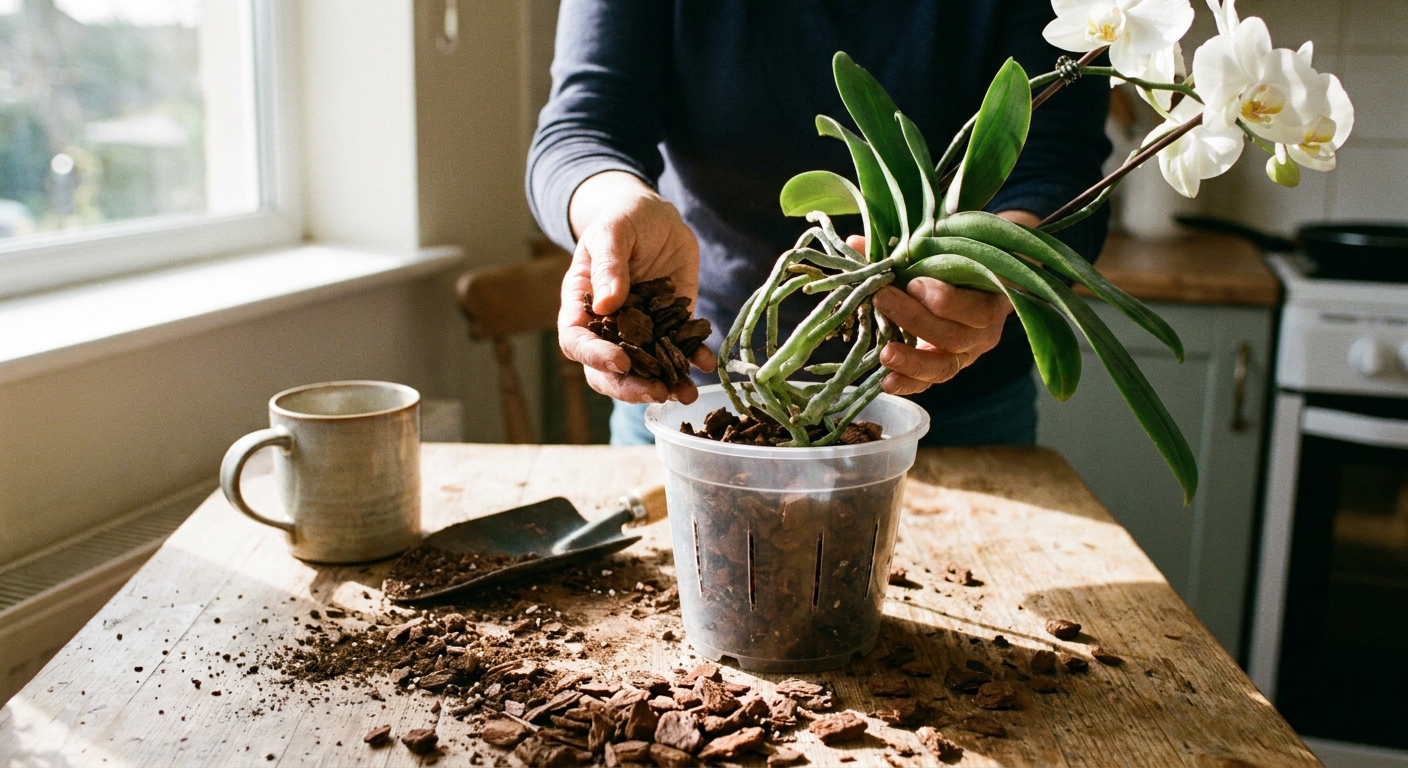
5) Repot correctly
Choose a pot that fits the remaining roots. Too large equals too wet.
- Hold the orchid so the base sits just above the pot rim line.
- Add bark mix around the roots, tapping the pot to settle it. Do not pack it like you are stuffing a sleeping bag.
- Keep the crown above the media. Leaves should never be buried.
6) Wait before heavy watering
If you trimmed many roots, give the plant 2 to 3 days before the first full watering so cuts can callus. If you barely trimmed, you can water sooner.
Watering that works
Most orchids fail from love. Specifically, frequent sips that keep the roots damp all the time. Orchids want a soak, then a chance to breathe.
Soak and dry
- Water thoroughly until it drains freely from the bottom.
- Let it drain completely. Never let the pot sit in water.
- Water again only when the mix is mostly dry and roots look silvery.
How often is normal?
It depends on your home. In many houses, that is every 7 to 10 days. In a warm, bright room it might be every 5 to 7 days. In winter, every 10 to 14 days is common.
Best water temperature and type
- Temperature: lukewarm is ideal. Cold water can shock roots.
- Type: rainwater, distilled, or filtered is gentler if your tap water is very hard. If tap water is your only option, flush the pot with plain water monthly to reduce salt buildup.
Avoid these watering traps
- Ice cubes as a long-term routine. It is a marketing hack, not orchid biology.
- Misting as “watering.” It bumps humidity for minutes, but does not hydrate roots.
- Water pooling in the crown or between leaves.
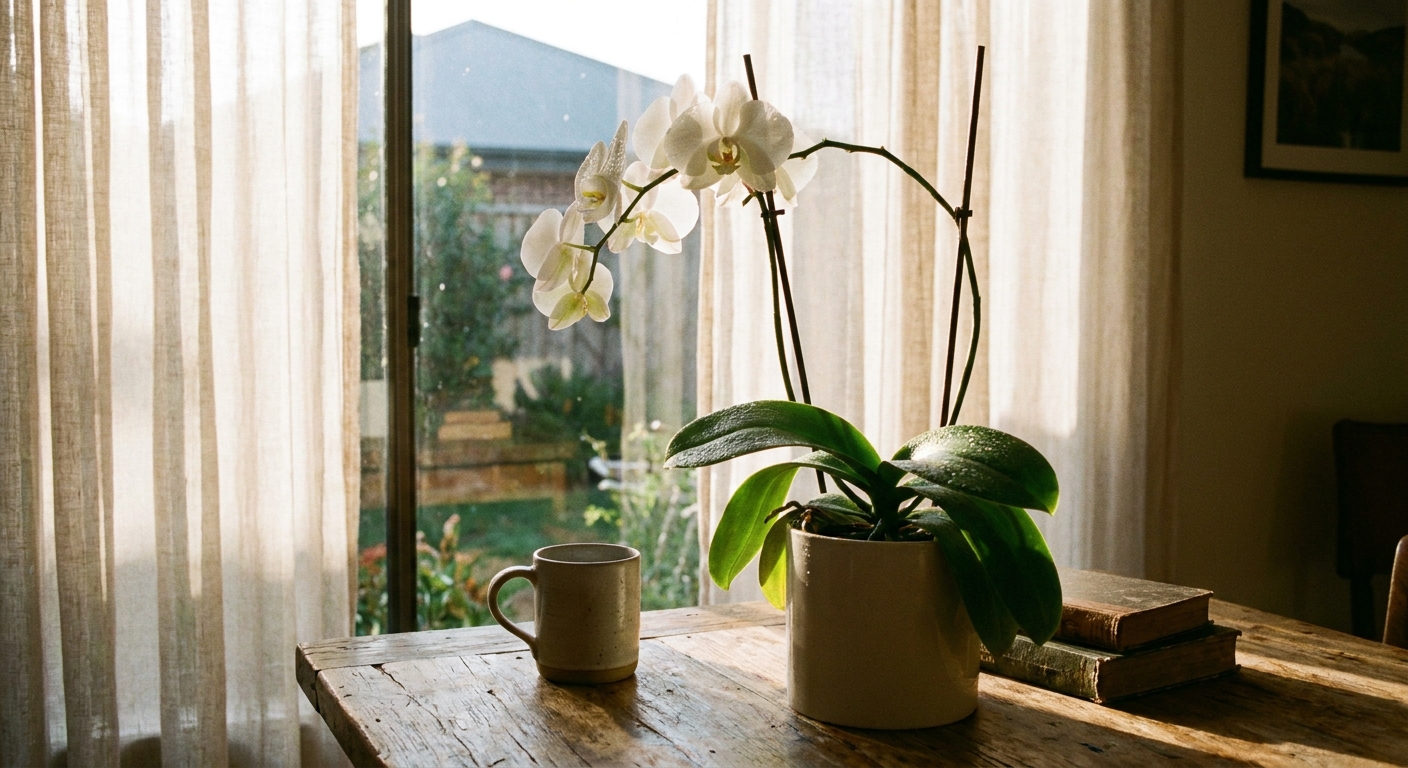
Light matters
If your orchid stays alive but never looks vigorous or refuses to bloom again, light is often the missing piece.
Best light for Phalaenopsis
- Bright, indirect light near an east window is a classic sweet spot.
- South or west windows can work if filtered with a sheer curtain.
Leaf color clues
- Medium green leaves: usually good.
- Very dark green: often too little light.
- Yellowing with scorched patches: usually too much direct sun.
Humidity and airflow
Phalaenopsis orchids like moderate humidity, roughly 40 to 60%. They also tolerate typical indoor humidity surprisingly well if watering is correct. What they do not love is stale air plus wet roots.
- Easy humidity boost: place the pot on a pebble tray with water below the pot base, or cluster plants together.
- Better than constant misting: run a small humidifier nearby in winter.
- Airflow: a gentle fan across the room helps prevent rot and fungus.
Temperature basics
Phalaenopsis prefer typical indoor temperatures, roughly 65 to 80°F (18 to 27°C). They dislike sudden drafts, heater blasts, and cold windowsills.
- Avoid: leaves pressed against a cold window at night, or a vent blowing directly on the plant.
- For blooming: a small nighttime temperature drop for a few weeks can help trigger a spike, about 10°F (5 to 6°C) cooler at night than daytime.
Pick the right potting mix
Orchid potting mix is about matching your home and your habits.
- All bark: dries faster. Great for people who tend to overwater or for lower-light homes.
- Bark plus a little sphagnum moss: holds moisture longer. Helpful in very dry homes or for underwaterers, but go easy because too much moss can stay wet and invite rot.
Fertilizer for recovery
An orchid in crisis does not need heavy feeding. It needs stable care. Once you see new root tips or a fresh leaf, gentle fertilizer can help it rebuild.
My simple routine
- Use a balanced orchid fertilizer (often labeled 20-20-20) or a urea-free orchid formula.
- Feed at quarter strength every 2 to 4 weeks during active growth.
- Once a month, flush the pot with plain water to wash out salts.
Tip: If you repotted into fresh mix, wait about 2 to 3 weeks before fertilizing.
Pest check
If your orchid is declining and the roots look fine, pests might be the quiet culprit. They love hiding in leaf joints and under the lip of the pot.
- Mealybugs: white cottony clusters, sticky residue.
- Scale: flat brown bumps that do not wipe off easily.
- Spider mites: fine webbing, speckled leaves, especially in dry air.
Isolate the plant, rinse leaves, and wipe with a cotton swab dipped in isopropyl alcohol for small outbreaks. For persistent infestations, use an insecticidal soap or horticultural oil, following the label.
Common scenarios
Droopy, wrinkled leaves
This is usually root trouble, not a leaf problem.
- Check roots for rot or dehydration.
- Repot into fresh bark if the mix is old or soggy.
- After repotting, keep light steady and avoid frequent tiny waterings.
Yellow leaves
- One bottom leaf yellow: normal aging.
- Multiple leaves yellowing quickly: often overwatering, poor drainage, cold stress, pests, or crown issues.
Root rot
Root rot is very fixable if you act early.
- Remove all mushy roots.
- Repot smaller if needed.
- Water less often, and increase airflow and light.
No blooms for a long time
Your orchid may be healthy, just not persuaded.
- Increase light gradually.
- Provide a small nighttime temperature drop for a few weeks in fall or winter, about 10°F (5 to 6°C) cooler at night than daytime.
- Do not over-fertilize. Too much nitrogen can mean lots of leaves, few flowers.
Looks dead, but something is still green
Let’s be specific: a green flower spike is not proof of life if the crown and roots are failing. What matters is a firm crown and at least some firm roots, or any solid green tissue at the base of the plant. If the crown is firm and you have any viable roots, keep it in bright indirect light, water carefully, and wait. Sometimes orchids surprise you.
Recovery timeline
Orchid revival is rarely instant. Here is what I look for.
- Week 1 to 2: plant stabilizes, no further yellowing, roots not getting worse.
- Week 3 to 6: new root tips appear as bright green or pinkish nubs, leaves feel slightly firmer.
- Month 2 to 4: a new leaf begins, root system fills in, watering rhythm becomes predictable.
- Month 6+: with good light and a gentle temperature drop, you may see a new flower spike.
If your orchid is recovering, resist the urge to keep changing things. Consistency is the secret ingredient.
Mistakes that slow recovery
- Using regular potting soil: orchids need air around roots.
- Oversized pot: extra media stays wet too long.
- Watering on a schedule: water based on dryness and root color.
- Leaving decorative cachepots full of water: drainage must be real, not theoretical.
- Chasing problems with constant products: most orchids improve from better light, fresh media, and correct watering.
Quick FAQ
Should I cut the flower spike off?
If the plant is struggling, yes. Cutting the spike lets it put energy into roots and leaves. Use clean scissors. If the orchid is otherwise healthy and the spike is still green, you can leave it, but recovery is usually faster if you remove it.
Can I revive an orchid with no roots?
Sometimes. If the crown is firm and there is any living tissue, you can try a high-humidity recovery setup with the plant positioned above lightly damp sphagnum (not packed against the crown). Keep it warm, bright, and ventilated to avoid mold. Results vary, but it is worth a try.
When should I repot an orchid normally?
About every 1 to 2 years, or when the bark breaks down and holds too much water. A struggling orchid with sour, decomposed mix should be repotted immediately, regardless of season.
A pep talk
If you have ever felt intimidated by orchids, you are not alone. They are not fragile divas, they are just particular about their roots getting air. Focus on the root zone, give bright gentle light, and keep water from lingering where it should not. Then let time do its slow, planty magic.
If you want, tell me what kind of orchid you have, what the roots look like, and how you water. I can help you narrow down the most likely cause and the quickest fix.