How To Rescue A Dying Orchid Plant
If your orchid looks like it is actively plotting its own demise, you are not alone. Orchids have a dramatic reputation, but most “dying” orchids are simply stressed. The good news is that the fix is usually a handful of small, specific changes, not a miracle.
Many big-box and grocery store orchids are Phalaenopsis (moth orchids). This guide focuses on those because they are common and forgiving. If yours has tall cane-like stems (Dendrobium) or thick pseudobulbs (Cattleya, Oncidium), the diagnosis steps still help, but care details can differ.

First: is it really dying?
Before you do anything drastic, check whether your orchid is actually in trouble or just doing normal orchid things.
Totally normal
- Flowers dropping after weeks of blooming. The plant can be healthy and still drop blooms.
- One older bottom leaf yellowing occasionally, especially after blooming.
- A green flower spike turning brown after flowering (sometimes they rebloom from the same spike, sometimes they do not).
Needs rescue attention
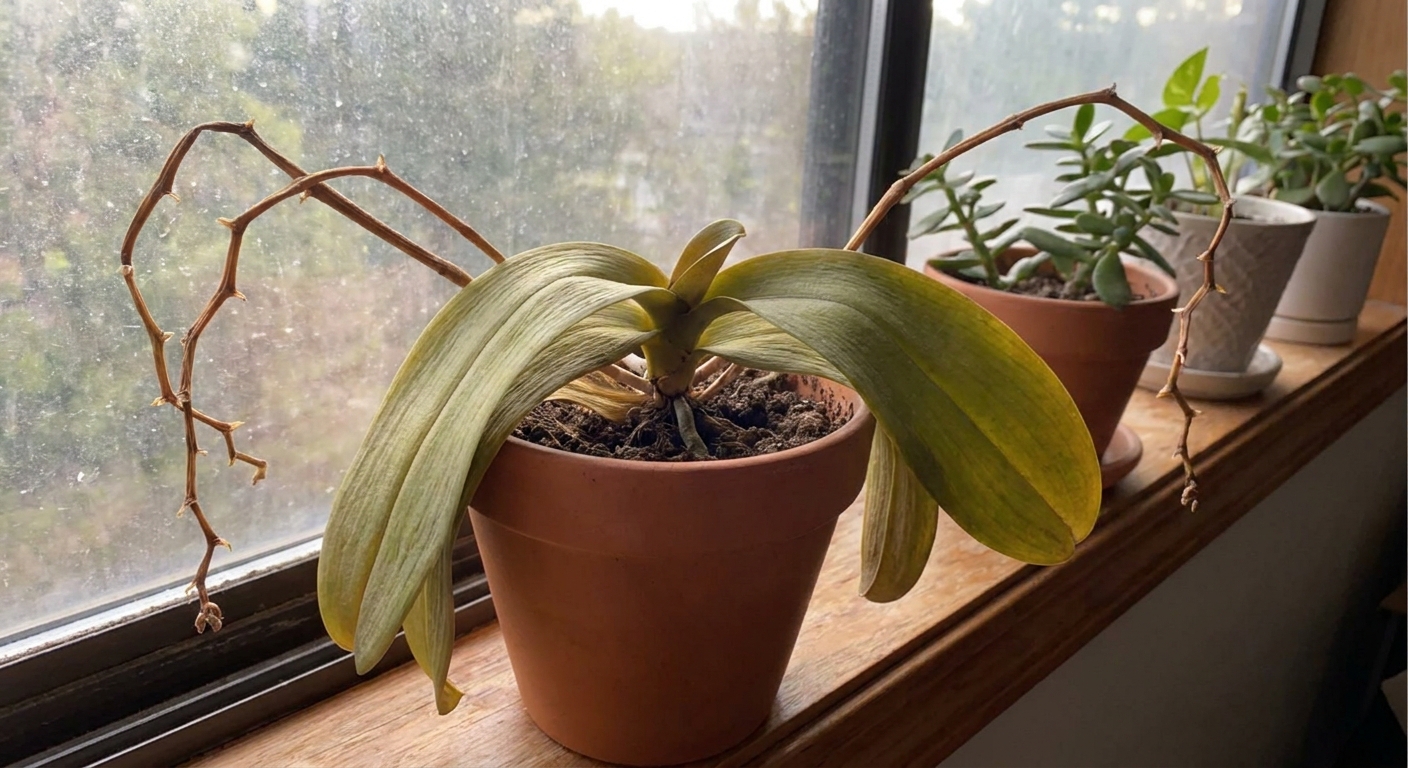
- Wrinkled, floppy leaves that look dehydrated.
- Multiple leaves yellowing fast, especially from the crown outward.
- Mushy roots or a sour, swampy smell in the pot.
- Black, spreading spots on leaves.
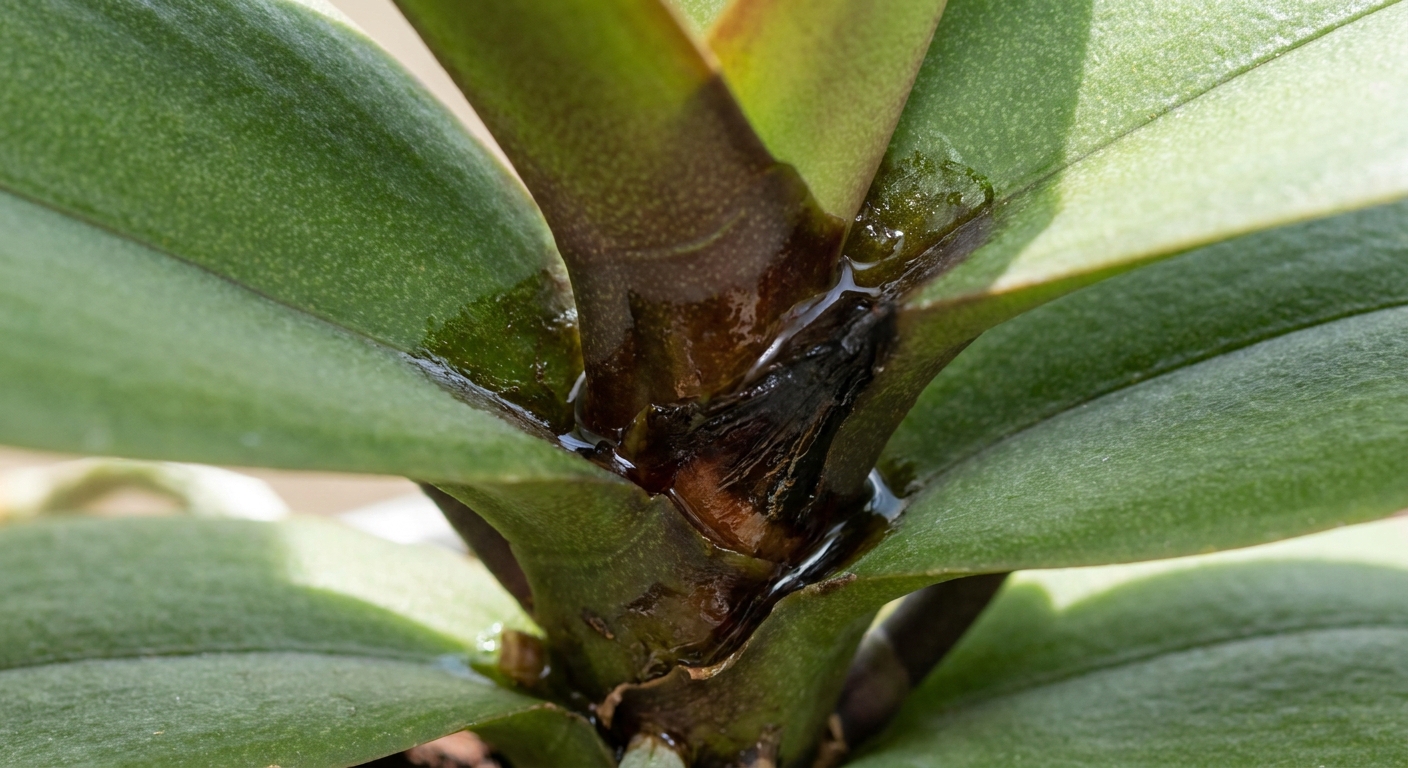
- Crown (center) looks wet, black, or collapsing.
Quick reassurance: after a repot and root trim, your orchid might look a little worse before it looks better. Leaves can stay limp while the plant rebuilds roots. New root tips are the real comeback sign.
Quick diagnosis
Orchid rescues go best when you treat the cause, not the vibe. Use this checklist to narrow it down.
1) Check the roots first
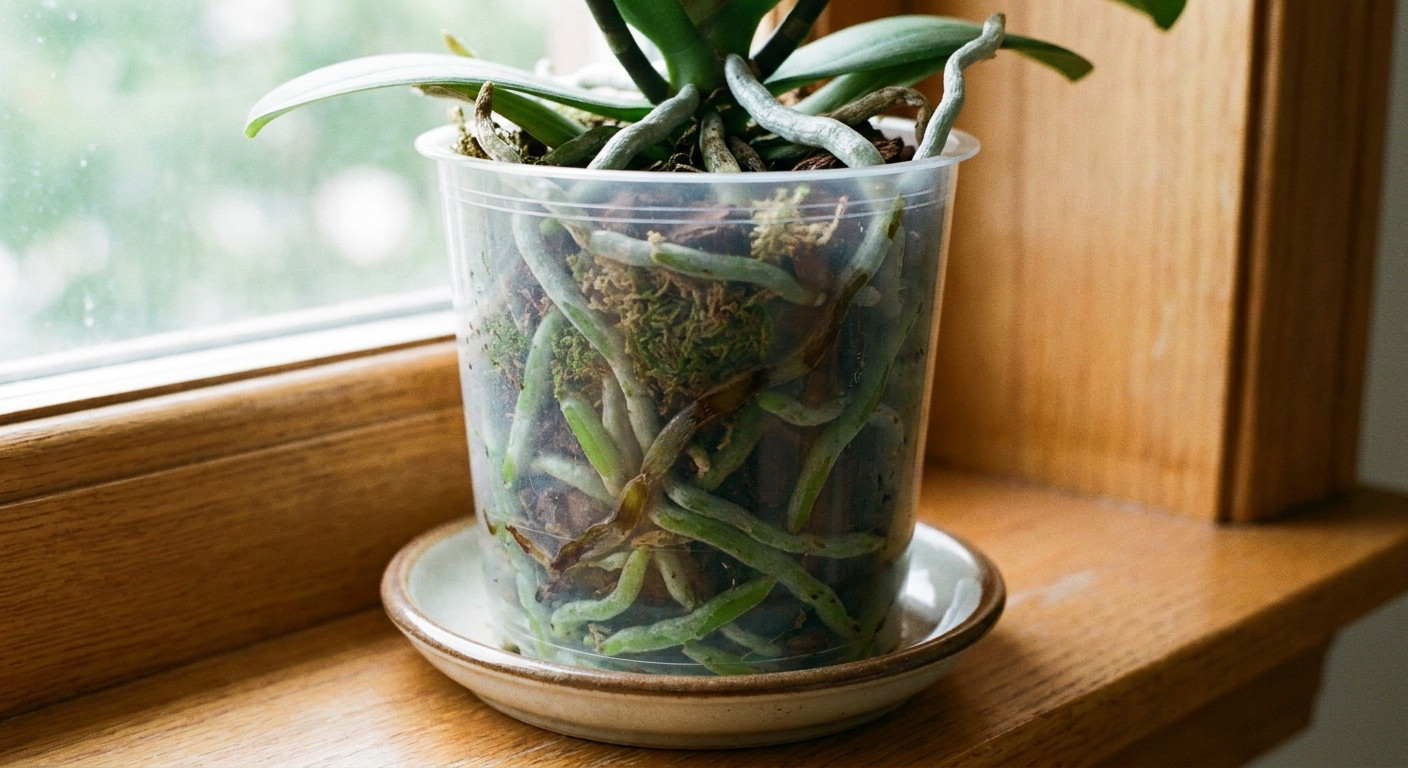
Healthy Phalaenopsis roots are firm. They are often green when wet and silvery when dry, but do not treat that like a strict mood ring. Roots deep in the pot can stay greener because of humidity and lower light.
How to check: If your orchid is in a clear pot, look through the sides. If not, slide it out gently and inspect.
2) Read the leaves
- Wrinkled leaves + dry, crisp roots usually means underwatering or potting mix that is old and water-repellent.
- Wrinkled leaves + mushy roots usually means overwatering leading to root rot. The plant is thirsty because the roots cannot drink.
- Yellow leaves + black, soft center can mean crown rot, often from water sitting in the crown.
- Sunken, bleached patches often mean sunburn.
3) Check the mix
Bark-based orchid mix breaks down over time. Once it decomposes, it holds too much water and suffocates roots. A common repot interval is about 12 to 24 months, but the real clue is what the mix is doing: if it smells sour, looks crumbly, stays wet too long, or roots keep failing, it is time.
Also common: some Phals are sold packed in sphagnum moss (sometimes with a dense “moss plug” in the center). Moss can work, but when it compacts it can stay wet for ages. If your orchid is in tight, old moss, assume it is part of the problem.
30-minute rescue plan
If you do nothing else, do these steps. This is the core of rescuing most struggling orchids: remove what is rotting, refresh the medium, and reset watering.
Step 1: Gather supplies
- Fresh orchid potting mix (chunky bark mix is ideal for Phalaenopsis)
- A pot with drainage (a clear orchid pot is great, but not required)
- Clean scissors or pruners
- Rubbing alcohol (for sterilizing tools)
- Cinnamon (optional, for small cuts on roots only)
- Paper towels
Step 2: Unpot and clean
Gently remove the orchid from its pot. Peel away old bark, moss, and any compacted gunk. Rinse the roots with lukewarm water so you can see what is alive.
Step 3: Trim dead roots
Sterilize your scissors with rubbing alcohol. Cut off roots that are:
- Brown and mushy
- Hollow and papery
- Black and collapsing
Keep roots that are firm, even if they look stained. When in doubt, gently squeeze. Firm is friend.
About cinnamon: it is a drying, surface-level helper, not a systemic cure. If you use it, dab it lightly on cut root ends only. Keep it off healthy roots and completely away from the crown because it can irritate and desiccate living tissue.
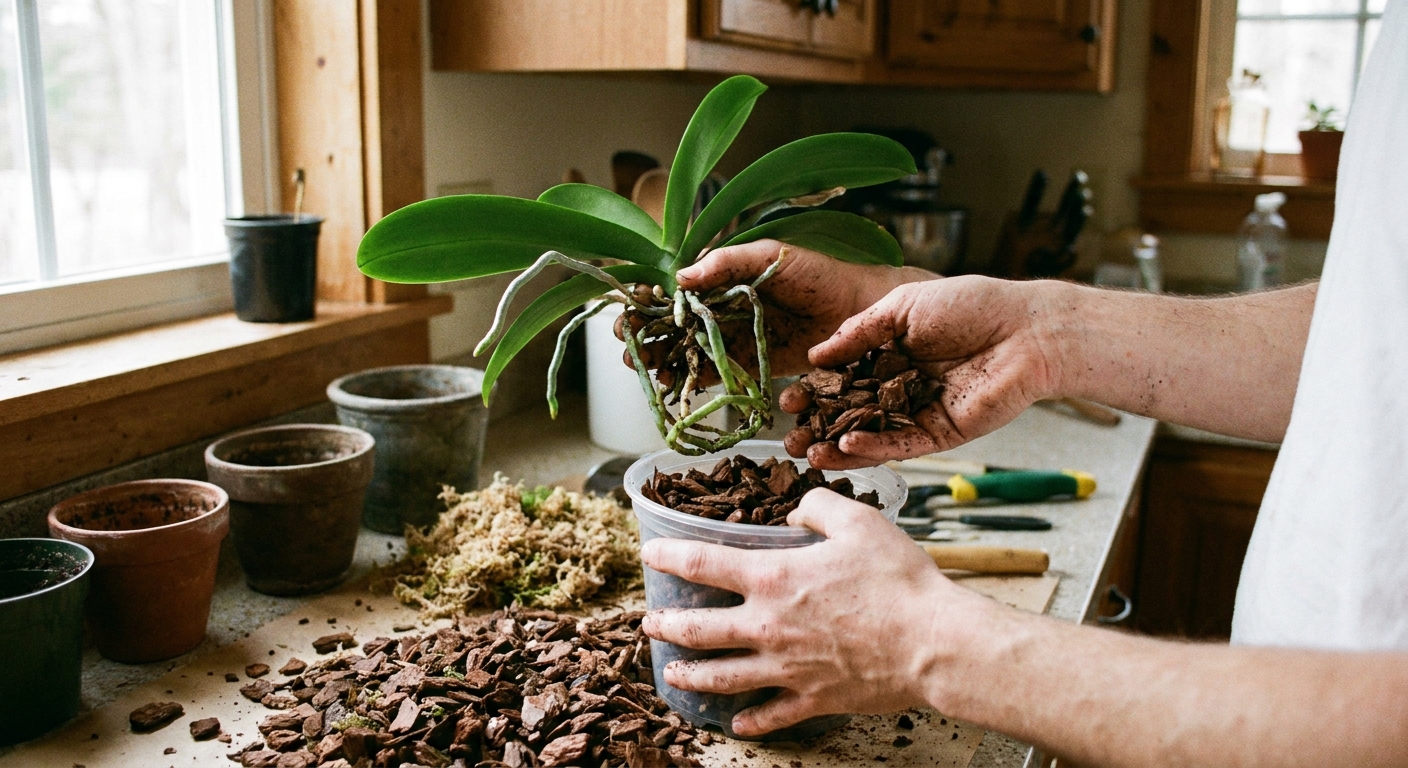
Step 4: Repot correctly
Choose a pot that fits the remaining root mass. Orchids like to be slightly snug. Hold the plant so the base sits just above the mix, then tuck bark around roots. Do not bury the crown.
Pro tip: Tap the pot on the counter to settle bark into air pockets instead of packing it down hard. Roots want airflow.
When not to repot
If your orchid is in spike or bloom and otherwise healthy, repotting can shorten the show. If the plant is crashing (rot, sour mix, failing roots), repot anyway. Pretty flowers are not worth losing the plant.
If it has root rot
Root rot is the number one reason orchids crash. It is also very fixable if the crown is still healthy.
What it looks and smells like
- Roots are brown, soft, slimy, or hollow
- Potting mix smells sour or swampy
- Leaves look limp even though you are watering
Aftercare
- Avoid soaking right away if you made lots of cuts. Many growers wait about 1 to 3 days before a full soak so cuts can dry slightly. If the plant is severely dehydrated or your home is very dry and warm, do not leave it bone-dry. You can water lightly around the mix, then let it drain.
- After that, water thoroughly, then let excess drain completely.
- Keep the plant in bright, indirect light and warm temperatures to encourage new roots.
- Avoid fertilizer until you see new root tips or a new leaf starting.
Expect recovery to take time. Orchids are slow and steady. New roots are the real sign you are winning.
If it is dehydrated
Dehydration can happen from underwatering, low humidity, or roots that cannot absorb water (often from old, compacted mix). If your roots are mostly firm but the plant looks shriveled, focus on consistent moisture without drowning it.
Try the soak method
- Place the pot in a bowl or sink.
- Add room-temperature water up to just below the pot rim.
- Let it soak for 10 to 15 minutes.
- Drain completely. No standing water in the cachepot.
How often to water
Instead of a calendar, use plant cues:
- Water when roots look mostly silvery and the pot feels light.
- If roots are green and the pot feels heavy, wait.
In many homes, that ends up being every 7 to 10 days, but your light, pot type, mix type (bark vs moss), and season matter more than the number.
Watering technique and water quality
A lot of “my orchid is dying” stories are really “my watering method is accidentally setting traps.”
How to water without crown rot
- Water the mix, not the leaves.
- Water in the morning so any stray moisture can dry by night.
- If water gets into leaf joints or the crown, blot it with a paper towel.
Water quality basics
- Use room-temperature water.
- Avoid softened water (it can add salts that stress roots).
- If you have very hard water or you fertilize regularly, flush the pot with plain water occasionally to reduce salt buildup (let a lot of water run through the pot, then drain fully).
Light, temp, airflow
Watering gets all the attention, but orchids often decline because their environment is slightly off for months.
Light
- Bright, indirect light is the sweet spot.
- An east window is often ideal.
- South or west windows can work if filtered with a sheer curtain.
If leaves are dark green and growth is slow, it may be too dim. If leaves have pale, bleached patches, it is likely too much direct sun.
Temperature
Most Phalaenopsis orchids like typical home temperatures: roughly 65 to 80°F (18 to 27°C). Avoid cold drafts and heating vents that blast hot, dry air.
Airflow
Still air plus wet mix is a recipe for rot. Gentle airflow from normal room circulation is great. You do not need a fan pointed at your orchid, just avoid crowded, stagnant corners.
Common scenarios
Yellow leaves
- One bottom leaf yellowing slowly: normal aging. Let it fall off on its own.
- Several leaves yellowing quickly: check roots for rot, check for cold damage, and make sure the crown stays dry.
Black spots on leaves
Isolate the plant if you have other houseplants nearby. Improve airflow and avoid splashing water on leaves. If spots are spreading and soft, trim the worst areas with sterilized scissors and keep the plant drier on the foliage side. If spotting is extensive or rapidly spreading, a targeted fungicide labeled for orchids may be warranted.
Wrinkled leaves but you are watering
This is classic root failure. Unpot and inspect. If roots are mushy, treat as root rot. If roots are mostly fine, you may have a hydrophobic, broken-down mix that is not wetting evenly. Repot into fresh bark, or refresh old moss that has compacted.
The crown is mushy or black
This is the hardest situation. If the crown is actively rotting, remove standing water immediately and keep the crown dry. Carefully remove obviously rotted tissue if it lifts away easily, then focus on warmth and gentle airflow.
Some growers use hydrogen peroxide here, but it is debated and can damage tissues if overused. If you choose to try it, use 3% household hydrogen peroxide only, apply a small amount once to bubble out debris, and do not repeat it routinely. Your safest “treatment” is dryness in the crown, better airflow, and patience. If the rot has reached the growing point, recovery is uncertain. Occasionally an orchid will produce a basal keiki (a baby plant) if enough tissue is still alive.
Pests that mimic decline
If your care seems fine but the plant keeps weakening, check for hitchhikers. Common orchid pests include mealybugs (white cottony clusters), scale (small brown bumps), and spider mites (fine webbing, speckled leaves). Isolate the plant, wipe pests off with cotton swabs and isopropyl alcohol, and follow up with an appropriate treatment if needed.
After the rescue
Think of recovery like rebuilding soil health. You are restoring the conditions that make growth possible.
Week 1 to 2
- Keep in bright, indirect light.
- Water only when the pot dries appropriately.
- Do not fertilize yet if you did major root trimming.
Weeks 3 to 8
- Watch for new root tips (green points) and a new leaf.
- Once you see new growth, feed lightly with an orchid fertilizer at quarter strength every 2 to 4 weeks.
Humidity without the mush
If your home is very dry, aim for moderate humidity, but keep roots airy:
- Use a pebble tray with water below the pot line.
- Group plants together.
- A small humidifier nearby works well.
Avoid misting into the crown. Water trapped in the center is a fast path to rot.
How to rebloom
A rescued orchid often needs time before it blooms, and that is okay. Focus on leaf and root health first.
Bloom triggers
- Bright, indirect light consistently
- Healthy roots in airy mix
- A gentle temperature drop at night for a couple of weeks (about 5 to 10°F cooler than daytime) can encourage spiking
What to do with the spike
- If the spike is green, you can leave it. Sometimes it branches and reblooms.
- If the spike is brown and dry, cut it near the base with sterilized scissors.
Rescue mistakes
- Watering on a schedule instead of checking roots and pot weight.
- No drainage, especially orchids kept in decorative pots without emptying excess water.
- Using regular potting soil that smothers roots. Orchids need air at the roots.
- Overpotting into a huge container that stays wet too long.
- Letting water sit in the crown after watering or misting.
- Ignoring the original medium, especially dense moss plugs that stay wet in the middle.
When to call it
If there is no firm tissue at the base, the crown has collapsed completely, and all roots are gone, the odds are not great. But if you have any firm roots or a firm base, it can be worth trying. Orchids can surprise you, especially when you stop fussing and simply give them steady light, airflow, and appropriately timed water.
If you want, tell me what your roots look like (firm and silvery, or mushy and brown), what kind of pot and mix it is in (bark or moss), and where it sits in your home. I can help you pinpoint the most likely issue in a few questions.