How to Repot a Houseplant

Repotting sounds like a big, fussy chore until you realize it is really just giving your plant fresh pantry space and a room that fits. Most houseplants do not need a new pot every year, but fast growers (like pothos and tradescantia) might ask for more frequent upsizing. Either way, plants appreciate fresh soil and a little breathing room when they ask for it.
Below, I will show you how to tell when it is time to repot, how to pick the right pot size, how to choose soil that matches your plant, and a step-by-step method that keeps roots happy and minimizes transplant shock.
Signs it is time to repot
Your plant will usually tell you when it has outgrown its setup. Here are the most reliable clues, from subtle to urgent.
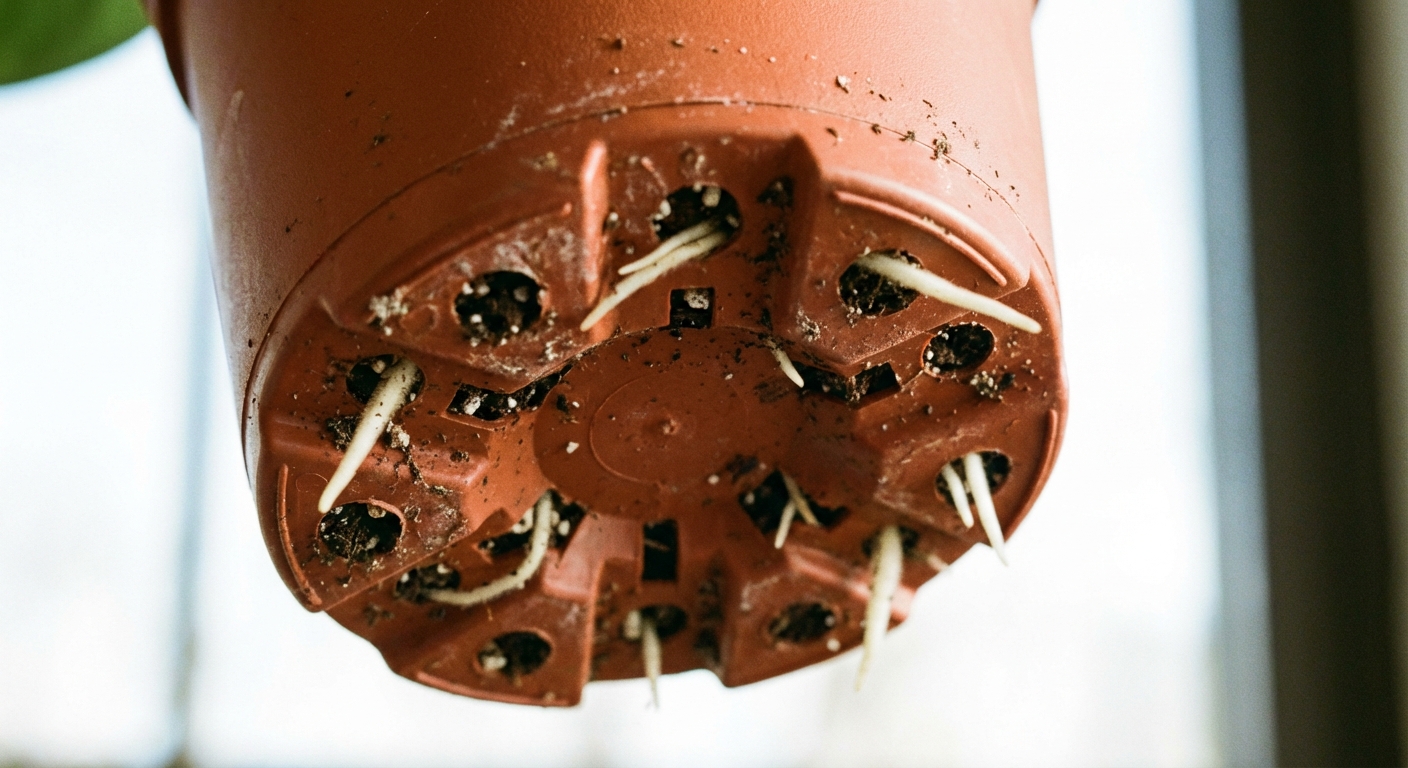
1) Roots circling or creeping out
If you slide the plant out and see roots wrapped around the inside like a cinnamon roll, that is classic root crowding. You might also notice roots poking out of drainage holes or lifting the plant upward.
2) Water runs straight through
When a pot is full of roots, there is less soil to hold moisture. You water, and it immediately pours out the bottom. The plant may act thirsty again a day later, even though you watered “properly.”
Quick caveat: fast runoff can also happen when peat-heavy mix dries too far and turns hydrophobic, or when water channels through compacted soil. Treat this as a strong hint, then confirm by checking the root ball.
3) Stunted growth during the growing season
If your plant normally puts on new leaves in spring and summer but seems stuck, it may be root-bound or depleted of nutrients. (Light and temperature can also be culprits, but crowded roots are common.)
4) The soil looks tired or behaves oddly
- Soil pulls away from the edges and becomes hard to re-wet.
- Water sits on top and drains slowly, which can happen when potting mix breaks down and compacts.
- A persistent musty smell that returns after watering can signal poor aeration.
5) The plant is top-heavy
If it tips over easily or the canopy is much wider than the pot, upsizing can be about stability, not just root space.
Timing tip: Most houseplants repot best in spring through early summer, right as active growth kicks in. You can repot in other seasons if the plant is struggling, but growth and recovery are typically slower in winter.
Repotting vs. potting up vs. soil refresh
These get lumped together, but they are slightly different “tools,” and choosing the right one keeps you from overdoing it.
- Potting up: Move the plant to a slightly larger pot with minimal root disturbance. Great for fast growers and plants that hate being messed with.
- Full repot: Remove old mix, loosen roots, and reset in fresh mix. Best when soil is compacted, there is salt buildup, watering has become tricky, or you suspect root issues.
- Top-dress refresh: Scrape off the top 1 to 2 inches (2 to 5 cm) of soil and replace with fresh mix. Helpful for big plants you cannot easily lift, but it is not a substitute for root space. Indoors, I usually reach for fresh potting mix plus a small sprinkle of worm castings rather than straight compost, since rich organics can invite fungus gnats.
Note on fungus gnats: repotting can help if the mix is staying too wet or breaking down, but it is rarely a solo fix. Pair it with better drying cycles, sticky traps, and BTI (mosquito bits) if needed.
How to choose the right pot size
If you remember one rule, make it this: go up just one size.
For most houseplants, that means moving to a pot that is 1 to 2 inches (2 to 5 cm) wider in diameter than the current pot (up to 3 inches for very large floor plants). Pot “sizes” are not perfectly standardized, so use the diameter as your guide. A pot that is too big holds extra wet soil around the roots, which can lead to root rot, fungus gnats, and “mystery yellowing.” (Yellow leaves can also come from light, watering habits, or nutrients, so use it as a clue, not a verdict.)
Snug-pot reminder: Some plants actually like a tighter fit (many hoyas and snake plants, for example). Do not upsize just because it has been a year. Upsize because the roots and soil are telling you to.
A quick pot-size cheat sheet
- 4-inch pot → 5- or 6-inch
- 6-inch pot → 7- or 8-inch
- 8-inch pot → 10-inch
- 10-inch pot → 12-inch
Drainage matters most
Pick what you love, but prioritize drainage.
- Must-have: at least one drainage hole.
- Terracotta: breathable and forgiving if you tend to overwater.
- Plastic or glazed ceramic: holds moisture longer, great for plants that dry out fast.
- Cachepot method: keep the plant in a nursery pot with holes and set it inside a decorative pot. Easy, clean, and very practical.
Soil selection by plant type
Potting soil is not one-size-fits-all. The goal is always the same: air + moisture balance. Roots need oxygen as much as they need water.
Aroid mix (pothos, philodendron, monstera, syngonium)
These plants like chunky, airy mixes that drain well but do not dry instantly.
- Good blend: 2 parts indoor potting mix + 1 part orchid bark + 1 part perlite or pumice
Succulents and cacti
Fast drainage is the whole game here.
- Good blend: 1 part potting mix + 1 part pumice/perlite + 1 part coarse sand or fine gravel
Tropical “even moisture” plants (peace lily, ferns, calathea, fittonia)
These appreciate a mix that holds moisture but still breathes.
- Good blend: 3 parts potting mix + 1 part perlite + optional small handful of fine orchid bark
Orchids
Most common house orchids (phalaenopsis) want bark-based media, not regular potting soil.
- Use: orchid bark mix with a little sphagnum moss if your home is very dry
Citrus, figs, and woody houseplants
They do well in a structured mix that drains nicely but does not collapse.
- Good blend: potting mix + perlite/pumice + a bit of bark for structure
Note on compost: I love compost, but indoors I use it lightly. Too much can make mixes dense (and sometimes gnat-friendly). If you add it, think “seasoning,” not “main ingredient.” Worm castings are a gentler indoor option.
Step-by-step: how to repot a houseplant
Set yourself up first. Repotting goes smoother when everything is within reach and the plant is not bone dry.
What you need
- A pot with drainage (and a saucer)
- Fresh potting mix suited to your plant
- Gloves (optional but nice)
- Trowel or spoon
- Chopstick or blunt skewer (for teasing roots and settling soil)
- Clean snips for trimming dead roots
Optional but smart: mild soap and a disinfectant (like diluted bleach) if you are reusing a pot, especially if rot was involved.
1) Water the plant (lightly) a few hours before
Slightly damp soil slides out more easily and reduces root breakage. Avoid repotting right after a deep soak where everything is soggy.
2) Prep the new pot
Add a thin layer of mix to the bottom.
You do not need rocks or gravel. They do not improve drainage in a meaningful way unless you change the soil structure itself. In fact, a layer of gravel can create a perched water table effect where water stays trapped in the soil above the rocks, keeping roots wetter than you intended. The simplest win is: use a well-matched potting mix and a pot with drainage holes.
3) Remove the plant
Tip the pot on its side, support the plant at the base, and gently work it out. If it is stuck, squeeze a plastic pot or tap the rim. For terracotta, run a butter knife around the inside edge.

4) Check the roots (and do a quick pest scan)
Healthy roots are usually light-colored and firm. Dark, mushy, or hollow roots are not doing their job.
This is also a great moment to look for hitchhikers around the crown and on the root ball. Mealybugs can hide in tight leaf joints, and while root pests are rarer indoors, it is worth a quick look.
- If roots are circling: tease them loose with your fingers or a chopstick.
- If the plant is very root-bound: you can lightly score the outer root layer in a few vertical lines to encourage new outward growth. Keep it gentle and only do this when the roots are truly packed, not as a routine step.
- If you find rot: trim off mushy roots with clean snips, then repot into a faster-draining mix. Wash and disinfect the pot before reusing it.
Bonus check: If your plant came in a nursery plug, mesh, or a peat “cage,” remove it if you can. Those can restrict roots and create weird wet spots in the pot.
5) Place at the right height
Set the plant so the top of the root ball sits about 1 inch below the rim. Keep the crown (where stems meet soil) at the same depth it was before. Burying it deeper can invite rot.
6) Add soil and settle it gently
Fill around the sides with fresh mix. Use a chopstick to nudge soil into air pockets, but do not pack it down hard. Roots want little air gaps, not concrete.
7) Water in, then pause
Water thoroughly until it drains. This helps the mix settle around the roots.
- If your plant likes evenly moist soil: water as usual, then let the top inch or so dry before watering again. Fresh mix often stays wetter than you expect, so resist the urge to keep topping it off.
- If your plant is an aroid: a thorough water-in is great, then allow a partial dry-down (top 1 to 2 inches) so the roots can breathe.
- If your plant is a succulent or cactus: often wait 2 to 7 days before watering, especially if you disturbed roots. The goal is to let any tiny root breaks callous over first. If your home is very warm and dry or the roots were barely touched, you may not need the full wait.
8) Aftercare for the next 1 to 2 weeks
- Give bright, indirect light. Skip harsh sun for a bit.
- Hold off on fertilizer for about 3 to 4 weeks, especially if your fresh mix contains slow-release fertilizer. (If you use a very inert mix, like mostly bark and perlite, you may feed a bit sooner, but keep it gentle.)
- Expect a small pause in growth. That is normal. If leaves droop, check moisture and give it time to re-root.
Common repotting mistakes
Jumping up too many pot sizes
This is the number one beginner trap. Big pot equals big puddle of wet soil. Most houseplants prefer gradual upsizing.
Using garden soil indoors
Outdoor soil compacts in containers and can bring pests. Stick with indoor potting mixes and amendments like perlite, bark, and coco coir.
Skipping drainage holes
Even “careful” watering becomes risky without drainage. If you love a pot with no holes, use it as a cachepot.
Overhandling delicate roots
Some plants hate rough root work (peace lilies are dramatic, ferns are sensitive, hoyas can sulk). If the soil is fine and you mainly need space, pot up with minimal disturbance.
Fertilizing immediately
Fresh mix and newly disturbed roots do not need a buffet right away. Let the plant settle first.
Quick FAQ
How often should I repot houseplants?
Many common houseplants do well with repotting every 12 to 24 months, but it depends on growth rate, pot size, and your conditions. Fast growers may need it sooner, slow growers can go longer. Use the signs, not the calendar.
Should I loosen the roots every time?
If roots are lightly holding the shape of the pot, gently loosening the outer layer is helpful. If the plant is not root-bound and you are just refreshing soil, keep disturbance minimal.
Why is my plant drooping after repotting?
Mild droop can be normal transplant shock. Keep it out of hot sun, maintain appropriate moisture, and give it a week. If droop worsens, check that the soil is not staying soggy and that the plant is not planted too deep.
A gentle pep talk
Repotting is not a test you can fail. It is a conversation with your plant: “Are you comfy in there?” If the answer is no, you are simply giving it the next size up in shoes and a fresh, fluffy bed to stretch into.
If you want more help for truly root-bound plants, Leafy Zen also has a deeper “rescue mode” approach that walks through stubborn, compacted root balls and recovery care. But for everyday repotting, this guide will keep you confidently in the green.