How to Propagate an Anthurium at Home
If your anthurium has been quietly thriving and throwing out those glossy, heart-shaped leaves, propagation is the next joyful step. It feels a little like getting a “bonus plant” from the one you already love. The best part is that anthuriums are usually happiest when you propagate them the same way you’d naturally tidy them up: by dividing a crowded plant during repotting or separating offsets when they show up.
In this guide, I’ll walk you through three at-home methods that actually work for beginners: division at repot (my favorite), basal offsets (the easiest when available), and stem cuttings (a little fussier, but totally doable with humidity). I’ll also show you what to do afterward, because anthuriums can be slow rooters, and how to spot crown rot before it steals your success.

Before you start
Many commonly sold houseplant anthuriums are hybrids in the Anthurium andraeanum group (the classic waxy red or pink spathes). A lot of today’s “fancy foliage” anthuriums are sold under names like A. clarinervium, crystallinum, magnificum, warocqueanum, or hybrids and lookalikes, and labels aren’t always perfect. The propagation steps are similar across the board, but the pace can vary a lot by plant and conditions. Foliage types often appreciate higher humidity and can be slower to root, but there are always exceptions.
Quick anatomy check
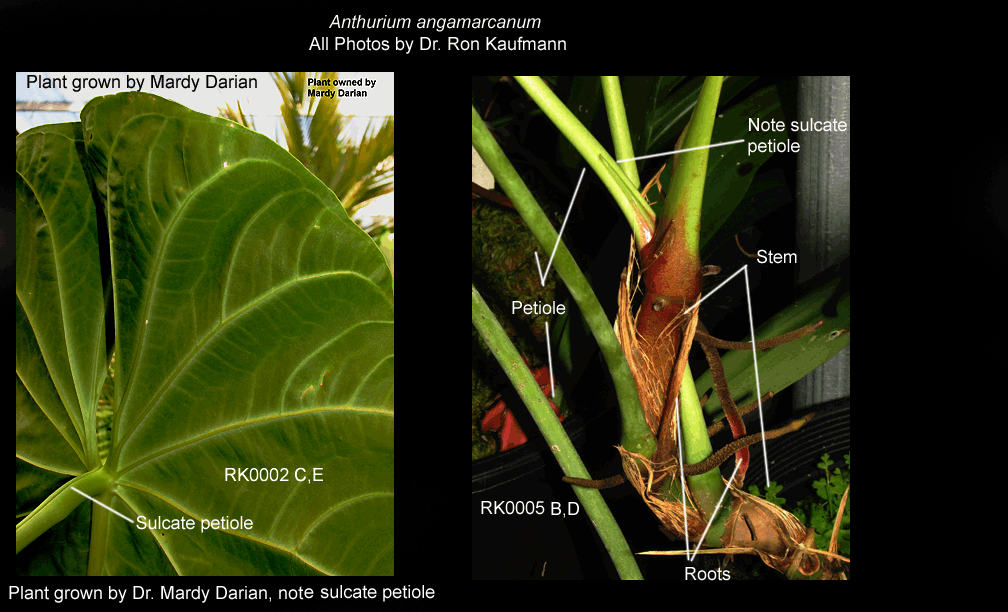
- Crown: where leaves and roots meet. Keep this from sitting wet.
- Nodes: points on the stem where roots and leaves can form. Cuttings need at least one node.
- Basal offsets: baby plants emerging from the base of the mother plant (not every anthurium makes these often).
- Aerial roots: roots that grow above the soil line. These are a huge help for stem cuttings.
If you’re not sure which method fits your plant, peek at the base. If it looks like a clump with multiple growth points, you’ve probably got a good candidate for division. If you see a distinct baby with its own little roots, go for an offset. If you’ve got a longer stem with nodes and a few aerial roots, that’s when stem cuttings can shine.
Supplies
- Clean, sharp pruners or a knife (wipe with isopropyl alcohol)
- Small pots with drainage holes
- Fresh anthurium-friendly mix (chunky, airy, fast-draining)
- Sphagnum moss or perlite (optional but helpful for cuttings)
- Clear plastic bag or humidity dome (for cuttings)
- Gloves (anthurium sap can irritate skin)
Quick safety note: anthuriums are irritating if chewed or ingested (people and pets), so keep cuttings and sap away from curious mouths.
A simple potting mix
Anthuriums love oxygen around their roots. If your mix stays soggy for more than a day or two, propagation is where things can go sideways fast.
- Base: 2 parts orchid bark
- Moisture buffer: 1 part coco coir or peat
- Air space: 1 part perlite or pumice
- Optional: a small handful of horticultural charcoal
If you already have a good aroid mix, use it. The goal is the same: moist, not wet, with plenty of air pockets.
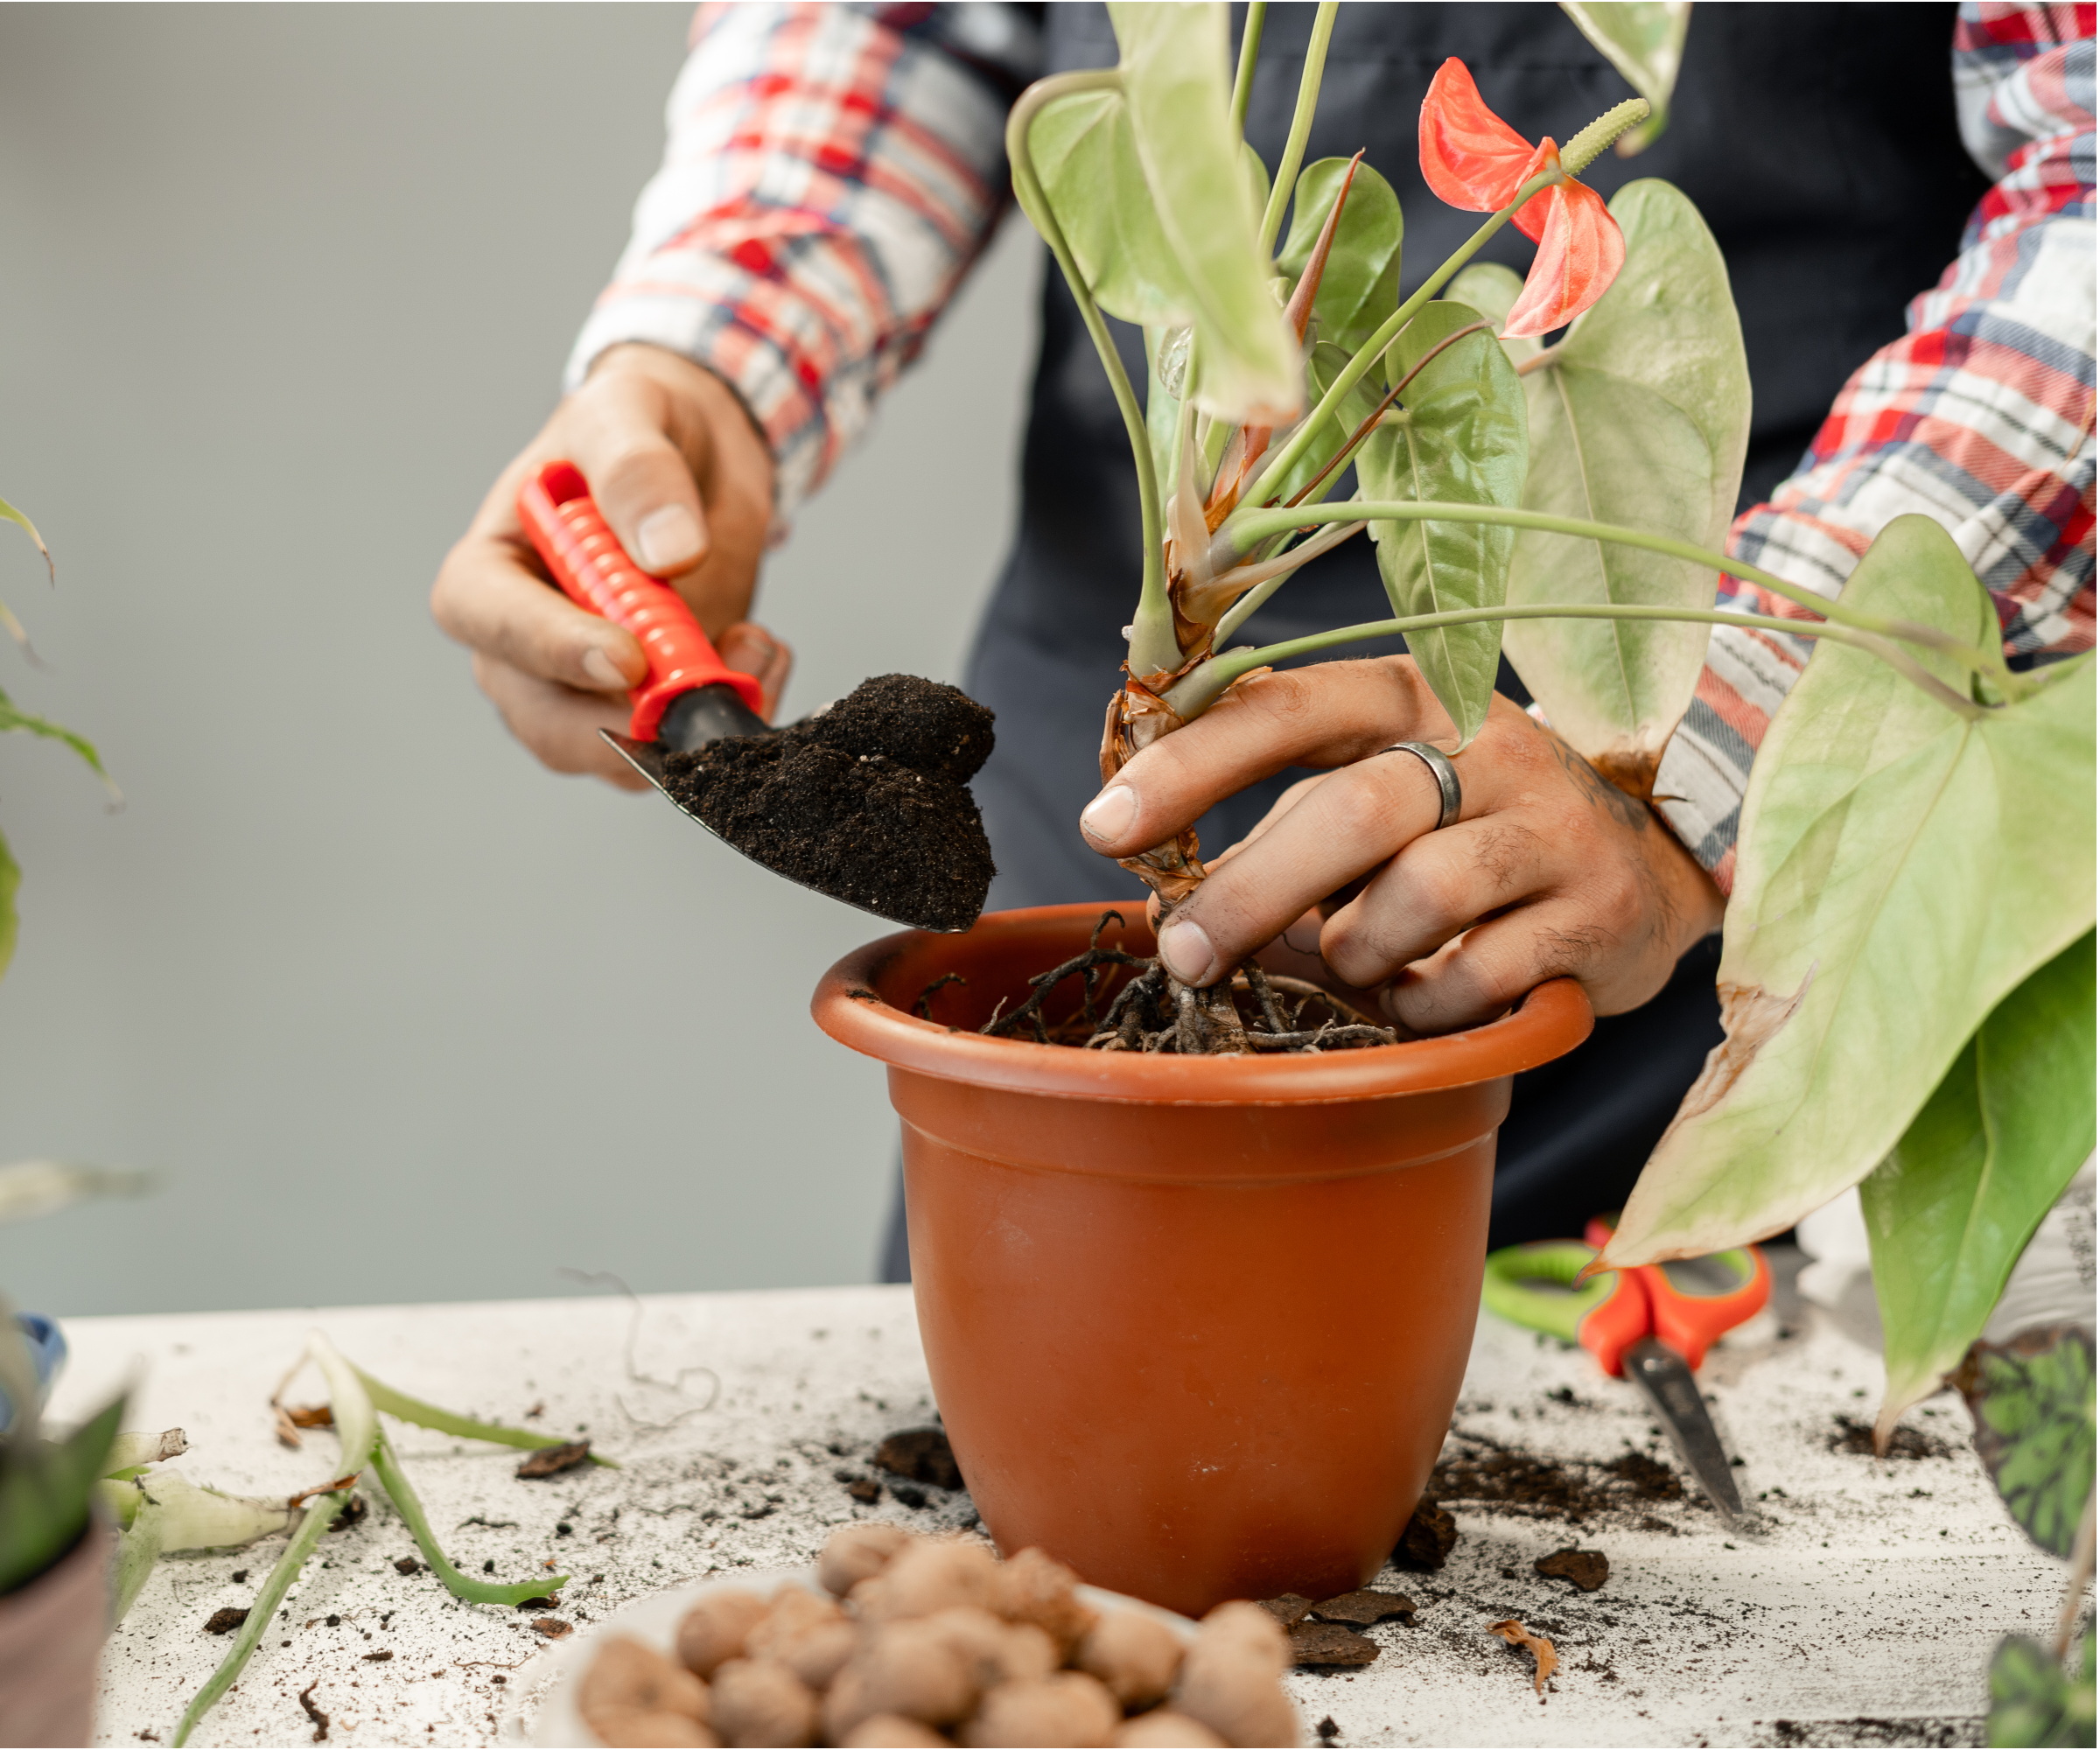
Method 1: Division
This is the cleanest, most reliable way to propagate anthurium at home. You’re not asking the plant to invent roots from scratch. You’re simply separating what it already grew.
When to divide
- Roots circling the pot or pushing up the plant
- Several distinct growth points in one pot
- Water runs straight through because the pot is packed with roots
- Best timing: spring through early summer (but indoors, you can do it anytime if the plant’s healthy)
Step-by-step
- Water the day before. Slightly hydrated roots are more flexible and less likely to snap.
- Slide the plant out. Support the base and gently wiggle it free.
- Loosen the root ball. Tease apart roots with your fingers, working from the bottom and sides.
- Find natural separations. Look for sections that already have their own roots and at least 2 to 3 leaves.
- Separate. Use your hands where possible. If roots are tightly fused, make a clean cut with a sterilized knife.
- Pot up. Place each division in a small pot. Keep the crown at or just above the soil line so water can’t pool against it.
- Water lightly. Moisten the mix evenly, then let excess drain completely.
Keep your divisions a touch snug in their new pots. Oversized pots hold too much wet mix, which is basically an invitation to rot.

Method 2: Offsets
If your anthurium has produced basal offsets, congratulations. The plant’s basically doing the propagation planning for you. Just know that many anthuriums don’t offset frequently, so if you’ve never seen one, you’re not doing anything wrong.
When an offset is ready
- It has at least 2 leaves of its own
- You can see or feel its own roots, not just attached tissue
- It’s large enough to handle without snapping (often 3 to 6 inches tall, depending on variety)
Step-by-step
- Unpot or gently excavate. You can do this at repotting, or carefully move mix aside to expose the connection.
- Locate the “bridge.” Offsets are typically connected by a short stem or shared crown tissue.
- Cut cleanly. Sterilize your blade and cut between mother and offset, aiming to keep as many offset roots intact as possible.
- Pot the baby. Use a small pot and airy mix. Keep the crown at or slightly above the surface, and avoid water pooling at the base.
- Keep conditions steady. Offsets are usually less dramatic than cuttings, but they still love stable moisture and warmth while they settle in.
If the offset has no roots at all, treat it like a cutting and use the humidity-dome method below. Rootless offsets can work, they just need a little more babying.
Method 3: Stem cuttings
Stem cuttings are the method most likely to be called “easy,” and also the one most likely to end in a mushy stem if conditions are too wet and cold. I still use it, especially for leggy plants with visible nodes and aerial roots, but I do it with air flow, warmth, and humidity control in mind.
Choose a good cutting
- Pick a stem section with at least one node (two is better)
- If possible, include an aerial root or root nub
- Aim for 1 to 2 leaves on the cutting. If the leaves are huge, you can trim them slightly to reduce moisture loss
Step-by-step
- Sterilize your tool. Clean cuts lower infection risk.
- Cut below a node. Make one smooth cut, no sawing.
- Optional: let it dry a bit. You can let the cut end air-dry for about an hour on a clean surface. Some growers pot right away, so don’t stress this step.
- Root in damp moss or perlite. Moisten, then squeeze hard. It should feel like a wrung-out sponge.
- Set the cutting. Nestle the node into the medium, keeping leaves above the surface.
- Create a humidity dome. Use a clear bag or dome and keep it propped so it doesn’t press on leaves.
- Vent daily. Open for a minute or two each day to refresh air and discourage fungal issues.
- Bright, indirect light and warmth. Think near an east window, or a few feet back from a bright south or west window. Warmth helps too. A spot around 70 to 80°F is ideal, with humidity often happiest around 60 to 80% for rooting.
Important: don’t bury the crown and don’t keep the stem soaking wet. You want humidity in the air, not a swamp at the node.

Aftercare
Anthuriums can take their sweet time. A cutting that looks unchanged for weeks may still be working underground. The trick is to keep conditions steady and avoid “helping” too much.
Right after propagating
- Hold back on fertilizer. Wait until you see new growth or firm resistance when you gently tug.
- Water lightly. Keep the mix evenly moist, never swampy. Let the top inch dry slightly for potted divisions and offsets.
- Keep light consistent. Bright, indirect light supports rooting without scorching.
- Keep temperatures warm. Cool rooms slow rooting and raise rot risk.
When to remove the humidity dome
For cuttings and rootless offsets, remove the dome gradually. Start by venting longer each day for a week, then leave it off for a few hours daily, then retire it completely once the plant stays perky.
How long it takes
These are estimates, and your species or cultivar, light, temperature, and humidity will absolutely move the timeline around.
- Division: often minimal slowdown, new growth in about 2 to 6 weeks
- Offsets with roots: often about 3 to 8 weeks to settle and push growth
- Stem cuttings: often about 4 to 12+ weeks
When to up-pot
Up-pot when you see active new growth and roots reaching the pot edges (or circling the bottom). If you tug gently and it feels anchored, that’s a good sign. Size up just one pot size so the mix doesn’t stay wet too long.
If you’re a chronic over-checker, try this gardener’s compromise: label the pot with the date and promise yourself you won’t tug-test for at least two weeks. I say this with love because I’ve hovered over plenty of moss cups like a nervous parent.
Crown rot
Most anthurium propagation failures trace back to one thing: the start stayed too wet with not enough air. Crown rot can move fast, so learning the early signs is worth it.
Early signs
- Soft, squishy base at the crown or stem
- Yellowing leaves that feel limp, not crisp
- Dark, water-soaked tissue near the soil line
- Sour smell from the potting mix
- Cutting that wobbles because the node is breaking down
What to do
- Unpot immediately. Don’t wait for “one more day.”
- Remove all mushy tissue. Cut back to firm, clean tissue with a sterilized blade.
- Discard wet medium. Don’t reuse it.
- Let the plant dry slightly. Give it an hour or two in open air.
- Restart in fresh, airy mix. Use a smaller pot and water sparingly.
If rot has reached the only node on a cutting, that cutting is usually a loss. If you’ve got another node higher up that’s still firm, you can recut above the rot and try again with a drier medium and better ventilation.
Common questions
Can I propagate anthurium in water?
You can, and some people have great luck with it. I don’t usually recommend it as the first choice for beginners because stagnant water and cool temps can invite rot, and the switch from water roots to a chunky mix can be a little bumpy. If you try it, keep the water clean (refresh it regularly), keep it warm, and move to an airy mix once you’ve got several strong roots.
Should I use rooting hormone?
Optional. Divisions and rooted offsets don’t need it. For stem cuttings, a light dusting can help, but humidity control and oxygen at the node matter more than any powder.
Should I cut off flowers?
If a new division or offset tries to flower right away, I usually remove the bloom stalk. Early energy is better spent on roots and leaves.
Why isn’t my cutting rooting, but it’s not dying either?
That’s classic anthurium behavior. As long as the stem stays firm and the node looks healthy, keep conditions steady. Warmth and bright, indirect light often nudge things along.
A gentle mindset
If you remember one thing, let it be this: anthurium propagation rewards patience and airiness. Keep the crown from sitting wet, keep humidity high but the rooting medium only lightly moist, and let the plant do its slow, steady work.
And if your first attempt flops, welcome to the club. Every gardener I trust has composted a few “learning experiences.” The next try is usually the one that sticks, especially once you get a feel for that sweet spot between moist and too wet.