How to Propagate a Fiddle Leaf Fig
If your fiddle leaf fig has gotten tall and leggy, dropped a few leaves, or is simply outgrowing your space, propagation is the most satisfying kind of “pruning.” You get a healthier, better-shaped parent plant and a brand-new baby Ficus lyrata to share (or keep, no judgment). I talk to my ferns, so yes, I also tell my fiddle leaf fig it is doing a brave thing.
Below, I will walk you through three reliable methods: stem cuttings in water, stem cuttings in soil, and air layering. I will also cover the best time of year, what to do while you wait for roots, and how to troubleshoot the most common reasons propagation fails.
Before you start
What you will need
- Healthy fiddle leaf fig with a stem that has at least 2 to 4 leaves and visible nodes
- Sharp, clean pruners or a sterile knife (wipe with isopropyl alcohol)
- A clear jar (for water propagation) or a small nursery pot with drainage (for soil propagation)
- Fresh potting mix (details below) or clean water
- Optional: rooting hormone (helpful, not required)
- Optional: a clear plastic bag or humidity dome (use carefully)
- Paper towels for the sap
Nodes matter more than leaves
Roots come from nodes, the little bumps or rings on the stem where leaves attach. A cutting can lose a leaf and still root, but a cutting without a node will not.
Pick a good node
Choose a section with clearly visible node spacing and healthy, firm stem tissue. Avoid very thin, floppy growth and, if you can, avoid the oldest, super-woody sections that tend to root more slowly.
A quick word about sap
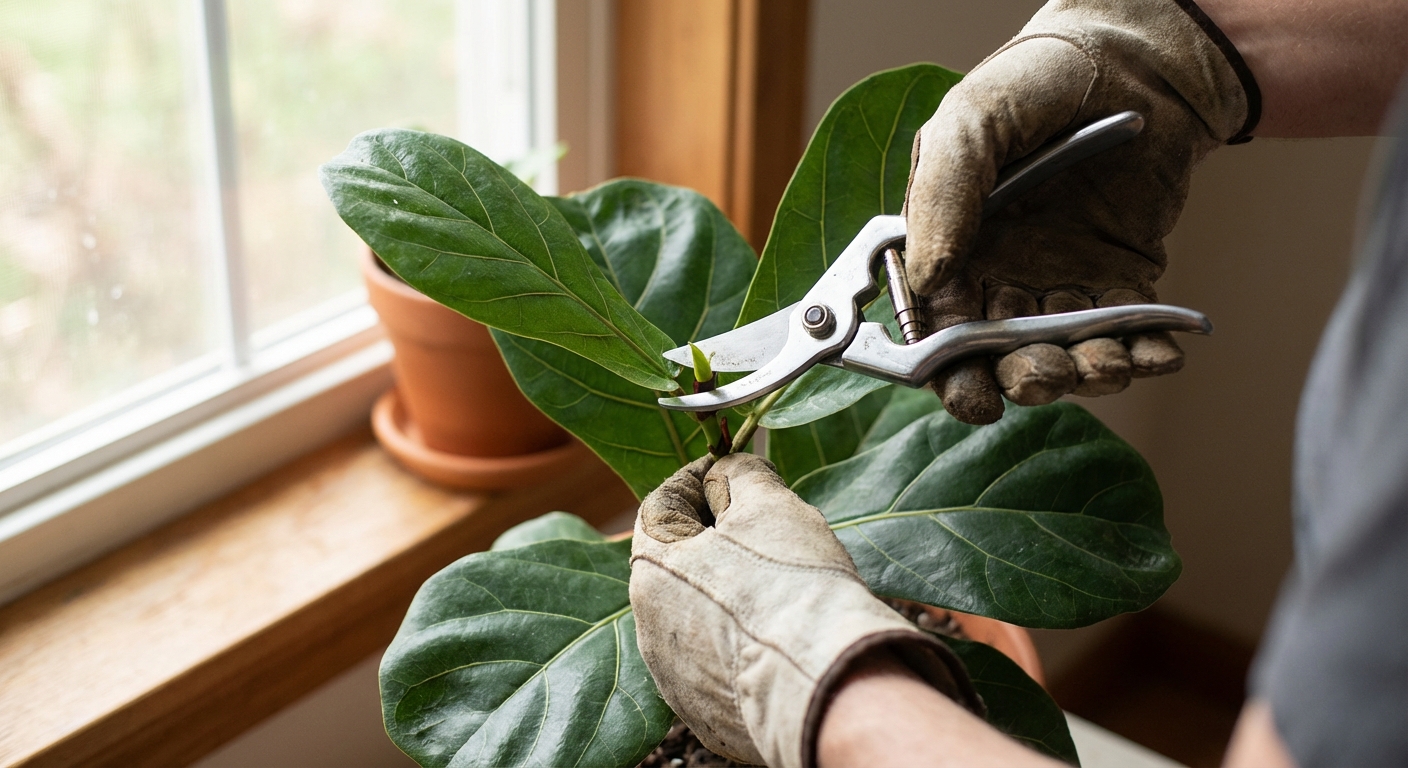
Fiddle leaf figs bleed a milky latex sap when cut. It can irritate skin, and contact or ingestion can cause irritation for pets. Wear gloves if you are sensitive, keep cuttings away from pets, and dab the cut end with a paper towel until the sap slows. Toss used paper towels somewhere pets and kids cannot access, and wash your hands and tools after.
Best time of year to propagate
The easiest rooting happens when your fiddle leaf fig is actively growing. Aim for:
- Spring through early summer for the fastest, most reliable results
- Late summer can work if your plant is still pushing growth and light is strong
- Fall and winter are possible but often slower, and problems like rot are more likely if conditions are cool, dim, or too wet
If you must propagate in winter, provide bright light (a grow light helps), keep temperatures steady, and be extra conservative with moisture.
Method 1: Propagate a fiddle leaf fig cutting in water
Water propagation is popular because you can watch the roots form. It is also a little easier to catch problems early.
Step-by-step
- Choose your cutting. Pick a healthy stem tip with 2 to 4 leaves and at least 1 to 2 nodes. Avoid weak, thin growth.
- Make the cut. Cut just below a node at a slight angle. A cutting length of 4 to 8 inches is a good sweet spot.
- Remove lower leaves. Strip any leaves that would sit below the waterline. Leaves in water tend to rot.
- Reduce leaf load (optional, but very helpful). Big leaves lose a lot of moisture. If your cutting has huge leaves, keep 1 to 3 leaves total, or trim large leaves in half to reduce transpiration.
- Let sap stop bleeding. Dab with a paper towel for a minute or two. Some gardeners rinse the cut end under lukewarm water.
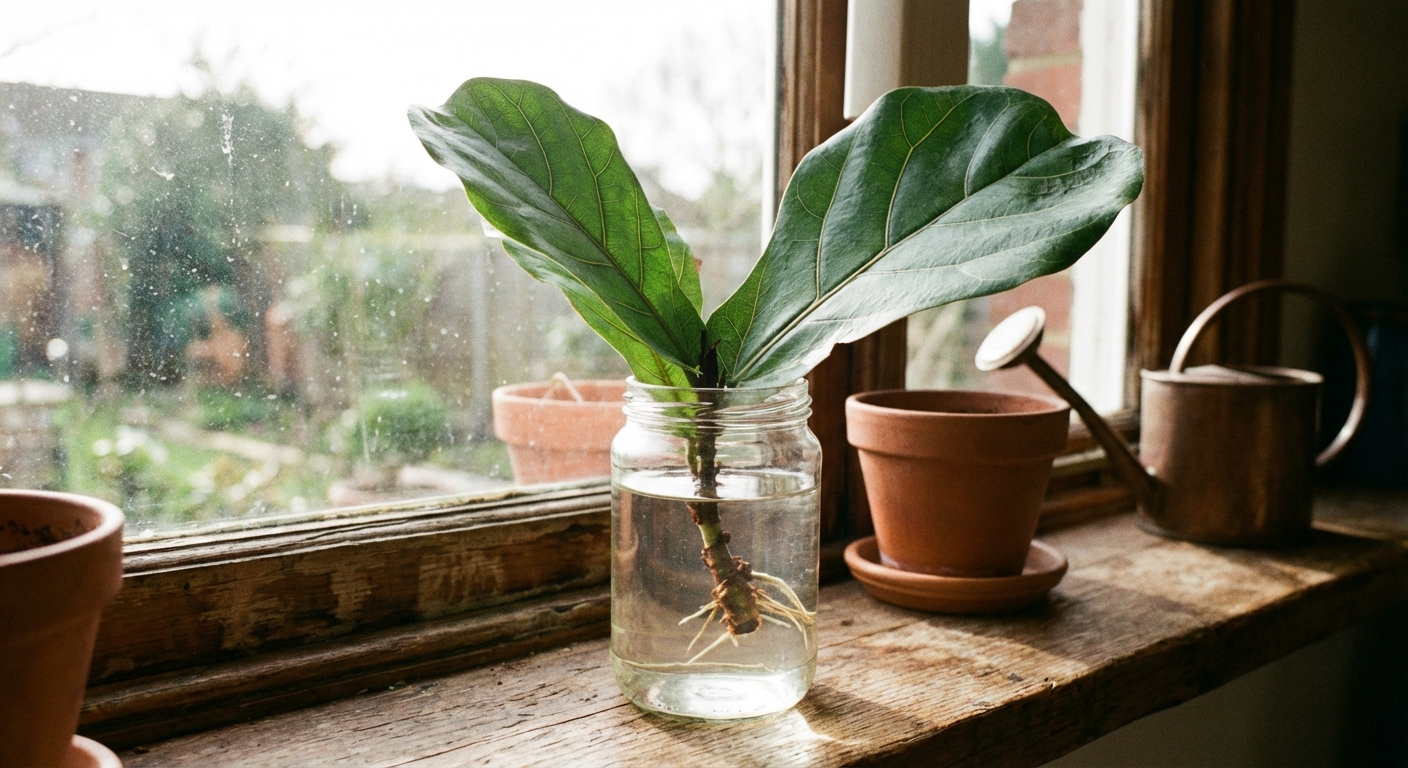
- Place in water. Put the cutting in a clean jar of room-temperature water so that at least one node is submerged.
- Bright, indirect light. Set it near a bright window, but out of harsh direct sun that overheats the jar.
- Change the water. Swap for fresh water every 3 to 7 days, or sooner if it looks cloudy. If your tap water is heavily chlorinated, filtered or dechlorinated water can help.
When to pot up
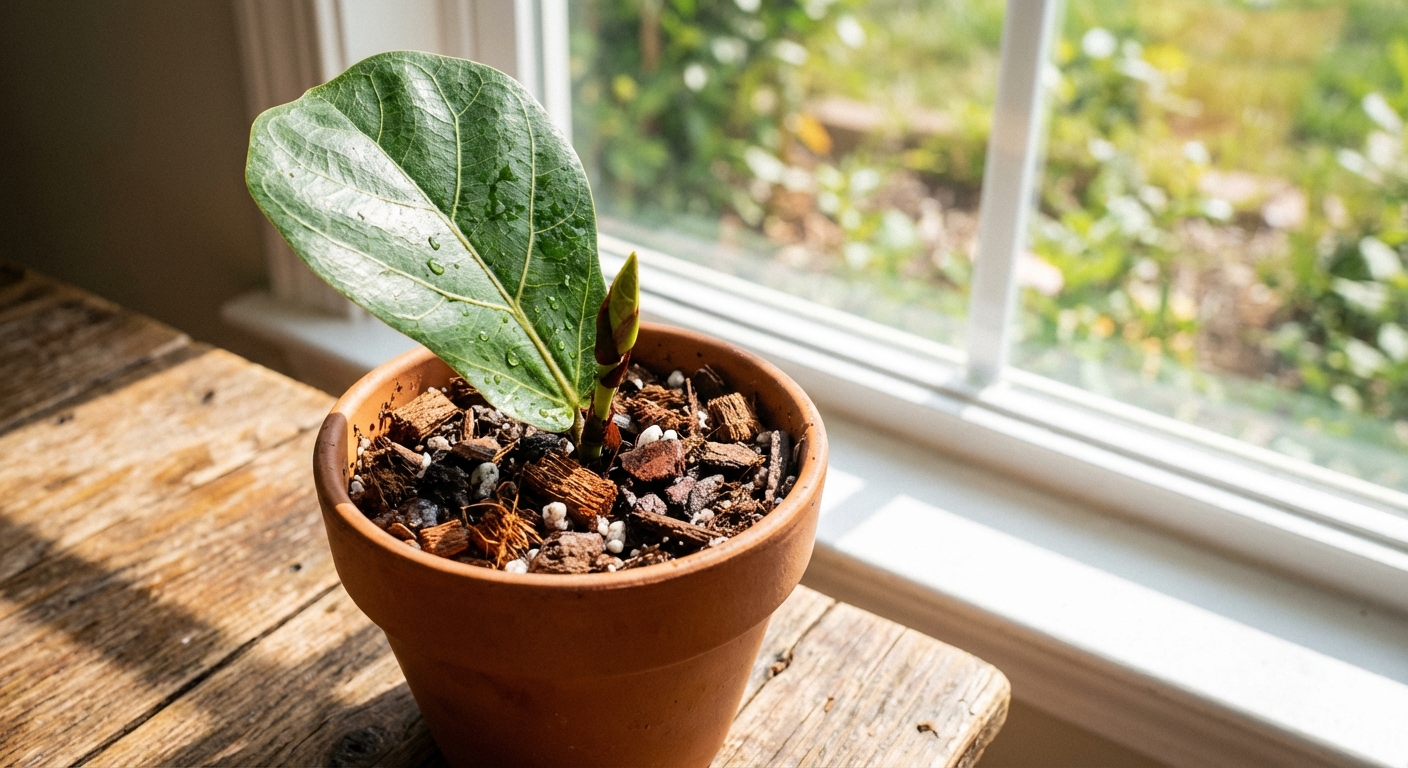
Wait until roots are 2 to 4 inches long and you see a few branching roots. Then pot into a small container with drainage.
A good potting mix for fresh water-rooted cuttings
New water roots can be delicate, so aim for airy, fast-draining soil:
- 2 parts indoor potting mix
- 1 part perlite or pumice
- 1 part orchid bark (optional but wonderful for airflow)
Moisten the mix, plant the cutting gently, and keep it evenly moist (not soggy) for the first 1 to 2 weeks while it adjusts. After that, transition to normal watering and avoid harsh direct sun at first.
Method 2: Propagate a fiddle leaf fig cutting in soil
Soil propagation skips the transition from water roots to soil roots. It can be slower to “see,” but it can produce sturdier roots from the start under stable conditions.
Step-by-step
- Prepare a small pot. Use a 4 to 6 inch pot with drainage holes.
- Use a light, chunky mix. A blend like potting mix plus perlite (and optional bark) prevents soggy conditions.
- Take your cutting. Cut just below a node, remove lower leaves, and dab away sap.
- Reduce leaf load (optional). Keep 1 to 3 leaves, or trim large leaves in half to reduce moisture loss.
- Optional rooting hormone. Dip the cut end, then tap off extra. More is not better.
- Plant the node. Insert the cutting so at least one node is below the soil surface. Firm gently.
- Water at planting. Water thoroughly, then let excess drain. After that, water again when the top inch of mix dries slightly.
- Create gentle humidity. If your home is dry, loosely tent a clear bag over the pot. Keep plastic from touching leaves and open daily for airflow.
- Bright, indirect light and warmth. Keep it cozy, around 70 to 80°F if possible.
How to tell it rooted
- New growth is the best sign, but it can take time.
- After 4 to 8 weeks, try a gentle tug. If there is resistance, roots are forming.
- If the cutting stays firm and does not wrinkle or blacken, you are likely on track.
Method 3: Air layering (my favorite for bigger plants)
Air layering lets the plant grow roots while still attached to the mother plant. It is a fantastic method for tall fiddle leaf figs you want to shorten, because it often succeeds where cuttings can sulk.
Step-by-step
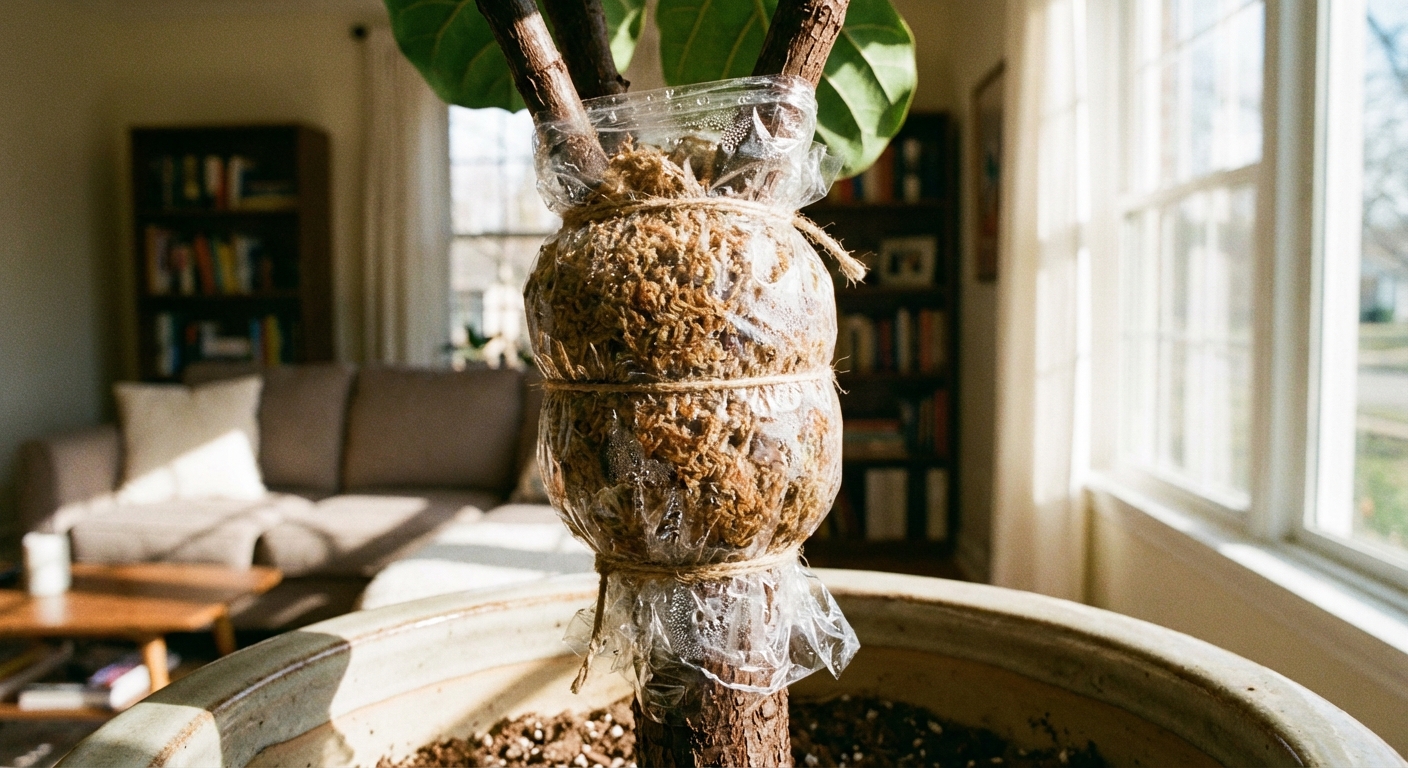
- Pick the spot. Choose a healthy section of stem where you would like the new plant to start. Find a node.
- Make a wound. With a clean knife, make a shallow upward cut about 1 inch long, or remove a thin ring of bark around the stem. The goal is to interrupt the outer layers so roots form, not to cut through the stem.
- Wedge it open. Ficus stems love to heal themselves back together. Slide in a toothpick, or tuck a tiny bit of sphagnum moss into the cut, to keep the wound slightly open.
- Optional rooting hormone. Dust the wound lightly.
- Wrap with moist sphagnum moss. Pack a small handful of damp (not dripping) sphagnum around the wound.
- Seal it. Wrap the moss with clear plastic wrap and secure both ends with twist ties or plant tape. Leave it snug but not crushing. For bonus points, wrap the plastic with a layer of aluminum foil to keep the area dark and discourage algae.
- Wait and check. In a few weeks to a couple of months, you should see roots pressing against the plastic.
- Cut and pot. Once you have a nice cluster of roots, cut below the rooted section and pot it up in a chunky mix.
Why air layering works so well
The cutting does not have to survive on stored energy alone. It stays connected to water and nutrients while it builds roots, which makes it less stressful and often faster for mature stems.
Care for new cuttings until they root
Light
Give bright, indirect light. Think: near a sunny window, but not in the hot beam where leaves scorch and jars turn into little greenhouses.
Temperature
Warmth speeds rooting. Aim for 70 to 80°F. Avoid cold drafts and blasting vents.
Watering (for soil cuttings)
Keep the mix lightly moist, never soggy. Overwatering is the fastest route to rot. Let the top inch dry slightly, then water again.
Humidity
Moderate humidity helps, but stale air hurts. If you use a bag, vent it daily. If you live somewhere humid already, skip the bag and focus on consistent moisture and warmth.
Fertilizer
Hold off until you see signs of rooting and new growth. Once established, feed lightly during the growing season with a balanced houseplant fertilizer at half strength.
Staking
If the cutting wobbles, add a small stake. Movement can break tiny new roots.
Troubleshooting failed propagation
Propagation is part science, part patience, and part “why are you like this?” If your cutting fails, it is not a character flaw. Here is what is most likely happening.
The cutting turned black or mushy
- Cause: rot from bacteria or fungus, usually from stagnant water, soggy soil, or low light and cool temps.
- Fix: Start over with a fresh cutting above the rot. Sterilize your tools. Use fresh water or a lighter soil mix. Keep warm and bright. Change water regularly.
Leaves are drooping or falling off
- Cause: stress, low humidity, too much direct sun, or the cutting cannot take up enough water yet.
- Fix: Move to bright indirect light. Reduce leaf load by keeping only 1 to 3 leaves, or trim large leaves in half. Consider a loose humidity tent with daily ventilation.
No roots after weeks
- Cause: too little light, water too cold, seasonal slowdown, or the cutting had an unhealthy node.
- Fix: Increase light (a grow light helps). Keep temps steady and warm. Refresh water. If nothing after 8 to 12 weeks, take a new cutting in spring or try air layering.
The water smells bad or looks slimy
- Cause: bacterial growth from decaying plant tissue or dirty containers.
- Fix: Rinse the jar, refill with fresh water, and trim off any soft tissue on the cutting. Remove any leaf bits below the waterline.
Roots formed in water, but the cutting struggled after potting
- Cause: transition shock from water roots to soil conditions.
- Fix: Pot into a small container with airy mix, keep evenly moist for 1 to 2 weeks, and maintain bright indirect light. Avoid direct sun at first. Do not fertilize right away.
The cutting is wrinkly, dry, or shriveling
- Cause: dehydration, often from low humidity, too much light, or a cutting that cannot uptake water due to damage.
- Fix: Move out of direct sun, increase humidity gently, and make sure at least one healthy node is submerged (water method) or buried (soil method). If the base is dried and sealed, re-cut just below a node.
FAQ
Can you propagate a fiddle leaf fig from a single leaf?
A leaf without a node may stay green in water for a while, but it will not grow into a new plant. You need stem tissue with a node to produce roots and new growth.
How long does fiddle leaf fig propagation take?
Most cuttings root in 4 to 10 weeks in good conditions. Some take longer, especially in lower light or cooler homes.
Water or soil propagation, which is better?
Water is great for visibility and quick feedback. Soil can be great for sturdier roots and avoids transplant shock. If you are new, try water first. If you already have a good chunky mix and stable conditions, soil is excellent.
Should I cut the top off my tall fiddle leaf fig?
If it has outgrown the space or is getting bare lower down, yes, topping can encourage branching. Air layering is a wonderful way to top a plant while also making sure the top portion already has roots before you separate it.
A gentle final pep talk
Fiddle leaf figs have a reputation for drama, but propagation is one of the best ways to learn their rhythms. Start with a healthy stem, prioritize nodes, keep conditions warm and bright, and do not fuss too much. Then go do something else for a week. Plants can feel us hovering, I swear.