How to Grow Okra at Home
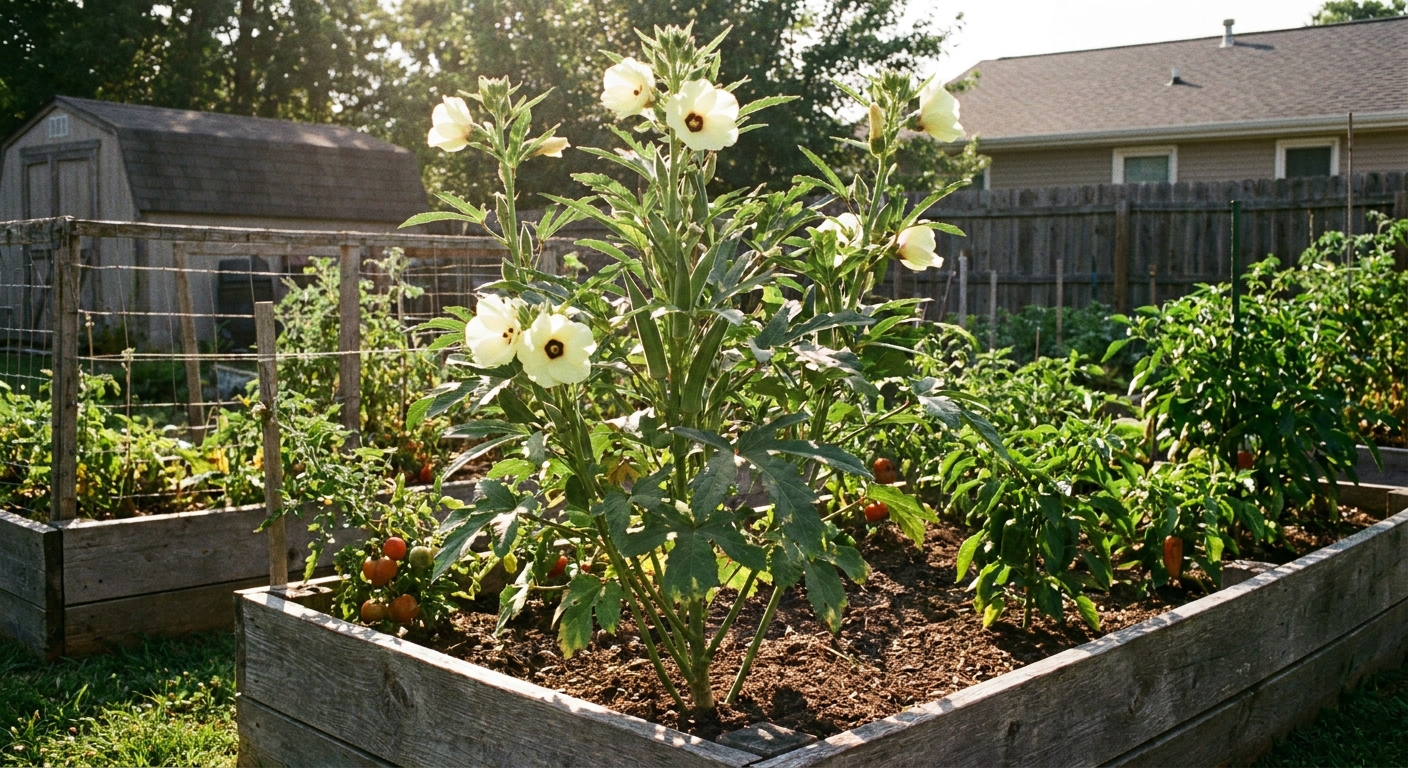
Okra is one of those plants that makes you feel like summer is working with you instead of against you. When the weather turns truly hot and many veggies start sulking, okra perks up, stretches tall, and starts handing you crisp green pods like little gifts.
If you have ever avoided okra because you heard it is “fussy” or “slimy,” here is the truth: okra is not fussy to grow, and the “slimy” part (that natural mucilage) is mostly a matter of harvest timing and how you cook it. Pick pods young and try dry, high-heat cooking like roasting, grilling, or quick pan-frying, and you will see a very different side of okra.
Okra does have two non-negotiables: heat and timely harvesting. Give it warm soil, full sun, and a consistent picking habit, and you will have tender okra for sautés, gumbo, roasting, or pickling.

Choose the right okra variety
Okra varieties are not wildly different in care, but they do vary in size, spininess, and how quickly they produce. If you are growing okra for the first time, choose a dependable, tender pod type and you will be off to a cozy start.
Great varieties for home gardens
- Clemson Spineless: The classic. Reliable, productive, and easy to find. “Spineless” still has tiny prickles, but it is much gentler than older types.
- Annie Oakley II: Earlier harvest and more compact than towering heirlooms, which can be helpful in smaller gardens.
- Jambalaya: A shorter plant that still yields well, often a good fit for containers and tight spaces.
- Red okra types (often sold as red burgundy): Gorgeous plants, and the pods are best harvested small. Note: many red pods turn greener when cooked.
My bias as a soil-and-sustainability gardener: pick a variety you will actually harvest often. Okra gets tough fast if you let pods sit, and a prolific plant is only “easy” if you keep up with it.
Sun, heat, and timing
Okra is a warm-season crop that wants full sun and genuinely warm soil. It is not interested in spring’s mood swings.
Light and temperature basics
- Sun: Aim for 6 to 8+ hours of direct sun daily. More sun usually means more pods.
- Soil warmth: Plant 2 to 4 weeks after your last frost, once soil temperatures are reliably about 65 to 70°F (or warmer). If nights are still chilly, okra will stall.
- Heat tolerance: Okra thrives when summer turns up the dial, often performing best when daytime temps are consistently warm.
If your spring is short and your summer arrives like a door slamming, okra is your plant.
Soil prep for strong growth
Okra is not a heavy diva, but it grows fast and tall. It appreciates soil that drains well, holds some moisture, and has plenty of organic matter.
What okra likes in the ground
- Texture: Loamy, well-draining soil is ideal. If you have clay, add compost and consider raised beds to improve drainage.
- Fertility: Mix in compost before planting. A couple inches worked into the top layer is usually perfect.
- pH: Slightly acidic to neutral is a comfortable range for most garden soils.
Okra’s secret superpower is its root system. If you build living, crumbly soil, okra will reward you with resilience during hot spells.
Quick disease-prevention note: Rotate where you grow okra (and other related crops) every year or two if you can. It helps reduce the buildup of soil-borne problems like wilts and root diseases.
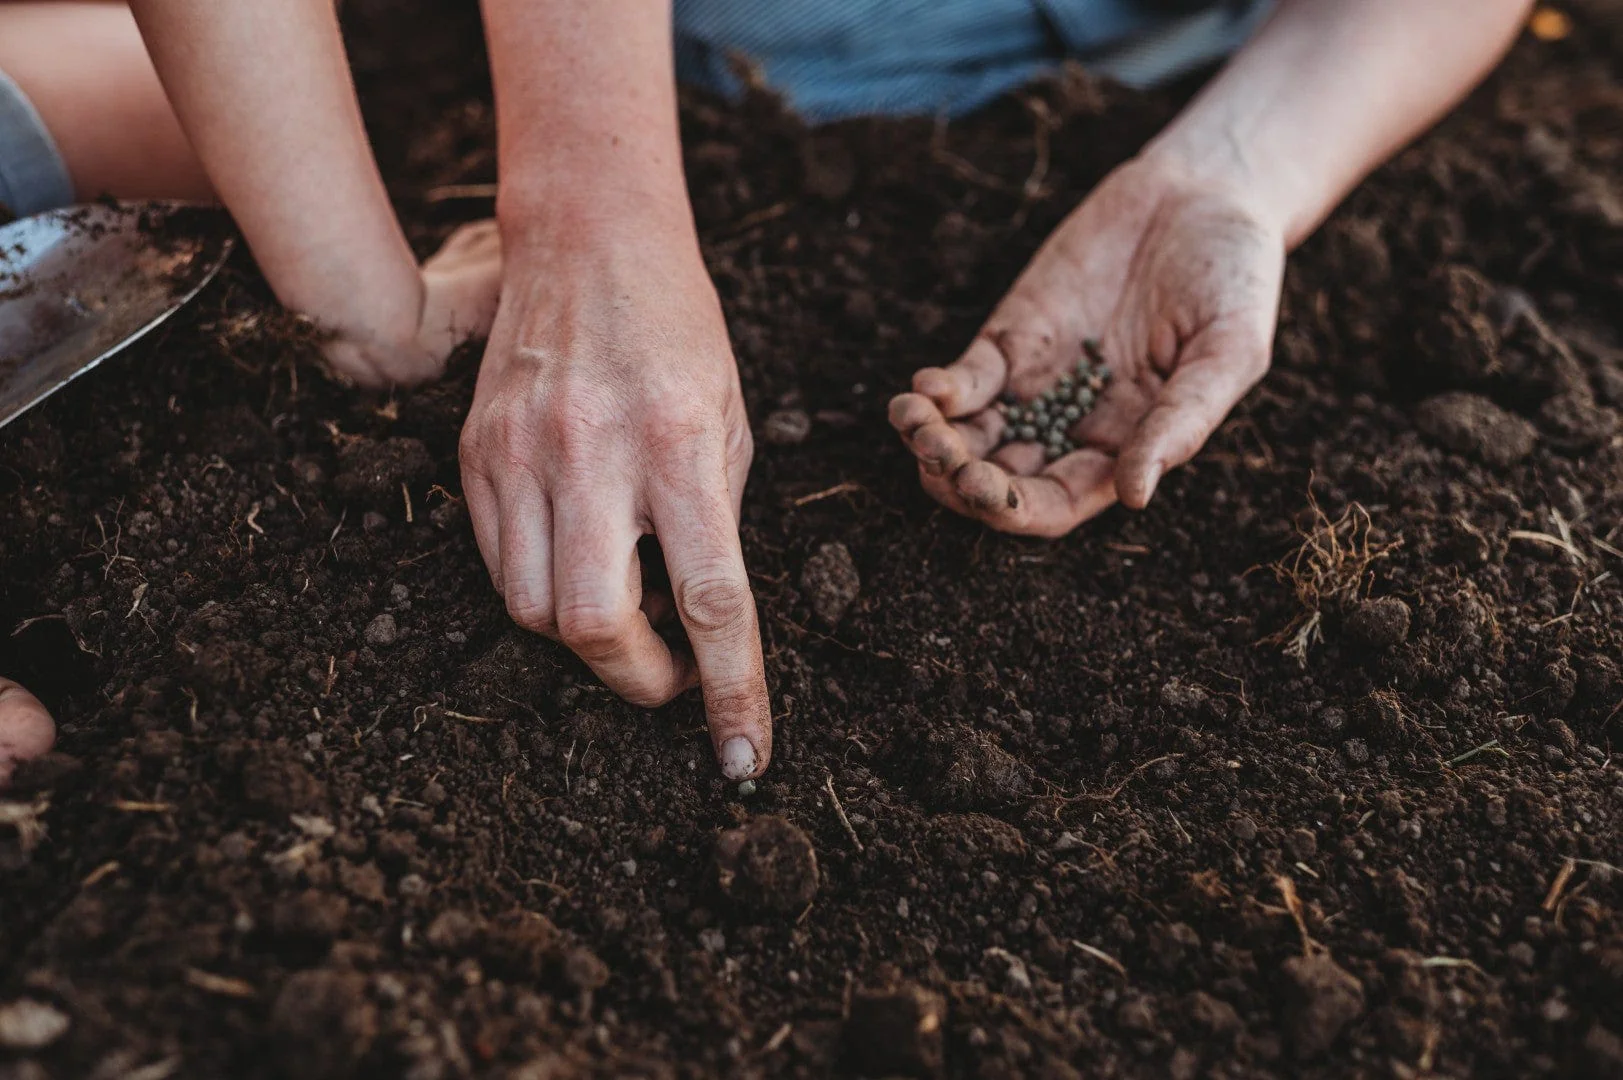
How to plant okra seeds
Okra is typically direct-sown from seed, and it is happiest when it never has to move. If you do start it indoors, be gentle with the roots, but direct sowing is the simplest route.
Step by step planting
- Wait for warmth: Plant when the soil is at least 65 to 70°F and the forecast looks settled.
- Optional boost: Soak seeds in room-temperature water for several hours or overnight to speed germination.
- Plant depth: Sow seeds about 1/2 to 1 inch deep.
- Thin: Once seedlings are a few inches tall, thin to the strongest plants.
Timeline tip: Okra usually germinates in about 7 to 14 days in warm soil. First harvest is often around 50 to 70 days after planting, depending on variety and heat.
Spacing and support
Okra needs airflow and elbow room, especially in humid summers where pests and disease can pile on when plants are crowded.
Simple spacing guidelines
- Between plants: About 12 to 18 inches apart for compact types, and 18 to 24 inches for taller, big-producing varieties.
- Between rows: About 3 to 4 feet, so you can comfortably harvest without snapping stems.
In windy areas or if your variety grows tall, a simple stake can help prevent plants from leaning once they are loaded with pods.
Watering: steady, not soggy
Okra is drought-tolerant once established, but the best pod quality comes from steady, consistent moisture. Big swings between bone-dry and drenched can lead to tougher pods and stressed plants.
Okra watering rhythm
- Seedling stage: Keep the top few inches of soil evenly moist to help germination and early root growth.
- Once established: Water deeply when the top inch or two of soil dries out. In hot weather, that may be more frequent than you expect.
- Mulch: A 2 to 3 inch layer of straw, shredded leaves, or untreated grass clippings helps keep moisture steady and protects soil life.
If you want a simple rule: okra likes a drink, not a bath.
Feeding okra (do not overdo it)
Too much nitrogen can give you lush, green plants that forget to make pods. I have seen it happen, and yes, it is heartbreaking.
Organic-friendly fertilizing tips
- Compost first: Compost at planting often provides enough nutrition for home gardens.
- Side-dress if needed: If plants look pale or growth is sluggish, add a thin ring of compost around the base midseason.
- Go easy on high-nitrogen fertilizers: If you use an organic fertilizer, choose a balanced blend and follow label rates.
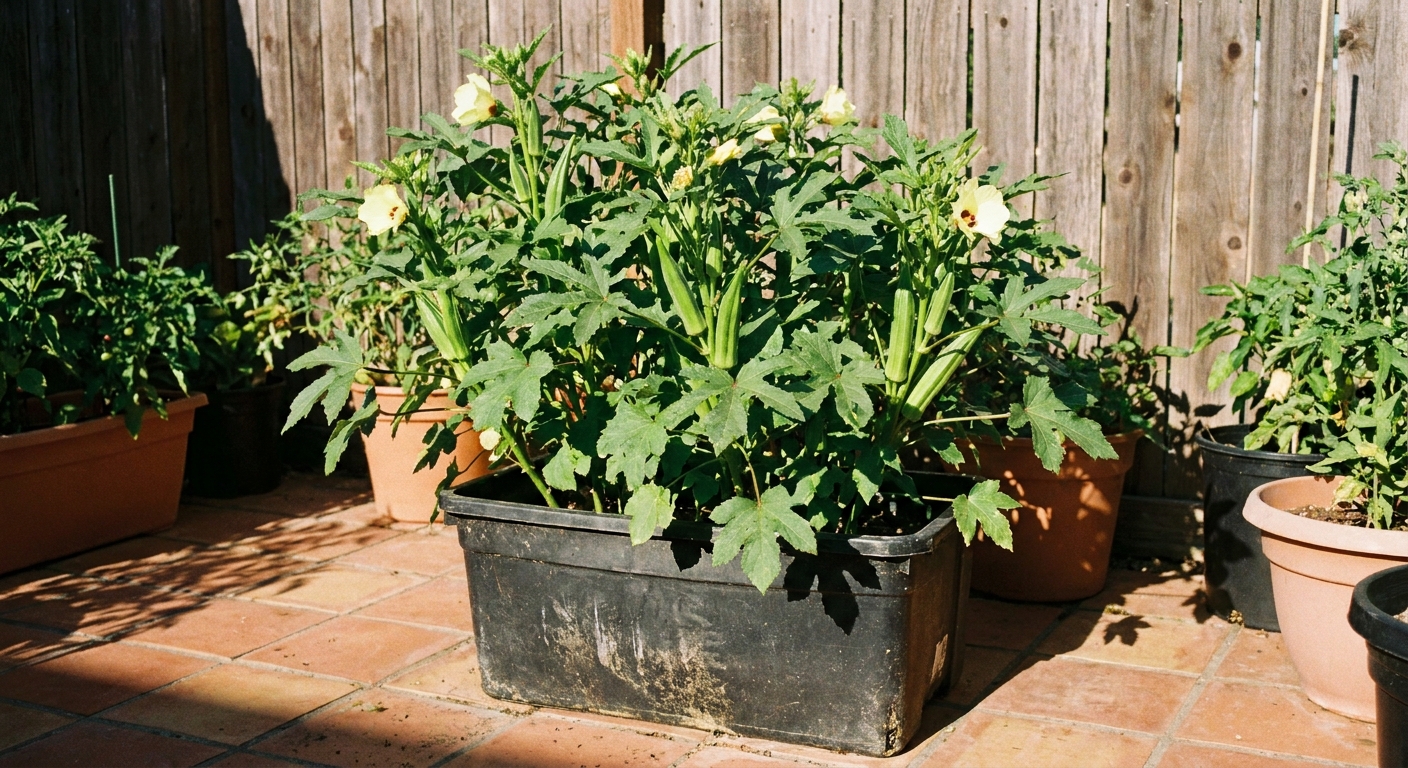
Growing okra in containers
No yard? No problem. Okra can be surprisingly happy in a container, as long as you give it depth, sun, and regular water.
Container essentials
- Pot size: Use a container about 5 to 10 gallons per plant. Bigger is better, especially in hot climates where pots dry fast.
- Soil: High-quality potting mix plus compost. Avoid heavy garden soil in pots.
- Drainage: Non-negotiable. Make sure water can escape freely.
- Water: Containers dry faster, especially in heat. Check daily during hot spells.
- Support: A stake can help if the plant gets top-heavy.
Common pests and prevention
Okra is tough, but it is not invisible to bugs. The good news is you can handle most pests with a calm, consistent approach that protects beneficial insects and the health of your soil.
Aphids
Aphids cluster on tender new growth and undersides of leaves, sucking sap and leaving sticky honeydew.
- First response: Blast them off with a strong stream of water in the morning.
- Encourage helpers: Lady beetles, lacewings, and tiny parasitic wasps do a lot of free labor.
- Soap option: If needed, use insecticidal soap, coating the undersides of leaves. Reapply as directed, and avoid spraying in harsh sun.
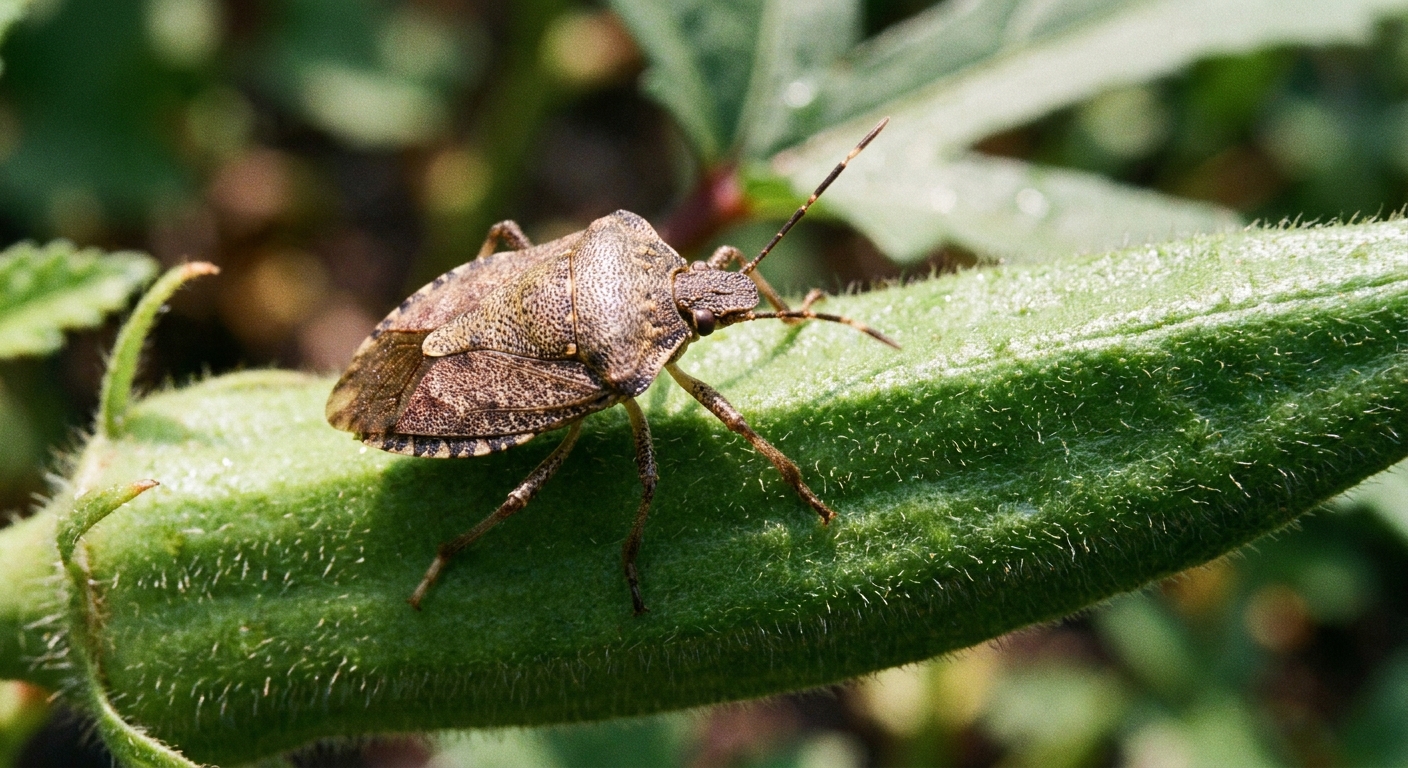
Stink bugs (and leaf-footed bugs)
These sap-suckers can pierce pods and cause blemishes, tough spots, or misshapen okra. They often hide, so you have to be a bit nosy in the garden.
- Hand pick: Drop adults into a jar of soapy water. Check plants in the morning when bugs are slower.
- Egg patrol: Look for clusters of barrel-shaped eggs on leaf undersides and remove them.
- Row cover early: Lightweight fabric row cover can help when plants are young. Remove once flowering is underway so pollinators can visit.
Flea beetles and spider mites (quick note)
- Flea beetles: Tiny “shot holes” in leaves, especially on seedlings. Row cover early, keep plants growing steadily, and avoid letting seedlings stall.
- Spider mites: Fine webbing and stippled leaves during hot, dry weather. Hose off leaf undersides and keep plants well-watered and mulched.
General pest and disease prevention
- Keep plants spaced: Airflow makes a big difference.
- Mulch: Stabilizes moisture and supports soil predators that eat pest larvae.
- Water at the soil line: Wet leaves invite leaf spots and mildew. Morning watering is your friend.
- Rotate crops: Helps reduce soil-borne diseases and pest carryover from year to year.
- Avoid broad-spectrum sprays: They can knock out beneficial insects and lead to worse pest cycles later.
When and how to harvest okra
If okra has ever tasted woody to you, it was harvested late. Okra pods go from tender to tough quickly, especially in hot weather. Harvesting is where you earn your okra confidence.
Harvest timing
- Pick pods young: Many varieties are best around 2 to 4 inches long, depending on the type.
- Check often: During peak heat, pods can grow fast. Harvesting every 1 to 2 days is common.
- Use gentle protection: Some pods and stems have tiny prickles. Gloves or a long-sleeved shirt can make harvesting more pleasant. If you have sensitive skin, wash your hands after harvesting and avoid rubbing your eyes.
How to harvest
- Cut, do not yank: Use clean pruners or a knife to snip pods off without damaging the stem.
- Keep picking: The more you harvest, the more okra produces.
One more tender truth: a single missed pod can become a fibrous club in just a few days, and letting pods mature to seed can slow down new production. Stay on it, and you will be rewarded.
Culinary slime tip: If you want less mucilage, cook okra fast and hot (roast, grill, sear, fry) and avoid crowding the pan. Acidic ingredients like tomatoes, vinegar, or lemon can also help, especially in stews.
Saving seeds and end-of-season notes
If you want to save okra seed, let a few pods stay on the plant until they are fully mature and dry. They will become large and hard. Harvest them, let them dry further in a protected airy spot, then crack the pods to collect seeds.
At season’s end, cut plants at the base and leave roots in the ground if you can. Roots feed soil life as they decompose, and your future garden bed will thank you.
Troubleshooting
My okra is tall but not making pods
- Make sure it has full sun.
- Ease up on nitrogen-heavy feeding.
- Confirm the weather is truly warm. Okra can pause in cooler stretches.
- Be patient if you planted early. Okra often starts slowly, then suddenly decides it is time.
Pods are tough
- Harvest smaller pods more often.
- Water consistently, especially during extreme heat.
Leaves look chewed or spotted
- Inspect undersides of leaves for pests and eggs.
- Improve airflow by thinning crowded growth and keeping weeds down.
- Water at the base of the plant to keep foliage drier.
Plant wilts in hot weather (but soil is moist)
- Check for root-knot nematodes: If a plant looks mysteriously miserable, dig gently and look at the roots. Swollen, knobby roots can be a clue.
- Rotate crops: Avoid planting okra in the same spot year after year in nematode-prone gardens.
- Improve soil: Compost, mulch, and healthy soil biology can help plants cope, even when you cannot fully eliminate the problem.
Okra growing checklist
- Full sun: 6 to 8+ hours
- Warm soil: Plant after frost, ideally at 65 to 70°F or warmer
- Spacing: 12 to 24 inches between plants (variety-dependent)
- Moisture: Deep, consistent watering plus mulch
- Harvest: Every 1 to 2 days, pods around 2 to 4 inches
- Rotation: Shift planting spots to help prevent soil-borne issues
- Pest plan: Water spray for aphids, hand-pick stink bugs, protect beneficials
If you plant okra once, you may find yourself planting it every year. It is a confident, sun-loving crop, and there is something deeply satisfying about stepping into a hot garden morning and coming back with a bowl of fresh pods. (I always say thank you to the plant. My ferns insist it helps.)