How to Get Rid of Corn Earworms Naturally

Corn earworms have a special talent for showing up right when you are daydreaming about butter and salt. One minute your sweet corn looks perfect, the next you peel back the husk and find a chewed tip and a not-so-cute caterpillar tucked inside.
The good news is you can manage corn earworms naturally without turning your garden into a chemical war zone. The key is understanding when the damage happens, then focusing your effort on the silk stage, because that is when the moth lays eggs and the tiny larvae slip into the ear.

What they are and why they are tricky
Corn earworm is the larval stage of a moth (Helicoverpa zea). The moths fly at dusk and night, and females lay eggs on fresh silks or nearby leaves. When the eggs hatch, the baby caterpillars head straight for the silks, then tunnel into the ear tip where they are protected from many sprays and from hungry birds.
That is why earworms feel so frustrating. By the time you notice tip damage, the caterpillar is already tucked inside its little corn bunker.
Earworm vs look-alikes
In the garden, “worm in the corn” can mean a few different pests. Identification matters because timing and control methods can differ.
Corn earworm (the usual ear tip culprit)
- Where you find it: Most often in the ear tip, feeding on kernels and silks.
- What it looks like: Variable colors from green to tan to pinkish-brown, often with faint stripes. The head capsule is usually light to medium brown. Size up to about 1.5 inches.
- Typical damage: Chewed silks, frass (sawdust-like droppings) at the ear tip, missing kernels near the tip.
Fall armyworm (more leaf and whorl damage)
- Where you find it: Often in the whorl of young corn plants, sometimes in ears later.
- Clue: Heavier ragged leaf feeding and “shot holes” as leaves unfurl.
- Look for: On larger larvae, a distinct pale, inverted “Y” marking on the head is a common clue, plus a generally tougher, more aggressive feeding style.
European corn borer (stalk and ear tunneler)
- Where you find it: Tunnels in stalks, tassels, and sometimes ears.
- Clue: Small entry holes with sawdust-like frass at the hole, broken tassels, weakened plants, or tunneling you can see when you split a stalk.
If your plants look healthy but the ear tip is chewed, you are most often dealing with corn earworm. In some regions, fall armyworm or European corn borer can show up in ears too, so use the clues above to confirm.
Silk timing matters most
Here is the most important natural-control truth: silks are the doorway. Fresh, green silks are highly attractive for egg laying. Once silks brown and dry down, the risk drops.
So rather than spraying “just because,” focus your efforts on these moments:
- Early silk: When silks first emerge, they are most attractive.
- Peak silk: The first 5 to 7 days after silk emergence is the hottest window in many gardens.
- After heavy rain: Rain can wash off protectants, so reapply if you are using sprays.
Quick monitoring tip: During fresh silk, check the ear tips and nearby leaves every day or two. Tiny, single eggs are often laid on silks. Catching the problem before larvae disappear into the ear is the whole game. If you like tools, a pheromone trap can tell you when moth flights spike so you can tighten up your timing.
If you want the bigger picture of planting, pollination, spacing, and keeping corn happy, Leafy Zen has a separate guide to growing sweet corn. This page stays focused on the mid-season “help, something is eating my ears” moment, plus what to do afterward.
Natural prevention during silking
1) Planting time and variety choice
If earworms are a yearly headache in your region, planting time can be a surprisingly powerful tool. Moth populations often build as the season warms. Earlier corn can sometimes silk before moth numbers explode.
- In many areas, early plantings have less earworm pressure than late summer ears.
- Staggered plantings can spread risk, but it also means you might keep a “buffet line” of fresh silks available for longer. If earworm pressure is high, fewer planting waves can sometimes help.
Also consider variety traits. Corn with good tip cover (tight husks that extend past the tip) can reduce how often larvae reach exposed kernels. It will not make you earworm-proof, but it can lower damage.
This is regional, so consider checking local extension pest alerts or asking a nursery that actually grows corn nearby.
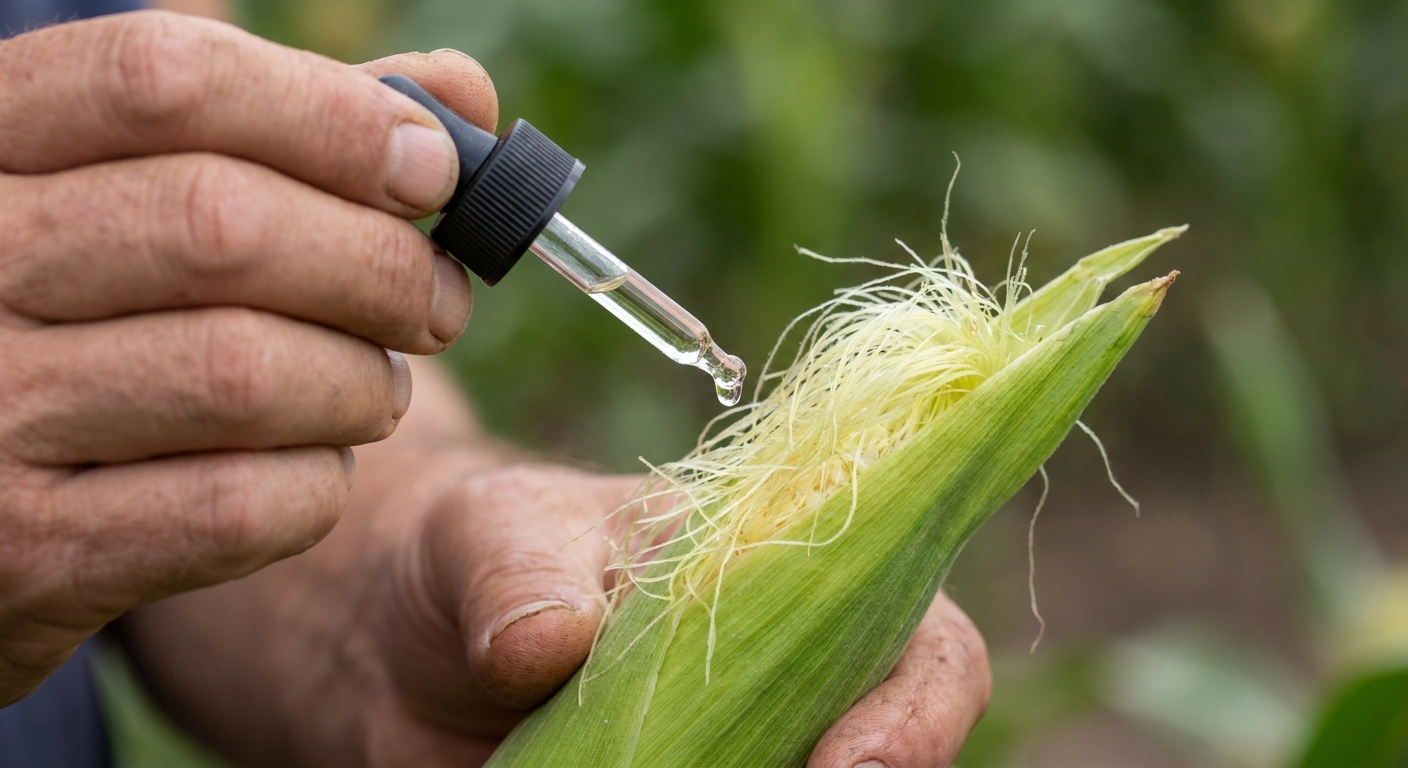
2) The mineral oil method
This method is old-school, low-tox, and oddly satisfying. The idea is simple: add a small amount of oil to the silk channel after pollination starts, making it harder for tiny larvae to survive as they travel down the silks.
When to do it (use cues, not just a calendar): A common guideline is about 3 to 5 days after silks emerge, but weather and variety can shift that. The safer rule is: wait until pollination is clearly underway. A couple of practical cues are silks starting to look slightly less fresh at the very tip and the ear beginning to feel like it is “filling” as kernels start to set. If you oil too early, you can interfere with pollination.
Where it goes: Aim for the silk channel, meaning the point where the silks enter the ear under the husk at the tip.
How to do it:
- Use a clean dropper or small squeeze bottle.
- Gently pull the husk tip open just enough to access the silk channel (or apply right at the tip without tearing husks).
- Apply about 5 drops of food-grade mineral oil (some gardeners use vegetable oil, but it can go rancid and may attract gnats in some climates).
- Repeat in about a week if pressure is intense and silks are still fresh.
Optional note about Bt in oil: You will see advice to mix a pinch of Bt into the oil. Results can vary because Bt works best when larvae eat it, and oil may affect how it spreads or how long it stays active. If you try it, keep it well mixed, apply after pollination has begun, and follow the product label.
Bagging ears
If you are growing a small patch and you love a tidy, reliable method, bagging can work beautifully.
- Wait until silks are out and pollination has started (often a few days after silk emergence).
- Cover the ear with a breathable paper bag or an organza bag and secure it loosely so air can move.
- Check occasionally for moisture buildup after rain. Good airflow matters.
This is extra work, but it is one of the most pesticide-free options available.
Bt and spinosad (use them right)
Let us be honest. Most “natural” spray recommendations on the internet are either too vague or too optimistic. Bt and spinosad are two of the few options that can make a real dent in earworm damage, especially if you apply them at the right time.
Label reminder: Product rates, re-entry intervals, and pre-harvest intervals vary. Always follow your label and local regulations, and keep applications targeted to the silks and ear tips.
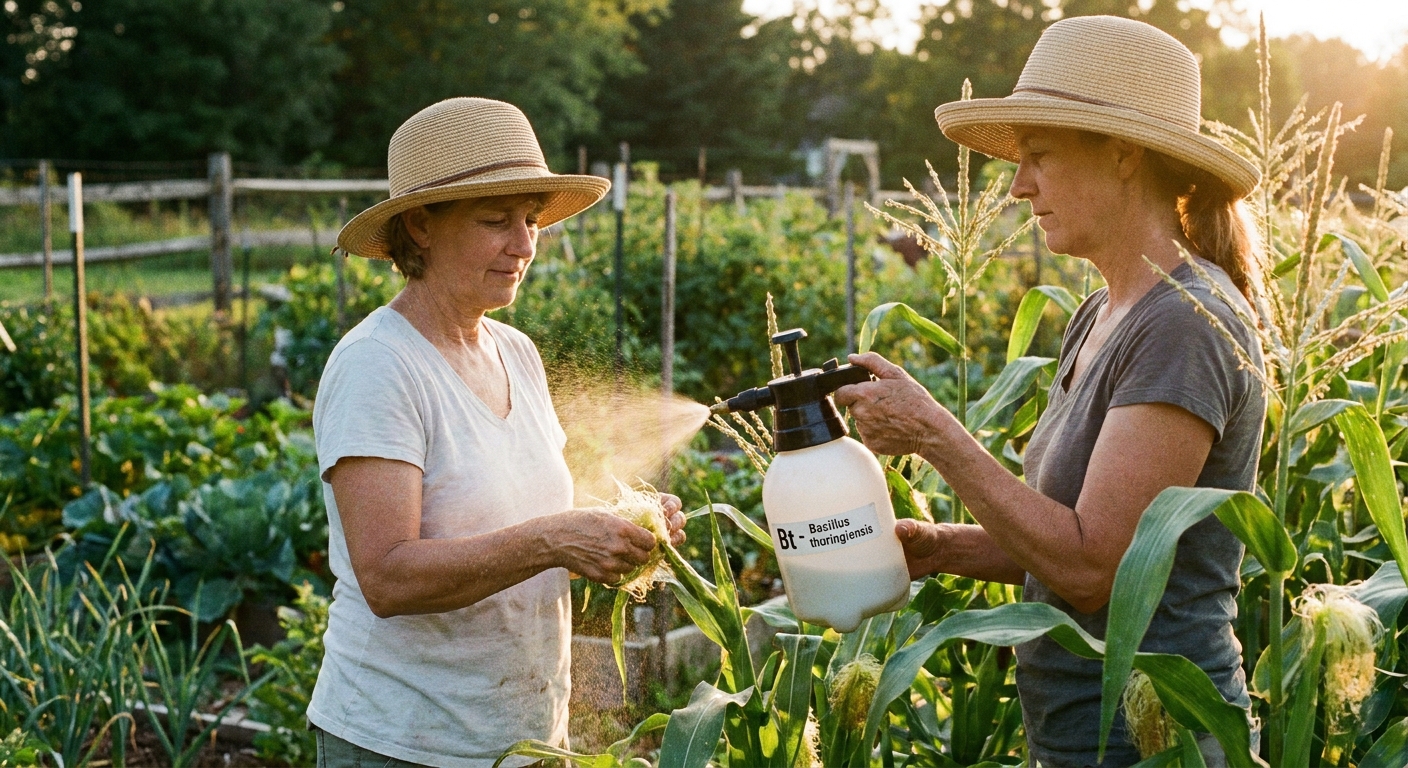
Bt (Bacillus thuringiensis var. kurstaki)
Bt is a naturally occurring soil bacterium that targets caterpillars when they eat it. It is most effective on small larvae, which is why silk timing is everything.
- Best for: Early intervention when eggs hatch and larvae are tiny.
- When to apply: Start when silks first emerge, then repeat every 3 to 5 days during fresh silk, and after heavy rain.
- When to stop: Continue until silks are mostly brown and drying down.
- Where to aim: Silks and the ear tip area. You want Bt where the larvae will feed.
- Notes: Bt breaks down in sunlight and washes off, so repeat applications are normal, not a failure.
Spinosad
Spinosad is derived from a soil-dwelling bacterium and can be effective against earworms, again with good timing. It can be harder on beneficial insects than Bt, so I use it more selectively.
- Best for: Moderate to heavy pressure when Bt alone is not keeping up.
- When to apply: Evening applications are best to reduce risk to pollinators and to avoid quick breakdown in sun.
- How to apply: Keep sprays directed at silks and ear tips. Avoid spraying directly on tassels or any flowers where bees are active.
- How often: Follow label directions carefully. Do not overuse. Rotation and restraint help prevent resistance.
Safety note: Even organic-approved products can harm beneficial insects if misused. Spinosad is particularly hazardous to bees when it is wet. Avoid spraying when bees are foraging, and let sprays dry before pollinator activity resumes.
Beneficial insects
One of the most satisfying parts of organic gardening is realizing you are not gardening alone. Many beneficial insects help suppress caterpillars and moths, especially when you give them habitat and avoid broad-spectrum sprays.
Parasitic wasps
Several tiny wasps parasitize corn earworm eggs or larvae. You will probably never notice them working, but your corn might.
- How to help them: Grow small-flowered plants nearby, like dill, cilantro (let it flower), sweet alyssum, yarrow, and native flowers that bloom in succession.
- Avoid: Broad insecticides and frequent spraying that does not target the pest.
General predators
Lacewings, lady beetles (their larvae especially), ground beetles, and birds all contribute to a healthier pest balance.
- Keep mulch and diverse plantings nearby for shelter.
- Provide shallow water sources for beneficial insects.
In some areas, gardeners also purchase beneficial insects, but habitat usually gives you better long-term results than one-time releases.
Trap crops (optional)
Trap cropping is exactly what it sounds like. You plant something the pest likes, then manage the pest there so it does not move into your main crop.
For corn earworm, trap cropping is more common in larger gardens and small farms, but you can experiment at home if you are willing to monitor closely.
Options that are actually usable
- A small, early block of sweet corn planted 1 to 2 weeks ahead of your main planting can draw moths first.
- Okra is used as a trap crop in some regions for earworm relatives and can attract egg-laying. Results vary, so treat it as an experiment.
How to make it work
- Place the trap planting at the edge of your garden, upwind if possible.
- Monitor it closely during silking.
- Be willing to be ruthless: harvest early, remove heavily infested ears, or treat the trap planting so it is not a nursery.
If you are not ready to actively manage the trap crop, skip this section. An unmanaged trap crop can backfire.
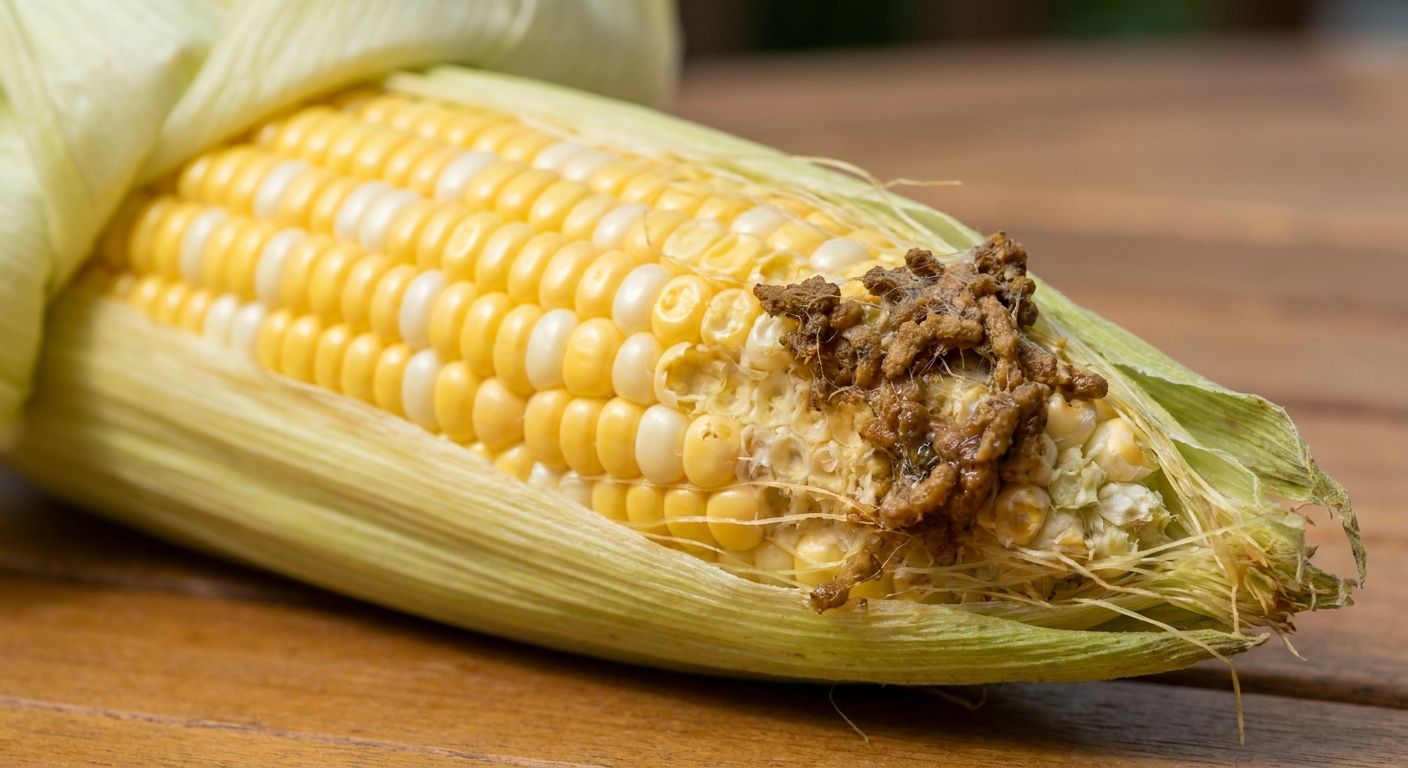
If you find worms at harvest
First, take a breath. Earworms are gross, but they are not a sign you “failed” at gardening. It is a sign you grew corn, which is basically an invitation to every hungry creature within a mile.
- Cut and compost the tip: Usually damage is confined to the top inch or two. Cut it off and enjoy the rest.
- Harvest promptly: Overmature ears can invite more pests and quality drops fast.
- Chill quickly: Sweet corn sugars convert to starch after harvest. Cool ears as soon as you can.
End-of-season cleanup
Corn earworms pupate in the soil. The larvae leave the ear, drop to the ground, and burrow to pupate. That means sanitation and soil-surface management can reduce pressure next season.
Expectation check: In many areas, earworm moths are strong fliers and can be migratory, so cleanup will not eliminate earworms completely. It does help lower the local baseline and reduces other pests at the same time.
After harvest
- Remove and compost or dispose of stalks and leftover ears. Do not leave cull ears on the ground.
- Pick up dropped husks and tips if you had heavy infestation. It reduces hiding places for other pests too.
Soil and overwintering
- In some climates, light tilling or turning the top few inches of soil in late fall can expose pupae to predators and weather.
- If you garden no-till, you can still reduce overwintering success by keeping the soil surface less hospitable: remove debris, use a clean mulch layer, and encourage ground beetles and birds.
Crop rotation
Rotating corn away from last year’s corn bed can help, especially in smaller spaces where pupae are concentrated. It is not a magic shield because moths can fly in from anywhere, but it can lower local pressure.
A simple natural plan
If you want a straightforward approach that fits most home gardens, here is the rhythm I suggest:
- Before silking: Support beneficial insects with small flowers nearby. Keep corn healthy with steady water and good soil fertility.
- At first silk: Start monitoring every day or two. If you use Bt, begin applications to silks.
- When pollination is underway: Apply mineral oil drops to each ear (use the timing cues above). Continue Bt if you are using it.
- High pressure: Consider spinosad as a targeted backup, applied in the evening and according to the label. Avoid spraying tassels and any blooms.
- Harvest window: Harvest promptly, trim tips if needed, and do not let cull ears sit in the patch.
- After harvest: Clean up stalks and fallen debris, and plan rotation if possible.
If you try one change this season, make it silk-stage timing. Earworms are beatable, but they require you to show up right at the doorway.
Quick FAQ
Is earworm-damaged corn safe to eat?
Yes. Cut off the damaged tip and discard it. The rest of the ear is typically fine. If there is mold, widespread rot, or you feel unsure, compost it and move on.
Do I need to spray the whole plant?
Usually no. Focus on silks and the ear tip area. Blanket spraying increases harm to beneficial insects and often does not improve ear protection.
Why do I still get earworms even when I spray?
Most often it is timing. Once the larva gets inside the ear, it is protected. Reapplication after rain and consistent coverage during fresh silk makes the biggest difference.