Get Rid of Mexican Bean Beetles Naturally
If your bean leaves look like someone took a tiny hole-punch to them, you are not imagining things. Mexican bean beetles can turn lush green bean plants into lace in a hurry, especially in warm stretches when their life cycle speeds up.
The good news is you do not need broad-spectrum chemicals to get control. With a little “morning garden patrol,” a lightweight cover, and targeted organic options when needed, you can protect snap beans, pole beans, lima beans, and other legumes while keeping your garden ecosystem intact.

Know your enemy: ID at every stage
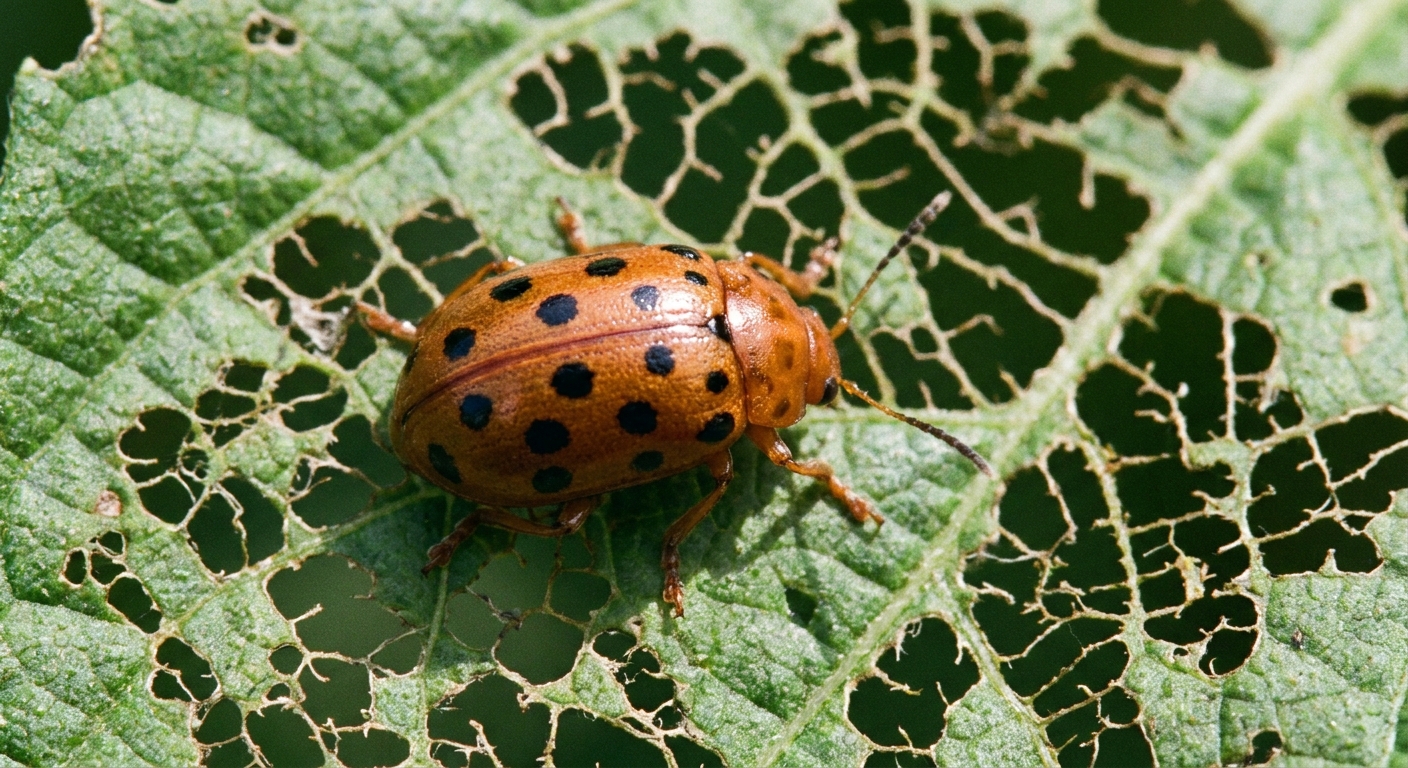
Mexican bean beetles are leaf-eating lady beetles. That is confusing because many ladybugs are helpful aphid hunters. Correct ID matters so you do not remove the good guys by mistake.
Name note: You will see this pest listed as Epilachna varivestis in many garden references, and as Henosepilachna varivestis in some newer sources. Same beetle, updated taxonomy.
Adults
- Look: Oval ladybug shape, about 1/4 inch (roughly 6 to 7 mm). Usually coppery to yellow-orange with 16 black spots often arranged in rows. Color can vary, so use the whole “ladybug-like shape + spot pattern + bean damage” combo for ID.
- Where: On bean leaves, often on the underside or within the canopy.
- Damage: They chew leaf tissue between veins, leaving a “skeletonized” or lacy look.
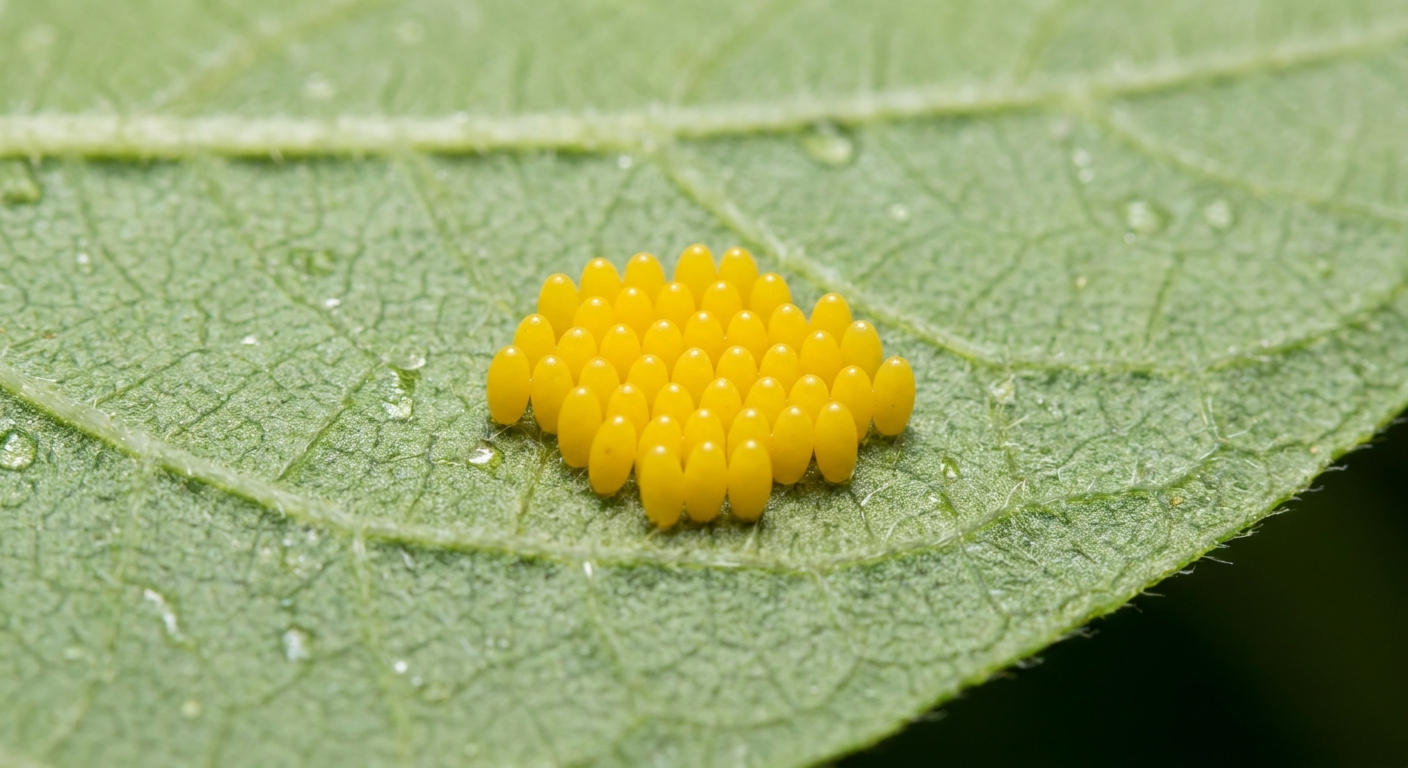
Egg clusters
- Look: Groups of bright yellow to orange eggs standing upright like tiny grains of rice.
- Where: Usually on the undersides of leaves, often in clusters of a few dozen.
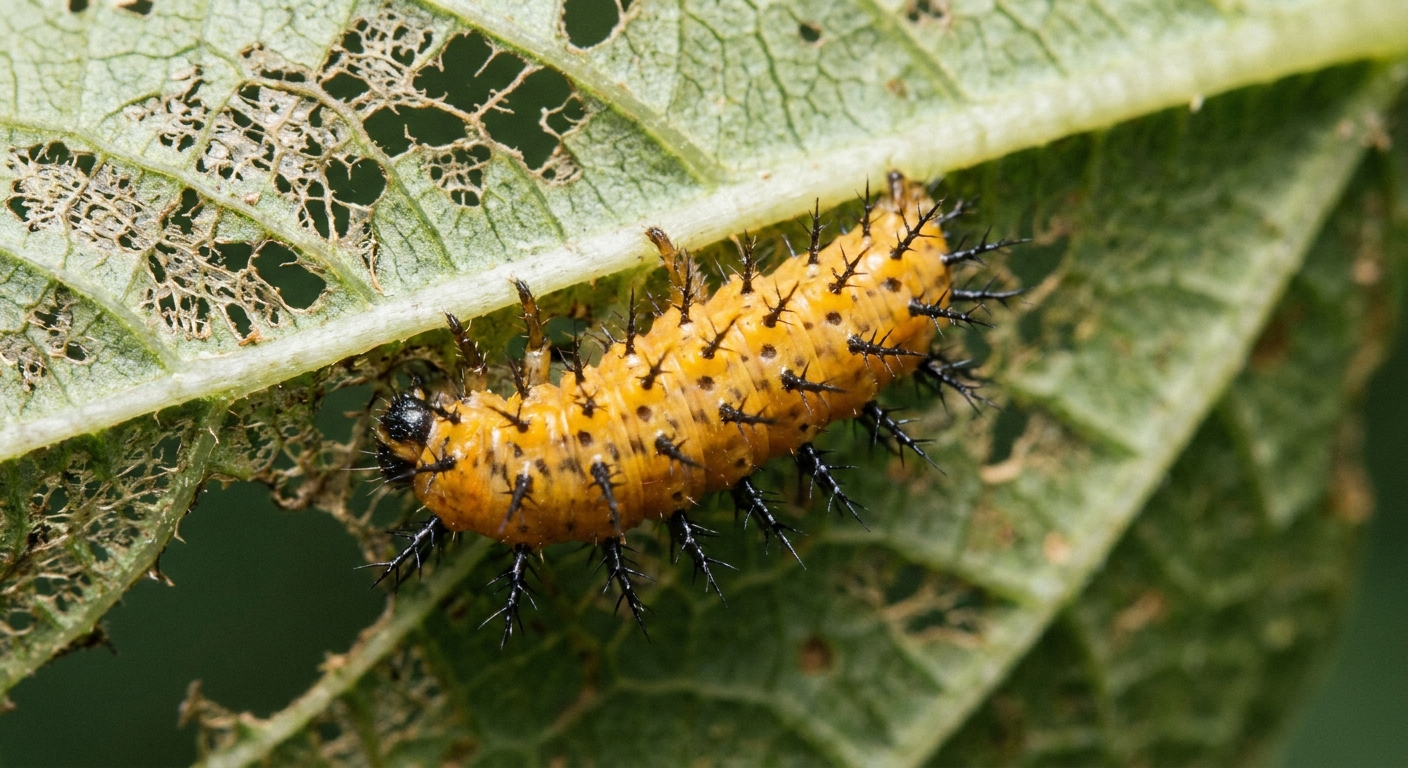
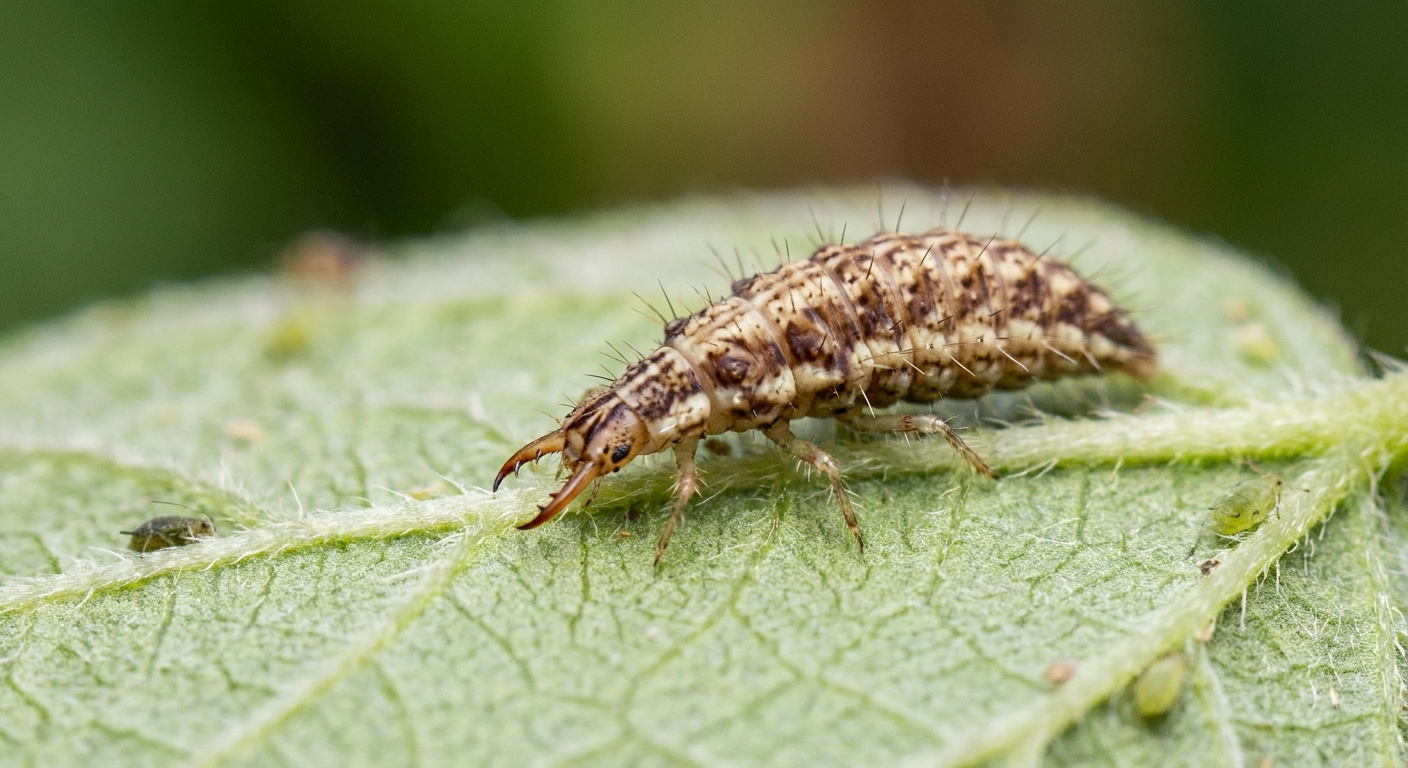
Larvae (the spiky ones)
- Look: Soft-bodied, yellow to orange larvae covered in branched spines, kind of like tiny sea urchins on land.
- Where: Mostly on leaf undersides and tender new growth.
- Damage: Heavy feeding and skeletonizing, often faster than adults.
Quick look-alike tips:
- Beneficial lady beetle larvae are usually elongated, dark gray or black with orange markings, and look like tiny alligators. Mexican bean beetle larvae are more rounded and uniformly yellow-orange with obvious spines.
- Other spotted beetles: Some beneficial spotted lady beetles can look similar at a glance. When in doubt, check what they are doing: Mexican bean beetles are typically on beans and actively chewing leaves and skeletonizing tissue.
Damage and timing
Mexican bean beetles overwinter as adults in leaf litter and garden debris, often around field edges, hedgerows, and sheltered spots. In spring, they move to beans and lay eggs. Larvae hatch, feed aggressively, then pupate and emerge as new adults. In many regions there can be multiple generations per season.
That is why early action is so powerful. Removing eggs and young larvae prevents the population surge that often hits just as your beans are finally taking off.
Where pressure is worst: It varies by region and season, but Mexican bean beetles are especially common in many parts of the eastern and central United States. If you have had them once, plan on watching for them again.
Step 1: Hand-picking that works
I know, I know. Hand-picking sounds like “extra.” But for Mexican bean beetles, it is one of the most effective organic tools, especially in small to medium gardens.
Best time of day
Go out in the early morning when beetles are sluggish. Bring a container of soapy water (a few drops of dish soap in water is enough) to drop adults and larvae into.
What to remove
- Adults: Pick and drop into soapy water.
- Larvae: Gently rub them off the underside of leaves into the container.
- Egg clusters: Scrape off with a fingernail or a small piece of tape, then smash or drop into soapy water.
A simple schedule
- When you first spot damage: Check plants every 1 to 2 days for a week.
- Once numbers drop: Shift to twice weekly checks.
- After a stretch of hot weather: Do an extra check. Heat can speed development, which can mean more feeding in less time.
What success looks like
You are winning when you see fewer new egg clusters, fewer larvae, and the newest leaves are coming in with less fresh skeletonizing than last week.
My tiny trick: Turn it into a 3 minute ritual. Coffee in hand, flip a few leaves, and you are done. Consistency beats intensity every time.
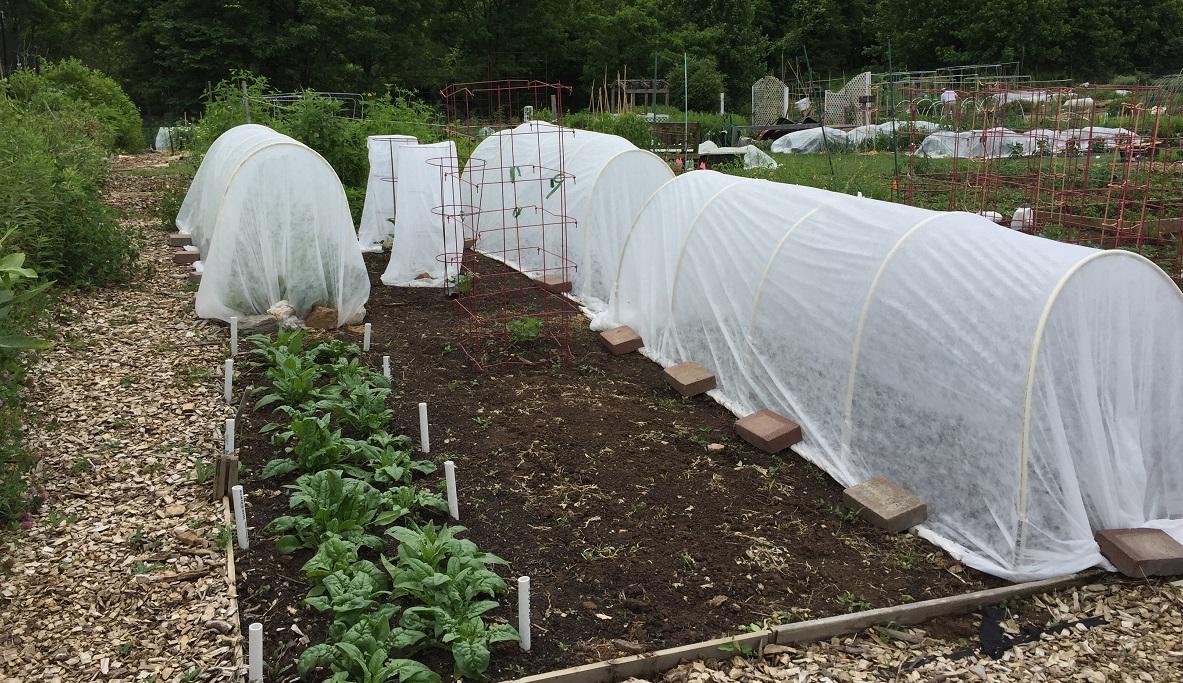
Step 2: Row covers
Floating row covers are one of the cleanest, most satisfying ways to stop Mexican bean beetles because they prevent adults from ever reaching your plants to feed and lay eggs.
How to use them on beans
- Cover plants right after sowing or immediately after transplanting.
- Use hoops or supports so the fabric is not pressed tightly against leaves (beetles can sometimes feed through contact points).
- Seal edges with soil, boards, or landscape pins so beetles cannot crawl underneath.
- Before sealing, do a quick check to make sure no adults are on the plants or soil surface, and remove nearby plant debris where adults like to hide.
- Check weekly to make sure plants are not overheating and the cover stays sealed.
Do beans need pollinators?
Most common garden beans are largely self-pollinating. Row covers are usually safe to keep on through flowering, but if you notice fewer pods setting, pull covers back during the warmest part of the day for a few hours and re-secure them afterward.
Important: Row covers work best when you start with a clean slate. Clear old bean debris and leaf litter near the bed first, then cover so you are not accidentally protecting beetles along with your plants.
Step 3: Neem and spinosad
When hand-picking and covers are not enough, targeted organic sprays can help. The key is to use them thoughtfully so you do not harm pollinators and beneficial insects.
Neem (best early)
Neem products (often labeled neem oil) can deter feeding and interfere with growth in many insects. Results vary, but it tends to work best when you start early, especially on eggs and young larvae.
- Spray in the evening to reduce leaf burn and protect daytime pollinators.
- Thoroughly coat leaf undersides where eggs and larvae hang out.
- Repeat as directed on the label, often every 7 to 10 days during pressure periods.
Note: Neem is not a quick knockdown. Think of it as steady pressure, not a one-and-done.
Spinosad (best for heavy larval feeding)
Spinosad is an organic-approved product derived from a soil bacterium. It is effective against many chewing insects, including Mexican bean beetle larvae, and can be very useful when damage is ramping up.
- Use it as a last-step tool when you see lots of larvae and rising leaf damage.
- Apply in the late evening and avoid spraying open blooms.
- Target the plant, especially undersides, and follow label directions closely.
- Be aware it can also harm some beneficial insects if sprayed directly, so keep it targeted and do not overuse it.
- Rotate tactics so pests do not build resistance.
Pollinator safety: Spinosad can harm bees if they contact it while wet. Evening application and avoiding flowers makes a big difference.
Step 4: Recruit beneficials
Your garden has a tiny workforce ready to help, especially if you give them shelter, water, and a reason to stick around.
Natural enemies that help
- Spined soldier bugs and other predatory stink bugs that feed on larvae.
- Green lacewing larvae that hunt soft-bodied insects and small larvae.
- Parasitic wasps that attack eggs and larvae. In some areas, a parasitoid called Pediobius foveolatus is used or reported, but availability and effectiveness vary by region.
- Birds can help, especially in more diverse gardens.
How to support them
- Plant small-flowered nectar plants nearby such as dill, cilantro (let some bolt), sweet alyssum, yarrow, and calendula.
- Avoid broad-spectrum insecticides, even “organic” ones, unless truly necessary.
- Keep a shallow water source nearby with stones for landing spots.
- Leave a little wildness at the edges: diverse plants, mulch, and shelter.
A gentle reminder: Beneficials do not usually erase a pest overnight. They help you stay balanced so one bad week does not turn into a full season of frustration.
Step 5: Fall cleanup
If you do one thing to make next year easier, make it this. Mexican bean beetles commonly overwinter as adults in sheltered debris and leaf litter near gardens. Tidying up reduces the number that wake up hungry in spring.
- Remove and discard spent bean plants promptly after harvest. Do not leave them standing.
- Rake up leaf litter around the bean bed, especially if you had a heavy infestation.
- Compost thoughtfully: Hot composting can be fine. If your pile is cool and slow, bag and dispose of heavily infested plant material instead.
- Rotate crops: Next year, plant beans in a different bed if possible so emerging adults have to travel farther to find them.
Rotation is not magic, but it adds friction to the beetle’s plan, and in gardening, friction is often enough.
A simple game plan
If you want a no-stress approach, here is the order I use in my own beds:
- At planting: Row cover if you had beetles before.
- Weekly habit: Flip leaves and remove egg clusters.
- At first damage: Morning hand-pick adults and larvae for 7 to 10 days.
- If pressure keeps climbing: Neem for early infestations, spinosad for heavy larval feeding, applied in the evening and away from blooms.
- All season: Keep beneficial-friendly flowers nearby and avoid broad-spectrum sprays.
- After harvest: Pull plants, clean up debris, and rotate next year.
And if you miss a few eggs or lose some leaves, you have not failed. Beans are resilient. Your job is not perfection. Your job is keeping the plants healthy enough to outgrow the nibbling.
When to step in
Even badly laced plants can rebound if you stop the next generation. If your plants are still growing and you can protect the newer leaves, they often recover and set pods normally.
In general: tolerate a little damage on established plants, but take action fast on seedlings and young plants that cannot afford to lose much leaf area.
Consider replanting if:
- Plants are stunted and repeatedly defoliated, with new growth immediately attacked.
- You are late in the season and the plants cannot regrow before first frost.
- Beetle pressure is extreme across the garden and you cannot keep up with control.
If you do replant, use row covers from day one and move the new planting as far from the old bean patch as you can.
Common questions
Are Mexican bean beetles the same as cucumber beetles?
No. They are different pests. Cucumber beetles attack cucurbits and can spread bacterial wilt. Mexican bean beetles focus on beans and other legumes and cause skeletonized leaves.
Will dish soap spray fix the problem?
Soap sprays are more effective on soft-bodied pests like aphids. Mexican bean beetles have a tougher exterior. Use soap water for drowning hand-picked beetles, not as your main spray.
Do I need to spray if I find a few beetles?
Not necessarily. If you catch eggs and early larvae quickly, hand-picking plus a cover can be enough. Save sprays for when you are clearly losing the tug-of-war.