Dendrobium Orchid
Dendrobium orchids are the kinds of plants that make you pause in a doorway and just stare for a second. Their blooms can look almost too perfect to be real, and then you realize, nope, they are real, and yes, they can absolutely live on your windowsill. The secret is understanding one simple truth: “Dendrobium” is a big family, and different types want slightly different routines.
Let’s make it easy. This guide will help you figure out which Dendrobium you likely have, then walk you through care that works in real homes, not greenhouse fantasy land.

Meet the Dendrobium types (quick version)
Most home growers run into two broad “personalities” of Dendrobium. If you get this part right, everything else starts to click.
Quick caveat: There are other dendrobium groups too (like antelope type Spatulata, Latouria, and Formosae) with their own quirks. The two types below cover the majority of dendrobiums commonly sold as houseplants.
Phalaenopsis-type Dendrobium (warm-growing)
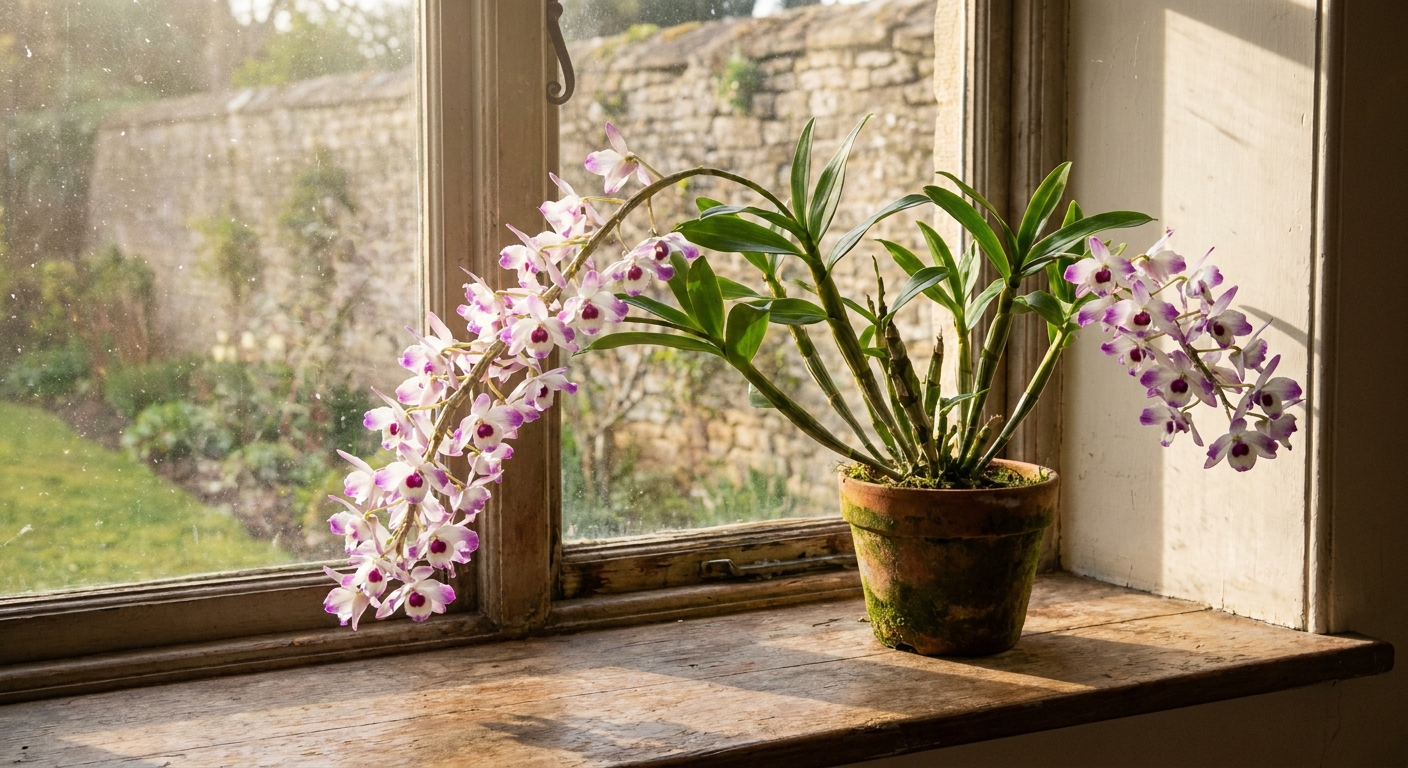
- Look: Upright, cane-like stems with leaves along the upper portion. Flowers often appear near the top and can last a long time.
- Care vibe: Fairly steady care year-round. No true winter rest.
- Common labels: Often sold simply as “Dendrobium” in grocery stores and garden centers.
Name confusion alert: “Phalaenopsis-type Dendrobium” describes a dendrobium that has a phalaenopsis-like look. It is not the same plant as a standard Phalaenopsis (moth) orchid.
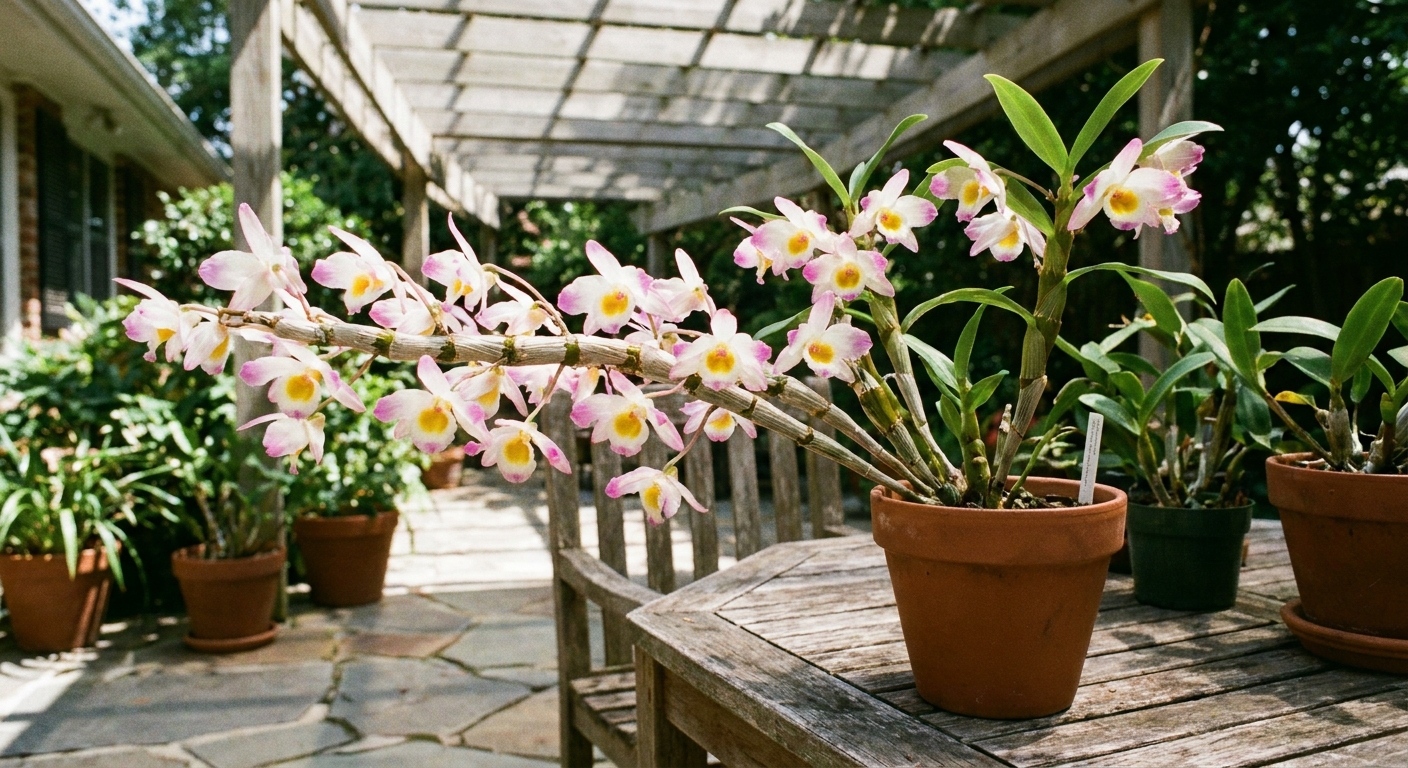
Nobile-type Dendrobium (cooler-growing, needs a rest)
- Look: Canes that may drop some leaves in winter. Flowers often pop along the sides of the canes.
- Care vibe: Needs a brighter, cooler, drier winter period to trigger blooms.
- Common labels: “Dendrobium nobile” or “nobile hybrid.”
Not sure which you have? If your plant keeps its leaves and seems to grow steadily all year, treat it like a phalaenopsis-type. If it starts looking a little sleepy in winter and may drop leaves, you probably have a nobile-type that wants a seasonal shift.
Light (the bloom-maker)
Dendrobiums love bright light. Not “dark corner near a window” light. Think “I could read a book here without turning on a lamp” bright.
- Best indoor spot: An east window for gentle morning sun, or a bright south or west window with a sheer curtain if the sun is intense.
- Target: Bright, indirect light with a little direct sun. A couple hours of morning sun is often perfect. Hot midday sun through glass can scorch fast.
- Clue you are nailing it: New canes grow sturdy, leaves are medium green, and the plant feels energetic.
- Clue it is too dark: Long, floppy growth and plenty of leaves but no flowers.
- Clue it is too bright: Yellowing, scorched patches, or leaves that look bleached.
If you only fix one thing, fix light. It solves the majority of “my dendrobium won’t bloom” situations.
If you are growing a nobile-type, extra bright light in fall and winter is often what flips the “bloom switch.”
Watering (avoid wrinkles and rot)
Dendrobium roots like a rhythm: soak, then breathe. The goal is to water thoroughly and then let the potting mix approach dry before watering again.
How to water (reliable method)
- Take it to the sink.
- Water generously until it runs freely out the drainage holes.
- Let it drain completely. No standing water in a cachepot.
- Do not water again until the mix is almost dry and the pot feels light.
How to tell it is time
- Pot weight: A light pot is a thirsty pot.
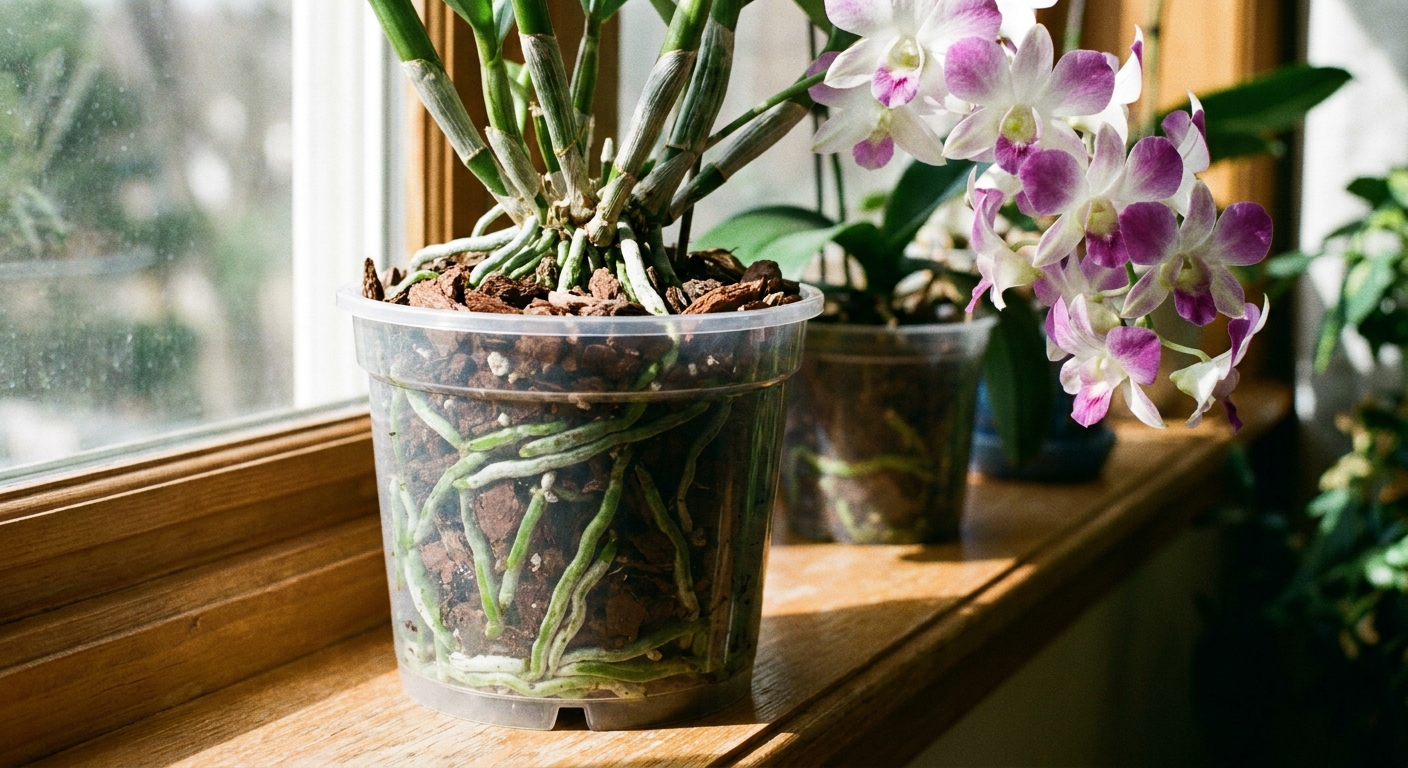
- Clear pot root clue: Silvery roots usually mean “dry,” greener roots often mean “still moist.”
- Skewer trick: Slide a wooden skewer into the bark. If it comes out cool and damp, wait. If it comes out mostly dry, water.
Seasonal rhythm
- Spring and summer (active growth): Often weekly, sometimes more often in warm, dry homes.
- Fall and winter: Back off. The plant uses less water in lower light.
Nobile-type winter rest (simple protocol)
To encourage blooms, many nobile-types benefit from a brighter, cooler winter with reduced watering. You are not trying to shrivel it into a raisin. You are letting it dry more between waterings.
- When to start: After the new canes finish growing and nights start staying cool, often in late fall.
- What “reduced watering” looks like: Water lightly or less often, just enough to keep canes from severely shriveling. Many homes land around every 10 to 21 days, but use your mix and pot weight as the real guide.
- When to resume: When you see buds swelling along the canes or new growth starting at the base, gradually return to normal watering.
- Fertilizer during rest: Pause or nearly pause until buds or new growth appear.
Humidity and airflow
Dendrobiums are happiest around 40 to 60 percent humidity, though many hybrids tolerate typical home humidity if you water correctly and give them good light.
- Easy humidity boost: Group plants together or run a small humidifier nearby.
- What to avoid: Stagnant air plus soggy mix. That combo invites fungus and rot.
- Simple airflow: A gentle fan in the room, not blowing directly on the plant all day.
Temperature
Most commonly sold dendrobiums are comfortable in normal household temperatures. Think of these as typical targets, not strict rules.
- Phalaenopsis-type: Generally happy around 60 to 85°F (16 to 29°C).
- Nobile-type: Often sets buds best with a sustained cool-night period in fall and winter, commonly nights around 50 to 60°F (10 to 16°C), plus bright light and reduced water.
If you cannot provide a big temperature drop, prioritize bright light and reduced watering for nobile-types in winter and you can still get blooms, just sometimes fewer.
Potting mix and pots
Dendrobiums are epiphytes in nature, meaning they cling to trees and their roots get air. So we mimic that with airy media.
Best potting mix (indoor)
- Medium-grade orchid bark as the base.
- Add a bit of perlite for extra airflow.
- Add a small amount of sphagnum moss only if your home is very dry and you tend to forget watering.
Pot choice
- Clear plastic orchid pots are fantastic because you can see root health and moisture.
- Clay pots dry faster and can be great for heavy-handed waterers.
- Always: Drainage holes are non-negotiable.
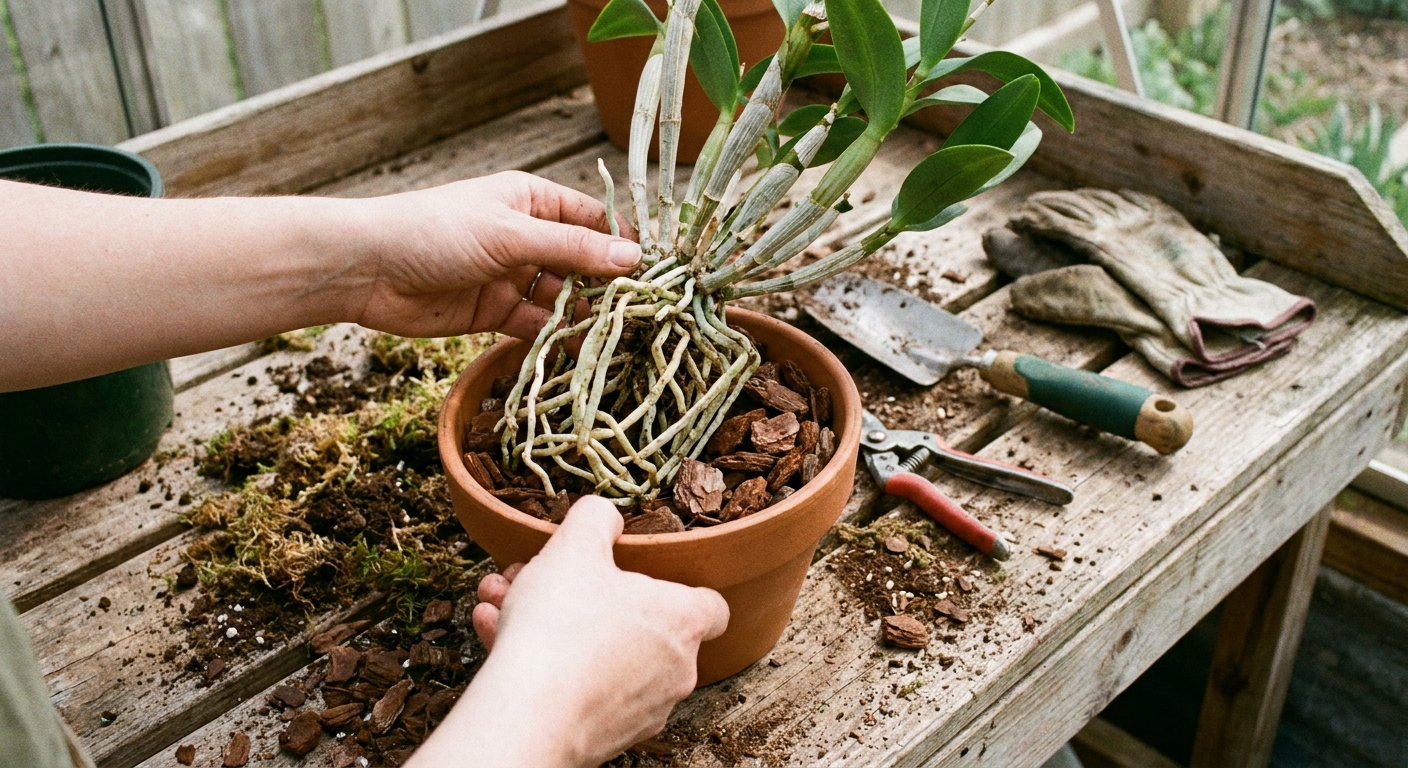
When to repot
Repot when the mix breaks down (mushy or sour smell), roots are overcrowded, or water stops flowing through easily. For most home growers, that is about every 1 to 2 years.
Best timing: When you see fresh root tips starting and new growth beginning, usually spring into early summer.
Fertilizer
Dendrobiums respond beautifully to gentle, regular feeding during active growth.
- Baseline: A balanced orchid fertilizer at quarter to half strength.
- Frequency: Every 2 to 4 weeks in spring and summer.
- Flush: Once a month, water thoroughly with plain water to wash out mineral salts, especially if you use tap water.
For nobile-types, reduce fertilizer in fall and pause or nearly pause during the cool rest, then resume when buds form or new growth begins.
Water quality (small detail, big difference)
- If your water is very hard, mineral salts can build up faster. Flushing monthly helps.
- If you have access to rainwater, RO, or distilled water, many orchids love it.
- Avoid softened water from a water softener, which can be harsh on orchid roots.
How to get it to rebloom
This is the part that convinces people they do not have a black thumb. Most “no blooms” issues come down to light or seasonal cues.
Rebloom checklist
- Light: Increase brightness first. This fixes the majority of bloom issues.
- Do not cut healthy canes: Dendrobium canes store energy.
- Leafless canes: On many nobile-types, even leafless canes can bloom again. On phalaenopsis-type dendrobiums, blooming is often from the upper nodes on mature canes, and reblooming from older canes can happen, but it varies by hybrid.
- Feed during growth: Fertilize when new canes are actively elongating.
- For nobile-types: Give cooler nights plus reduced watering in late fall through winter.
- Patience: New canes often need to mature before they bloom.
After flowering: You can cut the flower spike once blooms fade. Leave the canes unless they are clearly dead and brittle.
Common problems
Wrinkled canes
Likely cause: Dehydration from underwatering, damaged roots, or mix that dries too fast.
- Check roots. Healthy roots are firm. Rotting roots are brown, mushy, and hollow.
- If roots look good, water more thoroughly and a touch more often.
- If roots look bad, repot into fresh bark and trim dead roots with sterilized snips.
Yellow leaves
Likely cause: Natural aging of older leaves, too much sun, or staying too wet.
- If only one or two lower leaves yellow slowly, that is often normal.
- If many leaves yellow quickly, review light intensity and watering frequency.
Bud blast (buds drop before opening)
Likely cause: Sudden changes in temperature, low humidity, drafts, or inconsistent watering.
- Keep the plant away from heating vents and cold window drafts.
- Water consistently during bud development.
- Boost humidity gently with a humidifier.
No blooms, only leaves
Likely cause: Not enough light, or for nobile-types, missing the cool, brighter, drier seasonal cue.
- Move to a brighter window or add a grow light.
- If it is a nobile-type, give cooler nights in fall and winter and reduce watering.
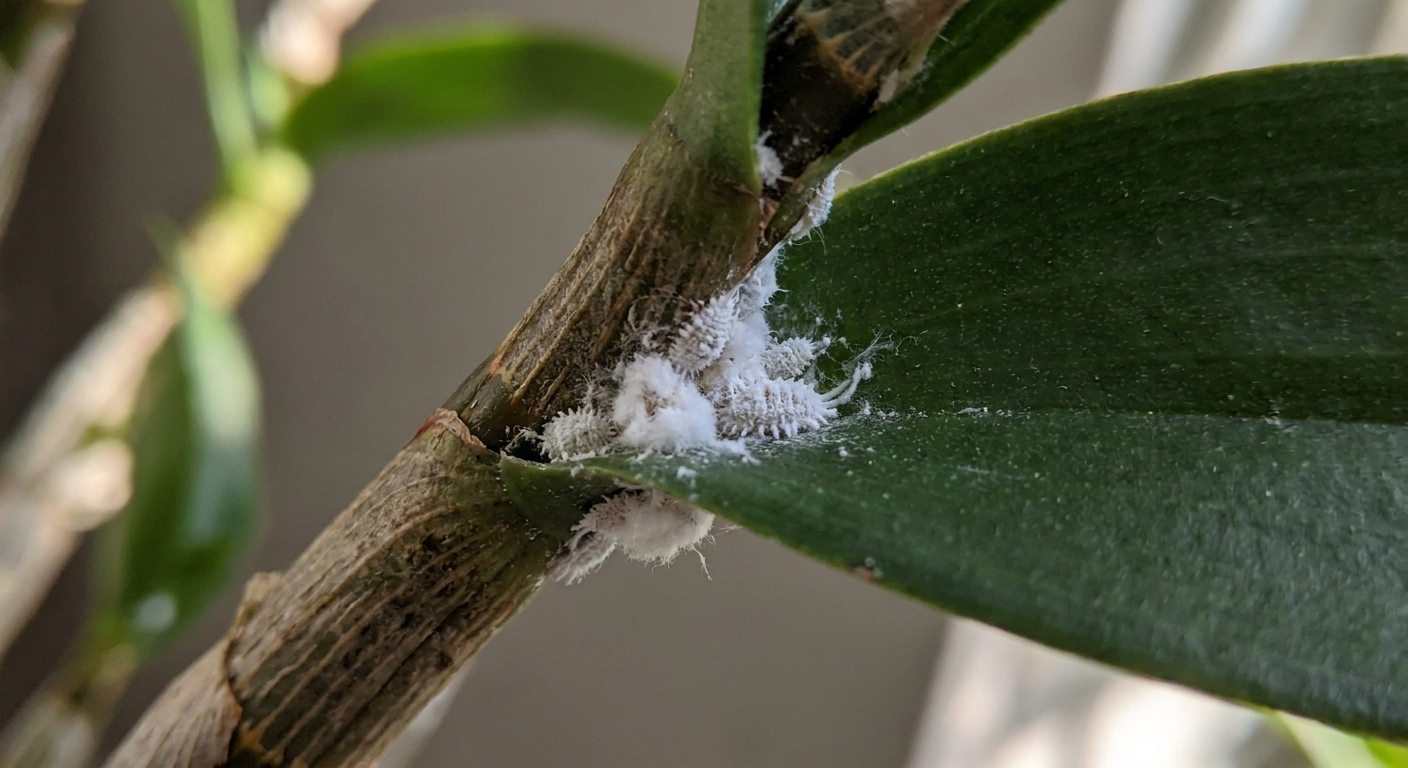
Sticky residue on leaves
Likely cause: Sap from flowers, or pests like scale and mealybugs.
- Isolate the plant so pests do not spread.
- Inspect closely along the undersides, leaf joints, and cane creases.
- Wipe with cotton swabs dipped in isopropyl alcohol (spot test first).
- Repeat weekly for a few rounds to catch new hatchlings.
- If pests keep returning, escalate to insecticidal soap or horticultural oil (follow label directions), and keep treating consistently.
Propagation
Yes, and dendrobiums are one of the more forgiving orchids to divide, as long as you do not get too enthusiastic with the scissors.
- When: During repotting, ideally in spring as new growth begins.
- How: Divide so each section has at least 3 to 4 healthy canes and a solid root system.
- Aftercare: Keep slightly drier for a week or so, then resume normal watering as you see new root growth.
You may also see keikis (baby plants) on the canes. Let them grow roots about 2 to 3 inches (5 to 7 cm) long before removing and potting.
Quick care summary
- Light: Bright, indirect with some gentle sun (morning sun is your friend).
- Water: Soak and drain, then wait until almost dry.
- Mix: Airy orchid bark, not regular potting soil.
- Humidity: Aim for 40 to 60 percent if possible.
- Fertilizer: Weakly, during active growth.
- Reblooming: More light for all types; cooler, brighter, drier winter for many nobile-types.
To fine-tune care, assess your plant’s tag (if you have one), whether it drops leaves in winter, and the direction your main window faces. Those three clues usually point you to the right routine fast.