Caladium Care for Beginners
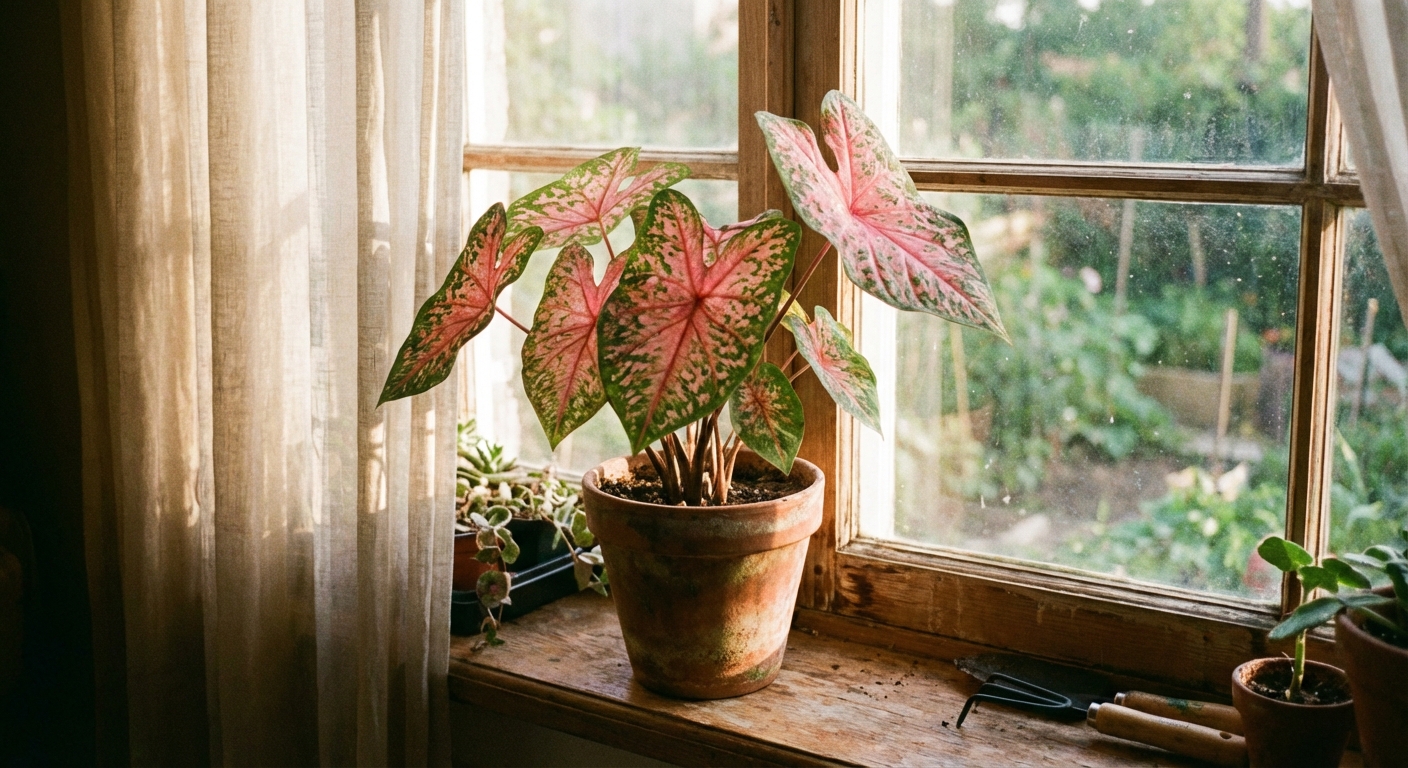
Caladiums are the plant equivalent of stained glass. Those big, thin, translucent-looking leaves seem hand-painted in pinks, reds, whites, and greens, and they somehow make even a plain porch pot feel like a little botanical party. The best part for beginners is that caladium care is more rhythm than rules: warm soil, bright filtered light, steady moisture, and then a well-earned nap (dormancy) when the season winds down.
Whether you want caladiums as a summer houseplant or as a shade-loving showstopper outdoors, this guide will walk you through the whole cycle from tuber to dormancy without the mystery.
Meet the caladium
Caladiums (Caladium bicolor and hybrids) grow from tubers that most gardeners (and most stores) casually call bulbs. In this guide, I will say “tuber” most of the time, but if your tag says bulb, you are still in the right place. They are grown for foliage, not flowers. In warm months, they push up dramatic leaves fast. When temperatures cool and days shorten, they naturally go dormant, dropping leaves and resting until warmth returns.
- Grown as: seasonal outdoor plant in many climates, or a warm-weather indoor foliage plant
- Favorite conditions: warmth, humidity, evenly moist soil, bright filtered light
- Natural habit: dormancy is normal and expected
Hardiness note: Caladiums are typically perennial outdoors in warm regions (often USDA Zones 9 to 11). In colder zones, treat them like a summer annual and plan to dig and store the tubers before frost.
Quick safety note: Caladiums are toxic if chewed (calcium oxalate crystals). Keep away from curious pets and toddlers who like to “taste test” leaves.
Choosing tubers and varieties
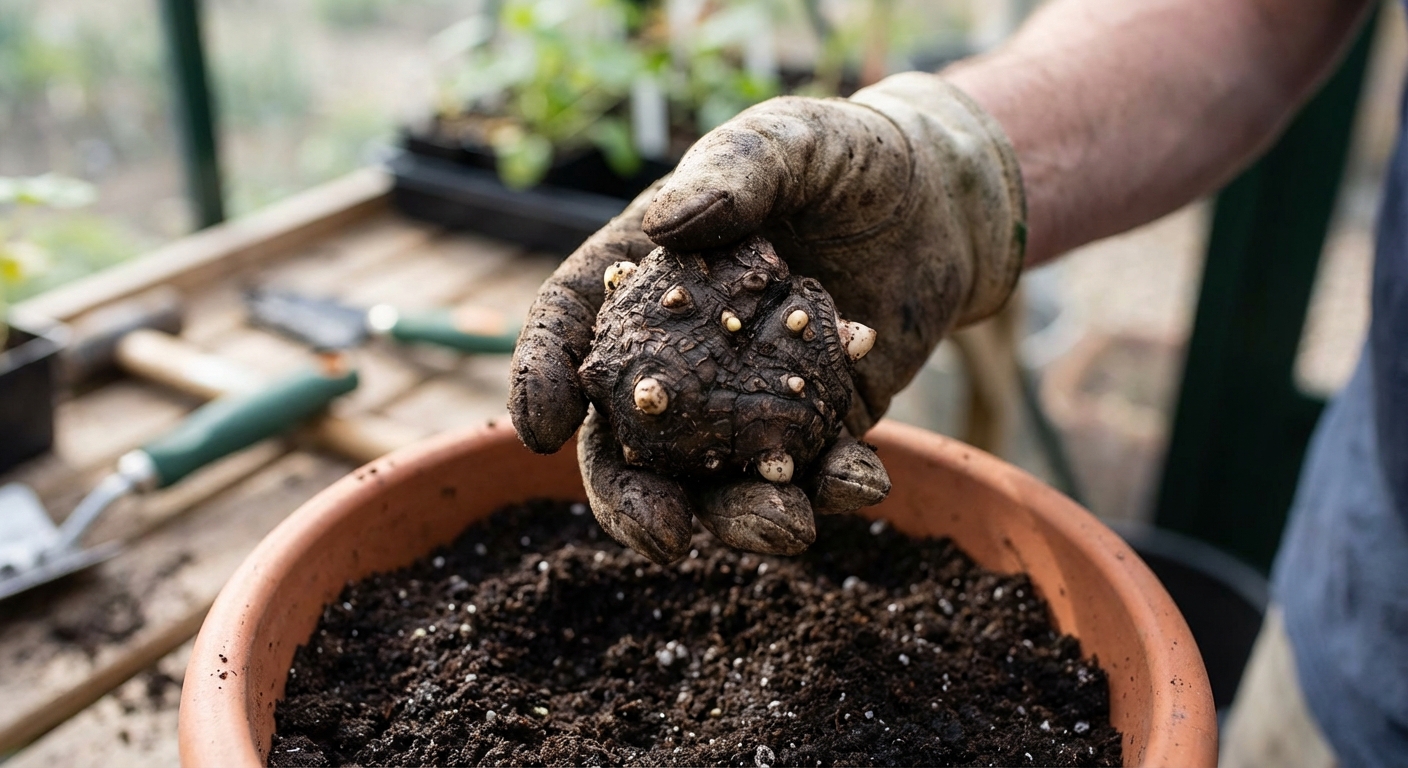
If you have ever bought a caladium tuber and wondered why it looked like a knobby little potato, you are not alone. When shopping, pick tubers that feel firm, not soft, hollow, or moldy.
Fancy-leaf vs. strap-leaf
- Fancy-leaf caladiums: big heart-shaped leaves, often the most dramatic color patterns. Great in containers and shady beds.
- Strap-leaf caladiums: narrower leaves, usually more leaves per plant, often a bit sturdier in sun and wind.
If you are growing outdoors and your spot gets a few hours of morning sun, strap-leaf types can be a little more forgiving. For bright indoor spots with filtered light, either type can thrive.
When to plant
Caladiums are warm-season plants. They sulk in cold soil, and a sulky caladium is one that invites rot. Timing is a big part of beginner success.
Outdoors
- Wait until night temperatures stay above 60°F (16°C).
- Aim to plant when soil is reliably 70°F (21°C) or warmer.
- If you plant closer to 65°F (18°C), expect slower sprouting and be extra strict about drainage. Cool plus wet is the rot recipe.
- A universal cue: plant after last frost once the soil has truly warmed, not just the air.
Indoors
- You can start tubers indoors in spring to get a head start.
- Provide warmth and patience. Sprouting is mostly temperature-driven. At 70°F to 80°F (21°C to 27°C), many tubers sprout in roughly 3 to 6 weeks, but cooler rooms can push it longer.
How to plant (step by step)
Planting caladium tubers is simple once you know the “which side is up” trick. Look for the bumpy side with little indentations or “eyes.” That is the top.
In pots
- Pick a pot with drainage holes. Caladiums hate sitting in water.
- Choose a pot size for a full look. As a simple rule, use a 6 to 8 inch pot for 1 large tuber, or plant 2 to 3 smaller tubers in an 8 to 10 inch pot for a lush, “wow” container.
- Use a light, moisture-retentive mix. A quality indoor potting mix plus perlite works well.
- Plant depth: 1.5 to 2 inches (4 to 5 cm) of soil over the tuber.
- Plant eyes-up. If you cannot tell, plant on its side. It will figure it out.
- Water lightly, then wait. Keep soil barely moist until you see growth, then transition to even moisture.
- Warmth helps. A warm room (70°F to 80°F) or a seedling heat mat speeds sprouting.
In the ground
- Spacing: about 8 to 12 inches apart for many varieties (check your tag if you have it).
- Depth: about 2 inches deep.
- Soil: rich with compost, loose, and well-draining.
My favorite outdoor trick is to mix a few handfuls of compost into the planting hole. Caladiums are leaf machines, and good soil gives them the fuel to perform.
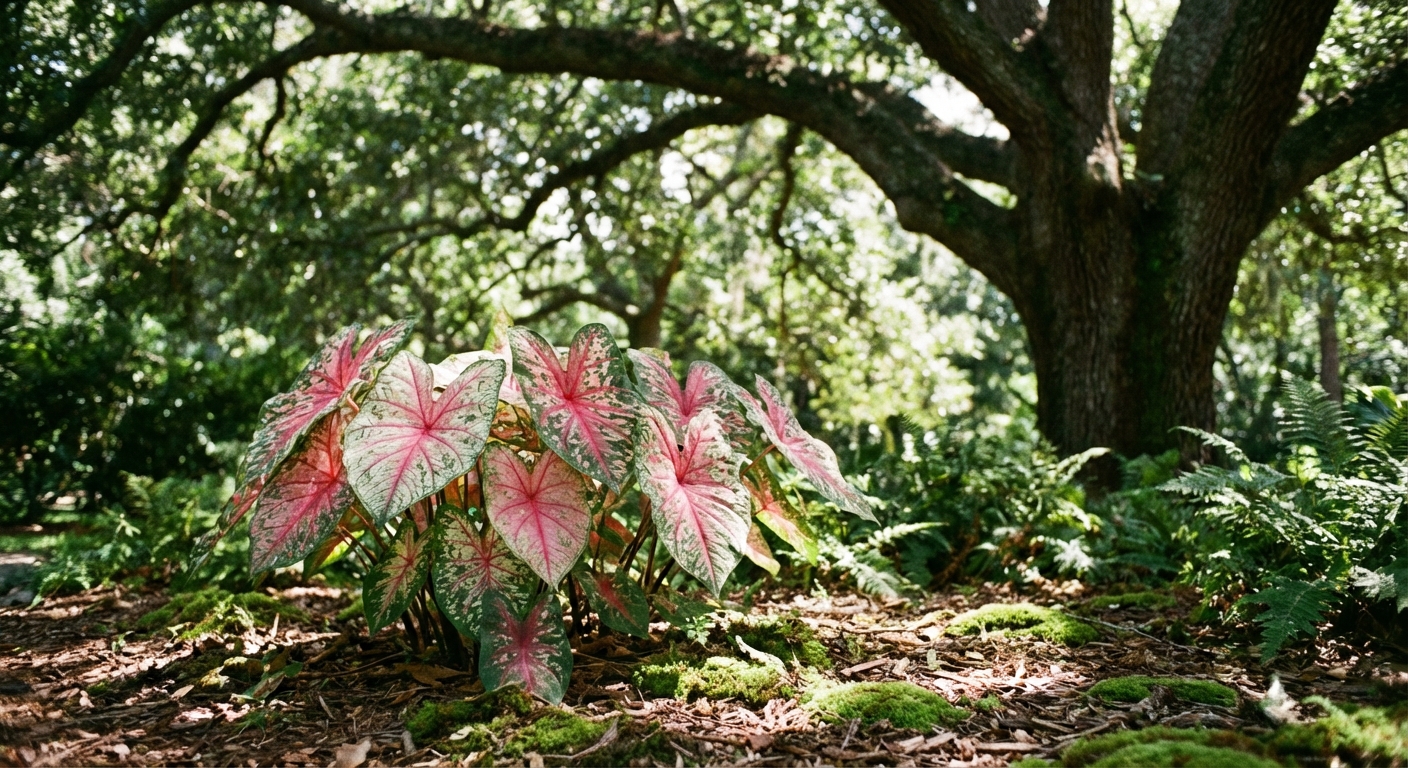
Light needs
Caladiums crave bright light, but not harsh direct sun that scorches those delicate leaves. Think “sun through a curtain” or “dappled shade under a tree.”
Indoors
- Best: bright indirect light near an east or north window, or set back from a south or west window.
- Too little light: slower growth and fewer leaves.
- Too much sun: crispy edges, bleached patches, and drooping in the afternoon.
Outdoors
- Best: partial shade, morning sun with afternoon shade, or dappled light.
- Sun-tolerant varieties: some modern types handle more sun, but in hot climates even “sun” caladiums can scorch in intense midday light. Morning sun is the safer kind of sun.
Watering
If caladiums had a motto, it would be “evenly moist, please.” They wilt dramatically when dry, but they also rot if the soil stays waterlogged. Your goal is soil that feels like a wrung-out sponge.
Indoors watering routine
- While sprouting: keep soil barely moist, never soggy.
- Once leafed out: water when the top 1 inch of soil feels dry.
- Water thoroughly until it drains, then empty the saucer.
- Use room-temperature water if possible. Cold water can stress tropical plants.
Outdoors watering routine
- Water deeply when the top couple inches begin to dry.
- Containers outdoors may need water daily during hot spells.
- Mulch helps keep soil evenly moist and cooler.
Beginner tip: If your caladium wilts, check the soil before reacting. Dry soil means water. Wet soil means pause and improve drainage and airflow.
Humidity and temperature
Those lush leaves evolved in humid conditions. In dry indoor air, caladiums can get crispy edges and stubborn growth. They will still live, but they will look a bit like they are having a bad hair day.
Best conditions
- Temperature: ideally 65°F to 85°F (18°C to 29°C). Avoid cold drafts and AC vents.
- Humidity: 50% or higher is fantastic, but many will do fine with a little help.
Easy humidity boosts
- Run a small humidifier nearby.
- Group plants together to create a mini humid pocket.
- Use a pebble tray (pot sits on stones above the waterline).
I do talk to my ferns, yes, but I also run a humidifier. Plants like love, but they really love water vapor.
Soil and potting mix
Caladium tubers want oxygen around them. Heavy soil holds too much water and invites rot. Aim for a mix that drains but does not dry out instantly.
- Indoors: high-quality potting mix + perlite or pine bark for extra air pockets.
- Outdoors: loosen soil and add compost. If you have clay, build a raised bed or grow in pots.
- pH: slightly acidic to neutral is fine for most gardens.
Fertilizing
Because caladiums are grown for leaves, they appreciate gentle feeding during active growth. The key word is gentle. Too much fertilizer can burn roots and leaf edges.
Indoor caladiums
- Feed every 4 to 6 weeks with a balanced liquid fertilizer at half strength during spring and summer.
- Stop feeding as the plant slows down and heads toward dormancy.
Outdoor caladiums
- Mix compost into the bed at planting time.
- Use a slow-release fertilizer sparingly, or a diluted liquid feed monthly.
Pruning and flowers
- Snip off yellowing or damaged leaves at the base to keep the plant tidy and improve airflow.
- Caladiums sometimes produce a small flower spike. It is not the main event. If you want to focus energy on foliage, you can remove it.
Common problems
Wilting leaves
- Dry soil: water deeply and keep an eye on containers during heat.
- Hot sun: move the pot to brighter shade or provide afternoon shade.
- Root stress from soggy soil: if soil is wet and leaves still droop, improve drainage and let the top layer dry before watering again.
Yellowing leaves
- Overwatering: most common. Let soil dry slightly and ensure the pot drains freely.
- Natural seasonal slowdown: late summer into fall, yellowing can be the start of dormancy.
- Low nutrients: if new growth is pale during peak season, consider a light feeding.
Crispy brown edges
- Low humidity: add a humidifier or group plants.
- Too much direct sun: shift to bright indirect light.
- Fertilizer burn: flush the pot with water and feed more gently next time.
Slow or no sprouting
- Soil is too cool: warm it up. Heat is the sprouting secret. If you can get the potting mix into the 70°F to 80°F range, you will usually see action sooner.
- Tuber planted too deep: 1.5 to 2 inches is plenty.
- Rot: if the tuber is soft or smells bad, it likely will not recover.
Pests
Indoors, watch for spider mites and thrips, especially in dry air. Outdoors, slugs and snails may nibble leaves.
- First step: rinse leaves and inspect undersides.
- Indoors: insecticidal soap or neem (test a leaf first) and increase humidity.
- Outdoors: hand-pick slugs at dusk and use pet-safe slug controls if needed.
Dormancy (do not panic)
Caladiums are not houseplants that stay picture-perfect all year for most of us. They are seasonal by nature. When light levels drop and temperatures cool, leaves will yellow and die back. This is not failure. This is the plant doing exactly what it is designed to do.
Dormancy vs. trouble
- It happens in late summer or fall, or after a cool spell.
- Multiple leaves yellow gradually.
- Growth slows down and the plant stops pushing new leaves.
Indoor note: If you keep a caladium very warm with bright light, it may hold leaves longer, but many still choose a rest. Think of dormancy as normal behavior, not a personal critique.
Once most leaves have faded, you can stop trying to “fix” it and switch into storage mode.
How to overwinter tubers
If you garden where frost happens, overwintering caladiums is the difference between buying new tubers every spring and building a little collection you reuse year after year.
For outdoor caladiums (in-ground)
- After leaves die back, wait for a dry day.
- Dig carefully and lift tubers without slicing them.
- Brush off excess soil. Do not wash unless you must.
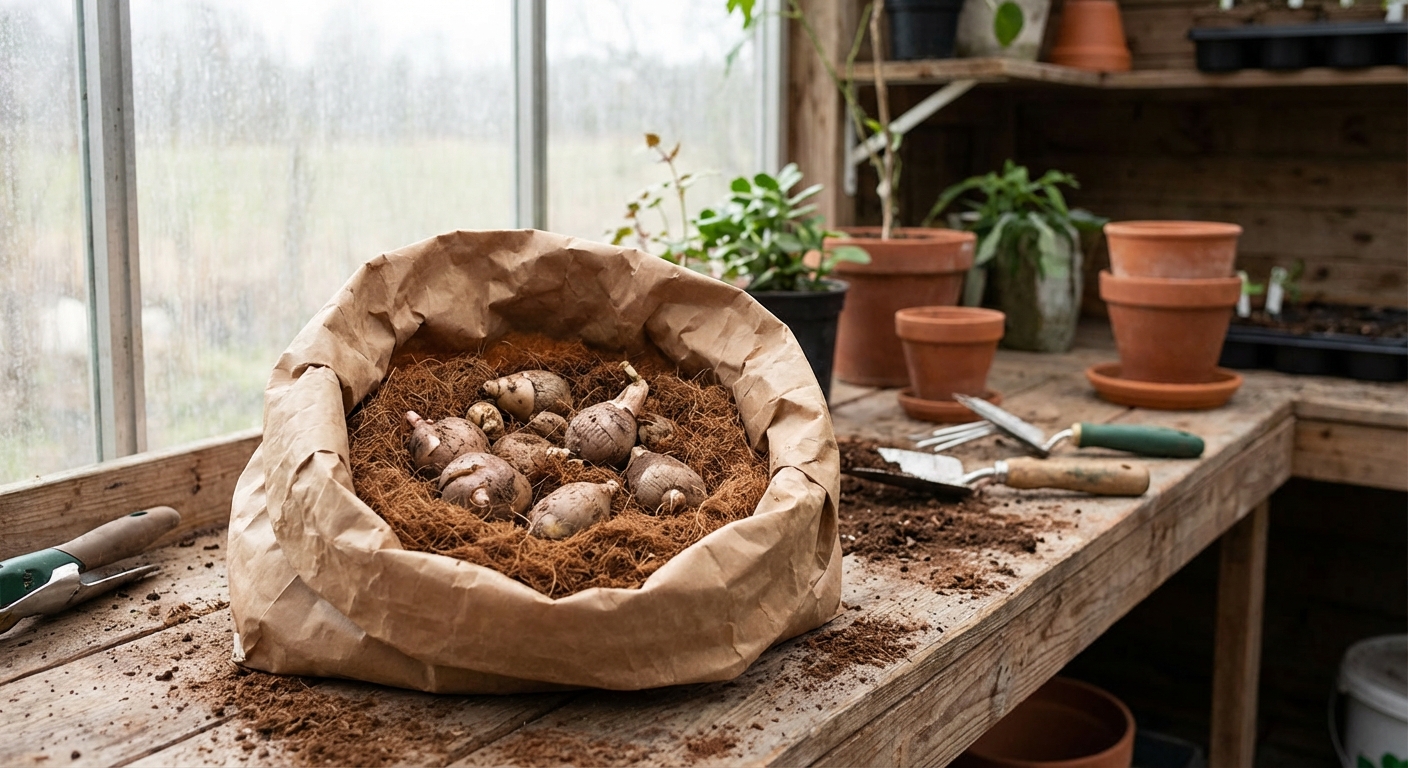
- Let tubers cure in a warm, airy spot for 7 to 10 days (out of direct sun).
- Store in a breathable container with dry peat moss, coco coir, or vermiculite.
- Keep in a dark place around 60°F to 70°F (16°C to 21°C).
For potted caladiums
- You can lift and store tubers like above, or store the tuber in the pot once it is fully dormant.
- If storing in the pot, keep the mix barely dry and do not water during dormancy.
Storage check-in: Once a month, peek at your tubers. If they look shriveled, add a tiny bit of moisture to the packing material. If you see mold, increase airflow and remove affected material. If tubers start sprouting in storage, it is usually a sign they are being stored too warm. Cool them slightly and plan to pot them up soon.
Cold warning: Avoid chilly garages that dip too low. Prolonged cold can cause chilling injury even if it does not freeze.
Waking them up in spring
When spring warmth returns, wake your caladiums slowly. Plant tubers into fresh mix, provide warmth, and water lightly until you see growth. Once leaves appear, move into your normal routine of bright indirect light, even moisture, and gentle feeding.
- If you stored tubers, discard any that are soft, hollow, or moldy.
- Do not rush them into cold outdoor nights.
- Expect the first leaves to be smaller. They size up as the season gets rolling.
Beginner checklist
- Warmth first: plant in warm soil, aim for 70°F+ soil and nights above 60°F.
- Light: bright indirect indoors, dappled shade outdoors.
- Water: evenly moist, never swampy. Barely moist while sprouting, then water when the top inch dries.
- Humidity: aim for 50%+ for happiest leaves.
- Dormancy: yellowing in fall is normal, reduce water and store tubers.
If you remember nothing else, remember this: caladiums are dramatic, not difficult. When they flop, they are giving you information. When they go dormant, they are simply resting. And when they wake back up in warmth, they will reward you with another round of living stained glass.