Amaryllis Bulb Dormancy After Blooming
When an amaryllis finishes its big, dramatic show, it can feel like the party is over. But this is actually the moment that decides next year’s performance. Amaryllis bulbs (Hippeastrum) are built for a rhythm: bloom, leaf out, recharge, then rest. Dormancy is not a punishment. It is the bulb’s deep breath.
Quick name note: the “amaryllis” sold as a holiday houseplant is usually Hippeastrum (South American). True amaryllis (Amaryllis belladonna) is a different plant with different timing. This guide is for the common indoor holiday bulb: Hippeastrum.
This page is all about the bulb-handling side of “after blooming” care: whether to dig the bulb or leave it in its pot, how to dry and cure it safely, what storage conditions actually work, and when to bring it back to life so it blooms again.

Do amaryllis bulbs need dormancy?
Most commonly sold amaryllis varieties rebloom best with a true rest period. Dormancy helps reset the bulb’s internal clock and encourages strong flower bud formation. Without it, you often get lots of leaves and little to no bloom, especially indoors. That said, results vary by cultivar and conditions. With very strong light, steady feeding, and the right temperatures, some bulbs may rebloom with a less formal rest.
There are exceptions. Some warm-climate gardeners grow amaryllis outdoors year-round and still get blooms, but even then the plant typically experiences a seasonal slowdown. If you want reliable indoor reblooming on a schedule, dormancy is your friend.
What dormancy is and what it is not
- Dormancy is a planned period of reduced watering, cooler temperatures, and lower light, allowing the bulb to rest.
- Dormancy is not letting a soggy bulb rot in a forgotten pot or sealing a damp bulb in plastic until it molds.
After blooming: dig it or leave it?
The “dig or leave it” decision depends on your space, your storage conditions, and how much you like to fuss. Neither option is better. We are just choosing the safest path for your bulb.
Option A: Leave it in the pot
Best for: gardeners who have a cool, dry closet or basement shelf and want minimal handling.
- Once flowering is finished, cut the flower stalk down to about 1 to 2 inches above the bulb. (Do not cut the leaves yet.)
- Keep the plant in bright light and water normally while it grows leaves.
- When you are ready to start dormancy later in the year, gradually reduce watering until the leaves yellow and die back.
- Move the pot to cool, dark storage once the foliage has fully collapsed.
Option B: Store it bare-root
Best for: anyone who struggles with moldy storage, fungus gnats in old soil, or overwatering accidents.
- After the recharge period (more on timing below), stop watering and let the leaves yellow.
- Tip the pot and gently remove the bulb.
- Shake off loose soil, trim dead roots, and let the bulb cure before storing.
Quick decision guide
- If your storage area is humid, store bare-root in breathable materials.
- If you tend to overwater, storing the bulb out of soil is safer.
- If you have limited space, leaving it in the pot is simpler.
- If the potting mix is old, soggy, or buggy, dig and refresh next season.
Do not rush dormancy
Here is the part many “after flowering” tips skip: the bulb needs time to refill itself. Those long, straplike leaves are solar panels. The stronger the leaf growth after blooming, the bigger the energy savings account for next year’s flowers.
How long to keep it growing
Aim for a minimum of 8 to 12 weeks of healthy leaf growth after blooming. For the most reliable rebloom, especially after holiday forcing, plan on keeping leaves growing for several months, often through spring and summer, then inducing dormancy in late summer to early fall (often August or September).
During this recharge phase:
- Keep it in very bright light, including some direct sun if acclimated.
- Water when the top inch of soil is dry, then drain completely.
- Feed lightly every 2 to 4 weeks with a balanced fertilizer.
Summer outdoors (highly recommended if you can)
If your amaryllis bloomed in winter, it is perfectly timed to “summer” outside for a serious recharge.
- After your last frost, move the pot outdoors.
- Start in bright shade for about a week, then gradually increase sun. Many do best with morning sun and afternoon shade, or filtered sun.
- Keep watering consistent and continue light feeding.
- Bring it back in before frost.
Think of dormancy as late summer or early fall behavior, even if you are doing it indoors.
How to start dormancy
Dormancy starts when you intentionally cut back moisture and shift the bulb cooler so it stops pushing growth. Low light helps, but dryness and temperature do the heavy lifting in most homes.
Step-by-step
- Stop fertilizing about 4 weeks before you want dormancy.
- Reduce watering gradually. Stretch the time between waterings, then stop once the leaves begin to yellow.
- Let the leaves die back naturally. When they are fully yellow and limp, cut them off near the bulb neck.
- Keep it dry. A dormant bulb should be kept on the dry side, not damp.
Note: If your bulb refuses to yellow and just keeps making leaves, you can still guide it into rest by moving it to a cooler spot and withholding water. It may take a few weeks to get the message.
Drying and curing bulbs
If you are storing the bulb out of soil, curing is what keeps “dormancy” from turning into “mystery fuzz and heartbreak.” The goal is to let surface moisture evaporate and allow minor nicks to dry.
How to cure safely
- After lifting the bulb, remove loose soil. Do not wash it unless you have a pest issue that requires it.
- Trim only what is clearly dead: papery outer layers are fine, mushy layers are not.
- If you cut anything juicy or soft, use a clean knife (wipe with alcohol between cuts) and let the cut area dry and callus for a day or two before storage. Optional: dust the cut with sulfur or a garden fungicide labeled for bulbs.
- Place the bulb in a single layer in a dry, airy spot out of direct sun.
- Cure for 3 to 7 days.
What a well-cured bulb looks like
- Neck is firm, not soft.
- Outer layers are dry and papery.
- No wet spots, no sour smell, no visible mold.

How to store bulbs
The storage sweet spot is cool, dark, and dry with airflow. You are trying to slow the bulb down, not freeze it.
Best storage conditions
- Temperature: about 50 to 60°F (10 to 16°C) is ideal for most home setups. Avoid freezing, and try not to store for long periods below about 45 to 50°F (7 to 10°C), since chilling can stress tender bulbs.
- Light: dark or very low light.
- Humidity: low to moderate, with breathable storage materials.
- Airflow: important, especially if you are storing multiple bulbs.
Where to store
- A closet on an exterior wall that stays cool
- A dry basement shelf
- An unheated spare room that does not freeze
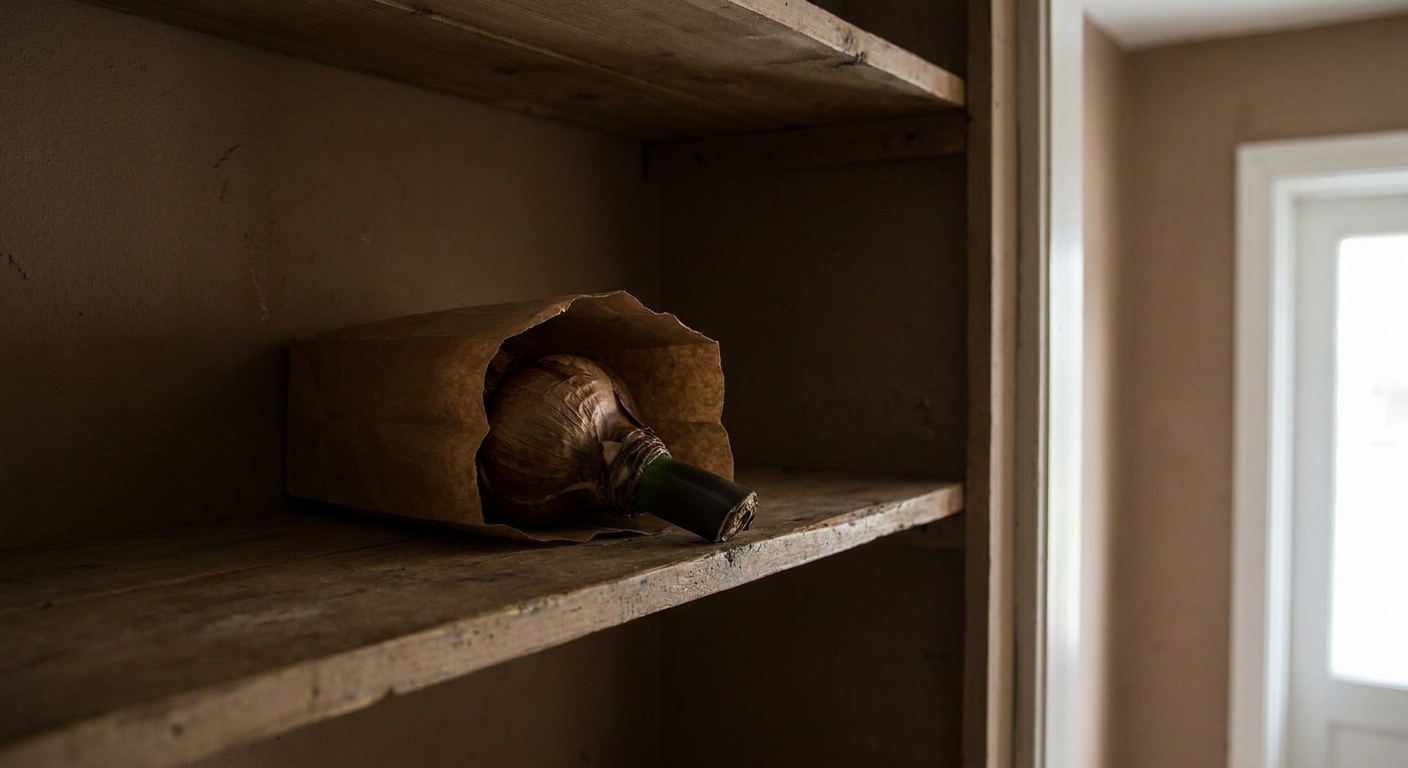
What to store bulbs in
- Paper bags
- Cardboard boxes
- Crates with dry peat moss, coconut coir, or wood shavings (optional, and only slightly packed)
Avoid: sealed plastic bags or airtight bins. They trap moisture and invite mold.
How long to store
A typical dormancy period is 8 to 12 weeks. Some gardeners push to 14 weeks, but very long storage can lead to dehydrated bulbs or weak regrowth.
Storing it in the pot
If you are storing the bulb in its pot, your main job is to prevent accidental watering and keep the soil from staying damp.
- Once the leaves are removed, put the pot in a cool, dark spot.
- Keep the potting mix mostly dry. If it is damp when storage begins, let it dry further in a protected spot with airflow before moving it into a closet.
- In most homes, do not water during dormancy.
- If the bulb becomes severely shriveled in storage, your space may be very warm and dry. In that case, a tiny sip of water (or a light moistening of the mix) once can prevent extreme desiccation. Do not restart regular watering until you are ready to wake it.
If you are a serial “just a little sip” waterer, I say this kindly: move the watering can to a different room. Dormant bulbs thrive on being mostly ignored.
Monthly storage check
Once a month, take a peek. This is not helicopter parenting. It is prevention.
What to look for
- Mold: wipe off light surface mold and improve airflow. If the bulb is soft or smells bad, remove affected scales and discard if rot is extensive.
- Soft spots: indicate rot. Cut away to firm tissue with a clean blade, let the wound dry and callus, and store with better airflow. If the basal plate (the flat bottom where roots emerge) is mushy, the bulb may not recover.
- Extreme shriveling: a little is normal. If it looks severely collapsed, your storage may be too warm and dry.
If your bulb starts sending up a green tip during storage, it is basically tapping its watch. You can end dormancy early and start the wake-up process.
When to repot and wake it
Plan backward from when you want blooms. Most amaryllis bloom about 6 to 10 weeks after you restart growth, depending on variety and conditions.
Wake-up timing
- For holiday blooms: start growth in early to mid-October (in many homes), adjusting based on your past timing.
- For late winter blooms: start in November or December.
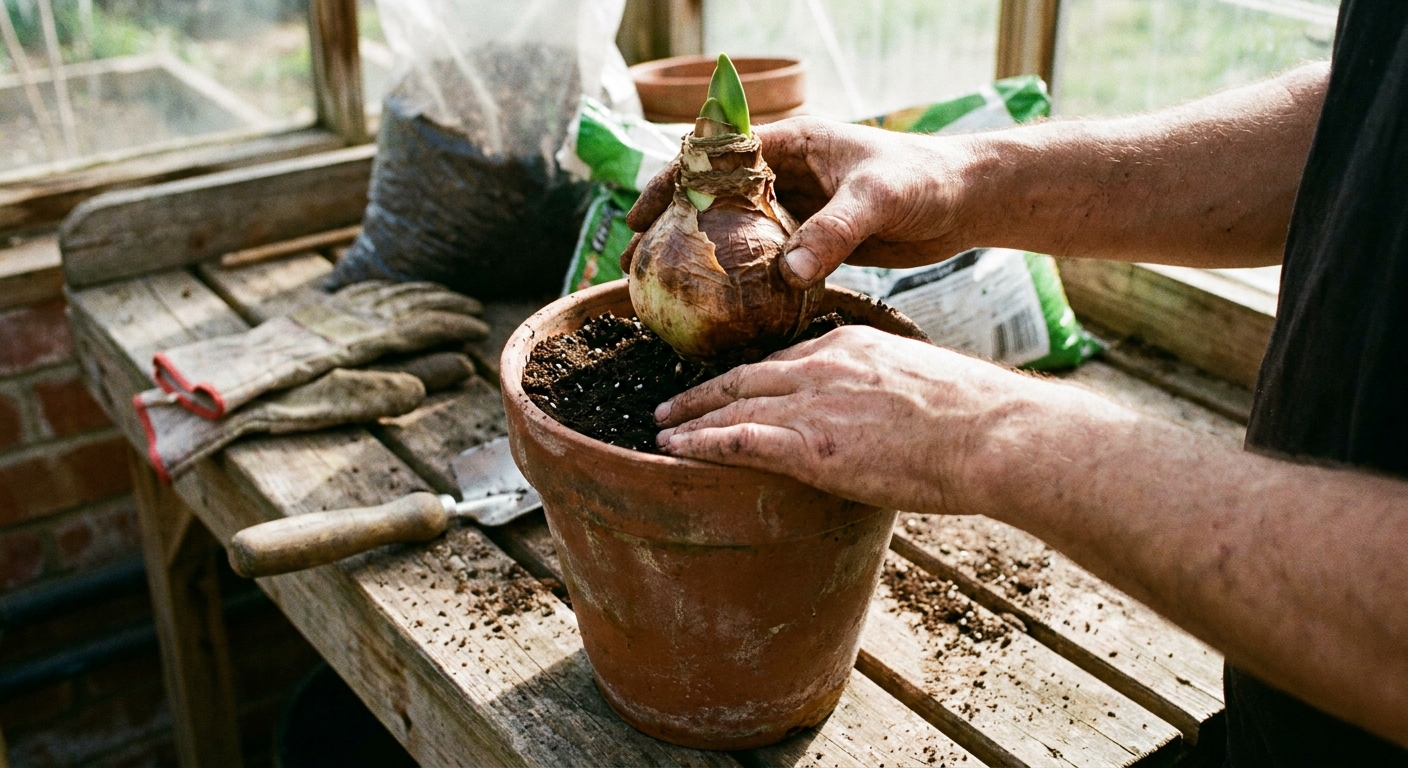
How to repot
- Choose a pot with drainage that is only 1 to 2 inches wider than the bulb.
- Use fresh, well-draining potting mix.
- Plant so the top third of the bulb sits above the soil line.
- Water lightly once to settle the mix, then let excess drain completely. Keep watering minimal until you see active growth, then water normally.
Offsets and extra bulbs
Some bulbs make offsets (bulblets) along the side. You can usually leave them attached. Separating very small offsets too early can slow the mother bulb’s rebound and delay flowering for the little ones. If you do separate, do it at repotting time and treat offsets like young bulbs that may need a couple of seasons to bloom.
Why dormancy helps rebloom
If you already read our rebloom guide, think of this page as the missing middle: the storage and rest mechanics that make the rebloom steps actually work in real homes.
- Rebloom relies on energy, which comes from the post-bloom leaf phase (ideally spring through summer).
- Rebloom relies on a reset, which comes from a cool, dry dormancy.
- Rebloom relies on timing, which comes from counting dormancy weeks and then starting growth 6 to 10 weeks before you want flowers.
In other words, the leaves pay the bill, dormancy clears the slate, and your wake-up timing schedules the show.
Troubleshooting
“My bulb is sprouting in the closet.”
Your storage area is likely too warm, or dormancy has run its course. Go ahead and pot it up, move it to bright light, and begin normal watering once growth is active.
“I stored it and now it is soft.”
Soft usually means rot. Cut away any mushy tissue to firm, healthy scales using a clean blade, then let the bulb dry for a few days in airy shade so the cut can callus. If the basal plate is mushy, the bulb may not recover.
“It shriveled a lot.”
Mild shriveling is normal. Severe shriveling can happen with very warm storage or long dormancy. Shorten the rest period next cycle, store closer to 50 to 60°F if possible, and consider one tiny drink during storage only if it is collapsing.
“I got leaves but no flowers.”
Usually one of these is the culprit:
- Not enough bright light during the recharge phase
- Too much nitrogen fertilizer
- Dormancy was too short, too warm, or skipped
- Bulb is too small or was depleted by previous forcing
Quick checklist
- Cut spent flower stalk once blooming is finished, keep leaves growing.
- Recharge for a minimum of 8 to 12 weeks, ideally spring through summer.
- Bright light, steady watering, light feeding during recharge.
- Stop fertilizer, reduce watering to trigger yellowing.
- Remove dead leaves, keep bulb dry.
- Store cool, dark, and breathable for 8 to 12 weeks. Avoid freezing and prolonged very cold storage.
- Repot, water lightly once, then wait for active growth before regular watering.
- Expect blooms 6 to 10 weeks after restarting.
If you want, tell me when your amaryllis finished blooming and what your home storage options look like. I can help you pick the easiest dormancy plan and a wake-up date that lines up with the blooms you want.