Thrips on Houseplants: How to Spot and Eliminate Them
Thrips are the kind of houseplant pest that makes even confident plant parents mutter, “What is happening to my leaves?” They are tiny, fast, and determined. The damage often shows up before you ever spot the insects themselves.
The good news is you can beat them. The honest news is it usually takes a plan, repeat treatments, and a little stubbornness of your own. Pull on your gardening gloves. I’ll walk you through exactly what to look for and what to do next.
What thrips are
Thrips are tiny, slender insects that feed by scraping plant tissue and sucking out the juices. That feeding style is why their damage looks like silvery, scuffed streaks instead of neat little holes.
They are tough to eliminate for a few big reasons:
- They hide in leaf folds, flower buds, and new growth where sprays have trouble reaching.
- They reproduce quickly, and adults can move or even fly short distances.
- They have a “wait it out” stage. Many common houseplant thrips drop into potting soil or tucked-away crevices to pupate, where foliar sprays cannot touch them.
- Eggs are protected. Thrips often lay eggs inside leaf tissue, so even a perfect spray day does not get everything at once.
If you are thinking, “So you’re saying I need to be persistent,” yes. That is exactly what I’m saying.
How to spot thrips damage
Thrips are often diagnosed by the pattern of damage more than the bug itself. Here are the classic signs I look for when I’m inspecting a plant at my kitchen sink.
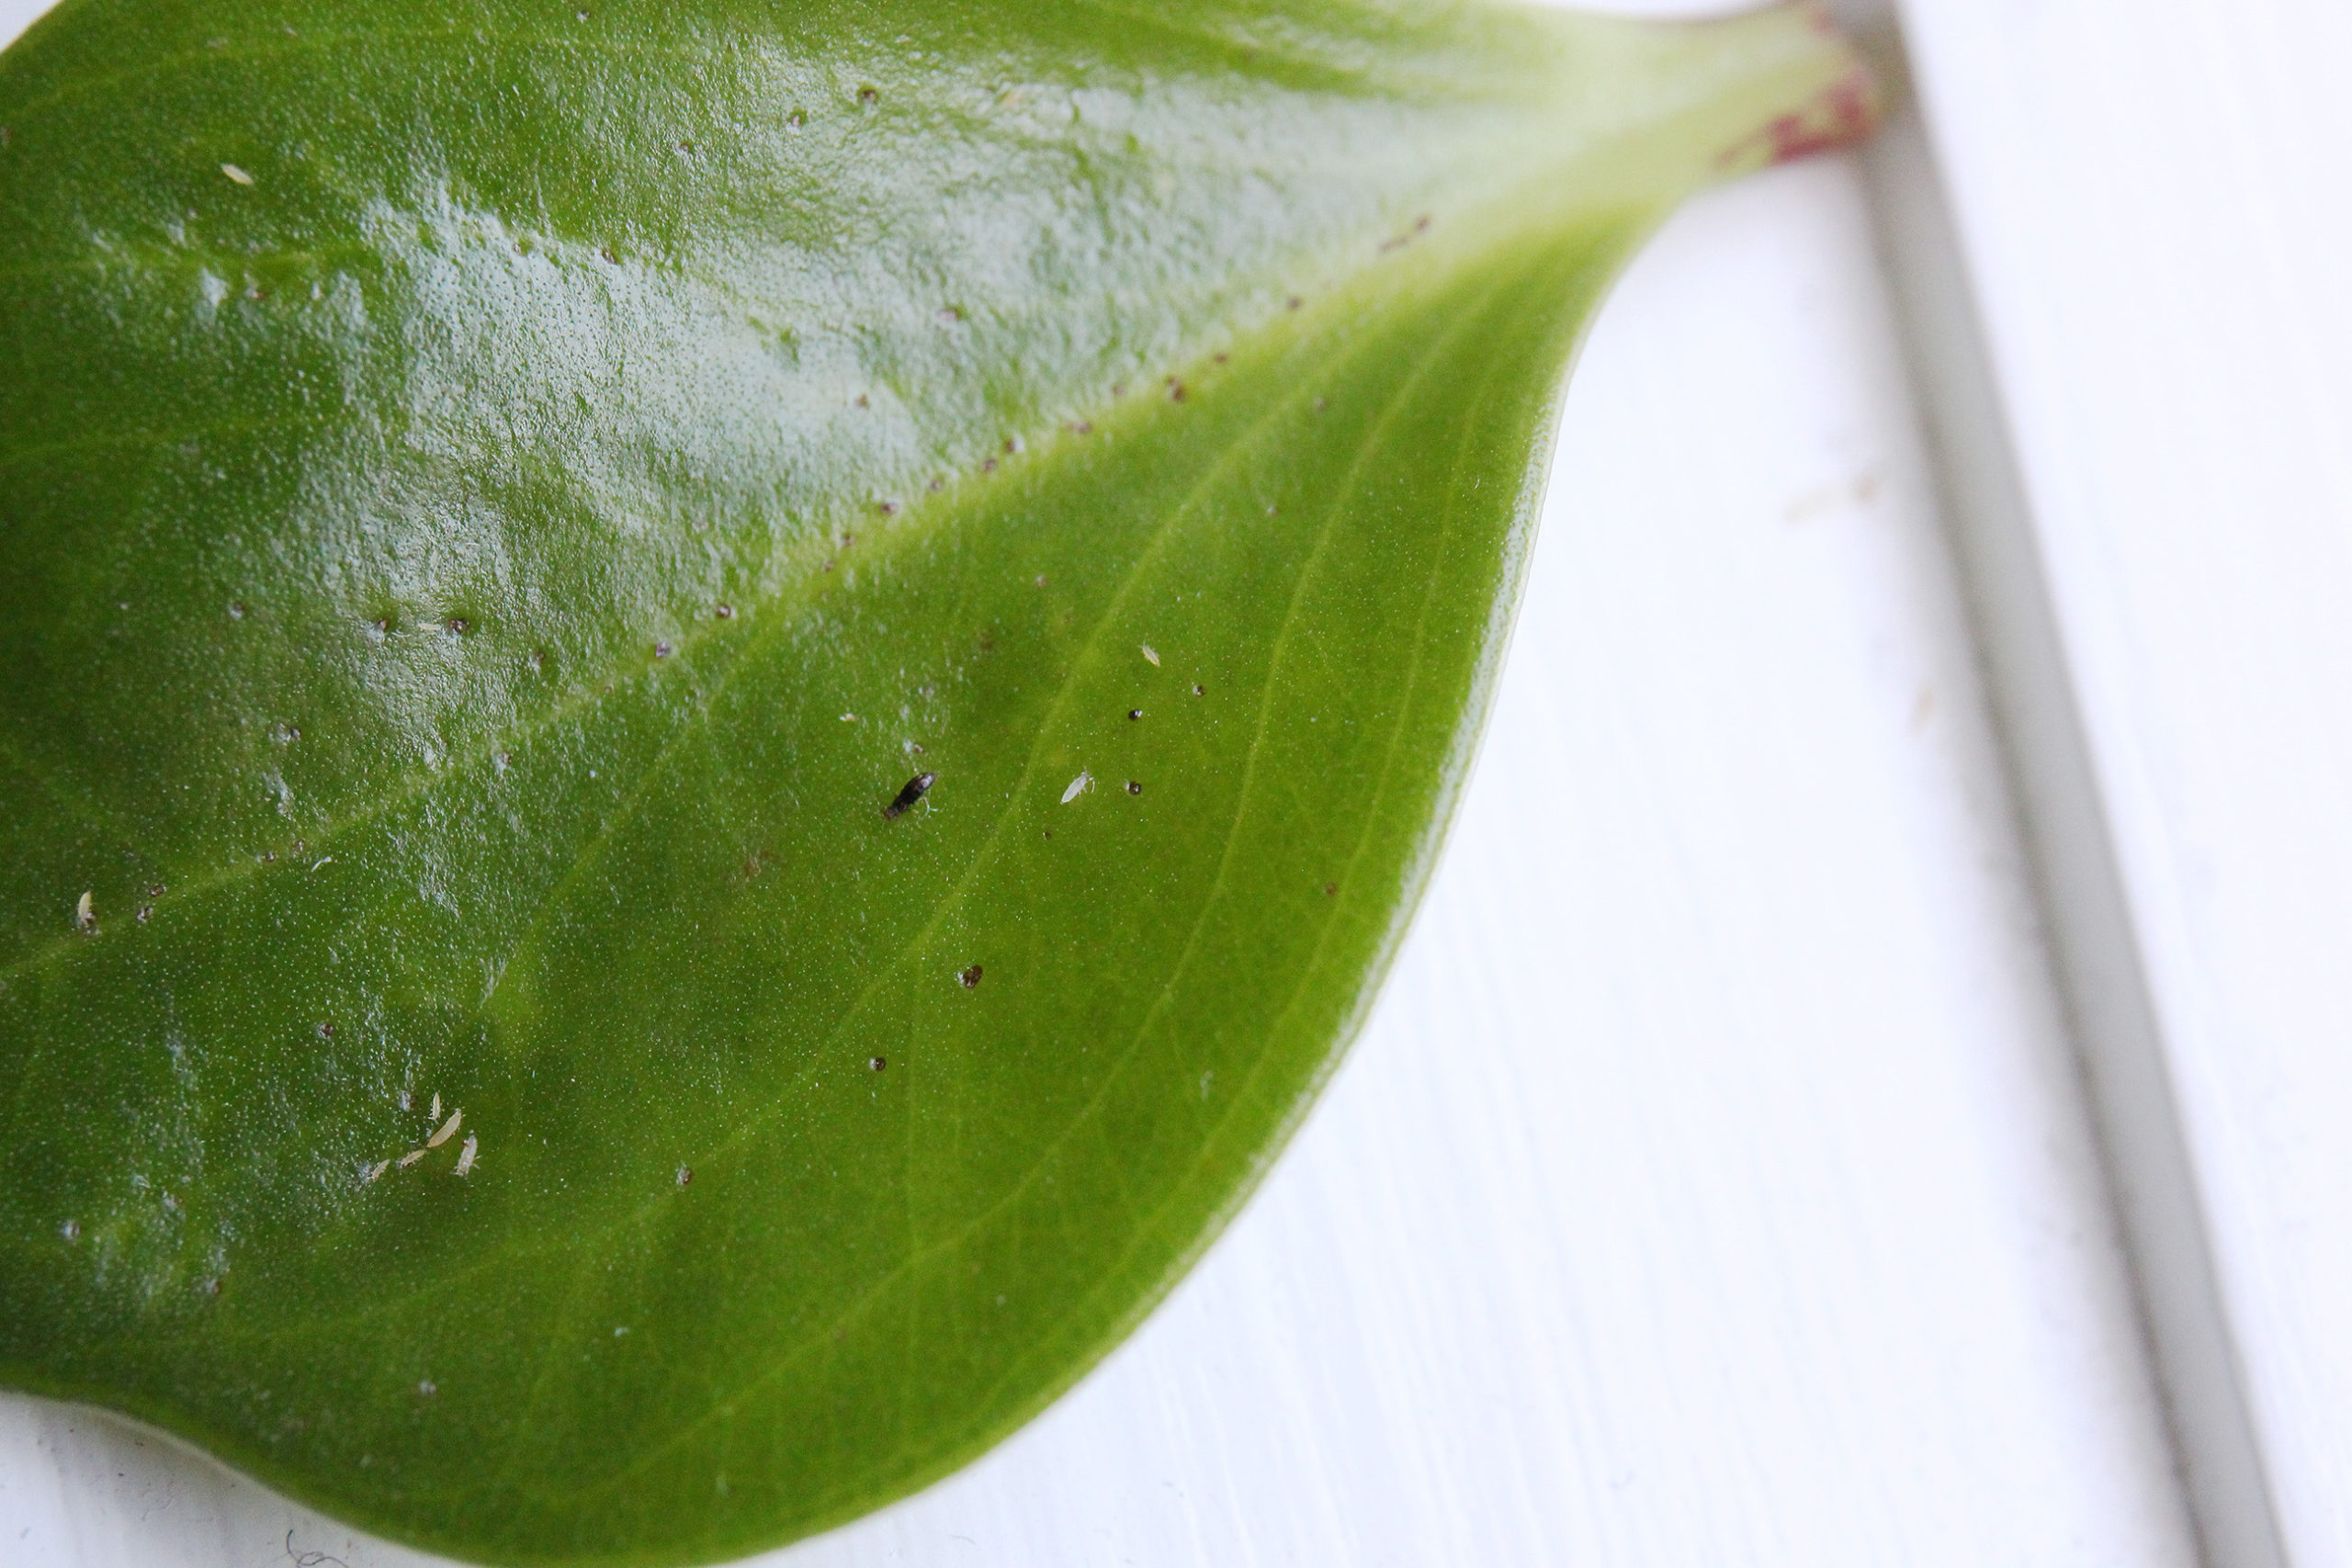
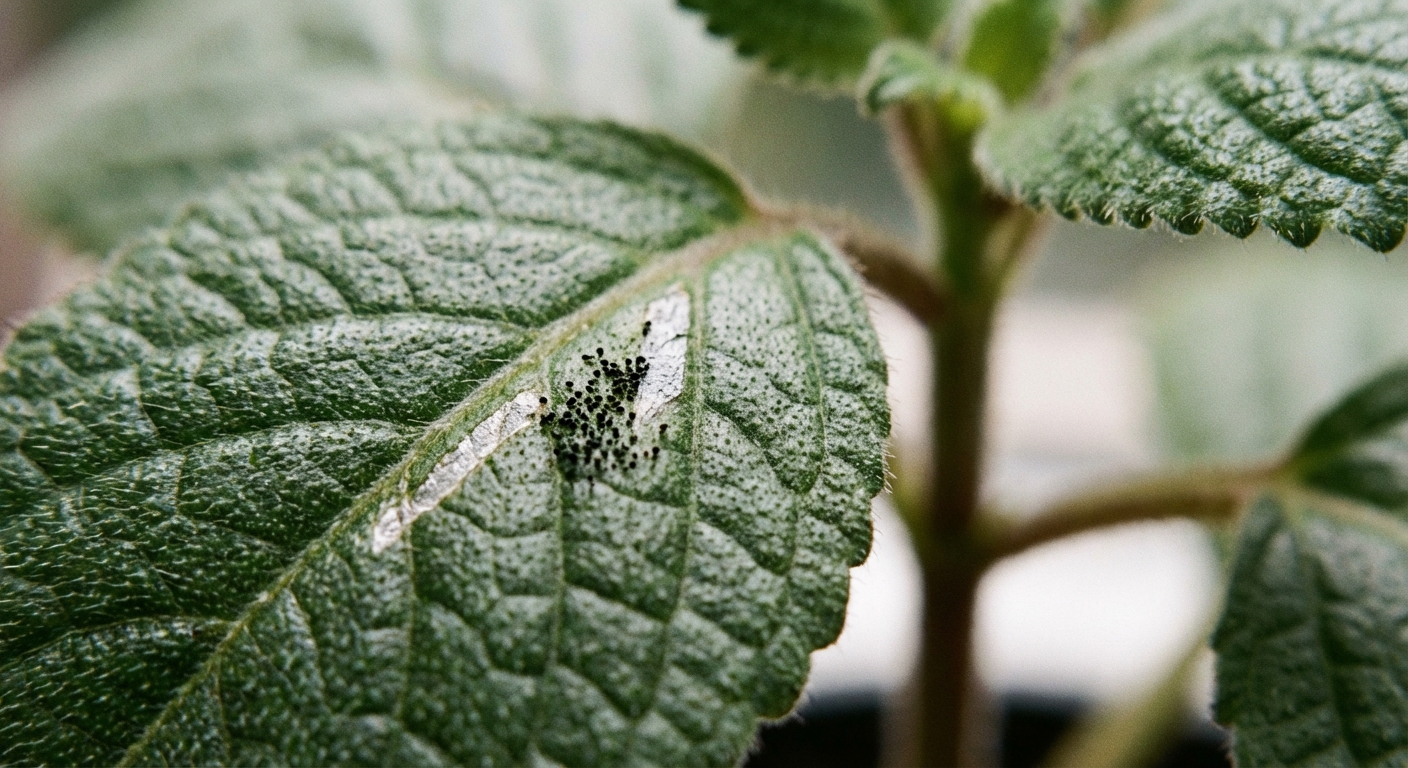
1) Silvery streaks and scuffed patches
Thrips feeding can leave leaves looking like they have been lightly sanded or brushed with silver paint. You might also see pale streaks that follow veins or appear in irregular lines.
2) Tiny black droppings
These look like pepper or tar specks on the leaf surface, often near the silvery damage. If you wipe with a damp white tissue, you may smear them slightly.
3) Distorted new growth
New leaves can emerge twisted, cupped, puckered, or narrow. The newest growth is often the tastiest, so thrips love to set up camp there.
4) Flower damage (if your plant blooms)
Thrips adore flowers. Buds may brown, petals can look streaked or bruised, and blooms may drop early. If you have a flowering houseplant that suddenly looks “off,” check the buds closely.
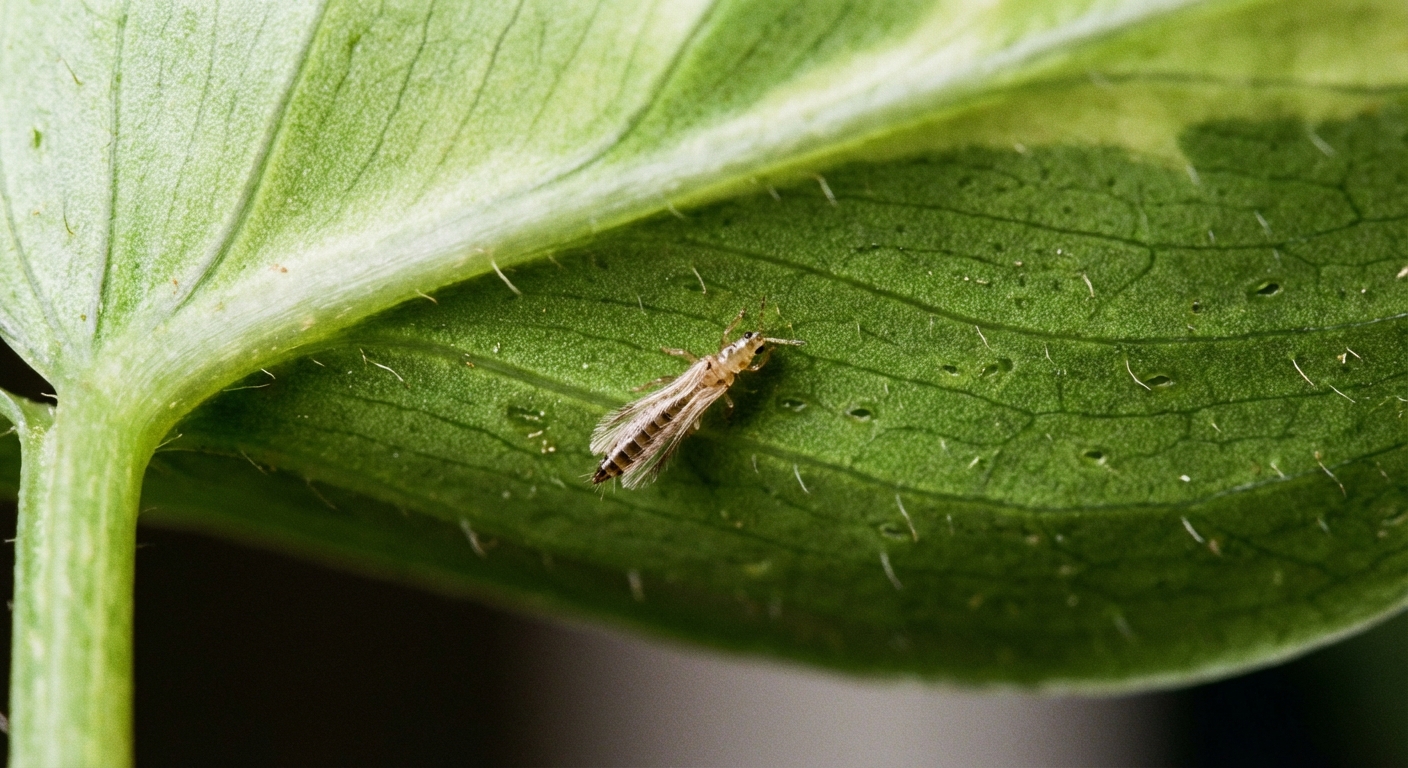
Confirming thrips
Do the white paper tap test
Hold a sheet of white paper under a leaf or flower and tap firmly. Thrips often fall onto the paper as tiny moving slivers. Adults may look tan, brown, or black. Immatures are usually paler.
Look in the tight spots
Use your phone flashlight and check:
- Leaf undersides, especially along the midrib
- New leaf curls before they unfurl
- Flower buds and the base of blooms
- Where the leaf petiole meets the stem
Use a hand lens if you have one
A cheap 10x loupe turns thrips from “maybe dust?” into “oh, that’s a bug.” If you love houseplants, it is a surprisingly satisfying tool.
Thrips or something else?
Thrips damage overlaps with a few other common problems. Here’s how I separate the lookalikes.
Thrips vs spider mites
- Spider mites often cause fine stippling (tiny pale dots) and may leave delicate webbing in leaf joints.
- Thrips more often cause silvery streaks and leave black droppings. Webbing is not typical.
Thrips vs mealybugs
- Mealybugs are cottony and obvious once you know what to look for, often clustered at nodes.
- Thrips are slender and fast, and the main clue is the scuffed silver damage plus black specks.
Thrips vs fungus gnats
- Fungus gnats fly around soil and windows. Larvae mostly feed on fungi and decaying matter, but in heavy infestations they can stress seedlings or tender roots.
- Thrips live on foliage and flowers, and the damage shows on leaves.
Thrips vs sunburn or low humidity
- Sunburn makes larger tan, crispy patches where direct sun hit, usually on the most exposed leaves.
- Low humidity tends to brown tips and edges, especially on humidity lovers.
- Thrips create streaky, silvery scarring and distorted new growth, often with black specks.
First steps
1) Isolate the plant
Move it away from your other plants. Thrips can spread, and they do not need your permission to do it.
2) Remove the worst damage
If a leaf is heavily scarred or a bloom is infested, prune it off and seal it in a bag. Do not compost it indoors.
3) Rinse like you mean it
Take the plant to the sink or shower and rinse the foliage thoroughly, including undersides. This does not solve thrips, but it can knock down numbers and make the rest of treatment more effective.
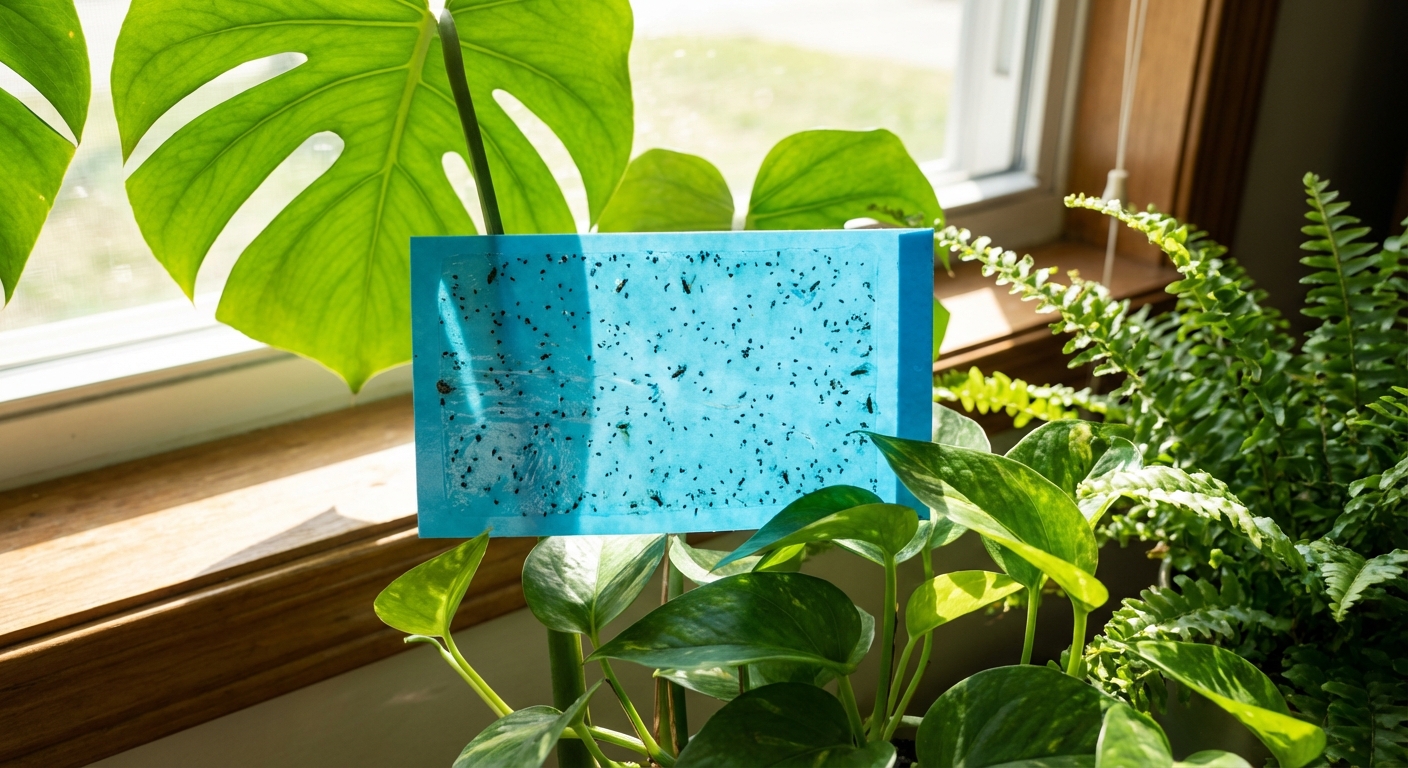
4) Add sticky traps right away
Blue sticky traps are often especially attractive to thrips, but yellow can help too. Traps will not eradicate an infestation, but they:
- Catch flying adults
- Help you monitor progress
- Reveal whether thrips are still active after treatments
Treatment options
Thrips control works best as a layered approach. Think of it like weeding a garden bed. One pass helps, but repeated passes win.
Option A: Insecticidal soap or horticultural oil
These are contact treatments, meaning they work when they hit the insect directly. They can be effective for light infestations and as part of a rotation.
- How to use: Spray tops and undersides of leaves, stems, and especially new growth. Apply until evenly coated and just starting to drip.
- Repeat: Every 4 to 7 days, or per label. Timing can vary with temperature and how fast thrips are cycling in your home.
- Watch-outs: Test on one leaf first. Some plants are sensitive, especially in bright light or heat. Do not spray in direct sun, and do not mix products unless the label says you can. Protect nearby surfaces and fabrics.
Option B: Sticky traps (support tool)
Use them alongside sprays. Place near the plant canopy, not down at the pot rim. Replace when dusty or full.
Option C: Spinosad
For many houseplant keepers, spinosad is the turning point. It is derived from a naturally occurring soil bacterium and is widely used in organic-leaning pest management, but it is still a pesticide and should be used carefully and exactly as directed.
- Why it helps: Thrips ingest it when feeding, which can make it more effective than pure contact sprays.
- How to use: Thoroughly coat leaf tops and undersides, paying extra attention to new growth and buds. If sticky traps show activity nearby, treat nearby plants too.
- Repeat: Follow the product label. Multiple applications are usually needed to catch newly emerged thrips, since eggs are protected inside leaf tissue and pupae may be in the soil.
- Important: Use only products labeled for indoor use and for your plant type. Availability and labeling vary by region. Spinosad is highly toxic to bees when wet, so keep it off blooming plants that go outside. Keep pets and kids away until dry.
Option D: Systemic insecticide (use with caution)
Systemics can be helpful for persistent infestations because the plant takes up the active ingredient. However, not all systemics work well for thrips, and labels vary widely by region. If you choose this route, check that thrips are listed on the label and follow directions carefully. Avoid using on plants that flower outdoors where pollinators could be exposed.
Option E: Beneficial insects
Predatory mites and other beneficials can work wonderfully in the right environment, especially enclosed plant shelves, cabinets, or greenhouse-like spaces where humidity and reintroduction can be managed. In a typical open living room, they often struggle to establish.
Option F: Soil-focused support (the missing piece)
Because many thrips pupate in the potting mix, soil attention can help prevent the “I sprayed and they came back” cycle:
- Replace the top inch of soil (and any fallen leaves) and bag it for disposal.
- Vacuum or wipe the area around the plant stand to remove fallen pupae and debris.
- Consider beneficial nematodes labeled for thrips pupae in soil, especially if you keep plants in a cabinet or a concentrated plant zone.
A realistic plan
If you want a simple routine, here is a practical schedule that balances effectiveness with real life.
Week 1: Knockdown and contain
- Isolate the plant.
- Prune heavily damaged leaves and infested flowers.
- Rinse thoroughly.
- Set sticky traps.
- Treat with an appropriate product (soap, oil, or spinosad if labeled for your use case).
- Clean up the soil surface and consider replacing the top inch of mix.
Weeks 2 to 4: Repeat on schedule
- Re-treat based on the label, or every 4 to 7 days for many soaps and oils.
- Keep rinsing between treatments if the plant tolerates it.
- Inspect new growth and buds with a flashlight.
- Replace traps as needed and track whether you are still catching adults.
- If you can, keep the soil surface tidy (no fallen petals, no leaf litter).
After you “win”: keep monitoring
Thrips love a comeback. Keep traps up for a few weeks after the last sighting. If you catch even a couple, restart your treatment cycle before it explodes again.
Common mistakes
- Only treating once. Thrips are not a one-and-done pest.
- Missing new growth and leaf undersides. This is where they hide and feed.
- Skipping the soil stage. If pupae are in the potting mix, foliar sprays alone can feel like chasing ghosts.
- Not treating nearby plants. If thrips spread, you will chase them room to room.
- Overstressing the plant. Too much fertilizer, harsh sun after spraying, or inconsistent watering makes recovery harder.
- Ignoring flowers. If your plant blooms, thrips often concentrate there.
Help your plant recover
Thrips damage does not “heal” on the affected tissue, but your plant can absolutely grow past it.
- Prioritize steady care: consistent watering, appropriate light, and decent airflow.
- Hold off on heavy fertilizing: push gentle growth once the infestation is under control.
- Wipe leaves occasionally: clean leaves photosynthesize better, and you will spot pests sooner.
- Be patient with new leaves: they should emerge cleaner and less distorted as thrips pressure drops.
One quick note: some plants show thrips damage faster than others, especially anything with tender new growth or thin leaves. If you have a plant that is always first to look rough, it is not you. It is a thrips magnet.
Prevention
Prevention is not about perfection. It is about making your home less welcoming to hitchhikers.
- Quarantine new plants for 2 to 3 weeks, even if they look healthy.
- Inspect weekly with a quick leaf underside check, especially on tender new growth and buds.
- Avoid bringing cut flowers near your houseplants if you have had thrips before. Flowers are a common source.
- Use sticky traps as early warning in your plant area, especially during warmer months.
When to let a plant go
I say this with all the tenderness of someone who has nursed plenty of dramatic plants back from the brink: sometimes the kindest choice is to toss a heavily infested plant, especially if:
- The plant is declining fast and cannot handle repeated treatments.
- Thrips keep spreading to your other plants.
- You have tried a full month of consistent treatment with no real improvement.
Throwing out one plant to protect the rest is not failure. It is triage.
Quick checklist
- Signs: silvery streaks, black droppings, distorted new growth.
- Confirm: tap test on white paper, check buds and leaf folds.
- Start: isolate, rinse, prune, add sticky traps.
- Remember: eggs can be inside leaves and pupae can be in soil, so repeat cycles matter.
- Treat: repeat applications, target undersides and new growth, consider spinosad (where labeled) for stubborn cases.
- Expect: persistence and monitoring, even after things look better.
If you want, tell me what plant you are dealing with and what symptoms you’re seeing. Thrips can be sneaky, but they are not smarter than a determined plant parent with a plan.