Sloped Yard Landscaping: Terraces and Retaining Walls
A sloped yard can feel like it is always slipping away from you. Mulch creeps downhill, soil washes into the driveway, and mowing turns into an extreme sport. The good news is that slopes are not a gardening curse. They are a design opportunity. With terraces and retaining walls, you can slow water down, stop erosion, and create a few flat, usable “rooms” for planting, play, and paths.
I learned this the hard way in my first little house, where every rainstorm rearranged my carefully fluffed compost like it had a mind of its own. The fix was not fighting the slope harder. It was working with it, one level at a time.
Start with a quick slope check
Before you buy blocks or start digging, get a feel for what you are working with. Your design choices, costs, and even whether you should DIY depend on the steepness and the soil.
How to measure the slope
- Grab a straight 8 to 10 foot board, a level, and a tape measure.
- Set one end of the board on the uphill side and level the board.
- Measure the vertical distance from the downhill end of the board to the ground. That is your “rise.”
- Slope percent = (rise ÷ board length) × 100.
Quick example: A 10-foot board with a 1-foot rise is a 10% slope.
As a rough guide:
- Gentle slope (under about 10%): Often manageable with planting, shallow terraces, and short walls.
- Moderate slope (about 10% to 25%): Terracing becomes very helpful, and walls need proper base prep and drainage.
- Steep slope (over about 25%): Consider professional help, engineering, and possibly permitting.
Look for these red flags
- Water channels carved into the soil after rain.
- Cracks in the ground or existing walls.
- Leaning fences or exposed roots on the downhill side.
- Clay soil that stays soggy for days, or sandy soil that slumps easily.
If your slope is failing, actively sliding, or you need a wall taller than 3 to 4 feet, it is worth getting advice from a local landscape engineer or a reputable retaining wall contractor. Also note that local codes define “wall height” in different ways (often from the bottom of the footing to the top of the wall), and extra loads uphill (called “surcharge” loads) like fences, slopes, patios, sheds, or driveways can trigger engineering at lower heights. Safety first, tomatoes second.
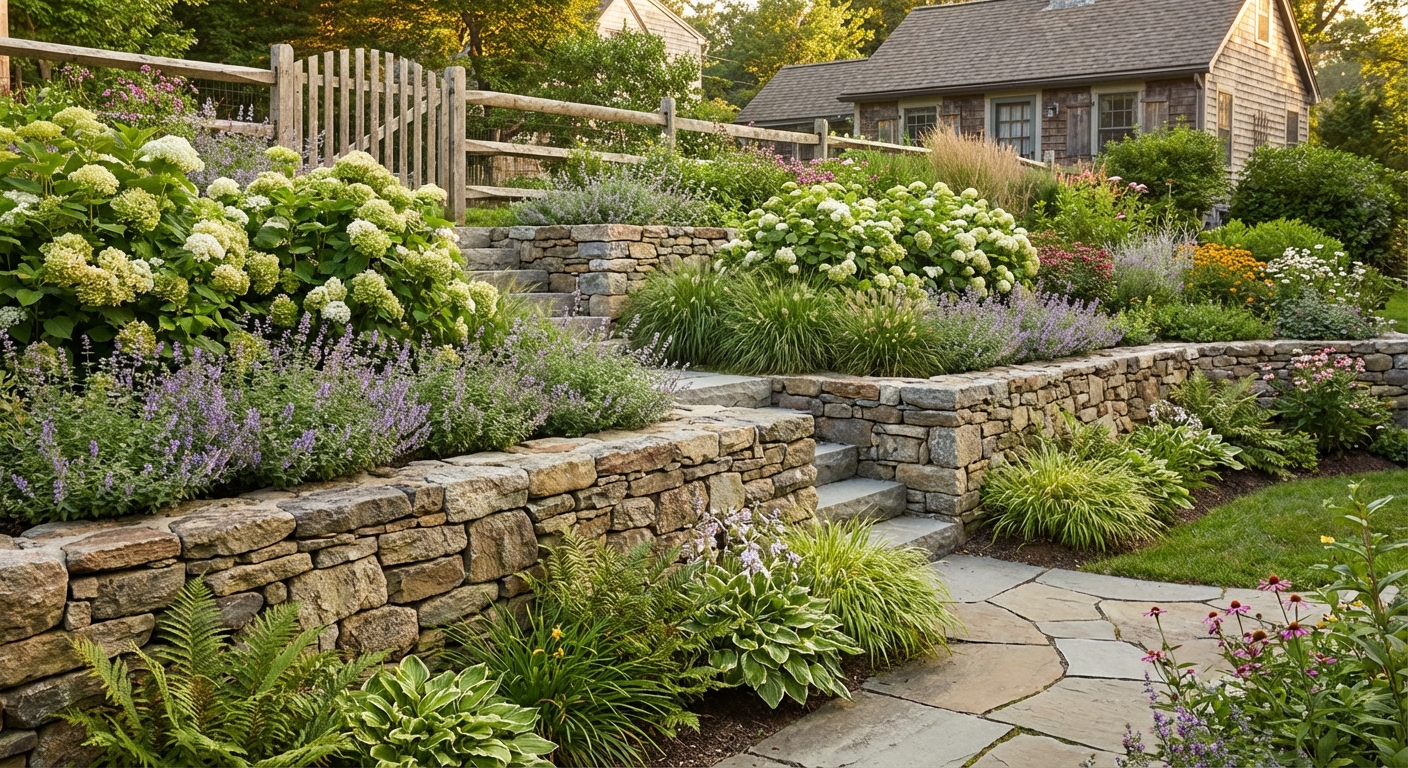
Terraces and walls
A terrace is the flat level you gain. A retaining wall is the structure that holds the uphill soil in place so that flat level can exist. Most sloped-yard makeovers use a series of shorter walls to create multiple terraces instead of one tall wall.
Why shorter terraces win
- More stable: Shorter walls handle less pressure.
- Better drainage: Water can be managed at each level.
- More usable space: Multiple garden zones feel intentional.
- Friendlier DIY range: A 1 to 2 foot wall is a very different project than a 6 foot wall.
Plan it like rooms
My favorite way to design a terrace system is to stop thinking “hill” and start thinking “rooms.” Each level gets a job. One might be a veggie bed zone, another a pollinator border, another a seating nook where you can sip tea and feel smug about your erosion control.
Map it in three passes
- Pass 1: Movement. Where do you need to walk? Sketch a main path and any stairs. Try to keep paths gentle and direct.
- Pass 2: Water. Where does water come from and where should it go? Note downspouts, hard surfaces, low spots, and where runoff currently exits the yard.
- Pass 3: Sun and use. Mark sunny and shady zones, then assign terrace “jobs” like vegetables, play space, fire pit, compost, or a shade garden.
Terrace sizing tips
- Vegetable beds: Aim for about 6 to 10 feet of depth so you are not forced into narrow strips.
- Seating areas: A comfortable patio terrace is often about 10 to 14 feet deep.
- Paths: 3 feet wide is a minimum for comfortable walking, 4 feet feels luxurious and wheelbarrow-friendly.
- Stairs: Plan them early so you do not end up with a weird, steep “ladder” later.
Drainage matters
I know drainage is not the romantic part. But hydrostatic pressure is one of the big reasons retaining walls fail. The other usual suspects are poor base prep, weak compaction, frost heave, and extra loads too close to the top. A good wall is not just strong on the front. It is smart behind the scenes.
Key drainage parts
- Gravel backfill: A zone of clean, angular gravel directly behind the wall so water can move freely.
- Separation fabric: Use a non-woven geotextile between native soil and gravel to reduce sediment clogging. (Skip the flimsy “weed barrier” stuff here.)
- Drain pipe: A perforated pipe (commonly 4 inch) at the base, sloped to daylight or a proper outlet.
- Outlets and cleanouts: Include outlets, cleanouts, and any pipe “sock” or wrapping based on your wall system and local practice.
- Weep holes (for some wall types): Openings that let water escape through the face.
Also, pay attention to roof runoff. If a downspout dumps onto your slope, your wall is going to take the blame for a gutter problem. Extend downspouts to a safe discharge area, rain garden, or solid drain line as needed, and follow local rules for stormwater discharge.
Pick a wall type
Retaining walls come in a few common flavors. Your budget, style, and height requirements help decide which one makes sense.
Segmental concrete block (SRW)
These are the interlocking blocks you see in many modern terraced landscapes. They are popular for good reason.
- Pros: Modular, tidy look, good DIY potential for short walls, engineered systems available.
- Cons: Heavy, requires careful base prep, taller walls may need geogrid reinforcement.
Natural stone
Stone walls can look like they have always belonged there, especially with plants softening the edges.
- Pros: Gorgeous, long-lived, great for cottage and woodland styles.
- Cons: More skill and cost, sourcing stone can be tricky, drainage still required.
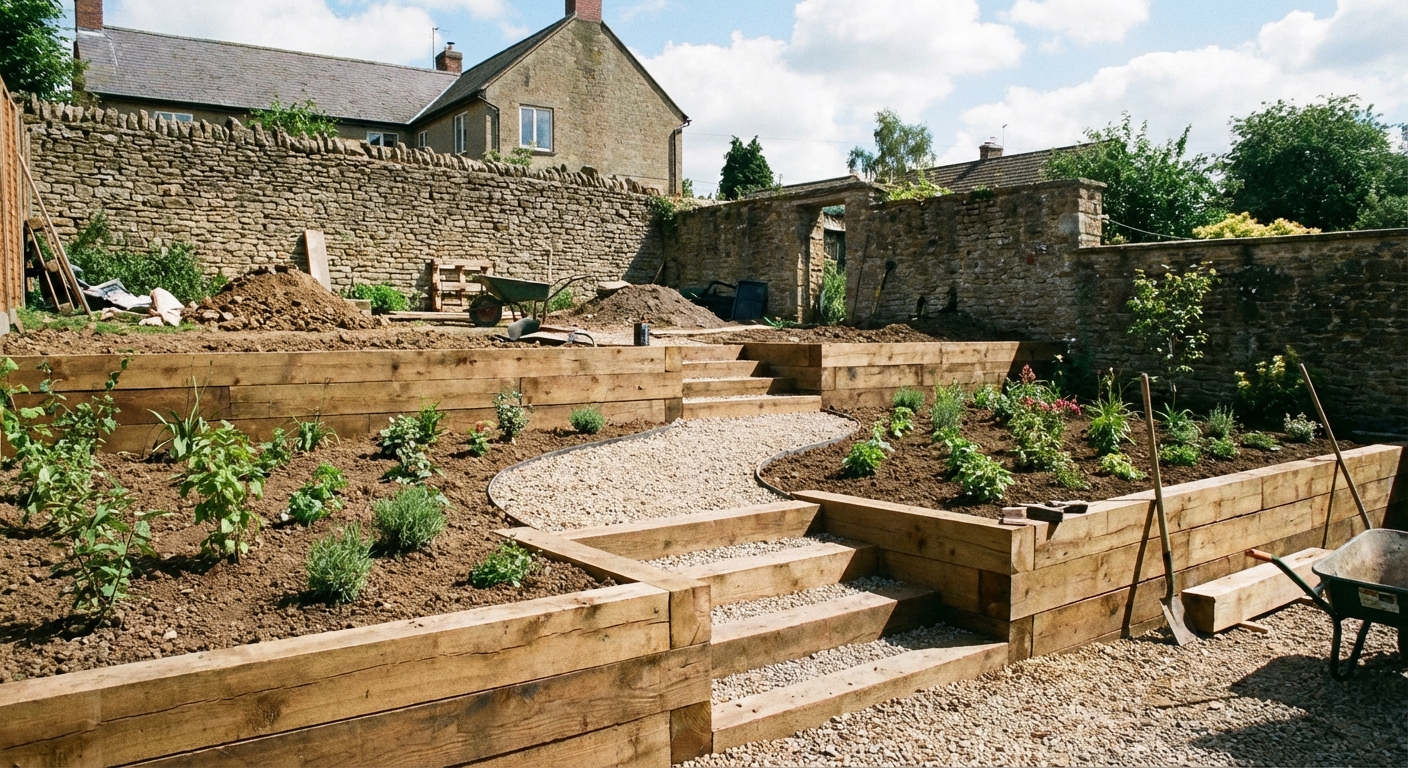
Timber walls
Timbers can be a budget-friendly entry point for short terraces, especially in rustic gardens. If you go this route, look for ground-contact pressure-treated lumber or naturally rot-resistant wood rated for ground contact, and follow local guidance on fasteners and safe handling.
- Pros: Often cheaper, easy to cut, fast to build for low walls.
- Cons: Shorter lifespan, potential rot, not ideal for tall walls or constantly wet soil.
Poured concrete
Very strong, very permanent, and usually not the first choice for a DIY weekend unless you love forms and heavy planning.
- Pros: Strong, clean lines, handles significant loads when engineered.
- Cons: Costly, complex, difficult to adjust later.
My gentle rule: The taller the wall (and the heavier the load above it), the more you should lean on an engineered wall system, professional input, and local code guidance.
Build a small wall
If you are building a low retaining wall, you can absolutely do this with patience, a strong back, and the willingness to redo the first course until it is right. The first row of blocks or stones is the whole story.
Before you dig
Call before you dig. In the US, that typically means calling 811 a few days ahead so utilities can be marked. If you are elsewhere, use your local utility locating service. Hitting a gas, electric, water, or communications line is not just expensive. It is dangerous.
Also take a minute to confirm property lines and any local rules about permits and drainage discharge. It is much easier to adjust a plan than to un-build a wall.
Tools and materials
- Work gloves, safety glasses
- Shovel and spade
- Hand tamper or plate compactor (renting is worth it)
- Level (a long one helps)
- Crushed stone base material (often 3/4 inch minus)
- Wall blocks or stone
- Clean gravel for backfill
- Non-woven geotextile fabric
- Perforated drain pipe and fittings (if needed)
Step-by-step
- Mark the wall line with stakes and string, then step back and make sure it looks right from multiple angles.
- Dig the trench wide enough for the block and your hands. Most walls need the first course partially buried. Follow the manufacturer guidance if using a block system.
- Build the base with compacted crushed stone in thin layers (lifts). Compact, level, compact again. This is where stability comes from.
- Set the first course perfectly level side-to-side and front-to-back. Take your time. Whisper encouragement to your blocks if needed. I do.
- Add gravel and fabric behind the wall as you go, keeping soil out of the drainage zone.
- Install drainage if your design calls for it, including an outlet and cleanout where appropriate. Make sure water has somewhere safe to go.
- Step back each course according to your wall system. Many blocks have a built-in setback for stability.
- Backfill thoughtfully. Backfill in lifts. Compact as recommended by your wall manufacturer, and avoid overzealous compaction right against the wall face if your system warns against it.
- Cap and finish. Add capstones, then grade the terrace surface so it gently sheds water away from the wall face and toward your drainage plan.
A note on geogrid: For taller walls or heavier loads (like a driveway above), geogrid reinforcement may be required. It extends back into the slope and locks the wall into a stronger mass. Use the wall manufacturer specs or an engineer to determine what is needed.
Cold climate note
If you get freeze-thaw winters, base depth and drainage matter even more. Frost heave can push a poorly built wall out of alignment. Follow local practice for base depth and materials, and do not skimp on compaction.
Stairs help a lot
Without stairs, a terraced yard can feel like a set of obstacles. With good stairs, it feels like a garden you want to wander through.
Simple stair guidelines
- Go for comfort: Many outdoor stairs feel best around a 6 to 7 inch rise and a 12 to 14 inch tread depth, but adjust to your space and local codes.
- Make them wide: 4 feet is lovely if you have room, especially for carrying pots or a harvest basket.
- Add landings: For longer runs, a landing gives your legs and your design a break.
- Use traction: Textured stone, broom-finished concrete, or gravel-inset treads help in wet weather.

Stop erosion now
If your slope is actively eroding and a full terrace project is months away, you can still slow the damage now.
- Mulch with strategy: Use shredded bark or wood chips that knit together better than big bark nuggets. Apply in a thicker layer, and refresh after heavy rain.
- Pin down jute netting: Biodegradable jute can hold seed and mulch in place while plants establish.
- Plant fast rooters: Groundcovers and grasses stabilize soil quickly.
- Add small check dams: In shallow channels, small rock lines can slow water and capture sediment.
- Redirect concentrated flow: Extend downspouts and break up runoff paths with swales or rock-lined channels.
Planting a terrace
Once you have terraces, you have microclimates. The top terrace is often drier and windier. The lower terraces may hold more moisture. Plant for those realities and your garden will look calm instead of stressed.
What to plant where
- Top terrace: Drought-tolerant plants, deep-rooted shrubs, herbs, and tough perennials.
- Middle terraces: Your “show off” zone. Mixed borders, cut flowers, or raised beds.
- Lower terrace: Moisture lovers, rain garden plants (if appropriate), and lush texture plants.
Slope-friendly plant ideas
Always cross-check with your local climate and whether a plant (or specific cultivar) is considered invasive in your area. When in doubt, choose local natives and clearly non-invasive cultivars.
- Groundcovers: Creeping thyme, native sedges, low sedums suited to your region, native strawberries where appropriate.
- Deep-rooted perennials: Coneflower, black-eyed Susan, yarrow, salvia, ornamental grasses (preferably non-invasive, region-appropriate types).
- Shrubs for structure: Region-appropriate junipers (non-invasive cultivars), ninebark (native in many areas), low-growing viburnums, and other locally recommended shrubs.
Planting tips
- Plant in drifts instead of singles. Groups of 3, 5, or 7 read as intentional and are easier to mulch around.
- Use living mulch like groundcovers between shrubs to reduce bare soil.
- Edge the beds so mulch stays put and irrigation is easier to manage.
Common mistakes
- Skipping base prep: A wall on uncompacted soil will settle unevenly and lean.
- No drainage plan: Water buildup is the silent wall killer.
- One big wall instead of steps: Taller walls are riskier and often more expensive once engineered correctly.
- Overloading the top: A parked vehicle, shed, heavy fill, fences, or steep grade too close to the wall increases pressure.
- Not checking local rules: Many areas require permits or engineering above certain heights, and the definition of height and surcharge varies.
A simple terrace plan
If you want a starting point, here is a classic layout that works for many medium slopes:
- Top level: A narrow planting strip with drought-tolerant shrubs and a drip line.
- Middle level: A 6 to 10 foot terrace for raised beds or a mixed border.
- Bottom level: A wider terrace for seating, a small lawn patch, or a play area.
- Connecting feature: One main stair run near the center, plus a gently curving path on one side if space allows.
Design it so you can stand in one spot and see where you are going next. Good terracing should feel like a stroll, not a scramble.
When to call a pro
I love a good DIY project, but retaining walls are one of those places where humility saves money and headaches.
Consider hiring a professional if:
- The wall will be taller than your local code threshold (often around 3 to 4 feet, measured in specific ways).
- You are supporting a driveway, structure, fence, steep slope, or anything heavy upslope (surcharge loads can change everything).
- Your soil is very wet, very clay-heavy, or you have a high water table.
- You see active slope movement or previous wall failure.
- You need complex drainage tying into stormwater systems.
After the hill
A terraced yard is one of those transformations that changes how you live at home. Suddenly the space feels bigger, safer, and more welcoming. Water behaves. Soil stays where you put it. And you get these little elevated stages for plants to shine.
If you take one thing from me, let it be this: start with water, build a solid base, call before you dig, and be patient with the first course. The garden will thank you quietly, one rainstorm at a time.
Quick checklist
- Measure the slope.
- Plan water first (downspouts, runoff paths, outlets).
- Confirm rules (permits, height definitions, discharge).
- Call before you dig (811 in the US).
- Build the base (proper depth, compacted in lifts).
- Add drainage (gravel, geotextile, pipe, outlets, cleanouts).
- Backfill smart (in lifts, per system specs).
- Plant for microclimates (and choose non-invasive options).