Plan a Pollinator Garden Layout That Thrives
Pollinator gardens are a little like hosting a dinner party that lasts all season. You're not just putting out one big meal in June. You're offering a steady table of nectar, pollen, shelter, and water from the first warm days of spring to the last crisp afternoons of fall.
The good news is you don't need acres or a professional landscape plan. You need a simple layout, a bloom schedule (that's succession planting), and plants that actually belong where you live (native to your ecoregion). I promise your future self will thank you when the garden starts humming, literally.
Start with a quick site map
Before you fall in love with plants, grab a tape measure, a notebook, and a cup of something nice. Sketch your space as-is. It can be messy. Plants don't judge.
Measure and mark the essentials
- Sun: Note areas with 6+ hours (full sun), 3 to 6 hours (part sun), and under 3 hours (shade). Pollinator flowers are happiest in sun, but shade gardens can still support native bees with the right plants.
- Water flow: Where does rain collect? Where does it run off? Those soggy spots can be a gift if you choose moisture-loving natives.
- Wind: Exposed corners dry out fast and can make it harder for butterflies to land. Windbreaks matter.
- Existing plants: Identify what you want to keep, remove, or simply cut back. Mature shrubs can become valuable shelter.
- Access: Mark paths, gates, hose reach, and the places you naturally walk. A pollinator garden that's easy to reach is a pollinator garden you'll actually maintain.
If you like a simple rule, try this: design for people first (paths and viewing spots), then fit plants around that. The pollinators will show up once the blooms do.
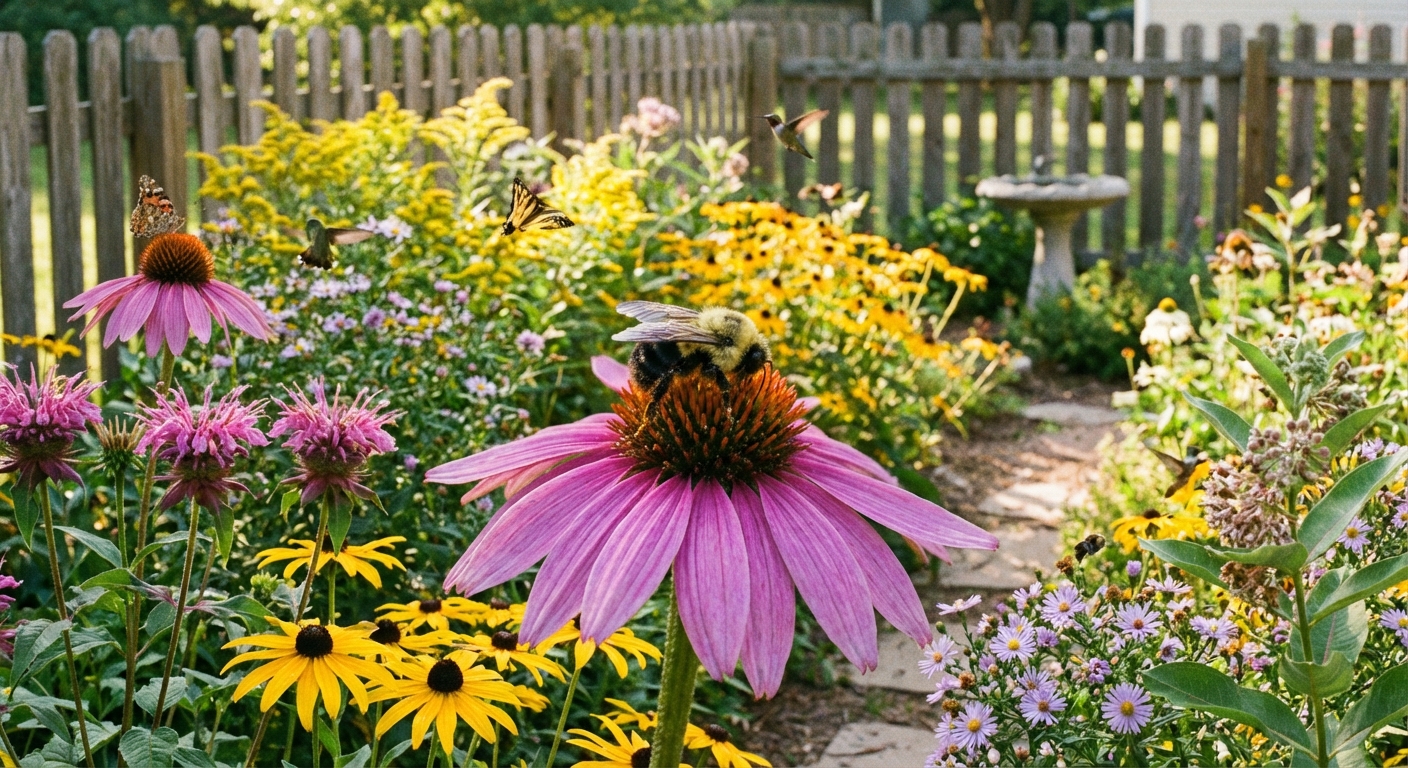
Choose a layout that feels safe
Pollinators don't just need flowers. They need a place to feed without feeling like a snack. Your layout can create that sense of refuge.
Think in layers
- Tall layer: Small trees or large native shrubs for perching, nesting, and wind protection. If you're in much of North America, examples might include serviceberry or elderberry (but local options vary).
- Middle layer: Flowering perennials and grasses for the main nectar and pollen buffet.
- Ground layer: Low natives, groundcovers, and leaf litter zones for overwintering insects.
Plant in drifts
Planting one lone flower is like putting one cookie on a huge table. Pollinators find and feed more efficiently when you plant in clusters. Aim for 3 to 7 of the same plant together, and repeat that plant in a few spots across the bed.
Add a sunny landing spot
Butterflies love warm, sheltered places to bask. A flat rock, a low stone edge, or even a sunny patch of bare soil near flowers helps them warm up and stick around.
Plan blooms from spring to fall
Succession planting is the secret sauce. A garden that blooms only in midsummer can still look gorgeous, but pollinators need consistent food. Your goal is simple: always have something blooming.
Pick seasonal anchor plants
Use this planning method: pick 3 to 5 anchor plants for each season, then sprinkle in a few extras for color and resilience.
- Early season (spring): supports emerging native bees and early butterflies.
- Mid season (summer): peak nectar flow, lots of bee activity, hummingbirds feeding heavily.
- Late season (fall): crucial fuel for migration and for overwintering survival.
Sketch a bloom calendar
On your site map, write “Spring, Summer, Fall” across the top. Under each, list your chosen plants and their bloom windows. If you see a gap of more than two weeks with no blooms, fill it.
Clara tip: When in doubt, add more fall flowers. Gardens often run out of steam right when pollinators need them most.
Choose native plants
Native plants aren't “better” because they're trendy. They're better because local pollinators recognize them, evolved with them, and can often use them for both food and reproduction. For many butterflies and moths, native host plants are what make the difference between a quick nectar visit and a full life cycle in your yard.
How to pick the right natives
- Start local: Look for a native plant list from your state or regional extension office, a native plant society, or a reputable local nursery.
- Match conditions: Choose plants for your sun and moisture, not your wishful thinking. (Yes, I'm gently talking to my past self here.)
- Aim for diversity: Mix flower shapes (tubes, daisies, spikes) and bloom times to support different pollinators.
- Include host plants: Milkweed for monarchs is the famous one, but many species also rely on specific native grasses, trees, and perennials.
If you're not sure whether a plant is native in your exact area, ask the nursery for the species name (not just a common name) and cross-check with a local native database. It takes five minutes and saves years of “why is nothing using this plant?” frustration.
Source plants responsibly
Where your plants come from matters as much as what you plant. A “pollinator plant” that's been treated with systemic insecticides can be a problem from day one.
- Buy from reputable growers: Native plant nurseries and specialty growers are often your best bet.
- Ask about chemical treatments: Request plants grown without neonicotinoids or other systemic insecticides. If the seller can't answer, that's a useful answer.
- Don't wild-collect: Leave wild populations wild, especially rare natives.
Clara tip: If the plant label says “great for pollinators” but the store also sells it as “pest-free,” ask one more question before you buy.
Map your garden like a buffet
Now the fun part: placing plants in the bed so it looks good to you and works well for wildlife.
Layout rules that work
- Tall plants in back or center: In a border, place tall blooms toward the back. In an island bed, put tall plants in the center and step down in height toward the edges.
- Put early bloomers up front: Spring flowers are precious. Place them near doors, patios, or windows.
- Repeat key plants: Repetition creates a calm design and makes it easier for pollinators to forage.
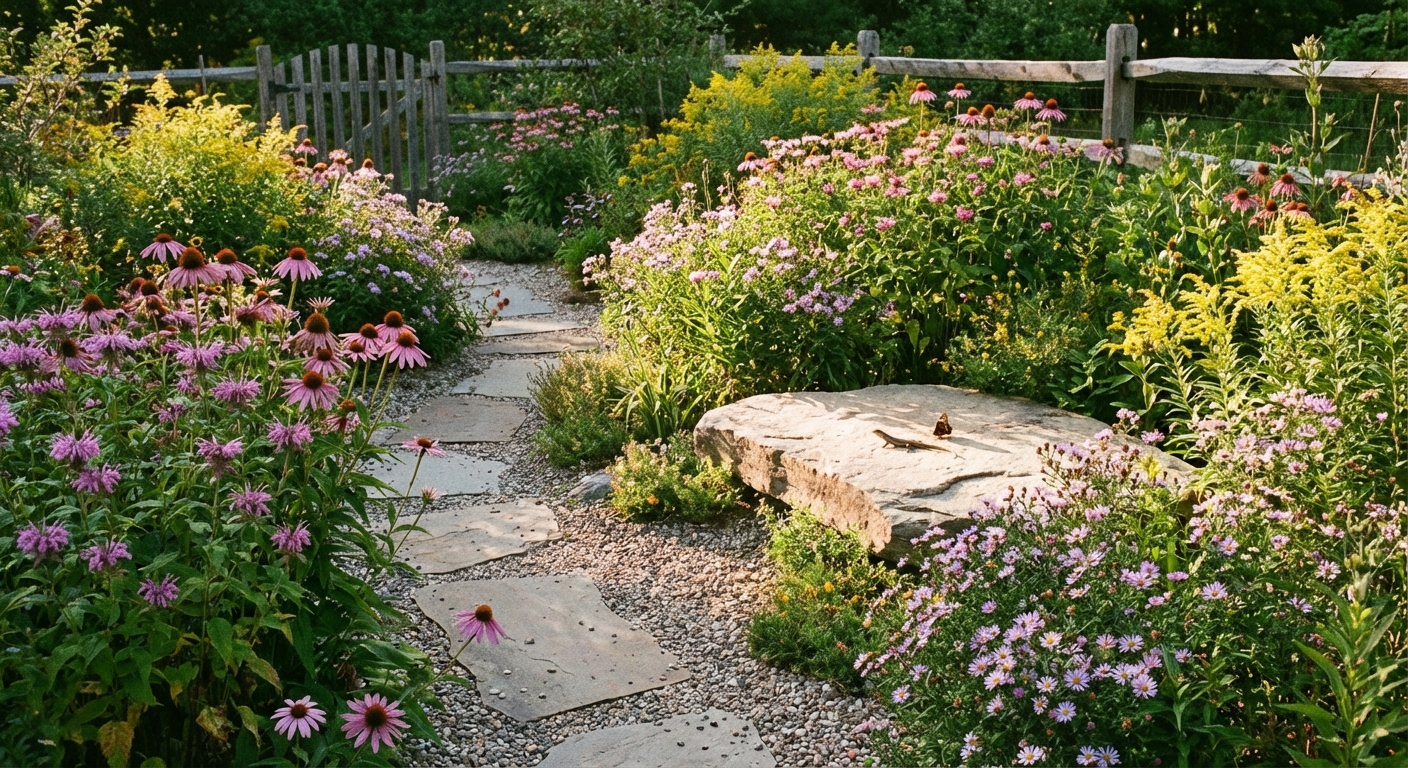
- Edge matters: Define the bed with a low plant line, stones, or a crisp cut edge. A tidy edge lets the inside be joyfully wild.
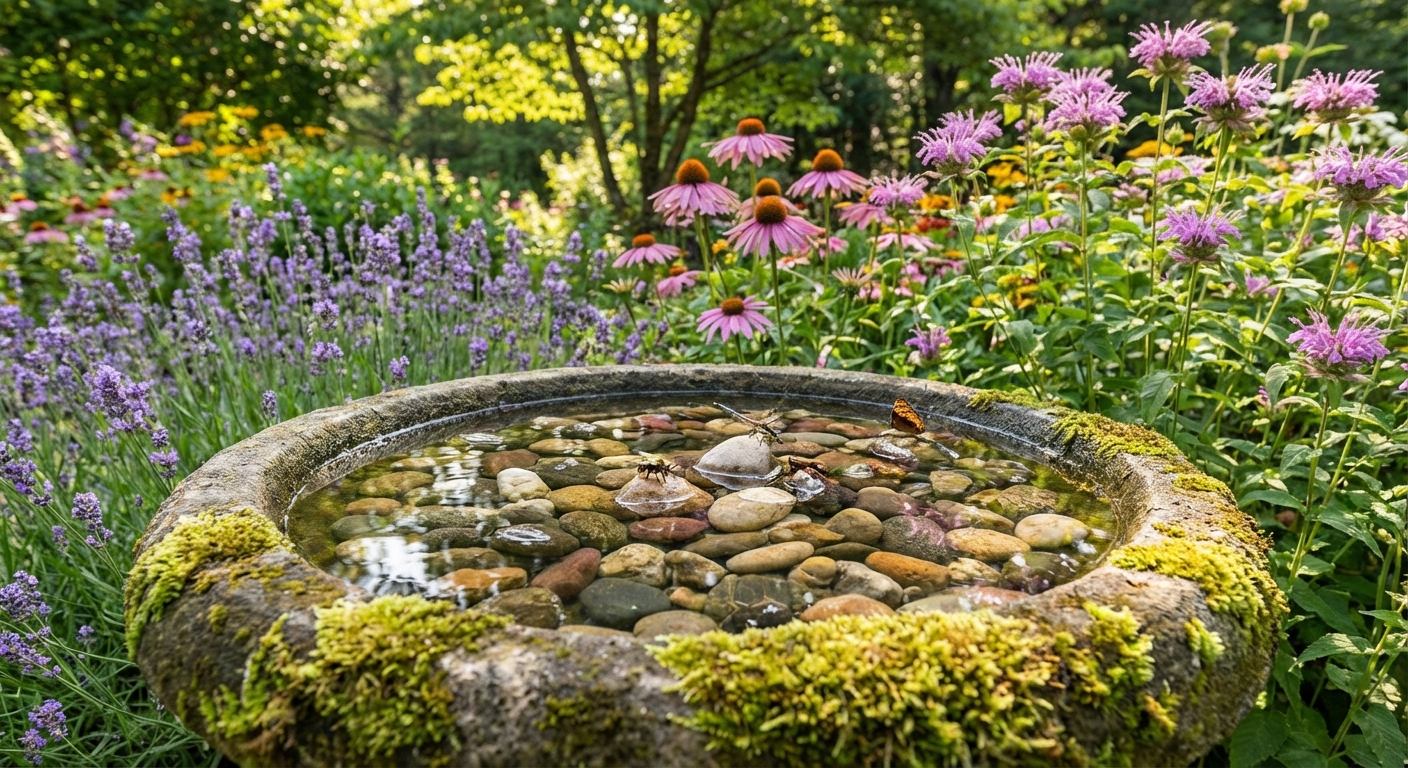
Add the non-flower essentials
- Water: A shallow dish with pebbles, a birdbath with stones, or a small dripping feature. Refresh it often so it stays clean and doesn't become a mosquito nursery (every 1 to 2 days is a good baseline in warm weather).
- Shelter: A small shrub, native grass clumps, or even a brush pile tucked out of sight.
- Nesting space: Most native bees nest in the ground, and only some use cavities (like stems, wood holes, or bee hotels). Leave some bare, undisturbed soil and a few stemmy zones.
Invasives and cultivars
Two quick shopping filters will save you a lot of grief later: avoid invasive plants, and be cautious with fancy cultivars.
- Skip invasives: If a plant is known to spread aggressively in your region, it's not a pollinator win. Check your local invasive species list when in doubt.
- Be picky with cultivars: Some cultivated varieties still help pollinators, but heavily double-flowered types can hide or reduce nectar and pollen. When you're choosing between “extra frilly” and “easy to access,” pollinators vote for easy.
Soil basics
I know soil isn't the glamorous part. But a pollinator garden runs on healthy soil the way a kitchen runs on a good pantry.
Prep without overdoing it
- Skip deep tilling when possible: It disrupts soil structure and can disrupt ground-nesting bee nests. Instead, loosen only where you plant.
- Add compost: A 1 to 2 inch layer on top helps with moisture and biology. You can lightly work it into the top few inches if your soil is very compacted.
- Mulch thoughtfully: Use shredded leaves or untreated wood chips, but keep mulch thinner in areas where you want bees to nest. Avoid piling mulch against plant crowns.
- Avoid pesticides: Especially systemic insecticides. Even “targeted” sprays can harm beneficial insects. If something's munching leaves, it might be somebody's baby.
My favorite sustainable shortcut: Use fallen leaves as mulch in autumn. Leaves feed soil life, reduce weeds, and create overwintering habitat. Nature hands you this resource for free. Take it.
A simple planting plan
It's easy to overbuy plants when you're excited. (Ask me about the year I “accidentally” came home with twelve salvias.) Instead, build your plan in steps.
Step-by-step approach
- Start with structure: Place shrubs and any large anchor plants first.
- Place seasonal anchors: Add your spring, summer, and fall backbone plants in drifts.
- Fill gaps: Add smaller natives, groundcovers, and grasses to knit everything together.
- Leave breathing room: New gardeners pack plants too tightly. Many natives get wider each year. Follow spacing recommendations and trust that the garden will fill in.
- Water for establishment: First year is “sleep.” Second year is “creep.” Third year is “leap.” Plan on extra watering the first season, then taper as roots deepen.
If you want a low-stress starting size, a 4x8 foot bed or a 10x3 foot border is plenty to create real pollinator activity.
Small spaces count
No yard? No problem. A balcony or patio can still be a tiny nectar stop with the right setup.
- Go for fewer, bigger pots: They dry out slower and give roots room.
- Pick 3 seasons: Aim for one spring bloomer, one summer workhorse, and one fall bloomer in containers.
- Add a water landing: A shallow saucer with pebbles works great. Refresh it often.
- Choose true species when you can: And confirm native status locally, since “native” depends on where you live.
Plan for bees, butterflies, and hummingbirds
Different pollinators have different preferences. A thriving garden welcomes all three by offering variety.
Bees
- What they like: Daisy-like flowers, clustered blooms, and lots of pollen.
- Layout note: Bigger patches of the same flower help bees forage efficiently.
- Extra support: Leave some bare soil and avoid heavy mulch everywhere.
Butterflies
- What they like: Flat-topped blooms for landing and sunny, wind-sheltered spots.
- Layout note: Include host plants in quieter corners where caterpillars can munch in peace.
- Extra support: A warm rock and a shallow water source can increase visits.
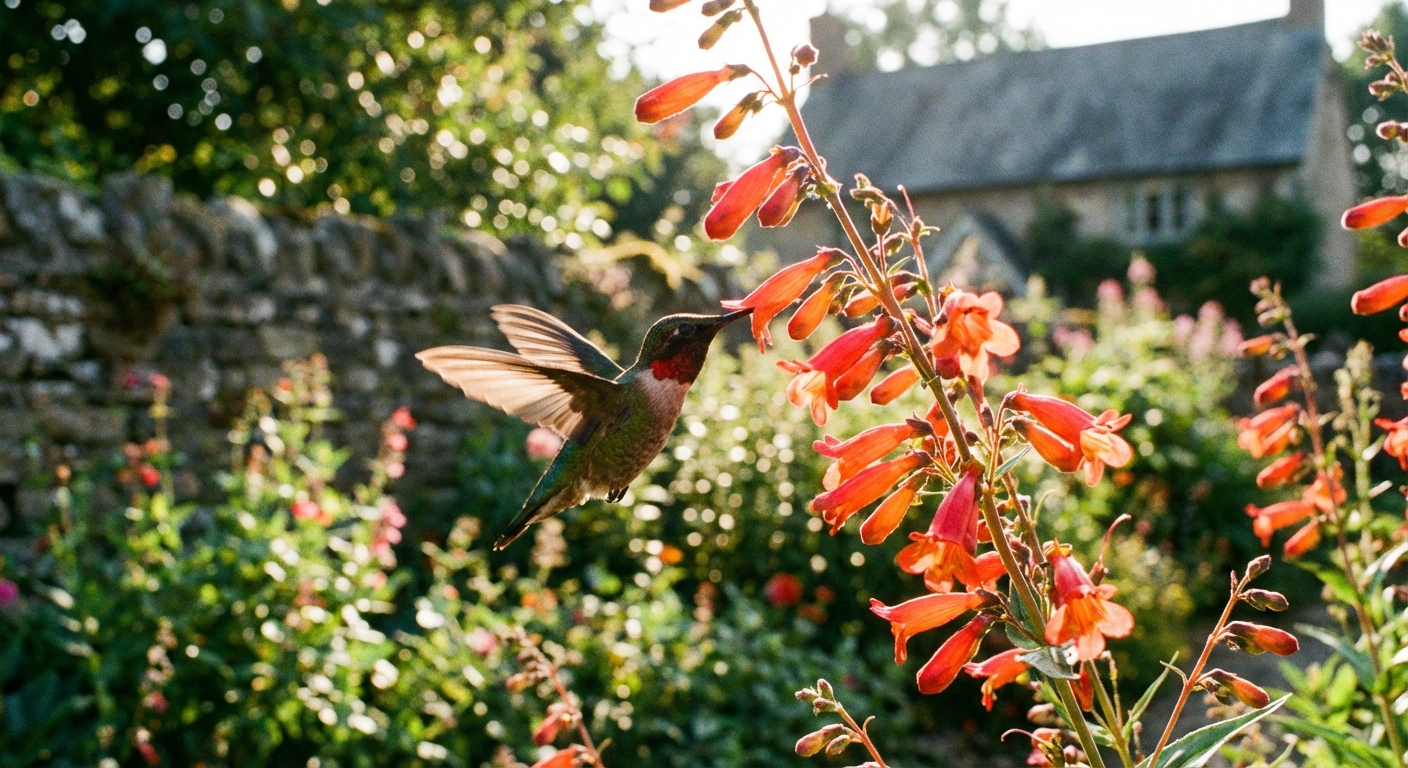
Hummingbirds
- What they like: Tubular flowers, often in red, orange, or hot pink.
- Layout note: Place tubular blooms where you can watch them easily, near a patio or window.
- Extra support: If you use feeders, keep them clean and treat them as a supplement, not the main plan.
Maintenance that works
A pollinator garden doesn't need constant fussing, but it does need a gentle rhythm.
In-season care
- Water the first year: Deep watering beats frequent sprinkles. Focus on roots.
- Weed early and often: The first season is the weeding season. It gets easier.
- Deadheading: Optional. Some plants rebloom with deadheading, but leaving seedheads can feed birds and shelter insects. Choose based on your goals and your time.
Cleanup timing
- Leave stems over winter: Many native bees overwinter in hollow stems. Wait to cut back until spring is truly settled. In many areas, a useful benchmark is when nighttime temperatures are consistently above about 50°F / 10°C, but timing varies by region.
- Cut back gently: When you do cut stems, leave 8 to 12 inches in place when possible.
- Keep some leaf litter: A thin layer under shrubs is habitat gold.
If your neighbors like tidy gardens, keep the edges crisp and add a small sign or decorative border. It signals intention while you quietly run a five-star insect hotel.
A sample layout
Here's a simple, adaptable plan for a sunny 10x6 foot bed. Adjust plant choices to your region using local native recommendations.
10x6 bed structure
- Back row (tall, 4 to 6 feet): 2 to 3 clumps of tall late-summer and fall bloomers, plus 1 small native shrub if space allows.
- Middle row (2 to 4 feet): 3 drifts of mid-season bloomers, repeated for cohesion.
- Front edge (under 2 feet): 2 drifts of spring bloomers and low long-blooming natives for a neat edge.
- One corner: shallow water dish with stones and a small sunny rock.
- One small patch: leave as lightly mulched or bare soil for ground-nesting bees.
This kind of layout looks good quickly, matures beautifully, and supports a wide range of visitors all season long.
Common mistakes
- Only planting summer bloomers: Fix it by adding early and late-season natives for continuous bloom.
- Too many plants, not enough repetition: Choose fewer species, plant them in drifts, and repeat.
- Using pesticides just in case: Start with healthy soil and observation. Identify the pest before responding.
- Over-mulching everything: Leave some nesting space and keep mulch off crowns.
- Ignoring paths and access: Add a simple stepping stone path or a maintenance strip so you can weed and water without trampling plants.
Gardening is a long conversation with your yard. If something flops, you didn't fail. You just got information. Adjust the plan, and keep going.
Your next step
Today, do the easiest high-impact thing: sketch your site map and mark the sun. Then pick just a few native anchor plants across spring, summer, and fall. Once you've got that succession backbone, the rest of the design becomes a joyful fill-in-the-blanks.
And if you catch me out there chatting with my ferns while bees work the flowers, please don't worry. It's normal. The garden makes us all a little happily weird.