Orchid Care for Beginners (Phalaenopsis)

If you have ever brought home a Phalaenopsis orchid (that classic “moth orchid” from the grocery store) and felt instantly intimidated, you are in good company. Orchids have a reputation for being fussy, but Phalaenopsis is one of the more forgiving blooming houseplants you can grow, as long as you understand one big truth (and avoid the most common kindness trap: keeping roots wet all the time).
Orchids are not planted like normal houseplants. They are epiphytes in the wild (some are lithophytic), meaning they grow on trees or rocks and breathe around their roots. Once you stop treating them like a pothos in potting soil, they get dramatically easier.
This guide will walk you through light, watering, humidity, repotting in bark mix, and the gentle tricks that help Phalaenopsis rebloom. Keep it simple, observe your plant, and remember: every orchid grower has killed at least one. That is not failure; it is compost education.
Meet your Phalaenopsis
Phalaenopsis orchids have broad, leathery leaves and usually bloom on tall arching spikes with flowers that can last for weeks or even months. Most beginner struggles come down to two areas: light (too little) and roots (too wet, too long).
Quick ID checklist
- Leaves: thick, oval, often arranged in a fan.
- Roots: chunky, silver-green, sometimes climbing outside the pot.
- Flowers: moth-like blooms on a single spike, common colors are white, pink, purple, and yellow.
Those aerial roots are normal. They are not misbehavior. They are your orchid breathing.
After you bring it home
New orchid? Do these quick checks before you do anything dramatic.
- Quarantine for a week or two: keep it slightly separate from other plants while you scan for pests.
- Check drainage: remove any tight decorative sleeve or cachepot while watering so the inner pot can drain and breathe.
- Look for a moss plug: many store orchids have a dense plug in the center that stays wet forever. If you suspect one and the plant is struggling, you can gently remove it. If the plant is healthy and in bloom, you can often wait until after flowering to do a full repot.
- Do not repot mid-bloom unless you must: if roots are rotting or the medium is sour and soggy, repotting is worth it even if you lose a few flowers.
Light: bright and steady
If I could follow you around your house for one day with a light meter, this is what I would repeat like a friendly mantra: bright indirect light.
Best window locations
- East-facing window: ideal in many homes. Gentle morning sun, bright the rest of the day.
- South-facing window: great if filtered by a sheer curtain or set back from the glass.
- West-facing window: can work, but watch for hot late-day sun that scorches leaves.
- North-facing window: usually too dim unless you add a grow light.
Aim for a spot where you can comfortably read a book during the day without turning on a lamp. That is a surprisingly good real-life test.
How to tell if the light is right
- Good light: leaves are medium green, plant grows steadily, and eventually produces a new flower spike.
- Too much light: yellowing leaves or dry, pale patches that look like sunburn.
- Too little light: very dark green leaves and no blooming for a long time (leaf color varies by hybrid, so treat this as a clue, not a verdict).
Rotate your orchid a quarter turn every week or two so it grows evenly instead of leaning hard toward the window.
Watering: soak and drain
Most Phalaenopsis orchids die from kindness. Specifically, frequent little sips that keep the roots damp all the time. Orchids want a thorough drink, then time to breathe.
When to water
Instead of watering on a strict schedule, use these cues:
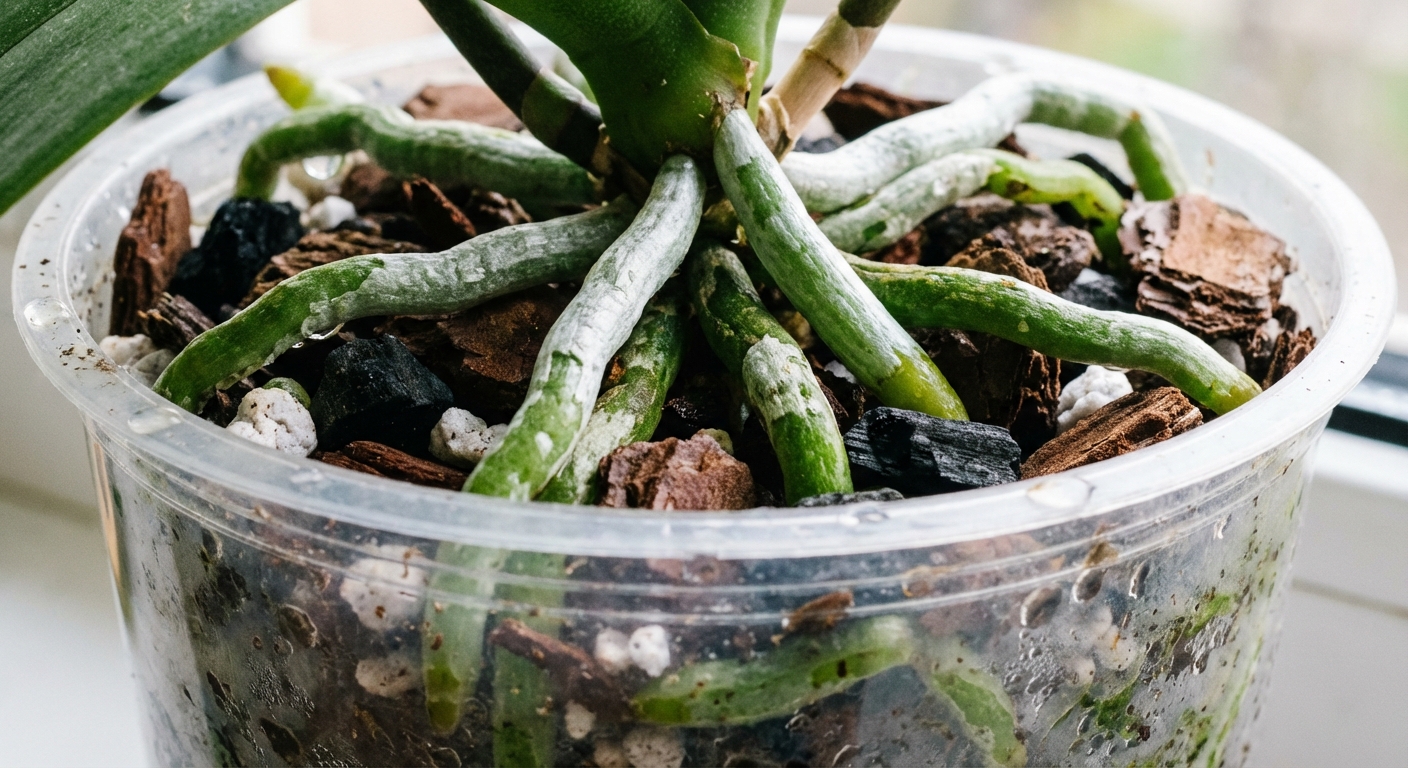
- Root color: silvery or pale gray roots usually mean it is time. Bright green roots usually mean “not yet.” This is easiest to read in a clear pot.
- Pot weight: a dry orchid pot feels noticeably lighter.
- Medium feel: bark should be close to dry, not soggy.
In many homes, this ends up being about every 7 to 10 days, sometimes more often in summer and less in winter. Your home’s humidity, temperature, and pot type matter more than the calendar.
How to water (my beginner-proof steps)
- Take it to the sink. If your orchid sits in a decorative cachepot or sleeve, lift the inner pot out so it can drain and get air.
- Soak first (most reliable). Place the pot in a bowl of room-temperature water for 10 to 15 minutes so chunky bark actually saturates.
- Drain like you mean it. Let it drip until no more water is running out. This is where root rot gets prevented.
- Return it to its spot. Never leave the pot standing in water.
Alternative: Running water through the pot can work, but only if you truly soak the medium. A quick 20 to 30 seconds is sometimes not enough for bark, especially in very dry homes.
Two watering mistakes to avoid
- Water sitting in the crown: If water pools where the leaves meet, it can cause crown rot. If you splash water there, blot it with a tissue.
- Ice cubes: Some people do this, but it is not recommended by most orchid growers. Phalaenopsis are tropical, and cold can damage roots. The melt can also water unevenly.
What water is best?
If your tap water is very hard or heavily softened, orchids may develop mineral buildup over time. If you notice crusty white deposits on bark or pot edges, try using rainwater, filtered water, or a mix of filtered and tap. Once a month, flush the pot thoroughly to wash out salts.
Humidity and airflow
Phalaenopsis orchids enjoy humidity, but they also need airflow. Think “bathroom spa” but with a gentle fan in the corner.
Humidity goals
Most homes do fine at 40% to 60% humidity. If your air is very dry (winter heating, desert climates), you have options:
- Pebble tray: Set the pot on pebbles with water below the pot base, not touching it. These help a little, but the effect is usually modest unless the plant is in a small, somewhat enclosed area.
- Humidifier: The most reliable solution for consistently dry homes.
- Grouping plants: A small cluster of plants creates a more humid microclimate.
Skip the daily misting habit
Misting can temporarily raise humidity for a few minutes, but it can also leave water sitting in crevices and encourage spots on leaves. If you mist, do it lightly, in the morning, and keep water out of the crown.
Temperature and blooming
Phalaenopsis orchids love typical indoor temperatures.
- Daytime: about 70°F to 80°F (21°C to 27°C)
- Night: about 62°F to 70°F (16°C to 21°C)
That small nighttime dip is not just comfortable. It is one of the signals that can encourage a flower spike.
Keep orchids away from heating vents, radiators, and cold drafts near exterior doors. Rapid swings stress the plant, even if the average temperature seems fine.
Season note: Many Phalaenopsis grow most actively in brighter, warmer months and slow down in winter. That slower pace is normal.
Potting and media
If your orchid is in dense moss that stays wet for a long time, or worse, potting soil, it will struggle. Phalaenopsis roots want oxygen. Chunky bark mix provides air pockets and dries more evenly.
Best pot choice
- Clear plastic orchid pot with lots of holes: lets you see root health and moisture level, plus it breathes.
- Decorative outer pot: totally fine, as long as the inner pot drains freely and never sits in water. Avoid tight sleeves that trap moisture and block airflow.
What to look for in an orchid bark mix
- Medium-grade fir bark or similar chunky bark
- Optional additives like perlite, charcoal, or a little sphagnum for moisture balance
- No dense garden soil or standard peat-heavy houseplant mix
If you are mixing your own, keep it simple: bark plus a bit of perlite is a great beginner blend.
Repotting
Repotting sounds scary until you do it once. Then it feels like giving your orchid clean sheets.
When to repot
- Every 1 to 2 years, as bark breaks down and holds too much water
- When roots are crowded and pushing the plant up and out
- If the medium smells sour or stays wet too long
- After blooming is finished (ideal timing)
Step-by-step repotting
- Soak the orchid first. Water it 30 to 60 minutes before repotting to make roots more flexible.
- Remove from the pot. Gently ease it out, loosening roots from the sides.
- Shake out old media. Pick away bark or moss stuck between roots.
- Trim dead roots. Use sterilized scissors. Dead roots are brown, hollow, mushy, or papery. Healthy roots are firm and green or silvery.
- Set the plant at the right height. The base of the leaves should sit above the media, not buried.
- Fill with bark. Tap the pot to settle bark around roots, but do not pack it tight.
- Wait a few days to water. If you trimmed roots, give cuts time to dry and seal, typically 2 to 4 days.
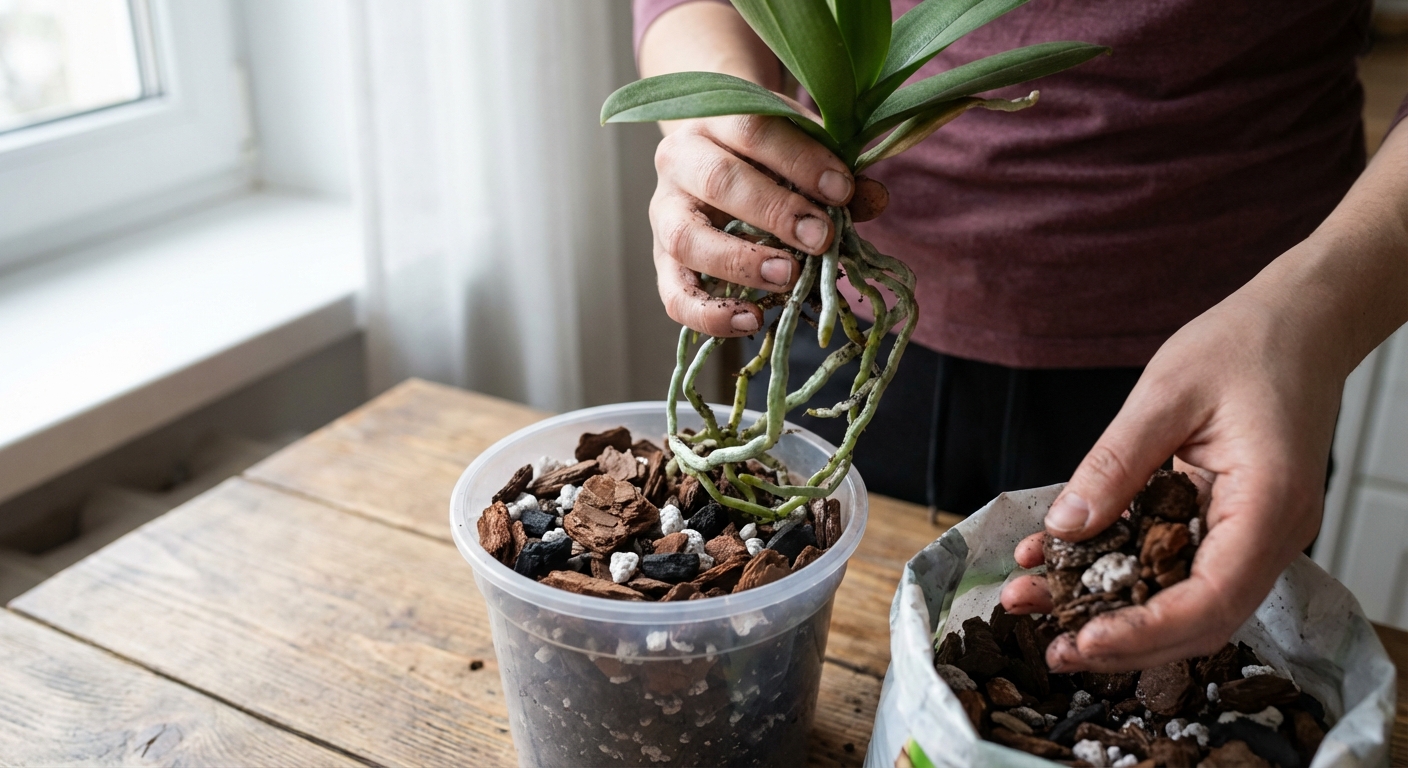
Note: Some root loss during repotting is normal. Orchids are tougher than they look.
Fertilizer
Phalaenopsis orchids do not need heavy feeding. Think “snacks,” not “three-course meal.”
A simple beginner routine
- Use a balanced fertilizer suitable for orchids (often labeled 20-20-20) and preferably urea-free, or a gentle balanced houseplant fertilizer used very dilute.
- Feed at quarter to half strength.
- Apply every 2 to 4 weeks during active growth (often spring through early fall).
- Skip fertilizer when the plant is stressed, freshly repotted, or very dormant.
Once a month, water thoroughly without fertilizer to flush out salts, especially if you use tap water.
Reblooming
This is the part everyone wants, and it is also where patience pays off. Reblooming is not about “making” the orchid flower. It is about creating the conditions where it chooses to.
After blooms: what to do with the spike
When blooms fade, you have two options depending on the spike and your goals:
- Option A: Keep the spike (possible quicker blooms). If the spike is still green, you can cut it 1/4 to 1/2 inch above a node (often above the second or third node from the base). A node is a small bump on the spike, usually tucked under a thin papery bract. Sometimes the spike branches and reblooms sooner, but the flowers may be smaller.
- Option B: Remove the spike (stronger long-term plant). Cut the spike near the base once it turns brown or if you want the plant to focus on roots and leaves. This often leads to a stronger next bloom cycle.
Use clean scissors. If you are nervous, start with Option B. It is the most foolproof for long-term health.
The trigger: cooler nights
Many Phalaenopsis set spikes after a few weeks of slightly cooler nights in fall or winter. Try this:
- Give your orchid 2 to 4 weeks of nights around 60°F to 65°F (16°C to 18°C). Some hybrids spike a bit warmer, so do not panic if your house never hits exactly 60°F.
- Keep daytime temps comfortable and light bright.
- Do not reduce watering drastically, just avoid keeping it constantly wet.
Once a spike appears, keep the plant in stable conditions and avoid moving it constantly. A steady routine helps buds develop without blasting or dropping.
Staking the spike
When the spike is 6 to 8 inches tall, you can gently guide it with a stake and soft clips. Do not force a curve. Spikes naturally reach toward light, so rotating the pot can make them twist.
Common problems
Wrinkled leaves
- Most common cause: dehydration from damaged roots or underwatering.
- What to do: check roots, repot if media is broken down, and water properly. Leaves may not fully plump back up, but new growth will improve.
Yellow leaves
- One bottom leaf yellowing: often normal aging.
- Several leaves yellowing: possible overwatering, root problems, or sun stress. Inspect roots and light exposure.
Mushy crown or black center
- Likely crown rot. This can be serious.
- What to do: keep the crown dry, improve airflow, remove soft tissue carefully if possible, and stop watering into the crown. Prevention is the best cure here.
Bud blast
- Common triggers: sudden temperature changes, drafts, very dry air, or moving the plant repeatedly.
- What to do: stabilize conditions, keep away from vents and doors, and maintain even watering.
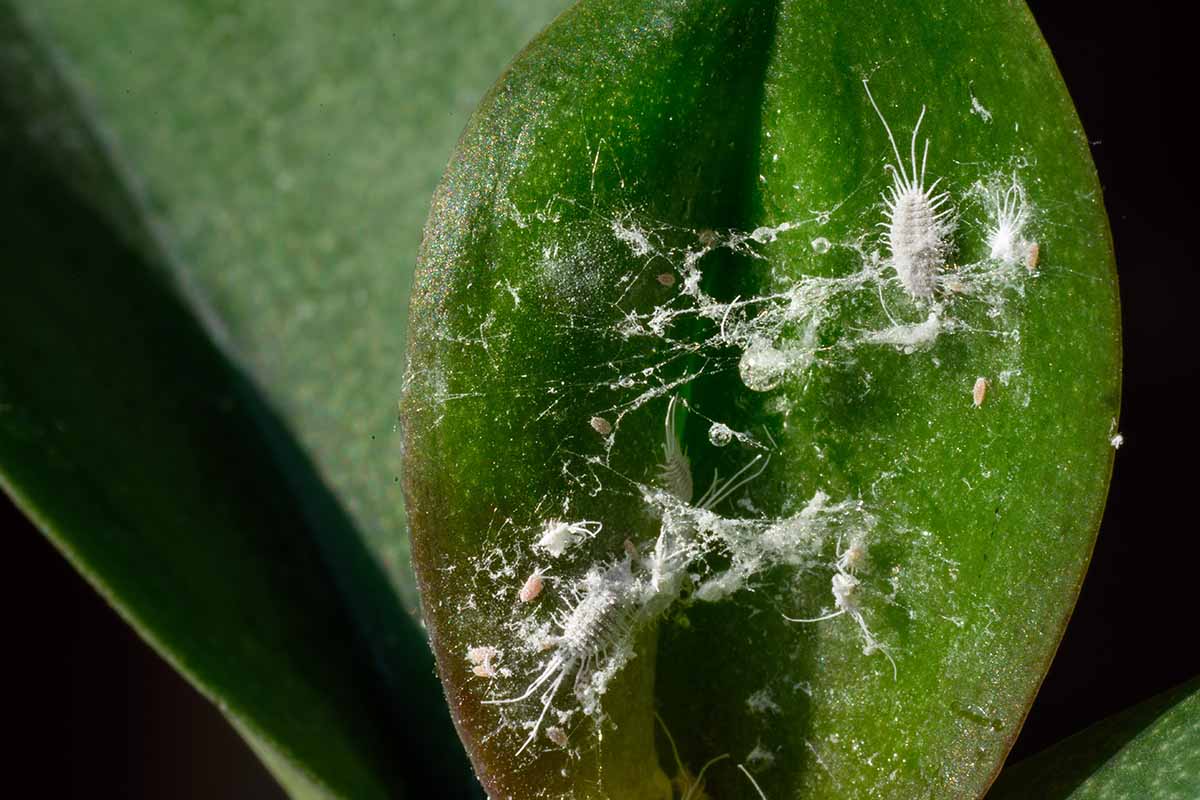
Sticky leaves
Sometimes orchids produce a little sticky sap naturally, especially near blooms. But stickiness can also signal pests.
- Check for: scale, mealybugs, aphids.
- What to do: isolate the plant. Wipe leaves and crevices with a cotton swab dipped in 70% isopropyl alcohol for mealybugs and scale, then repeat every 5 to 7 days for a few rounds. If you use insecticidal soap or horticultural oil, keep it off the blooms and try not to drench the potting media.
A simple weekly routine
If decision fatigue is your biggest plant killer, borrow my easy rhythm:
- Once a week: lift the pot, check bark dryness, and look at the roots if you have a clear pot.
- Water only when needed: soak and drain fully.
- Every 2 to 4 weeks: fertilize lightly during active growth.
- Once a month: flush with plain water.
- Every 1 to 2 years: repot into fresh bark after blooming.
That is it. Orchids thrive on calm consistency, not constant fussing.
Beginner FAQ
Should I cut off aerial roots?
No. Aerial roots help the orchid breathe and gather moisture. Only trim roots that are clearly dead, hollow, or mushy.
Can I grow my orchid in a bathroom?
Yes, if it has bright enough light. Bathrooms often provide lovely humidity. Just avoid placing the plant where it gets cold drafts or splashes into the crown.
My orchid came in moss. Do I have to repot immediately?
Not always. Moss can work in very dry homes, but it is easy to overwater. If the moss stays wet for a week or more, or you see root decline, repot into bark after blooming or sooner if the plant is struggling.
How long do blooms last?
Often 6 to 12 weeks, sometimes longer in stable conditions. Cooler temperatures can extend bloom life.
One last reminder
Orchid care is less about perfection and more about noticing. You will learn your plant’s rhythms: how quickly bark dries in your home, how bright your windows really are, and what healthy roots look like through a clear pot. Once you have that, Phalaenopsis becomes one of the most rewarding houseplants out there.
If your orchid is alive and growing a new leaf, you are doing it right. The blooms will follow.