Natural Tomato Disease Fixes
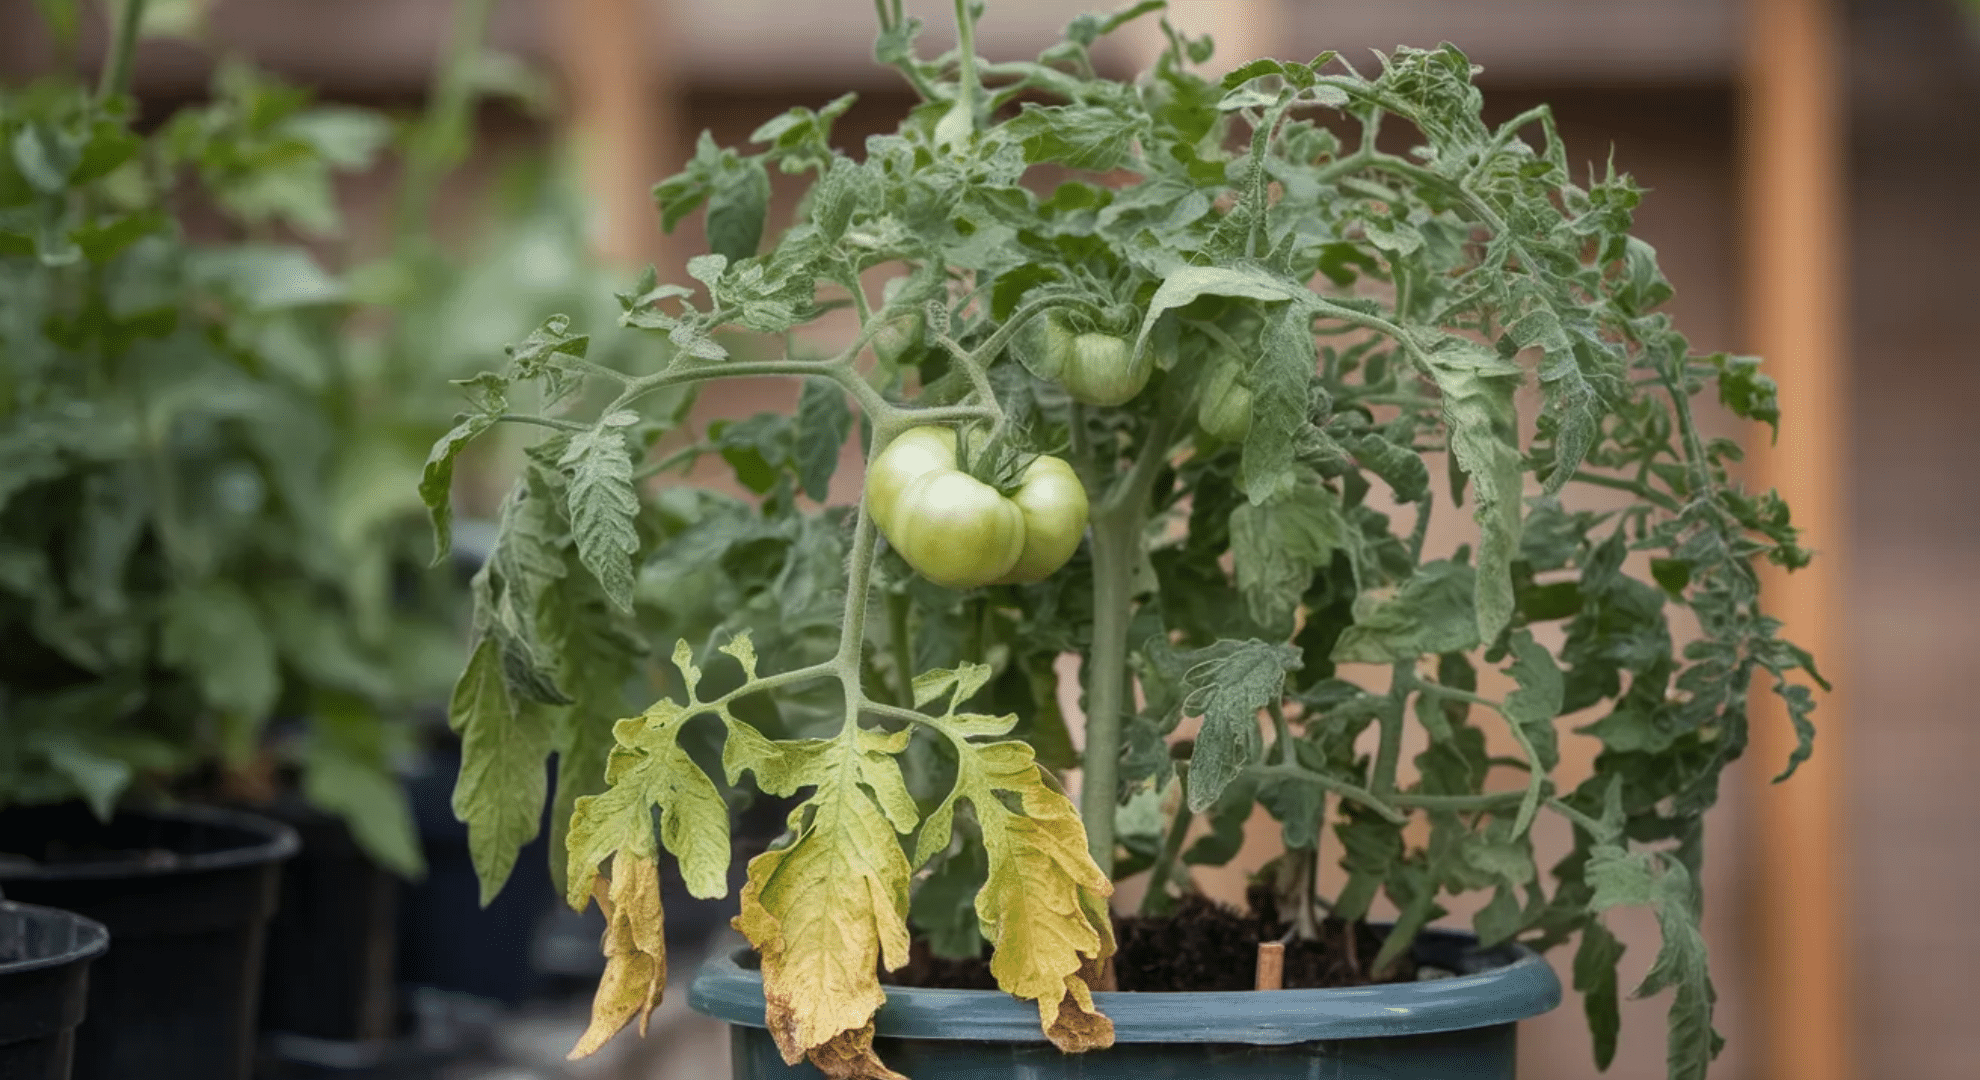
Tomatoes have a special talent for looking totally fine on Tuesday and mildly tragic by Friday. If you have ever stood there with a watering can in one hand and dread in the other, take a breath. Most common tomato problems are fixable, especially when you catch them early and focus on the real goal: strong plants, healthy soil, and fewer opportunities for disease to take hold.
This page walks you through three of the most common issues I see in home gardens, including containers and raised beds: blight, blossom end rot, and powdery mildew. We will identify what you are looking at, then treat it naturally, no harsh chemicals required.
First, diagnose before you treat
Tomato leaves can curl, spot, yellow, or crisp for lots of reasons, including heat stress, watering swings, nutrient imbalance, and disease. Before you spray anything, do this quick check. It saves time and it saves plants.
60-second tomato triage
- Where is the damage? Lower leaves first often points to splash-borne leaf-spot fungi or normal aging. New growth first can hint at nutrient or pest problems.
- What does the pattern look like? Round spots, concentric rings, white powder, or black leathery bottoms on fruit each have their own fingerprint.
- What has the weather been doing? Long wet stretches and humid nights invite many leaf diseases. Hot dry spells plus irregular watering often trigger blossom end rot.
- Check the fruit and stems too. Many diseases show up on fruit late, and stem lesions can be the giveaway.
If you are unsure, take a clear close-up photo in natural light of the leaf front and back, the stem near the soil line, and any affected fruit. That combination tells the story.
Blight (early blight and late blight)
Blight is a word gardeners use when tomato leaves start looking like they have been through a tiny bonfire. There are two main culprits. Some of the home-garden tactics overlap, but the urgency is different, so I break them apart below.
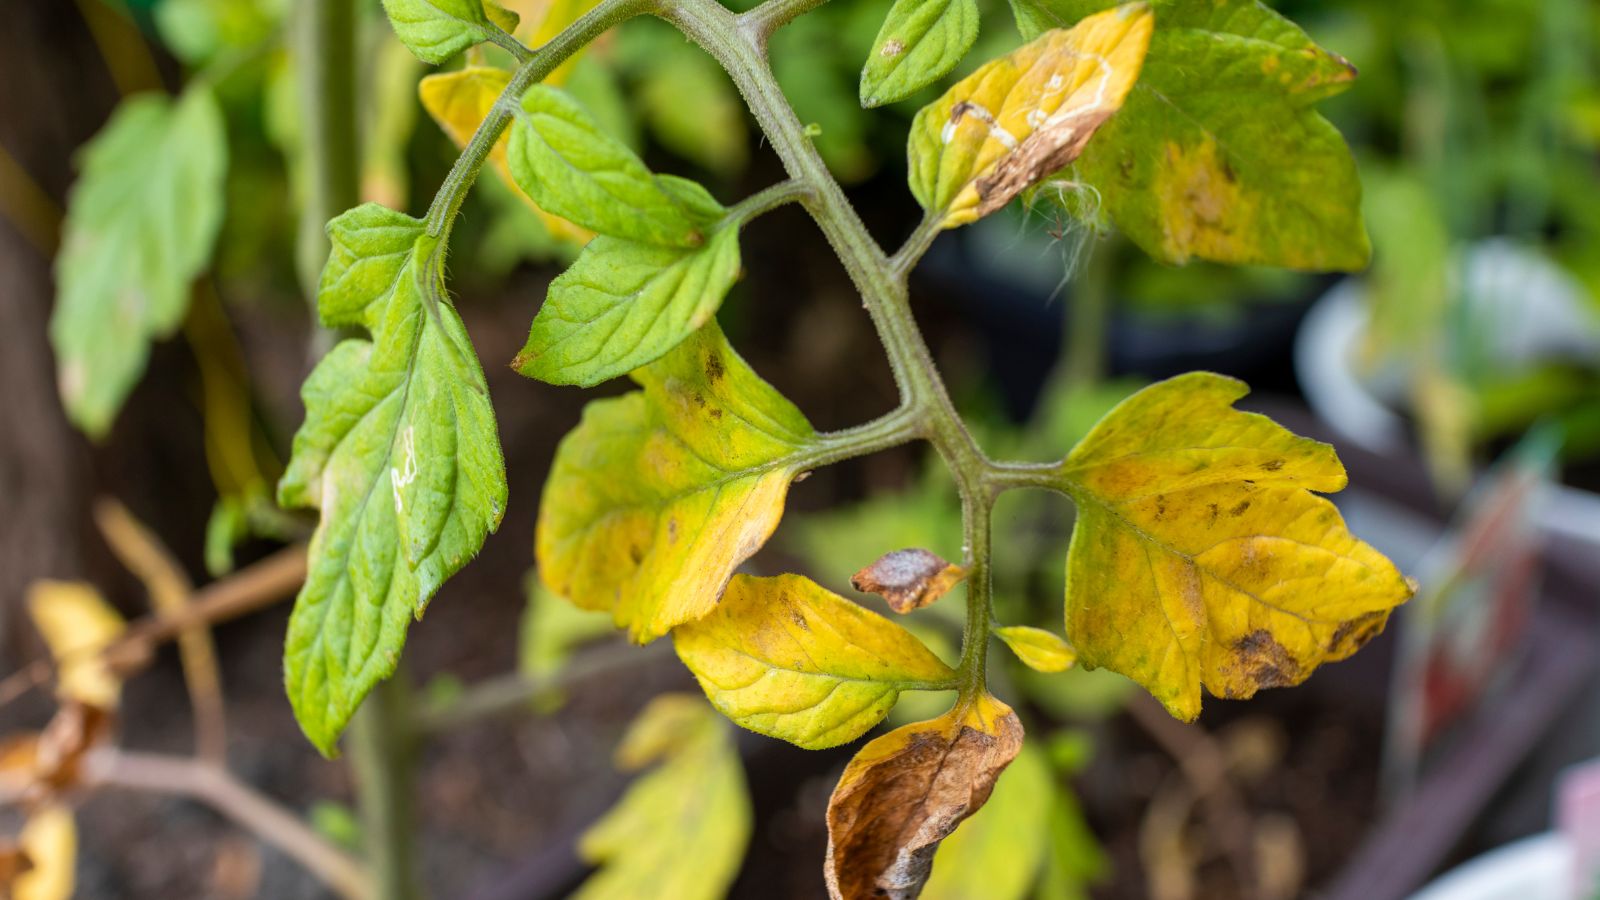
How to identify blight
- Early blight usually starts on older, lower leaves with brown spots that may have faint concentric rings (a bullseye look). Yellowing spreads outward from the spots.
- Late blight is more aggressive and can show greasy-looking dark patches that spread quickly, especially in cool, wet weather. You may see pale fuzz on leaf undersides when humidity is high. Fruit may develop dark, firm lesions.
Septoria leaf spot (common lookalike)
Septoria leaf spot often shows up right alongside early blight or gets mistaken for it. It typically causes many small, round spots (sometimes with tiny dark dots in the center) and starts on lower leaves. The good news is the natural home-garden approach is basically the same as early blight: remove infected leaves, keep foliage dry, mulch, and protect new growth.
Natural treatment steps
- Prune immediately and sanitize. Snip off infected leaves using clean pruners. Wipe blades with rubbing alcohol between plants, or wash with hot soapy water and dry. Put infected leaves in the trash, not the compost.
- Improve airflow. Remove a few extra lower leaves to lift foliage off the soil. Stake or trellis plants so leaves dry faster after dew and rain.
- Mulch like you mean it. Add 2 to 3 inches of straw, shredded leaves, or untreated grass clippings (thin layers) to reduce soil splash. Soil splash is a major delivery system for early blight and other common leaf-spot fungi. Late blight usually arrives on the wind, from infected transplants, volunteer potatoes, or regional outbreaks, but mulching still helps overall plant hygiene.
- Water at the base, early in the day. A slow soak at the roots is ideal. Wet leaves overnight are an open invitation for spores.
- Use an organic protectant when it makes sense. If you are in a rainy stretch or early blight is recurring, a copper-based organic fungicide can help protect new, healthy leaves. Copper is a protectant with limited curative action, so timing matters. Follow the label exactly and reapply as directed, especially after rain. Copper is allowed in many organic programs, but it is still a heavy metal that can build up in soil, so I treat it as a last step, not a lifestyle.
Late blight: when to escalate
If you strongly suspect late blight (fast spread, greasy dark lesions, cool wet weather, nearby potatoes, reports in your area), do not wait and see.
- Bag and trash infected leaves and consider removing the whole plant if symptoms are widespread. Do not compost.
- Do not work plants when wet and clean tools afterward.
- Check for volunteer potatoes and tomatoes nearby and remove them. They can keep the disease going.
- Look for local alerts from your extension office or master gardener program. Late blight can move through neighborhoods quickly.
What not to do
- Do not compost infected foliage unless you run a very hot, consistently managed compost system.
- Do not overhead water when blight is active.
- Do not strip the plant bare. Removing too many leaves at once can sunscald fruit and stress the plant. Aim for steady, strategic pruning.
Prevention that works
- Rotate crops (especially for early blight). Avoid planting tomatoes, peppers, potatoes, or eggplant in the same spot every year if you can. A 2 to 3 year break helps reduce soilborne carryover for early blight and many leaf-spot fungi. Late blight is less about soil persistence and more about infected living hosts, like volunteers and nearby plantings.
- Choose resistant varieties (resistance is not immunity). Look for resistance codes on seed packets and plant tags when available. Resistant plants often get sick later or less severely, not never.
- Give tomatoes space. Crowded plants stay damp longer. Damp is the enemy here.
- End-of-season cleanup. Remove tomato debris at the end of the season so problems do not overwinter in your beds. Also pull any volunteer tomatoes and potatoes next spring.
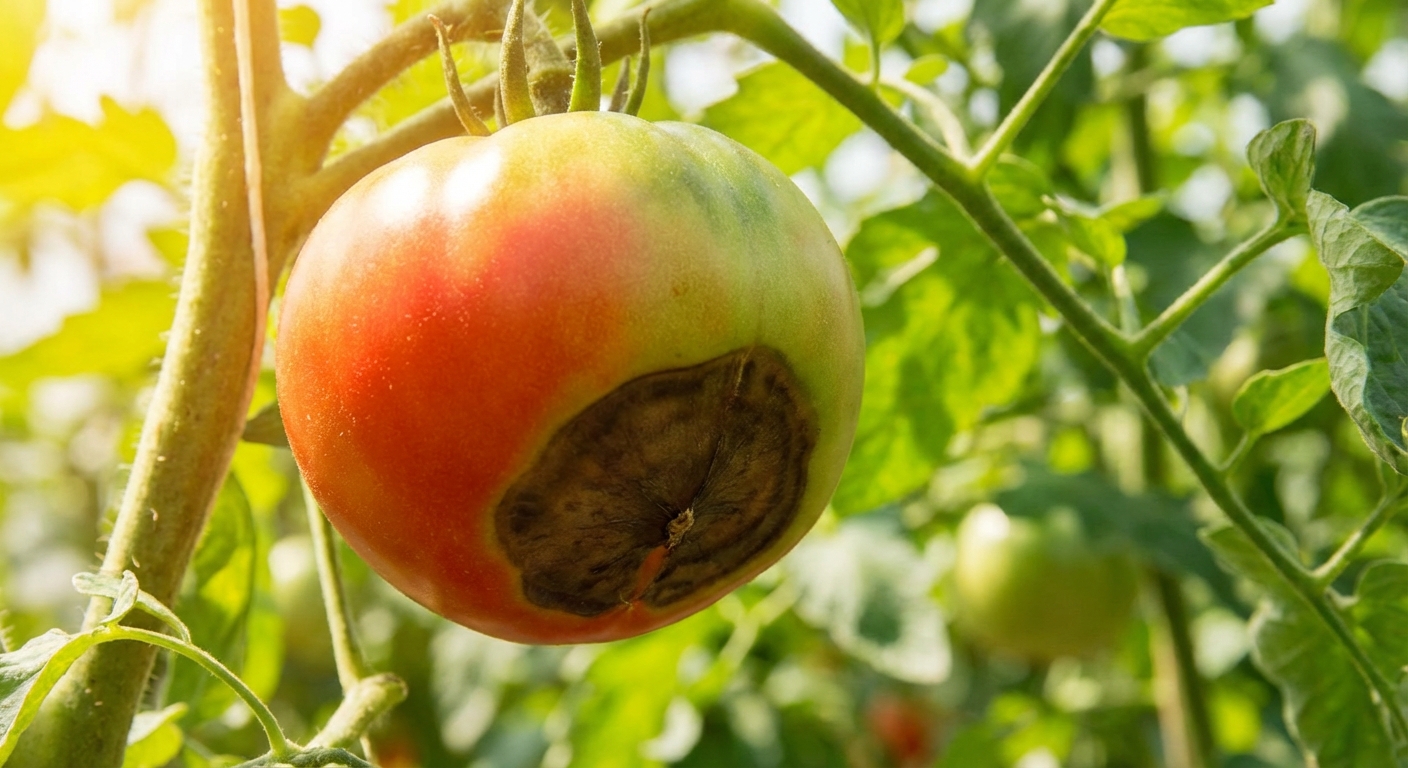
Blossom end rot (not a disease)
Blossom end rot is the heartbreak of the first big tomatoes, because the plant looks healthy and the fruit looks perfect until you flip it over. The good news: it is not contagious, and you can correct it.
How to identify blossom end rot
- A dark, sunken, leathery patch on the bottom of the tomato (the blossom end, opposite the stem).
- The spot may start tan or water-soaked, then turns brown to black.
- Often appears on the first flush of fruit, especially during heat or inconsistent watering.
Lookalikes to rule out
- Insect damage can leave holes, scarring, or exposed flesh rather than a smooth, leathery patch.
- Anthracnose (a fruit rot) often shows sunken spots that develop on ripening fruit, sometimes with salmon-colored spores in the center. Blossom end rot usually shows earlier and stays leathery.
Why it happens
Blossom end rot is most often caused by calcium not moving properly into developing fruit. That is usually a watering consistency problem, not a lack of calcium in the soil. Rapid growth, hot spells, container drying, root damage, and too much nitrogen can all contribute.
Natural treatment steps
- Remove affected fruit. It will not heal, and leaving it wastes the plant’s energy.
- Stabilize watering. Water deeply and evenly. In the ground, aim for consistent moisture rather than frequent sips. In containers, check daily during heat. The goal is evenly damp like a wrung-out sponge, not soggy.
- Container tips that help fast. Use the biggest pot you can (smaller pots swing from soaked to bone-dry fast), mulch the surface, and consider a drip line or watering spikes if you miss days. Avoid letting containers fully dry out between waterings.
- Mulch to buffer moisture swings. A thick mulch layer reduces the roller coaster that triggers calcium transport issues.
- Go easy on nitrogen. High nitrogen pushes fast leafy growth, which can outcompete fruit for calcium. If you fertilize, choose something balanced or slightly lower in nitrogen once flowering begins.
- Support root health. Avoid aggressive cultivating near the plant base. Damaged roots struggle to move water and nutrients.
Should you add calcium?
Sometimes, yes, but treat it like a soil-health decision, not a panic button.
- If you have never done a soil test and blossom end rot is common in your garden, consider a simple test. It is the fastest way to know if calcium and pH are truly off.
- If you need calcium, garden lime (raises pH) or gypsum (adds calcium without raising pH much) are common options. Choose based on your soil pH needs.
- Quick fixes like tossing eggshells in the planting hole or spraying foliar calcium are often too slow to help the fruit already affected. For this season’s tomatoes, steady moisture is the real win.
- In containers, a quality potting mix and consistent watering fix most cases without extra amendments.
Once watering is consistent, the plant often grows out of it. Later fruit can be perfectly fine.
Powdery mildew
Powdery mildew is that unwelcome dusting of flour that shows up when days are warm and nights are cool and humid. It is often more notorious on squash and cucumbers, but tomatoes can get it too, especially late season when plants are crowded or stressed.
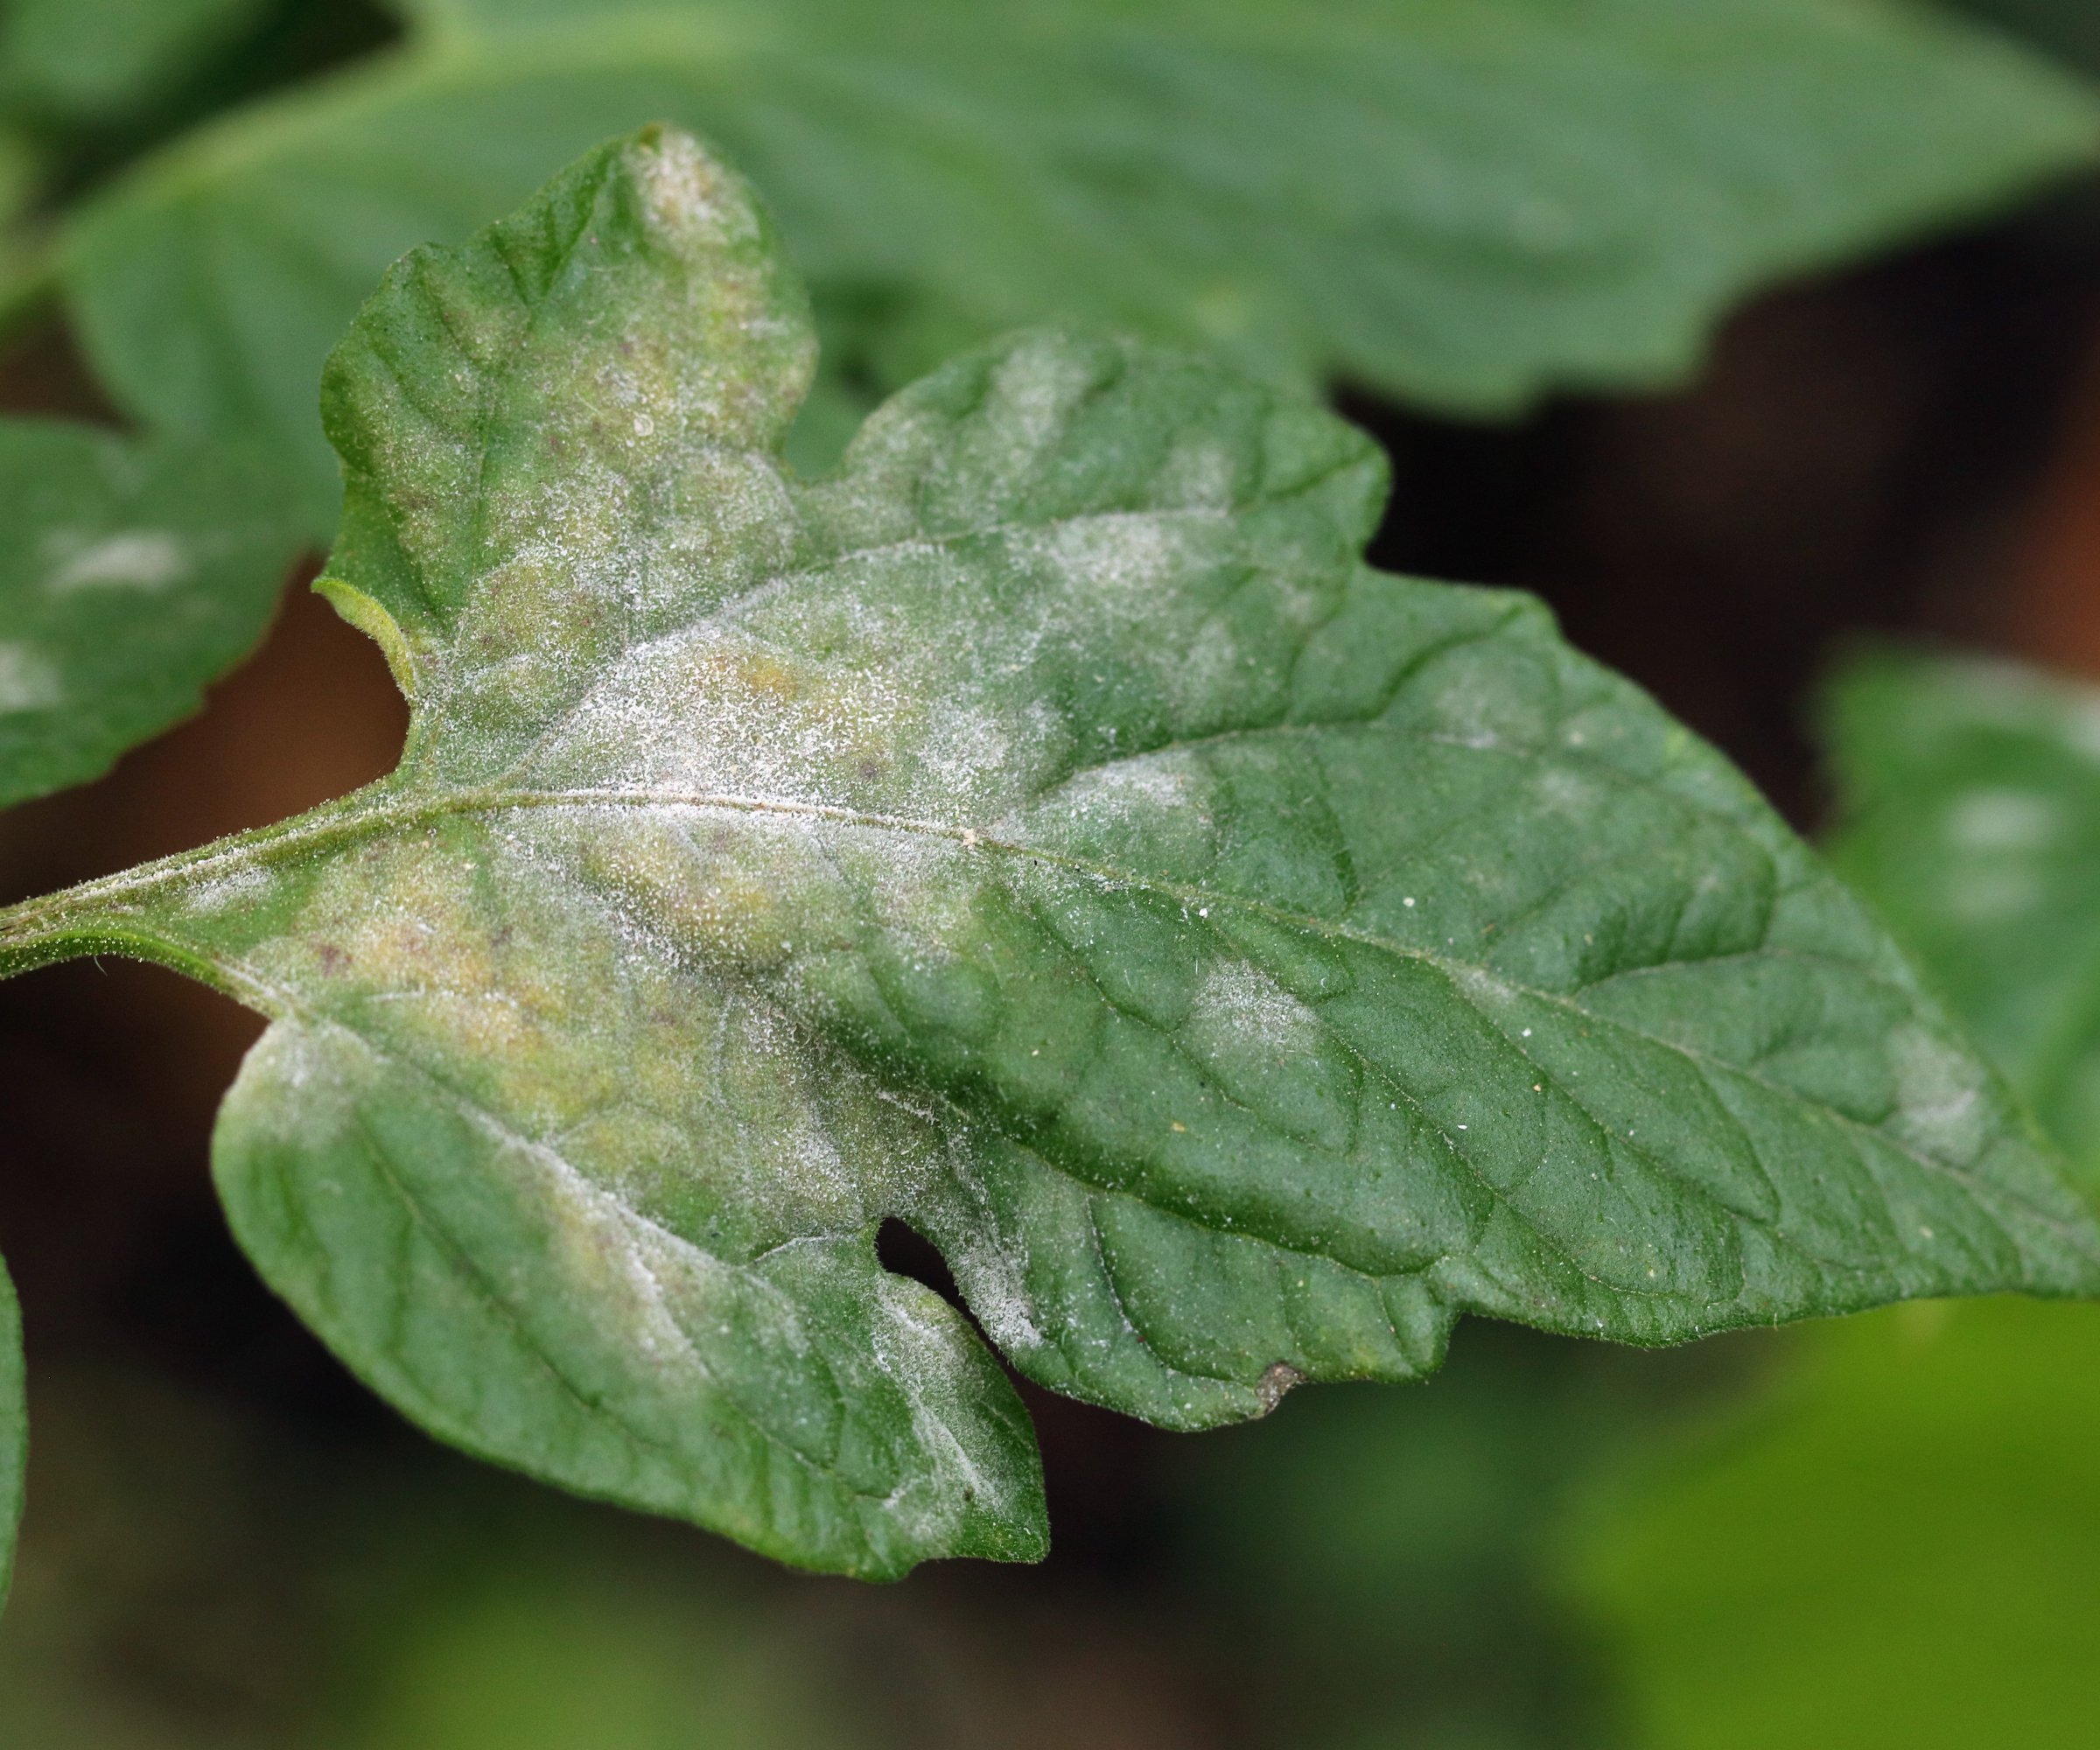
How to identify powdery mildew
- White or gray powder on leaf surfaces, sometimes starting as small patches.
- Leaves may yellow, curl, or dry as the infection spreads.
- Often begins on older leaves and moves upward.
Lookalikes to rule out
- Dust or dried residue from hard water, soil, or foliar sprays can look similar. Powdery mildew usually wipes off like fine flour and tends to spread patch by patch.
- Leafhopper stippling causes pale speckling, not a powdery coating.
Natural treatment steps
- Remove the worst leaves. Start with heavily coated foliage. Do not take more than about a third of the plant at once.
- Increase airflow. Prune for breathing room and tie stems to supports. Water early so humidity drops by evening.
- Try a gentle spray option. Choose one approach and stick with it for a couple of rounds, applying in the cool part of the day and following label directions where applicable.
- Potassium bicarbonate spray is very effective at disrupting powdery mildew.
- Sulfur products can work well preventatively, but avoid using sulfur close to oil sprays and avoid spraying during high heat.
- Milk spray (commonly 1 part milk to 9 parts water) is a classic home remedy that can help on light infections. Test on a small area first and reapply as needed.
- Do not overfeed. Over-fertilized, lush growth is tender and more susceptible.
Spray safety basics
- Always follow the label and local guidelines, even for organic products.
- Spray in early morning or evening to reduce leaf burn and protect pollinators.
- Test any spray on a small section first.
- Avoid applying sulfur within about 2 weeks of horticultural oils (and vice versa) to reduce the risk of plant damage.
- Wear basic protection such as gloves and eye protection, and avoid breathing spray mist.
Prevention tips
- Plant spacing matters. Tomatoes want sun and breeze.
- Morning sun is gold. It dries dew quickly, which reduces fungal pressure.
- Keep leaves off the soil. A little leggy pruning at the base helps many tomato issues, not just mildew.
Simple habits that prevent most problems
If there is one natural secret, it is this: we prevent disease by designing a garden that stays dry on leaves, rich at the roots, and steady in moisture.
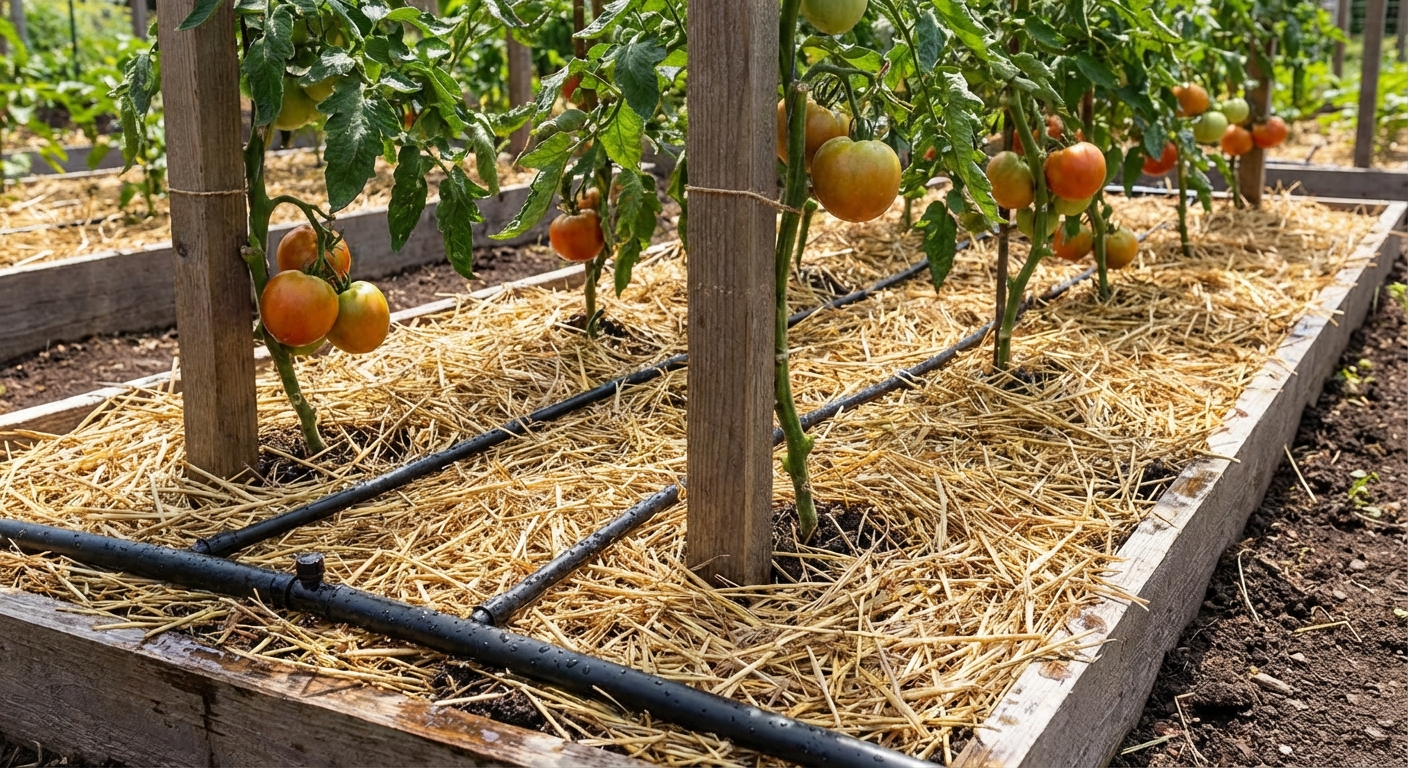
- Mulch every tomato. It protects soil life, reduces splash, and stabilizes watering.
- Water low and slow. Drip lines, soaker hoses, or careful hand watering at the base reduce leaf wetness.
- Prune thoughtfully. Remove lower leaves as plants grow and keep the center from becoming a humid jungle.
- Feed the soil, not just the plant. Compost, worm castings, and gentle organic fertilizers build resilience over time.
- Clean up at season’s end. A tidy bed breaks pest and disease cycles for next year.
Quick symptom checker
If you are standing in the garden right now, here is a fast cheat sheet.
- Brown spots with yellowing on lower leaves: likely early blight or septoria leaf spot. Prune, mulch, base-water, protect new growth.
- Fast-spreading dark patches in cool wet weather: possible late blight. Bag and trash infected material promptly, avoid working plants when wet, and check local alerts.
- Black, sunken bottom on fruit: blossom end rot. Remove fruit and stabilize watering.
- White powder on leaves: powdery mildew (or sometimes residue). Improve airflow and use potassium bicarbonate or another gentle option.
When to pull a plant
I am patient with tomatoes, but I am not sentimental when a plant becomes a spore factory. Consider removing a plant if:
- More than half the foliage is infected and declining quickly.
- New growth is immediately showing symptoms despite pruning and better airflow.
- Weather conditions strongly favor spread and you have other healthy tomato plants nearby.
- You suspect late blight and it is moving fast.
Bag it and trash it. Then wash your hands, clean your tools, and remind yourself that gardening is not about perfection. It is about paying attention, adjusting, and trying again with smarter soil and better timing.
If you want, tell me what you are seeing, including where it started on the plant and what your weather has been like. I can help you narrow it down.