How to Get Rid of Squash Bugs Naturally
If your zucchini looked gorgeous yesterday and today it is suddenly limp and sad, you are not alone. Squash bugs are one of those pests that can make a thriving patch look like it gave up overnight. The good news is you can beat them without reaching for harsh chemicals.
This guide walks you through how to identify squash bugs at every life stage, stop them early with prevention, and knock back active infestations using manual removal, row covers, companion planting, neem, and diatomaceous earth. Then we will finish with a season-by-season action timeline so you always know what to do next.
Squash bug identification
Squash bugs (commonly Anasa tristis) love plants in the cucurbit family: zucchini, summer squash, winter squash, pumpkins, and sometimes cucumbers and melons. They cause damage by piercing leaves and stems and sucking sap, which leads to stippling, yellowing, wilting, and sometimes plant collapse. You may also notice dark, varnish-like spots on leaves and stems near feeding areas. In some regions, squash bugs have also been associated with certain plant diseases, so it is safest to treat heavy infestations promptly.
What damage looks like
- Early: pale stippling or tiny specks, then dull yellowing or bronzing.
- As feeding increases: leaves look scorched at the edges, droop in the afternoon, and recover less each day.
- Severe: whole vines wilt and plants can collapse, especially if bugs are concentrated at the crown.
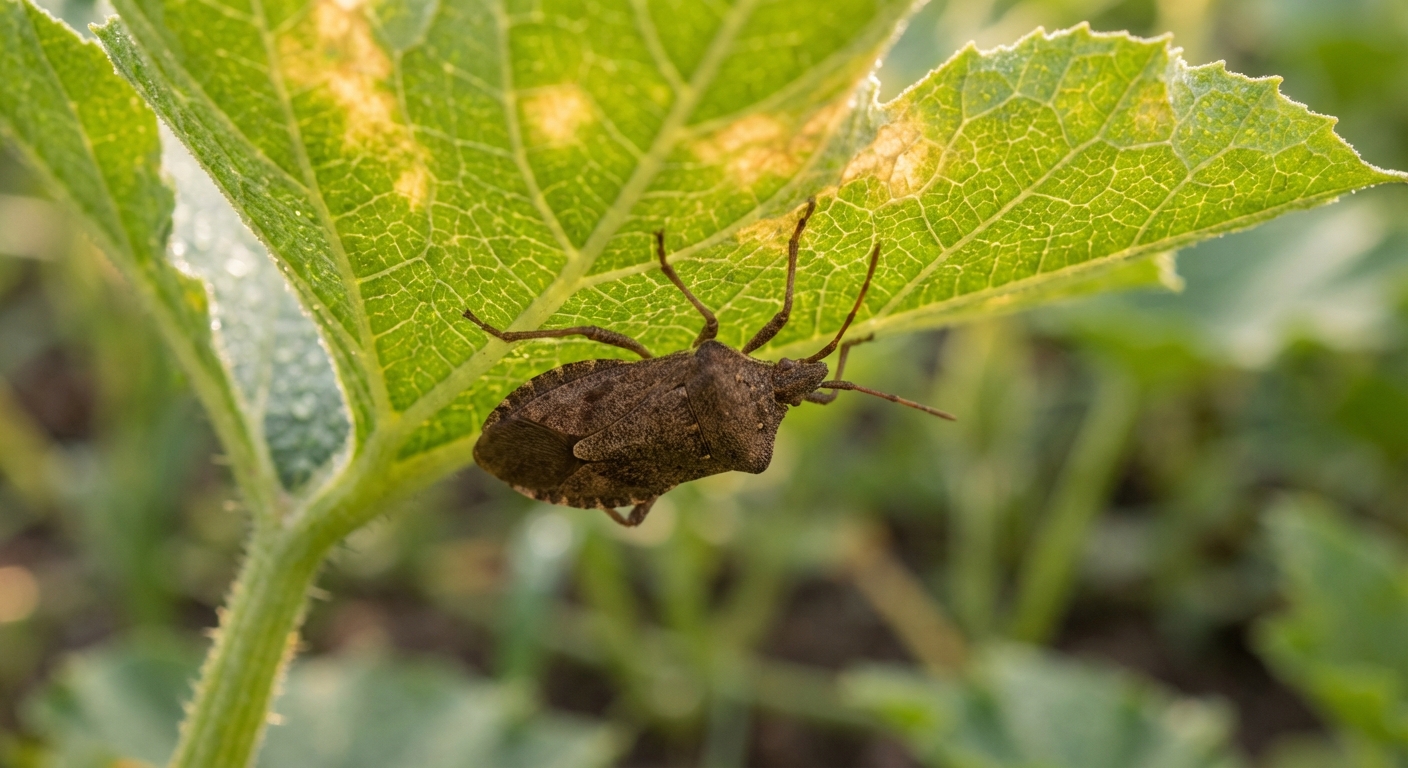
Adult squash bugs
- Size: about 1/2 to 3/4 inch long.
- Color: gray-brown to dark brown.
- Shape: flat-backed, shield-like body; looks a bit like a narrow stink bug.
- Where you find them: tucked at the crown of the plant, under leaves, or hiding beneath boards, mulch clumps, and debris.
Nymphs (young squash bugs)
- Size: tiny at first, then grow through several stages.
- Color: often pale greenish or gray when very young, then light gray bodies with dark legs as they mature.
- Behavior: nymphs cluster together, usually on the undersides of leaves.
Nymphs are the easiest stage to control naturally because they are smaller, softer, and tend to move in groups.
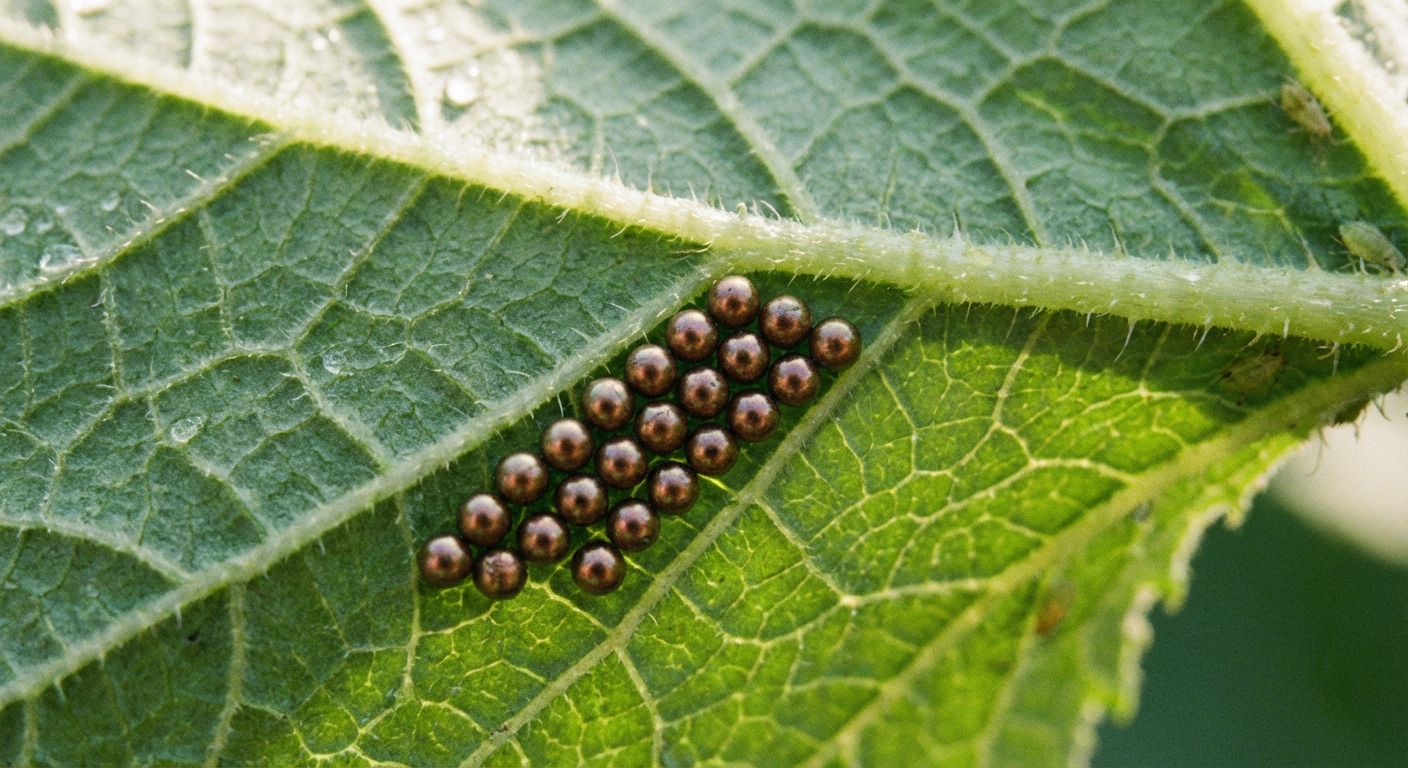
Egg clusters
- Look: tight groups of small, oval eggs, usually bronze, coppery, or reddish-brown.
- Location: typically on the underside of leaves, often along the veins in a neat pattern.
Confirm the pest
A quick gut-check helps you choose the right solution.
- If you see egg clusters on leaves: that is a classic squash bug clue.
- If plants suddenly wilt but the leaves are still green: check for squash vine borer holes and sawdust-like frass at the stem base. Squash bugs usually cause stippling and yellowing first.
- If you see spotted yellow-green beetles or striped beetles: those are cucumber beetles, a different pest with different egg and larva habits.
It is common to have more than one pest at once, so do a slow, calm inspection. I like to flip leaves like I am turning pages in a book, one at a time.
Natural prevention
Prevention does not have to be complicated. The goal is to remove hiding places, block early access, and keep plants vigorous enough to handle minor feeding.
1) Start with healthy soil
Squash plants are heavy feeders. Stress makes them easier targets. Before planting, work in finished compost and keep moisture consistent with deep watering.
- Mulch wisely: straw and leaf mulch help soil moisture, but keep mulch pulled back a few inches from the crown so adults have fewer cozy hiding spots.
- Avoid nitrogen overload: too much nitrogen can create tender growth that pests love. Aim for balanced fertility.
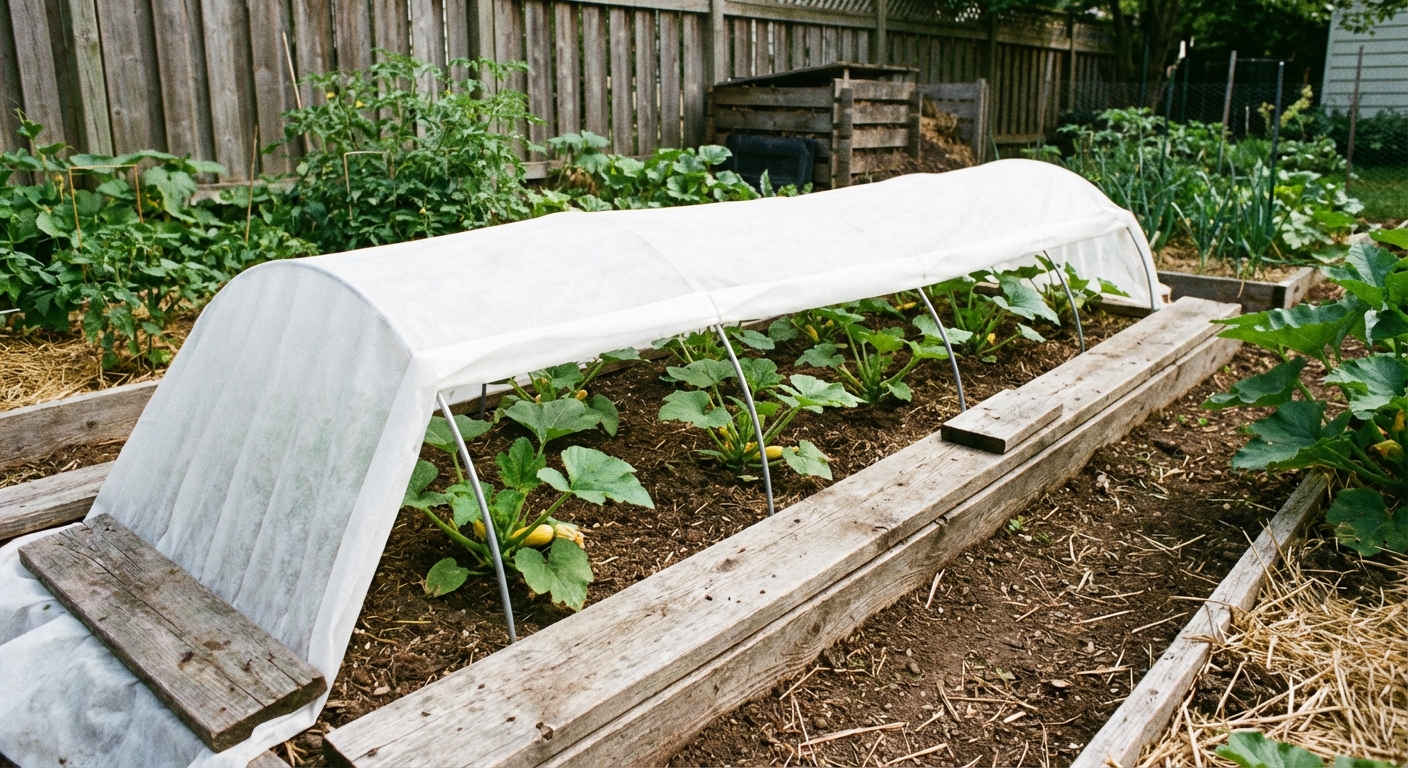
2) Use row covers early
Lightweight row cover is one of the most effective natural tools, but it must be used at the right time.
- Install: right after planting or transplanting.
- Secure edges: bury edges with soil or weigh down with boards so bugs cannot crawl in.
- Remove: when plants begin flowering so pollinators can reach blossoms.
If you are growing parthenocarpic varieties (some greenhouse cucumbers) you might keep covers on longer, but most squash need pollination.
Get rid of squash bugs naturally
When squash bugs show up, the most effective natural approach is a layered plan: remove eggs, trap adults, target nymphs, then protect new growth.
Step 1: Remove eggs
Egg removal prevents the next wave. Check leaves every day or two during peak season.
- Where to look: underside of older leaves near the plant crown.
- How to remove: press a strip of duct tape or masking tape onto the eggs and peel away, or scrape gently with a fingernail into a container of soapy water.
- Do not just flick eggs onto the soil: they can still hatch.
I keep a small jar of water with a squirt of mild dish soap in my garden apron pocket. It is not glamorous, but it works. When you are done, dump the strained soapy water onto bare soil well away from streams, ponds, and storm drains.
Step 2: Hand-pick bugs
Hand-picking feels old-school because it is, and it is incredibly effective when done consistently.
- Best time: early morning when bugs are sluggish.
- Tools: gloves, a headlamp if you are out early, and a soapy water jar or bucket.
- Technique: lift leaves, check the crown, and drop bugs straight into soapy water.
For nymph clusters, you can sometimes wipe them off with a damp paper towel and dunk it in soapy water.
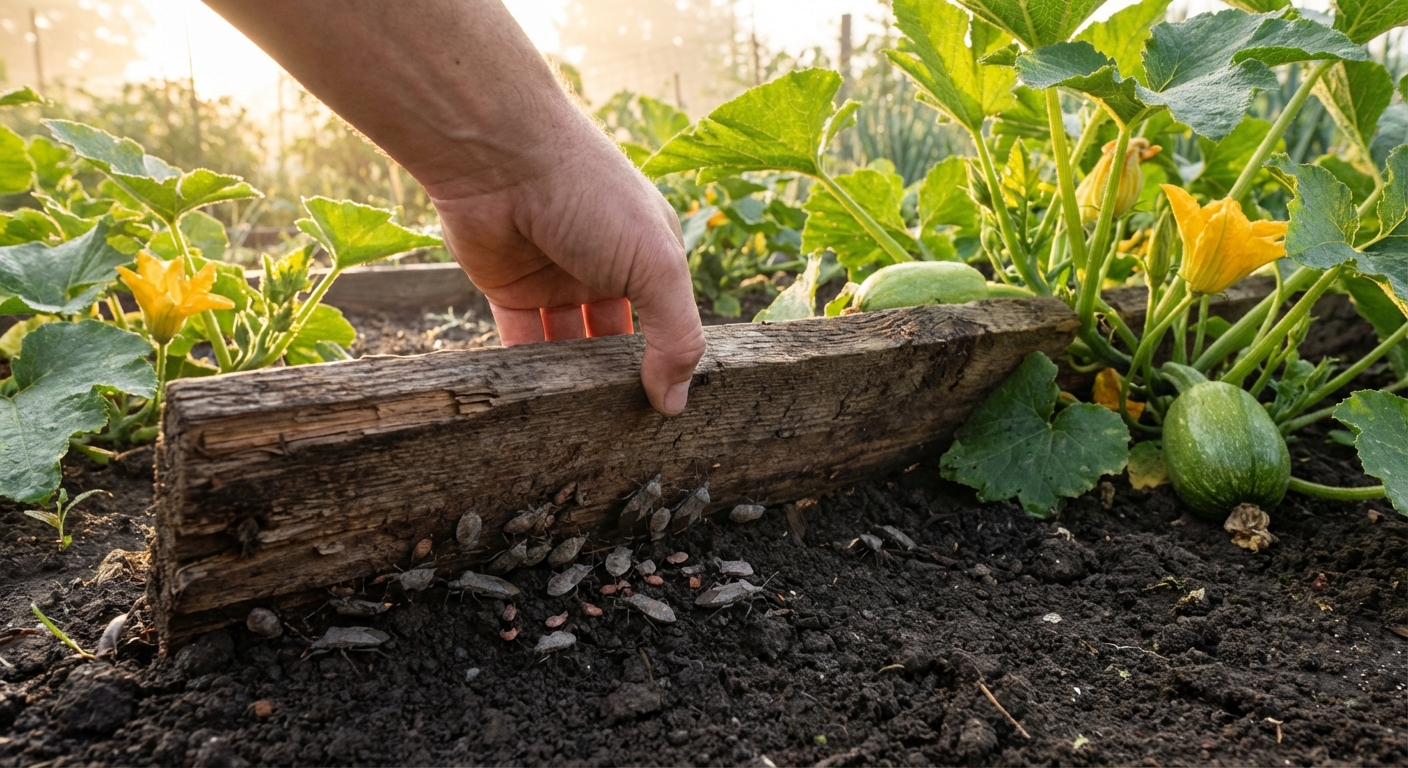
Step 3: Use board traps
Squash bugs love to hide during the day. You can use that habit against them.
- What to do: place a board, shingle, or piece of cardboard near the base of plants in the evening.
- Next morning: flip it and squish or drop the hiding bugs into soapy water.
Neem and diatomaceous earth
These two organic options can help, but they work best when you use them with good timing and realistic expectations.
Neem
Neem products vary. Some contain azadirachtin (more insect growth regulator activity), while others are clarified hydrophobic neem extract (more of a coating oil). Either way, neem works best on nymphs. It is not an instant knockdown for hardy adults.
- When to spray: evening or very early morning to reduce leaf burn risk and avoid spraying when pollinators are active.
- Where to spray: undersides of leaves, the crown area, and any visible nymph clusters.
- How often: follow label directions, often every 7 to 10 days during active pressure, and reapply after heavy rain.
- Avoid flowers: do not spray open blossoms to protect bees and other beneficials.
Tip from my own garden: neem works best after you have already removed egg clusters and hand-picked adults. Think of it as support, not the whole plan. Also, always follow the product label for mixing rates and edible-crop timing.
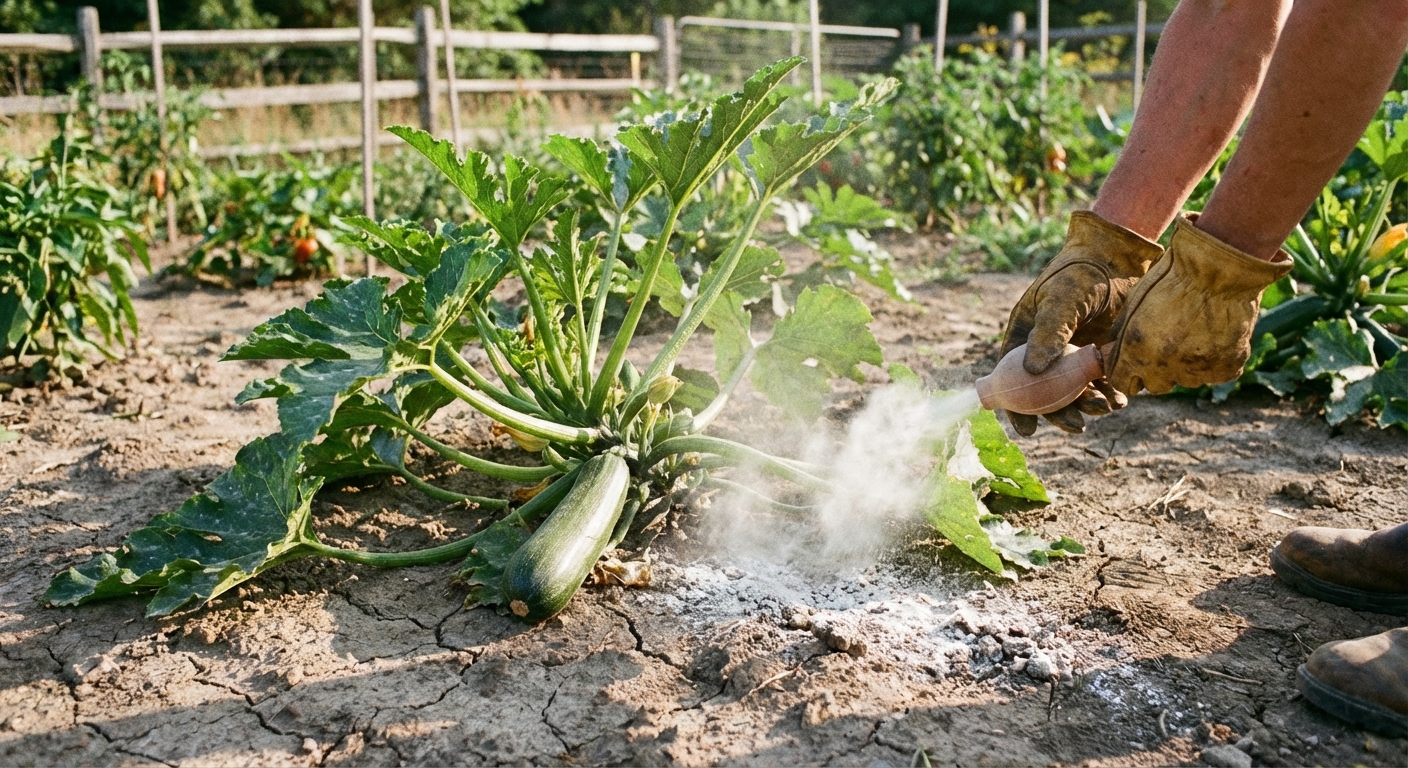
Diatomaceous earth (DE)
Food-grade diatomaceous earth is a fine powder that can scratch and absorb waxy oils from an insect’s outer layer, which can lead to dehydration. It can help most with small nymphs as they crawl, but it has limited effect on adults, and it only works when it stays dry.
- Apply when dry: DE must stay dry to work. Reapply after watering or rain.
- Where to apply: a light dusting on soil around the crown and along bed edges where bugs travel. Avoid turning the whole bed into a powdery beach.
- Wear protection: avoid breathing dust. A simple dust mask is a good idea during application.
- Use carefully around beneficials: DE can harm helpful insects too. Apply targeted, not everywhere.
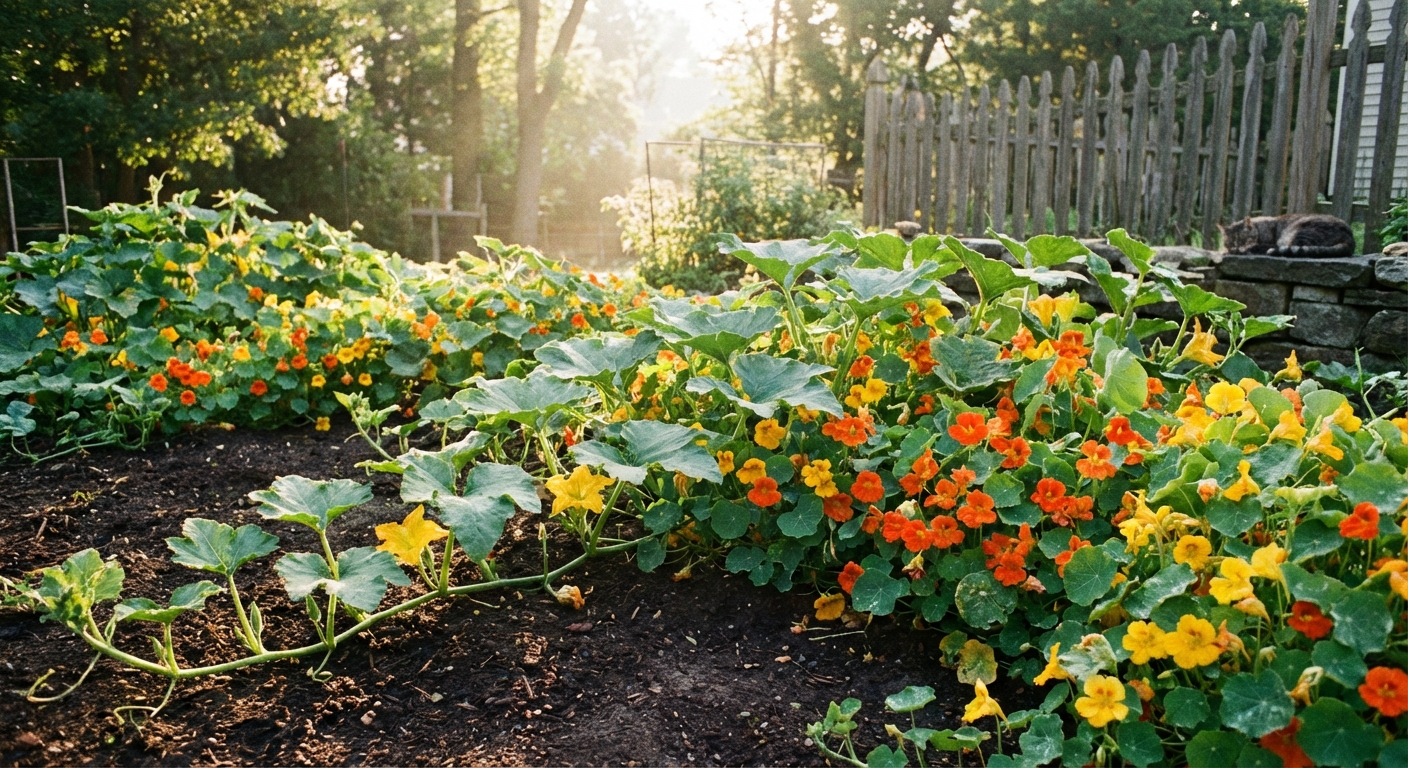
Companion planting
Companion planting will not magically erase an infestation, but it can make your squash patch less appealing and improve overall garden balance. Evidence is mixed, so treat this as a helpful supporting tactic, not a guarantee. Think of it as adding a little background noise that makes it harder for pests to find their favorite host.
Nasturtiums
Nasturtiums bring color, attract beneficial insects, and can act as a mild deterrent in mixed plantings. Plant them near squash beds or at bed corners.
- How to use: plant a ring or border of nasturtiums around squash, leaving airflow space.
- Bonus: the flowers are edible and beloved by pollinators.
Radishes
Radishes are often mentioned as a deterrent for squash bugs in kitchen-garden lore, and many gardeners find they help when planted nearby, even if the science is not slam-dunk.
- How to use: sow radishes along the outside edge of the squash bed, or tuck quick-growing radishes between young squash before the vines sprawl.
- Bonus: radishes can act as a living marker for where you planted before the squash takes over.
After flowering
Once flowers open, full row cover can block pollination. Here are gentler ways to protect plants while still letting bees do their work.
- Targeted hand work: keep up egg checks and morning hand-picking.
- Remove hiding spots: clear weeds and excess debris around the patch.
- Use board traps: keep them in place through peak bug season.
- Selective sprays: if you are using neem, apply at dusk and avoid flowers.
If you are growing a small patch, consistency beats intensity. Ten minutes a day is better than an hour once a week.
Protect beneficials
Your garden is not just you versus the bugs. Spiders, ground beetles, lacewings, parasitic wasps, and tachinid flies are all part of the cleanup crew.
- Avoid broad, frequent spraying, even with organic products.
- Skip blanket dusting with DE. Keep it tight to travel zones near the plant base.
- Leave some flowering plants nearby (like dill, alyssum, and nasturtiums) to support beneficial insects.
Crop rotation
Squash bugs overwinter as adults in plant debris, garden edges, woodpiles, and sheltered spots. Rotation reduces the odds that overwintered bugs emerge right beside their favorite buffet.
Rotate cucurbits yearly
- Rule of thumb: do not plant squash, pumpkins, cucumbers, or melons in the same bed two years in a row.
- Distance helps: rotate as far as your garden allows, ideally to a different section of the yard.
Clean overwintering sites
This part is sneaky-important. Even if you rotate, bugs can overwinter under nearby boards, thick mulch, old vines, or piles of pots.
- Keep bed edges tidy going into fall.
- Store boards and unused pots off the ground when possible.
- Do a spring cleanup before seedlings go in.
Seasonal timeline
If you want the simplest, most effective routine, follow this timeline. Squash bug control is less about one perfect product and more about doing the right small actions at the right time.
Early spring
- Clear old cucurbit vines and any garden debris where adults can hide.
- Loosen soil and add compost for strong early growth.
- Plan a new bed location for squash if possible.
Planting time
- Plant vigorous starts or direct sow into warm soil.
- Install row covers immediately and seal edges well.
- Plant companion flowers and quick radishes at the bed edge.
Early summer
- Start leaf-flip inspections 2 to 3 times per week.
- Remove any egg clusters you find.
- Set board traps near the crown area.
Mid-summer
- Remove row covers when flowering begins for pollination.
- Check for eggs every 1 to 2 days during peak pressure.
- Hand-pick adults in the morning and target nymph clusters.
- If needed, apply neem at dusk, focusing on undersides and nymphs, avoiding blossoms.
- Use DE strategically on dry soil near plant bases, reapplying after rain.
Late summer
- Stay consistent with egg removal and board traps.
- If a plant is heavily infested, declining, and past its best production, consider pulling it. It can feel brutal, but it reduces the population pressure on the rest of the patch and on next year’s garden.
- Keep watering steady to reduce plant stress.
Fall cleanup
- Pull and discard old squash vines promptly after harvest. Do not let them sit and become a winter hotel.
- Compost only if your compost reaches hot-compost temps. Otherwise, bag or dispose according to local guidelines.
- Remove boards and debris, and lightly cultivate the top layer of soil to expose hiding spots.
- Make a note of where cucurbits grew so you can rotate next year.
Common mistakes
- Waiting until the plant is wilting: start egg checks early. Eggs are your easiest target.
- Only spraying: neem can help, but it will not replace hand removal and egg control.
- Spraying flowers: protect pollinators by spraying at dusk and avoiding open blooms.
- Leaving vines in place all fall: cleanup is prevention for next year.
And if you miss a week, please do not spiral into black-thumb shame. Squash bugs are persistent. You just have to be a little more persistent.
Quick checklist
- Flip leaves and remove egg clusters with tape or a scrape into soapy water.
- Hand-pick adults and nymphs in the morning.
- Use board traps overnight and check them at dawn.
- Row cover early, then remove at flowering.
- Add nasturtiums and radishes around the patch (helpful, not magic).
- Use neem on nymphs at dusk, avoid blossoms, follow the label.
- Apply food-grade DE only when dry, and only where needed (limited effect on adults).
- Rotate cucurbits and do thorough fall cleanup.