DIY Garden Paths: Materials and How to Lay Them
A good garden path is a quiet kind of magic. It guides you through your space, keeps your shoes out of the mud, and saves your plants from the accidental heel stomp. It can be as simple as a few stones set in mulch or as polished as a paver walkway that looks like it has always belonged there.
In this guide, we are going to compare three DIY-friendly favorites: stepping stones, gravel, and pavers. Then I will walk you through a simple, dependable step-by-step method for each one so your path looks lovely and stays put through rain, roots, and time.
Choose the right path for your garden
Before you buy a single stone, take five minutes to watch your garden like it is telling you a story. Where do you naturally walk? Where does water sit after rain? Where do you need a stable surface because you carry a watering can, wheelbarrow, or a basket of tomatoes?
Quick decision checklist
- Traffic: Light foot traffic can handle stepping stones. Heavy daily use leans toward pavers.
- Drainage: Gravel excels in wet areas. Solid pavers need a good base and slight slope.
- Weeds and upkeep: All paths need some maintenance, but loose gravel needs the most tidying.
- Budget: Gravel is usually the most affordable. Pavers cost more but feel the most finished.
- Style: Stepping stones feel relaxed and cottagey, gravel feels naturalistic, pavers feel crisp and structured.
How wide should a garden path be?
- Single person path: 24 to 30 inches
- Two people walking side by side: 36 to 48 inches
- Wheelbarrow-friendly: 36 inches minimum, but 36 to 42 inches is often more comfortable (especially on curves)
One practical note: if you are planning for wheelchair access or want a truly easy path for strollers, walkers, or canes, you will likely want a wider, smoother surface (often pavers) and you may need to follow local code guidance.
One more practical tip: curves are charming, but keep them wide and gentle. Tight turns are where edging fails, gravel migrates, and everyone cuts the corner anyway.
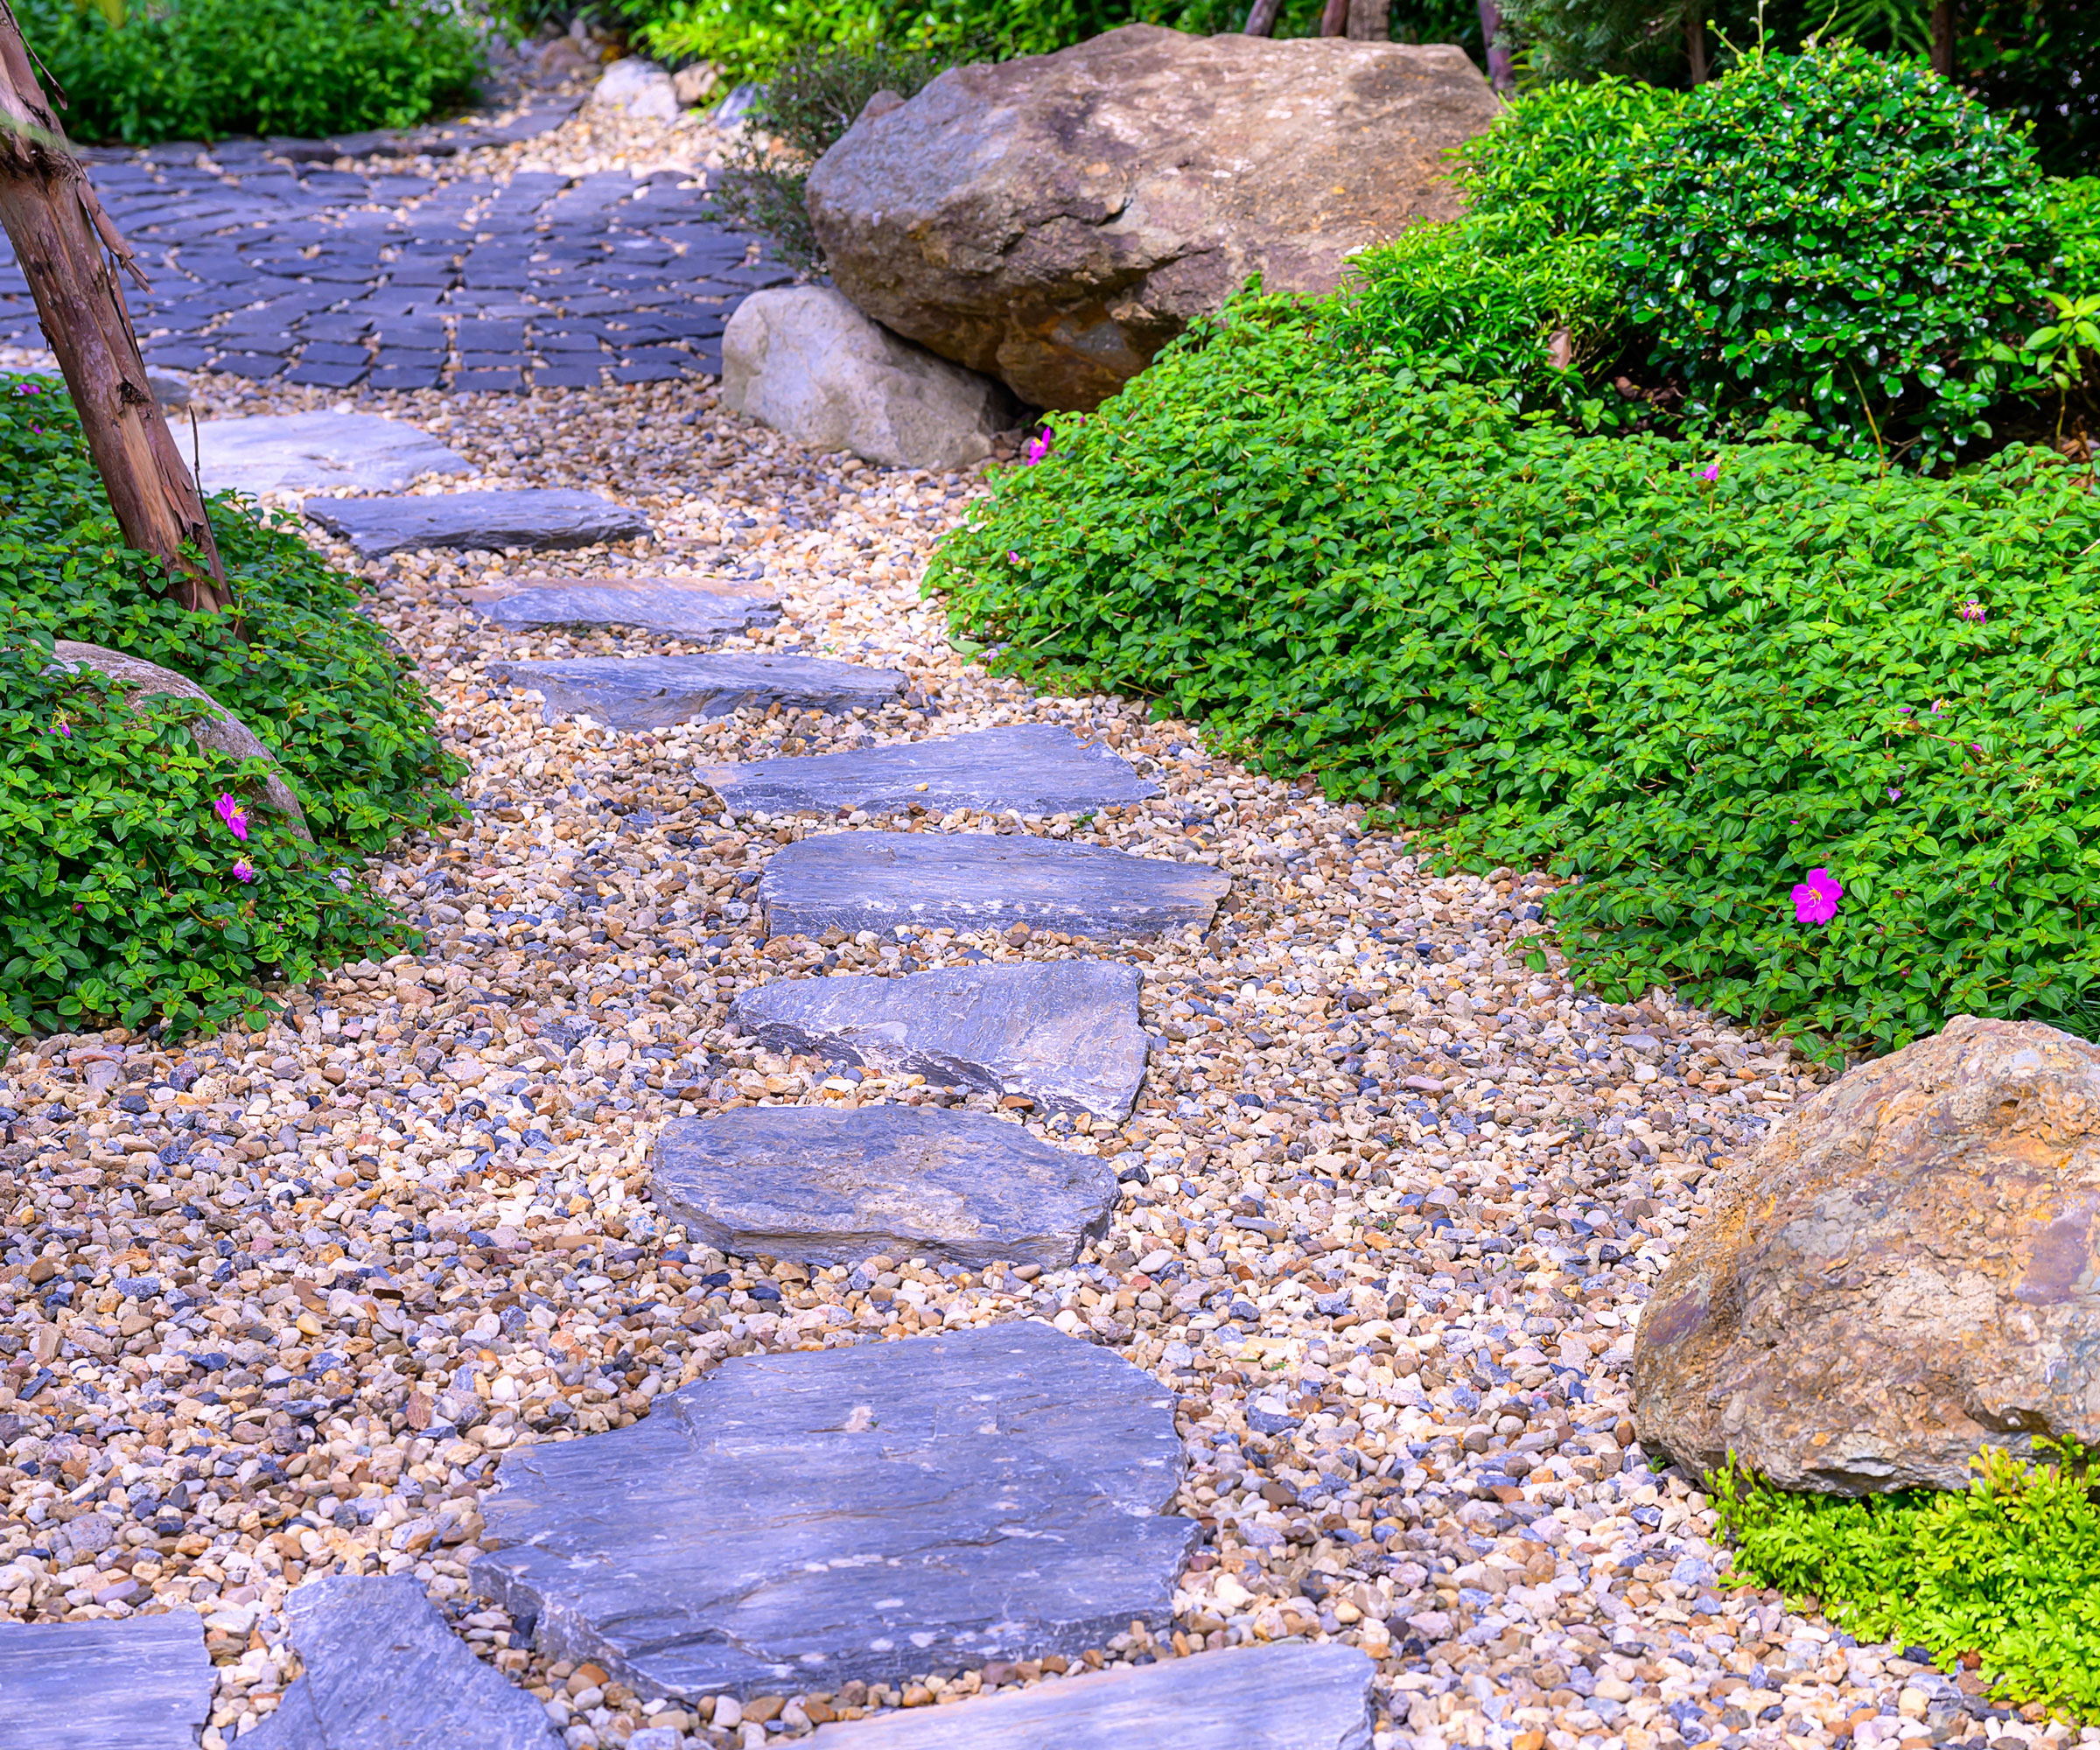
Stepping stones vs gravel vs pavers
All three can be gorgeous. The best choice is the one that matches how you actually live in your garden.
Stepping stones
Best for: informal garden strolls, stepping through beds, quick DIY upgrades.
- Pros: Fast to install, flexible layout, easy to adjust later, great for small spaces.
- Cons: Not ideal for carts or wheelbarrows, can wobble if set too shallow, grass can creep around edges.
- Look: natural, relaxed, storybook garden energy.
Gravel paths
Best for: long paths on a budget, rainy gardens, cottage borders, and areas where you want excellent drainage.
- Pros: Affordable, permeable, easy to DIY, forgiving of imperfect grades.
- Cons: Migrates into beds, needs occasional raking and top-ups, not great for bare feet, tricky for strollers and some mobility aids unless compacted and stabilized.
- Look: soft, crunchy, natural, and very garden-forward.
Pavers (brick or concrete)
Best for: main walkways, high-traffic routes, clean lines, and a polished entry path.
- Pros: Durable, stable underfoot, cart-friendly, easiest to keep neat.
- Cons: Most labor-intensive base work, more materials cost, edging is important.
- Look: structured, classic, and intentionally designed.
My honest gardener note: if you want the lowest-stress path long term, build the best base you can. Most path problems are not about the top material. They are about what is underneath it.
Plan and prep (no fuss)
Tools and supplies
- Measuring tape
- Garden hose or landscape paint to mark the route
- Spade shovel and hand trowel
- Steel rake
- Hand tamper or plate compactor (rent for pavers, optional but helpful for gravel)
- Level (a 2 to 4 foot level is perfect)
- Geotextile fabric (recommended for gravel; optional under stepping stones)
- Edging (metal, plastic, stone, or paver edging depending on path type)
- Base material: compactable crushed stone or road base (often labeled 3/4 inch minus)
- Bedding layer: the material specified for your pavers (often concrete sand), or decomposed granite for some stone installs
Safety first
- Call before you dig: have utilities marked before excavation.
- Wear PPE: gloves, eye protection, and hearing protection for compactors and saws.
- Mind the dust: cutting and sweeping sand products can create silica dust. Follow tool and material safety instructions.
Mark the path
Lay a garden hose where you want the path, stand back, and look at it from your most common viewpoints. Then walk it. Your feet will tell you the truth.
Once it feels right, mark the edges with landscape paint or flour. Yes, flour. It works, and the birds rarely complain.
Excavate to the right depth
Depth depends on material, traffic, and soil type. Here are dependable DIY starting points:
- Stepping stones set in soil: dig so the stone sits flush with surrounding grade, usually 2 to 3 inches deep plus your stone thickness.
- Gravel path (light to moderate foot traffic): 4 to 6 inches total depth (about 3 to 4 inches base + 1.5 to 2 inches top gravel). For soft soils or heavier use, plan for a deeper base (often 4 to 6 inches base alone).
- Pavers (pedestrian use): 7 to 10 inches total depth is common (base + bedding + paver). In clay soil or freeze-thaw winters, a deeper compacted base is often the difference between “beautiful” and “wavy by spring.” When in doubt, follow local supplier and manufacturer guidance for base depth in your region.
Plan for water
A path should never become a little canal. Aim for a gentle slope so water sheds off to one side, about 1/8 to 1/4 inch per foot. This is subtle, you will barely see it, but you will absolutely notice the difference after a storm.
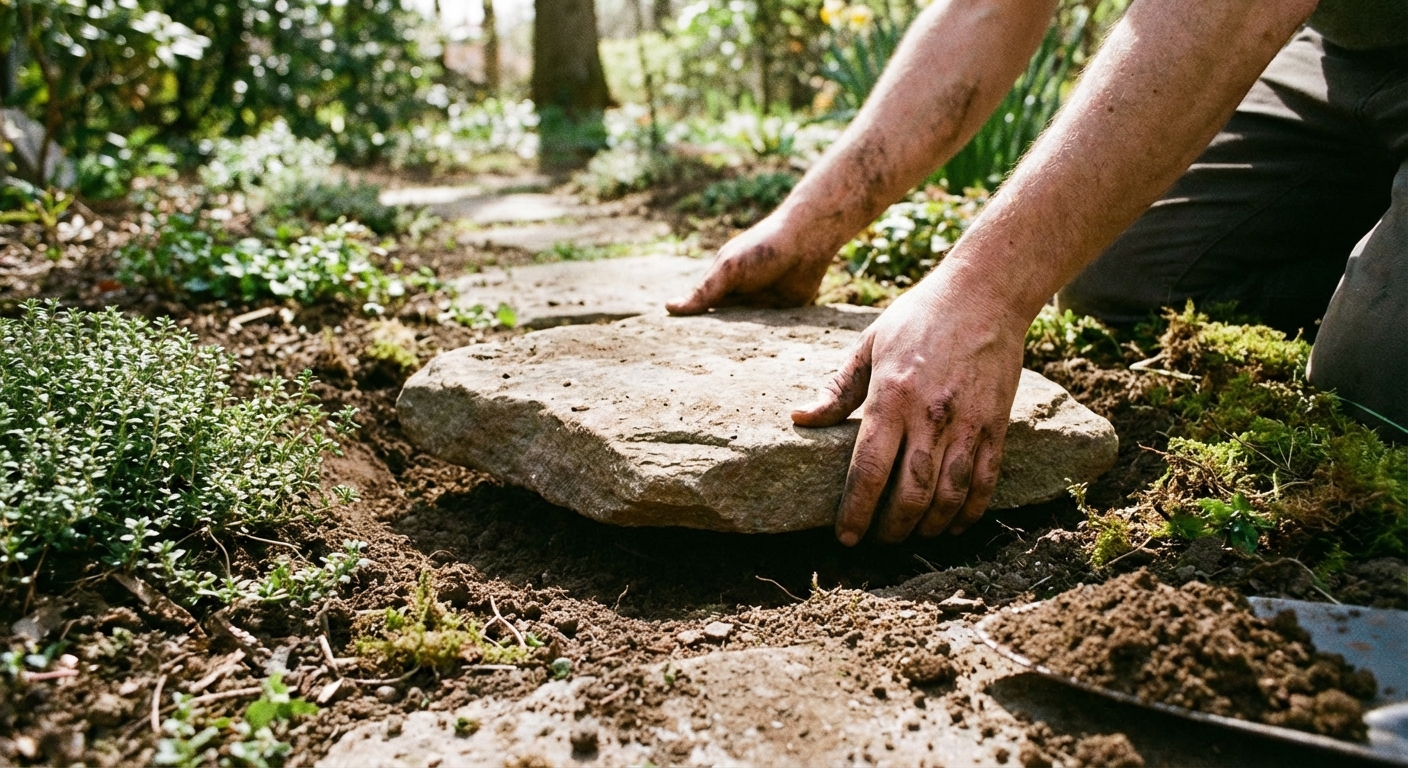
Install stepping stones
Stepping stones are perfect when you want something charming and simple. The key is setting each stone so it does not rock and it sits comfortably under your stride.
Step 1: Lay out your stride
Set stones on top of the ground first and walk the path. Most adults land comfortably with stones spaced about 18 to 24 inches from center to center, but do what feels natural for your body.
Step 2: Trace and dig
Trace around each stone with a trowel or spade. Remove the stone and dig down so the stone will sit flush with the surrounding soil or mulch. Flush matters because it prevents tripping and makes mowing easier if this path crosses lawn.
Step 3: Create a stable bed
For the most stable set, add a thin layer (about 1 inch) of compacted decomposed granite, stone dust, or coarse sand. Tamp it firmly.
Step 4: Set and level each stone
Place the stone, wiggle it into place, and check for wobble. Adjust by adding or removing bedding material. Use a small level if you want to be precise. I aim for “feels steady underfoot” more than perfection.
Step 5: Backfill edges
Backfill with soil or mulch, packing snugly along the edges. Water the area to settle the soil.
Pro tips
- Skip polished surfaces in shady areas. They can get slippery with algae.
- Use thicker stones (at least 2 inches) for a sturdier feel.
- Add low groundcovers between stones if you want a living path, like creeping thyme in sun or Irish moss in bright shade.
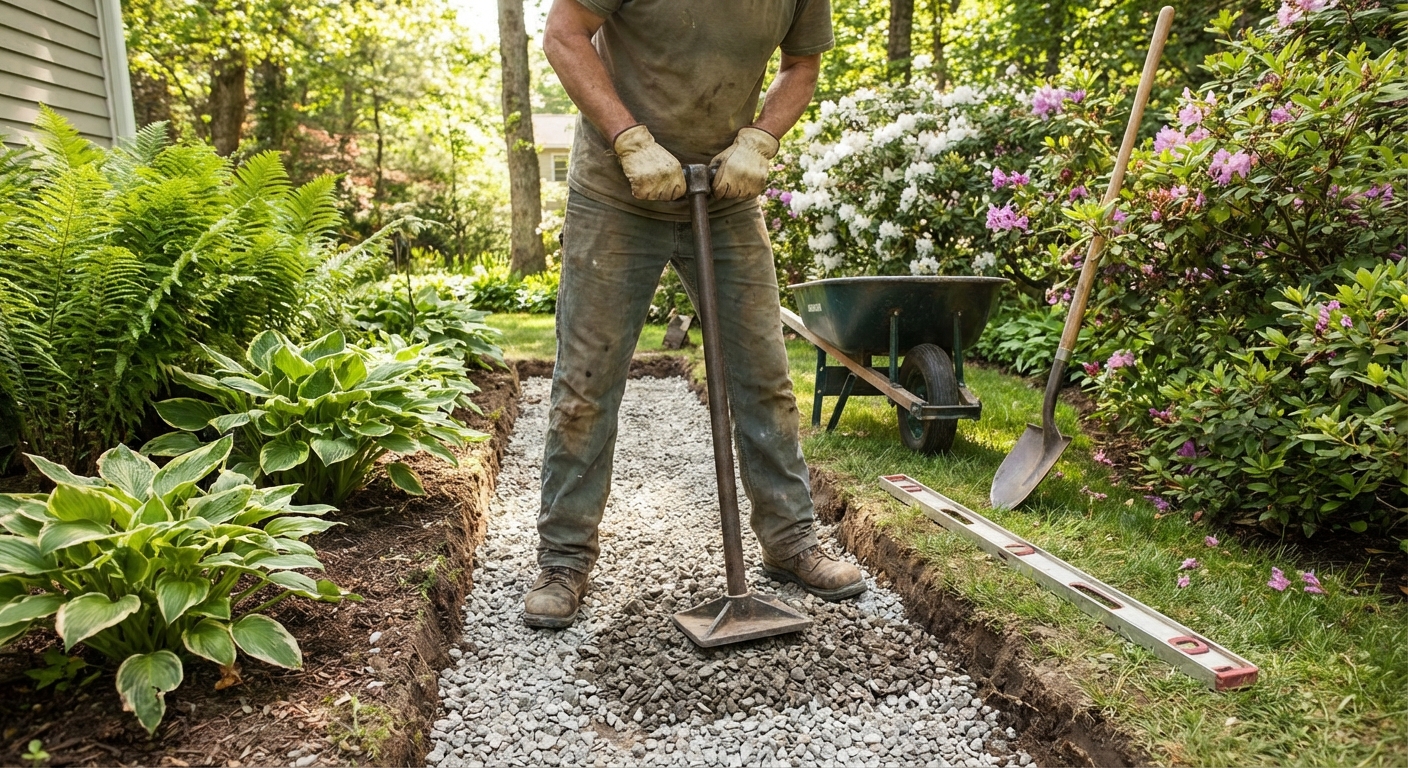
Install a gravel path
Gravel is wonderfully forgiving, and it makes a garden feel instantly established. The two secrets are edging and a solid base.

Step 1: Excavate and shape
Dig out the path to about 4 to 6 inches deep for light-to-moderate foot traffic. If your soil is soft or this is a high-traffic route, go deeper so you can build a thicker base. Rake it smooth and create a slight slope for drainage.
Step 2: Install edging first
Edging is your gravel’s best friend. Without it, gravel slowly wanders into beds and lawn like it is on a little adventure. Install metal, stone, or sturdy plastic edging along both sides.
Step 3: Add woven geotextile fabric
For gravel, a woven geotextile fabric is a better choice than flimsy “weed barrier” fabric. It helps separate soil from stone and improves base stability. Overlap seams by at least 6 inches and pin it down with landscape staples.
One gentle expectation-setter: fabric helps with separation, but it is not a magical weed-proof layer. Many weeds sprout from windblown seeds in the gravel fines on top, so plan on occasional quick weeding.
Step 4: Add and compact the base
Add 3 to 4 inches of compactable crushed stone for the base (often 3/4 inch minus). Wet it lightly, then tamp it firmly. For heavier use or softer soils, bump that base thickness up to 4 to 6 inches, compacted in layers.
Step 5: Add the top gravel layer
Pour 1.5 to 2 inches of your chosen top gravel, then rake it smooth. A smaller gravel (often around 3/8 inch) tends to feel nicer underfoot and rakes more easily.
Which gravel is best?
- Pea gravel: pretty and soft-looking, but rolls underfoot. Better for light-traffic paths.
- Crushed gravel: locks together better and feels more stable. My top pick for most paths.
- Decomposed granite: compacts very firmly and looks natural. Great for a more solid feel.
Gravel maintenance
- Rake back into place after heavy rain or snow shoveling.
- Top up every year or two where it thins.
- Pull weeds when they are tiny. Tiny weeds are humble. Big weeds are cocky.
Install pavers
Pavers are the “I want this to last” choice. The base prep takes effort, but once it is in, you get a walkway that feels solid and looks beautifully intentional.
Step 1: Mark, excavate, set grade
Mark the path and dig 7 to 10 inches deep depending on your climate and soil. If you have freeze-thaw winters or clay soil, err on the deeper side and compact in layers. Shape a slight slope away from structures.
Step 2: Add and compact base in lifts
Add a compactable crushed stone base in 2-inch lifts, compacting each layer. For many pedestrian paver projects, this is often 4 to 6 inches of compacted base, but in freeze-thaw regions it is common to go thicker. Use the paver base recommended by your local supplier for your conditions, and do not be shy about asking what they see perform well in your area.
Step 3: Install edge restraint
Use paver edging or a solid edge restraint. This keeps the pavers from slowly spreading apart over time.
Step 4: Add bedding layer
Add about 1 inch of bedding material, and use what your paver manufacturer specifies (often concrete sand, not masonry sand). Screed it level with a straight board resting on two pipes or rails. Do not compact the bedding layer before laying pavers unless your paver system specifies it.
Step 5: Lay pavers
Start from a straight edge, lay pavers in your chosen pattern, and keep joints consistent. Check level every few rows. If a paver sits high, lift it and remove a little bedding material. If it sits low, add a bit more.
Step 6: Cut pavers if needed
For curves and edges, you may need cuts. A rented wet saw makes clean work, or a paver splitter can do the job for many materials.
Step 7: Joint sand and final compaction
Sweep polymeric sand or jointing sand into the joints, then compact the surface with a plate compactor (use a protective pad to avoid scratching). Sweep again, then follow the sand’s instructions for misting and curing.
Pattern ideas
- Running bond: simplest and classic.
- Herringbone: excellent strength for high traffic.
- Basket weave: charming and cottage-friendly.
Quick upkeep notes
- You may need to refresh joint sand occasionally, especially after pressure washing or heavy rain.
- Ants love dry joints. Keeping polymeric sand properly installed helps.
- If a section settles over time, you can lift and re-level those pavers without rebuilding the whole path.
Make it feel like a garden
A path is practical, yes. But it is also a chance to create a little invitation to wander.
Soft edges
- Sunny edges: lavender, catmint, thyme, sedum, salvia.
- Part shade: hostas, heuchera, ferny things, sweet woodruff.
- Pollinator boost: tuck in low flowering plants near the path so brushing past releases that warm, herbal scent.
If your path runs through beds, leave a few inches of breathing room from big perennials. Future you will thank you when everything fills in and flops a bit after summer rain.
Common mistakes (easy fixes)
- Skipping base prep: If your path sinks or waves, you likely need more compacted base. Add it, compact it, then reset.
- No edging for gravel: Add edging now. It is much easier than raking gravel out of your beds forever.
- Stones that wobble: Lift and reset with a thin compacted bedding layer.
- Weeds popping through: Pull early, then top dress gravel or refresh joint sand. For chronic weed areas, reassess fabric and depth.
- Path too narrow: If you are constantly stepping off, widen it. A path should feel generous, not fussy.
A simple weekend plan
If you are standing in your yard thinking, “Okay, but where do I start,” do this:
- Mark the route with a hose and walk it.
- Choose your material based on use: stepping stones for light strolls, gravel for long and budget-friendly, pavers for main routes.
- Buy edging. Yes, even if you think you can skip it.
- Excavate to depth, build your base, and compact in layers.
- Lay your top material carefully and finish edges neatly.
And if it is not perfect the first time, welcome to gardening. We adjust, we learn, we tamp it down, and we grow into it. Your path will, too.